This example streams JPEG or raw images from the GAP8 to the host where they are displayed and colorized.
Prerequisites
Setup the WiFi via the Crazyflie firmware
The example can set up the WiFi itself, as an access point named WiFi streaming example, when it
is built with SETUP_WIFI_AP=1 (see Configuring the example). The
released aideck_gap8_wifi_img_streamer_with_ap.bin is built this way. Otherwise, set up the WiFi
via the Crazyflie firmware as described below.
The WiFi on the aideck can be set up in a number of ways, but to keep things simple for this tutorial we will be setting it up via the Crazyflie firmware as an access point, which means you will be connecting to the AI deck’s WiFi to run the examples.
First see the crazyflie-firmware repository documentation for more details on how to build and flash and checkout how to setup kbuild’s menuconfig.
Clone the crazyflie firmware via these instructions.
Then configure the Crazyflie firmware with the kbuild instructions.
In the kbuild menu, go to Expansion deck configuration and make sure Support AI deck is enabled. In the Support AI deck sub menu select WiFi setup at startup and the option Act as Access Point. Now go to the Credentials for access-point menu and set the SSID and KEY as you wish.
Now it’s time to flash the firmware. Use the following instructions to flash the configured firmware to the crazyflie.
Configuring the example
The default configuration preserves the original behavior: QVGA resolution, raw output, and starting and stopping the camera for each frame. Build variables can select the camera resolution, capture mode, sensor timing, stream encoding, and profiling output:
| Variable | Values | Default |
|---|---|---|
CAMERA_RESOLUTION |
qvga, qqvga, native |
qvga |
CAPTURE_MODE |
start-stop, pipelined |
start-stop |
SENSOR_FRAME_RATE |
default, 60 |
default |
STREAM_ENCODING |
raw, jpeg |
raw |
OUTPUT_PROFILING_DATA |
0, 1 |
0 |
SETUP_WIFI_AP |
0, 1 |
0 |
The pipelined mode uses three image buffers: two DMA buffers remain queued while one complete frame is encoded or transferred. If processing is slower than capture, complete frames are dropped instead of starting a transfer in the middle of a camera frame. The next frame is selected only after the current transfer, favoring a fresh frame and low photon-to-host latency over maximum throughput. Profiling reports the queue-to-completion latency and a cumulative count of these internal whole-frame drops.
The native resolution exposes the Himax sensor’s full 324 x 324 array. It
cannot be combined with SENSOR_FRAME_RATE=60.
Building and flashing the example
To build the default configuration and flash it, run:
$ cd aideck-gap8-examples
$ docker run --rm -v ${PWD}:/module bitcraze/aideck tools/build/make-example examples/other/wifi-img-streamer image
$ cfloader flash examples/other/wifi-img-streamer/BUILD/GAP8_V2/GCC_RISCV_FREERTOS/target.board.devices.flash.img deck-bcAI:gap8-fw -w radio://0/80/2M
For example, build pipelined QVGA JPEG streaming with 60 FPS sensor timing and profiling enabled using:
$ docker run --rm -v ${PWD}:/module bitcraze/aideck tools/build/make-example examples/other/wifi-img-streamer clean build image CAMERA_RESOLUTION=qvga CAPTURE_MODE=pipelined SENSOR_FRAME_RATE=60 STREAM_ENCODING=jpeg OUTPUT_PROFILING_DATA=1
Always include clean when changing build variables. The build does not track
compiler flags, so without it object files compiled with the previous settings
are reused.
Starting the viewer
In order to start the viewer, you will need the python package of opencv. Do check this issue if you also use the cfclient.
Install opencv python:
$ pip install opencv-python
In order to view the images from the GAP8 connect to the WiFi access point on the deck and run the following:
$ cd aideck-gap8-examples/examples/other/wifi-img-streamer
$ python opencv-viewer.py
Then you should be able to see the raw/color or jpeg image in the viewer like this:
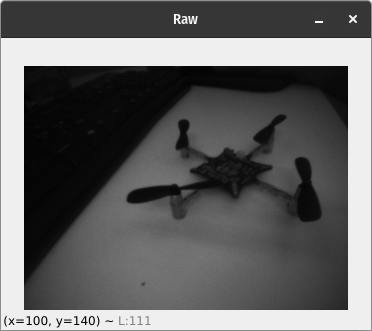
Note: If you like to save the images, you can run the opencv-viewer.py with the --save flag.
Note: If you enabled your aideck to connect to a wifi point, you would need to check the console tab of the cfclient to retrieve the ipaddress of the aideck. Then you will need to use the -n with the ip address with the viewer script.