
Brain Boost
Artificial Intelligence in a Nutshell
How it works
Edge AI computing for the Crazyflie® is now available!
Thanks to the GAP8 IoT application processor from GreenWaves Technologies and a camera, the AI-deck provides the essential hardware for capturing, analyzing, and classifying its environment. Originally presented by ETH Zurich as the PULP-Shield PCB design from IIS-ETHZ, this lightweight, low-power combination is ideal for embedded AI research and development on the micro-sized Crazyflie 2.x.
The AI deck 1.1 expands onboard computational capabilities, enabling experimentation with custom artificial intelligence workloads, including potential autonomous navigation implementations. The ESP32 provides WiFi connectivity and can be programmed to handle custom communication tasks.
The AI deck 1.1 version only has minor updates compared to the AI deck 1.0. The Himax camera module is now the greyscale version and the GAP8 is now revision C instead of B. For more details read this blog post and if the Bayer RGB version camera is wanted it can be bought stand alone here.
Note: A compatible JTAG programmer/debugger is required to flash the GAP8, see the flashing documentation. We recommend the Olimex ARM-USB-TINY-H. Familiarity with embedded system development is recommended for effective use of this platform.
Specifications
Features
- GAP8 – Ultra low power 8+1 core RISC-V MCU
- Himax HM01B0 – Ultra low power 320×320 monochrome camera.
- 512 Mbit HyperFlash and 64 Mbit HyperRAM
- ESP32 for WiFi and more (NINA-W102)
- 2 x Cortex-M 10-pin JTAG for GAP8 and ESP32
- Button connected to ESP32 for UART bootloader or other action
- 1 x green LED connected to GAP8 (A2)
- 1 x green LED connected to ESP32 (GPIO_24)
- Can work stand alone. Power board on VCOM.
Mechanical specifications
- Weight: 4.4g
- Size (WxHxD): 30x52x8mm
- Designed for mounting over/under the Crazyflie 2.X
Electrical specification
- Power supply 3V-5V @ VCOM up to 300mA
- 1-wire memory for automatic expansion board detection
- UART connected between GAP8 and Crazyflie (RX1, TX1)
- UART connected between ESP32 (RX2, TX2)
- ESP32 sysboot pin connected to Crazyflie (IO_1)
- Reset to GAP8 and ESP32 connected to Crazyflie (IO_4)
- SPI between GAP8 and ESP32
- GAP8 (B1) -> ESP32 (GPIO_5) io
- ESP32 (GPIO_25) -> GAP8 (A13) io
Usage
The AI deck adds WiFi connectivity to the Crazyflie, which can be used for communication with the Crazyflie and the AI deck . For the camera and the GAP8 no out-of-the-box functionality is added, instead these resources are left for users to fully use as they see fit.
The AI deck can be mounted on top or on the bottom of the Crazyflie 2.x.
The AI deck ESP32 antenna is a bit fragile and can be damaged during crashes. For better resilience, mount the AI-deck at the bottom, or put a peace of hot-glue as shown in the picture below.
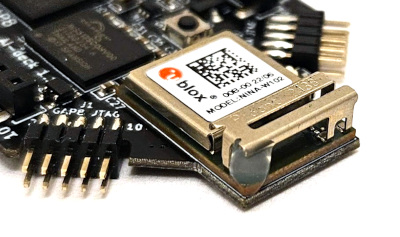
To get up and running with the deck see our getting started guide after which you will be able to either try out the pre-made examples or start making your own AI powered applications.
Note: A compatible JTAG programmer/debugger is required to flash the GAP8, see the flashing documentation. We recommend the Olimex ARM-USB-TINY-H. Familiarity with embedded system development is recommended for effective use of this platform.
Development
The main purpose of the AI deck is to be used to try out our examples and to develop your own AI powered applications. Start with the Getting started with the AI deck tutorial, then you can jump over to our examples or get started right away developing something of your own.
We recommend NanoCockpit for developing your own applications. It uses its own firmware on the ESP32, and its applications are flashed to the GAP8 with a JTAG adapter. They communicate with your host computer over WiFi using the Crazyflie Packet eXchange protocol (CPX).
The other examples use the original ESP32 firmware. With it, the GAP8 can be flashed over the air, after the GAP8 bootloader has been flashed onto it with a JTAG adapter, see the GAP8 bootloader README. CPX then also connects the GAP8 and the ESP32 to the STM32 on the Crazyflie. See switching firmware for how to go from one firmware to the other, and the flashing documentation for both ways of flashing.
Workshop
Make sure to check out the workshop PULP platform about the AI deck ! Note that some of the instructions have been updated, refer to the getting started guide for the latest procedures.
Resources
- Getting started with the AI deck
- Start here
- Development overview
- FAQ
- Getting help
- Expansion decks of the Crazyflie 2.x
- Datasheet
- Schematics
If you have any further questions please contact support@bitcraze.io