Introduction
The AI deck enables WiFi communication with the Crazyflie® as well as using the power-efficient GAP8 to run neural networks on board. This tutorial will prepare your AI deck to be used together with the examples in our GAP8 example repository and for you to start developing your own applications.
Prerequisites
Make sure that you have gone through the Getting started with the Crazyflie 2.0 or Crazyflie 2.1(+) tutorial first.
To run this tutorial and set up the AI deck you will need the following:
- Operating System
- Ubuntu 20.04 or later
- Hardware
- Crazyflie 2.1+
- AI deck
- Crazyradio 2.0 or Crazyradio PA
- A compatible JTAG programmer/debugger. We recommend the Olimex ARM-USB-TINY-H.
- Software
- Latest release of the cfclient
- Docker
- Install the docker according to Ubuntu instructions
Attach the AI-deck
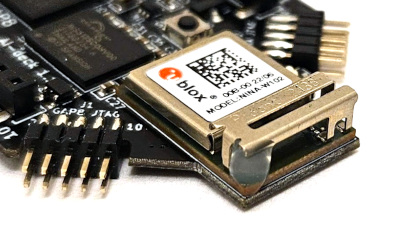
The AI-deck can be mounted both on top and on the bottom using the provided long header pins. Either position might yield different pros & cons but for development when a JTAG cable needs to be attached the top position works best. Note though that the ESP32 antenna is a bit fragile and can be damaged during crashes. For better resilience during crashes, mount the AI-deck at the bottom, or put a peace of hot-glue as shown in the picture below.
Preparing the AI deck and Crazyflie firmware
The first thing to do is to make sure that your firmware is up to date, this includes both the AI deck firmware (ESP32 and the GAP8) as well as the Crazyflie (STM32 and nRF51)
Update Crazyflie and AIdeck firmware
- Open up the cfclient on your computer
- Make sure that only the AI-deck is attached to the Crazyflie, with no other deck.
- Go to ‘Connect’->’bootloader’
- Type the address of your Crazyflie, press ‘Scan’ and select your Crazyflie’s URI. Make sure to choose ‘radio://…’ (not ‘usb://’). Now press ‘Connect’
- In the ‘Firmware Source’ section, select the latest release in ‘Available downloads’. Make sure to select the right platform (cf2 is for the Crazyflie 2.0 and Crazyflie 2.1(+) ).
- Press ‘Program’ and wait for the STM, NRF and ESP MCUs to be re-flashed. The Crazyflie will restart a couple of times, and the flashing of the ESP (‘bcAI:esp deck memory’) takes about 3 minutes.
- Once the status states ‘Idle’ and the Crazyflie is disconnected, double check if the flashing has succeded. In the cfclient, connect to the Crazyflie and check in the console tab if you see:
ESP32: I (910) SYS: Initialized. Also LED1 should be flashing with 2 hz.

NOTE: If you don’t see
ESP32: I (910) SYS: Initialized, try go through the steps again.
Gap8 bootloader
The GAP8 bootloader handles the process of flashing firmware to the GAP8 MCU over-the-air. Due to the production process, some decks unfortunately have an old bootloader version when leaving the factory, and if this is the case a new bootloader must be flashed to the deck. The symptom of an old bootloader is that flashing of firmware via the radio stops at 4% or 99% and does not finish.
Continue with the next step in this tutorial to determine if your bootloader is working. If the flashing does not finish, please go back to this step and flash the bootloader.
You will need to flash the bootloader on the GAP8 separately. This can only be done from a native linux computer or virtual machine (not WSL) with a jtag enabled programmer (Olimex ARM-USB-TINY-H JTAG or Jlink).
Clone, build and flash the bootloader with an Olimex ARM-USB-TINY-H JTAG or a Jlink using the following commands:
$ git clone https://github.com/bitcraze/aideck-gap8-bootloader.git
$ cd aideck-gap8-bootloader
$ docker run --rm -it -v $PWD:/module/ --device /dev/ttyUSB0 --privileged -P bitcraze/aideck /bin/bash -c 'export GAPY_OPENOCD_CABLE=interface/ftdi/olimex-arm-usb-tiny-h.cfg; source /gap_sdk/configs/ai_deck.sh; cd /module/;  make all image flash'
Check out the aideck flashing documentation for more detailed instructions.
Once you see the following it means you were successful
--------------------------
flasher is done!
--------------------------
--------------------------
Reset CONFREG to 0
--------------------------
GAP8 examine target
RESET: jtag boot mode=3
DEPRECATED! use 'adapter [de]assert' not 'jtag_reset'
NOTE: if you see
Error: Burst read failedor something similar, make sure that the 10 pin lint cable is properly attached. The programmer is not able to connect to the aideck properly.
If flashing hangs at
Initialising GAP8 JTAG TAP, you probably have to disconnect and reconnect the programmer and restart the Crazyflie.
Flash Wifi Example
- Go to the aideck example releases page and download
aideck_gap8_wifi_img_streamer_with_ap.binfrom the latest release. - With a crazyradio, replace [CRAZYFLIE_URI] with your crazyflie URI in the same form as
radio://0/80/2M/E7E7E7E7E7and type the following in your terminal:
cfloader flash aideck_gap8_wifi_img_streamer_with_ap.bin deck-bcAI:gap8-fw -w [CRAZYFLIE_URI]
Then you will see:
Reset to bootloader mode ...
Could not save cache, no writable directory
Could not save cache, no writable directory
Skipping bcAI:esp, not in the target list
Deck bcAI:gap8, reset to bootloader
| 0% Writing to bcAI:gap8 deck memory
/ 1% Writing to bcAI:gap8 deck memory
...
\ 99% Writing to bcAI:gap8 deck memory
| 100% Writing to bcAI:gap8 deck memory
This only should take 10 seconds for the wifi example.
NOTE: If the over air flashing hangs, try to reflash the firmware and ESP again and in case you flashed the gap8 bootloader, also flash that again with a programmer.
You can now connect to it in two ways
In your wifi list you should see ‘WiFi streaming example’. If you do, please connect to it.
To connect your ai-deck to an existing network you need to rebuild the crazyflie-firmware. Clone the repo https://github.com/bitcraze/crazyflie-firmware, open menuconfig and navigate to: Expansion deck configuration->Support the AI-deck->Wifi setup at startup-> Connect to a Wifi network->Credentials for access point
Input your network credentials here. Build the FW and flash it over the radio. Please see the Building and Flashing instructions guide.
Check the IP address/hostname in the cfclient logs when connecting to the drone to make sure it is correctly connected to the network
Clone the AIdeck example repository
Then run:
cd examples/other/wifi-img-streamer
python opencv-viewer.py [-n ip_address(if station)]
to see the following:

Note: This viewer needs opencv-python which you can install with pip install opencv-python. Be aware that the cfclient has a conflict with this library (see this issue), so please install it in a separate environment or remember to deinstall this library if you want to use the cfclient again.
Setup development environment
For development of the GAP8 chip, you need to have an environment with gap_sdk installed. To simplify the setup, we’ve created a Docker container that comes with nearly everything preconfigured.
⚠️ Important Notice: The GreenWaves Technologies website is down, preventing fetching and compiling the autotiler. This means that deploying neural networks through gap_sdk or our Docker image is not possible unless you already have the file. However, you can still deploy neural networks using DORY as an alternative.
For more details, updates and workarounds, see our announcement here.
In order to pull in the GAP8 SDK docker be able to use the autotiler in the GAP8 SDK (Facedetection and Classifcation examples) you will have to manually set it up and accept the license.
Setting up docker and the autotiler
$ docker run --rm -it --name myAiDeckContainer bitcraze/aideck
$ cd /gap_sdk
$ source configs/ai_deck.sh
$ make autotiler
Follow the instructions of the autotiler pull script. Press enter immediately at Enter URL from email: , fill in your information, wait for the email with the URL. Once you receive the email, fill the URL at the current Enter URL from email: , read the licence and accept if it is all fine to you.
In a second separate terminal on your local machine, commit the changes to a new image by running:
$ docker commit myAiDeckContainer aideck-with-autotiler
This will save the state of the container with the installed autotiler to a new image called aideck-with-autotiler that you will use later.
You can now go back to the first terminal and close the container
$ exit
Remember that this needs to be done every time you pull a new image of the bitcraze/aideck docker image
Next steps
Your AI deck is now prepared and ready for either your own applications or to try out some of our examples. To continue the tutorial, clone the aideck-gap-example repository with
$ git clone https://github.com/bitcraze/aideck-gap8-examples.git
and jump over to one of the following examples:
Further reading
- Check out the CPX documentation for more explanation of how to communicate with the AI deck
- The GAP8 repository examples to read about what examples we provide and to try them out
- Greenwaves GAP github repository for the gap8 sdk and various examples.