Hey, Victor here!
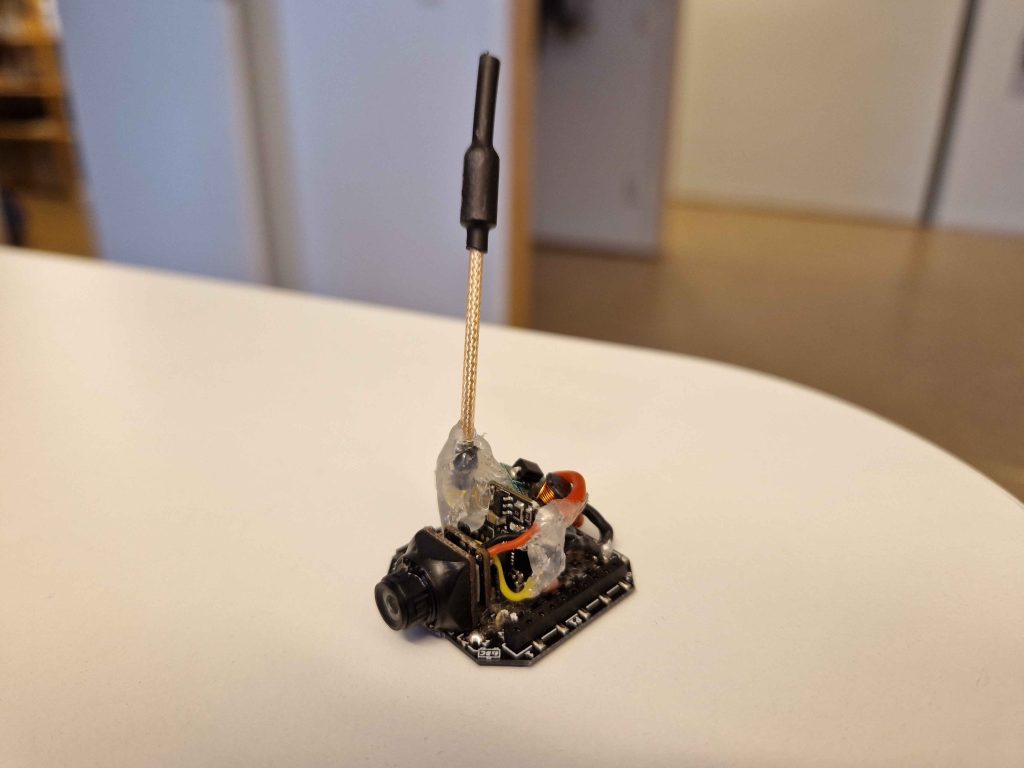
I’ve been flying FPV drones for some time and while I usually fly bigger drones (3-5 inch props) I have always wanted to put an analog camera on the Crazyflie to fly it in FPV. So, a few weeks ago I put together a simple FPV deck using off-the shelf components! The deck simply consists of a camera, VTX and a DC-DC converter, soldered onto a prototype deck.

The deck is very simple and consists of only four components and the price (as of writing) is approximately 50$ in total.
- Prototyping deck
- Camera: RunCam Atom 10x10mm 800TVL FPV Camera
- VTX: TBS Unify Pro Nano 5G8
- DC-DC converter: Voltage 5V boost converter (necessary since the camera and the VTX requries 5V.)
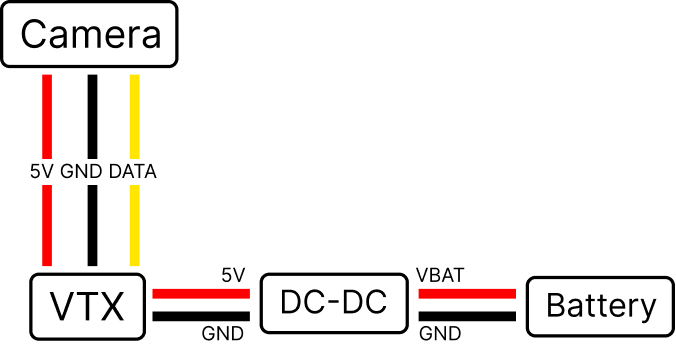
I did the wiring as follows:

I soldered the components onto the prototype deck and used some hot glue to attach the camera, as well as on and around the antenna to prevent it from breaking off when crashing. The deck weighs a total of 8.5 grams including connection pins.
I used the newly released upgrade kit on the Crazyflie which made it easier to fly since the motors and propellers makes the drone a lot faster and easier to control flying manually. The upgrade kit also increases the lift capacity of the drone, which is nice so that the extra weight of the camera deck doesn’t become a problem.
Radio Controller
When flying FPV race drones you typically want a nice radio controller and there are many options to choose from. I recently got myself a RadioMaster Zorro Radio Controller – 4-in-1 Multi-Protocol which supports a whole variety of different RC protocols, including the popular ones such as frsky, flysky and many more. You can run the popular OpenTX or EdgeTX firmware on it and the controller is equipped with multiple RF chips, whereas one of the chips is the nRF24L01. This means that we can control the Crazyflie with the controller! While I expected several hacks to make this work, thanks to the awesome Bitcraze community someone had already written support for the Crazyflie for the controller.
Below are the steps that I took to control the Crazyflie using a RadioMaster Zorro 4-in-1 controller. In short, we want two different firmwares: 1) Firmware for the remote controller (like the controller OS). 2) Firmware for the internal RF module. Please note that the details of the steps might change in the future, but hopefully it can still be helpful.
- Download the latest OpenTX or EdgeTX firmware.
- Clone the repository for the internal RF module: DIY Multiprotocol TX Module.
- Locate the file
Multiprotocol/CFlie_nrf24l01.inoin the repository and set the address of the Crazyflie that you want to connect to in the methodCFLIE_initialize_rx_tx_addr(). - Ensure that the
#define CFLIE_NRF24L01_INOis uncommented in the fileMultiprotocol/_Config.h - Download Arduino IDE in order to build the code for the internal RF module.
- Open Arduino IDE from the Multiprotocol directory and build the code by
Sketch -> Export Compiled Binary. This might take some time since the firmware is quite big. The binary can then be found inMultiprotocol/build/XXX.bin. - Plug in the SD card of the remote controller or connect it to the computer using USB-C and start the controller as a storage device.
- Transfer the two firmware binaries to the
firmwaredirectory of the radio controller. Unplug the radio controller and install the EdgeTX/OpenTX binary as the radio firmware, and the Multiprotocol binary for the internal RF module. - Create a new model and select the
CFLIEprotocol.
You should now be ready to fly! So turn on your Crazyflie and ensure that it’s on the address that you assigned in the CFLIE_initialize_rx_tx_addr() method in step 3. The radio should automatically find the correct channel so you shouldn’t have to worry about selecting the right channel.
Conclusions
I think the deck turned out really nice and it’s super cool to fly the Crazyflie in FPV! :) Some notes to consider:
- It’s possible to fly with the FPV deck with the normal motors and propellers of the Crazyflie but with the thrust upgrade kit the flying is easier and significantly more enjoyable since you can go a lot faster.
- Ensure that the battery is well and fully charged before flying.
- There’s no support for On-Screen Display (OSD) on this deck, but it would be a cool thing to test in the future. I believe that most flight controllers that supports onboard OSD has the MAX7456 or AT7456E chip, but there’s probably more ways to do it.
- The hot glue loosens up slightly from the heat dissipation of the VTX. I added some extra glue and it seems to hold quite well, even after multiple crashes.
- There are modules that contains the camera and the VTX in the same package, which might be a good/better option for the Crazyflie buying them separately and soldering them together.
Please let me know if you’ve found any mistakes in the text above or if you have any other cool ideas or hacks about FPV for the Crazyflie! :)
Cheers,
Victor
Nice post!
Regarding the Multimodule, I updated the Cflie protocol slightly with 2 improvements:
– switch to crtp_cppm_emu packets (this enables to set the max roll/pitch/… stick commands using the permanent parameters on the crazyflie). The original code had these hardcoded in the multimodule firmware.
– next to automatic channel and rate, you can set these also manually within the OpenTX/EdgeTX menu. The address still needs to be changed in the Multimodule firmware
The updated protocol is in this PR:
https://github.com/pascallanger/DIY-Multiprotocol-TX-Module/pull/723
Thanks!
That’s really nice! A nice future improvement would be to make it possible to change the address without having to reflash the firmware too :).
That is now also possible :) With this firmware:
https://github.com/flapper-drones/DIY-Multiprotocol-TX-Module/tree/CFlie_improved_address
Thank you for the wonderful post.
Referring to this article, I made a drone expansion deck with
1. Runcam Atom-W
2. vtx(tbs unify pro32 nano 5g8)
3.3vDC-5vDC converter
4. 250mAh LiPo battery(default)
5. thrust upgrade propeller and motor
However, when the motor rotates, the VTX shuts down due to insufficient current or voltage, making the camera and drone incompatible.
Is there anything I can do to resolve this issue? Any tips are welcome.
Easiest fix is probably to use a higher C-rate battery, e.g. like this.
Or, perhaps the 3.3V -> 5V cannot supply enough current? I think some off-the-shelf step-up modules can only supply quite low currents.
Can you specify which 5v DC-DC booster did you use? I have a bigger battery 350mAH one, but am still facing the same problem. As soon as the propellers start, the camera feed shuts off.
I tried turning on just 2 propellers, and it did the same. The feed remains consistent but noisy only when one propeller is turned on.
Can you tell me the exact specs you used/the picture of the circuit?
Thanks
Hmm, I can’t remember the exact details, but I’m pretty sure it was just a normal off-the-shelf 5V boost module, like this one: https://www.amazon.com/Module-Output-Voltage-Converter-Regulator/dp/B08NCM9ZPQ?th=1
Note that the vtx was very low power (25mW), so perhaps you can try to lower the power output of your vtx if you haven’t tried that already.
As a last shot, perhaps you can add a big capacitor on the vtx, in case the 5V module is sensitive to high throttle spikes?
I tried Tobias and Victor’s solution and it worked incredibly well! I appreciate your cooperation very much. As Victor said, the direct cause was that the amount of current required by VTX exceeded the maximum output current of the DC/DC converter. We were not aware of that. thank you.
I tried Tobias and Victor’s solution and it worked incredibly well! I appreciate your cooperation very much. As Victor said, the direct cause was that the amount of current required by VTX exceeded the maximum output current of the DC/DC converter. We were not aware of that. thank you.