Author: Victor Krook

Hey, Victor here!

As some of you may know, I’ve worked at Bitcraze for two summers (2019, 2020), and I did my Bachelor’s thesis here during the spring this year. While we mentioned shortly that I started working on my thesis (here), I never presented the results of it, so I thought that I’d do that now! Better late than never, right?

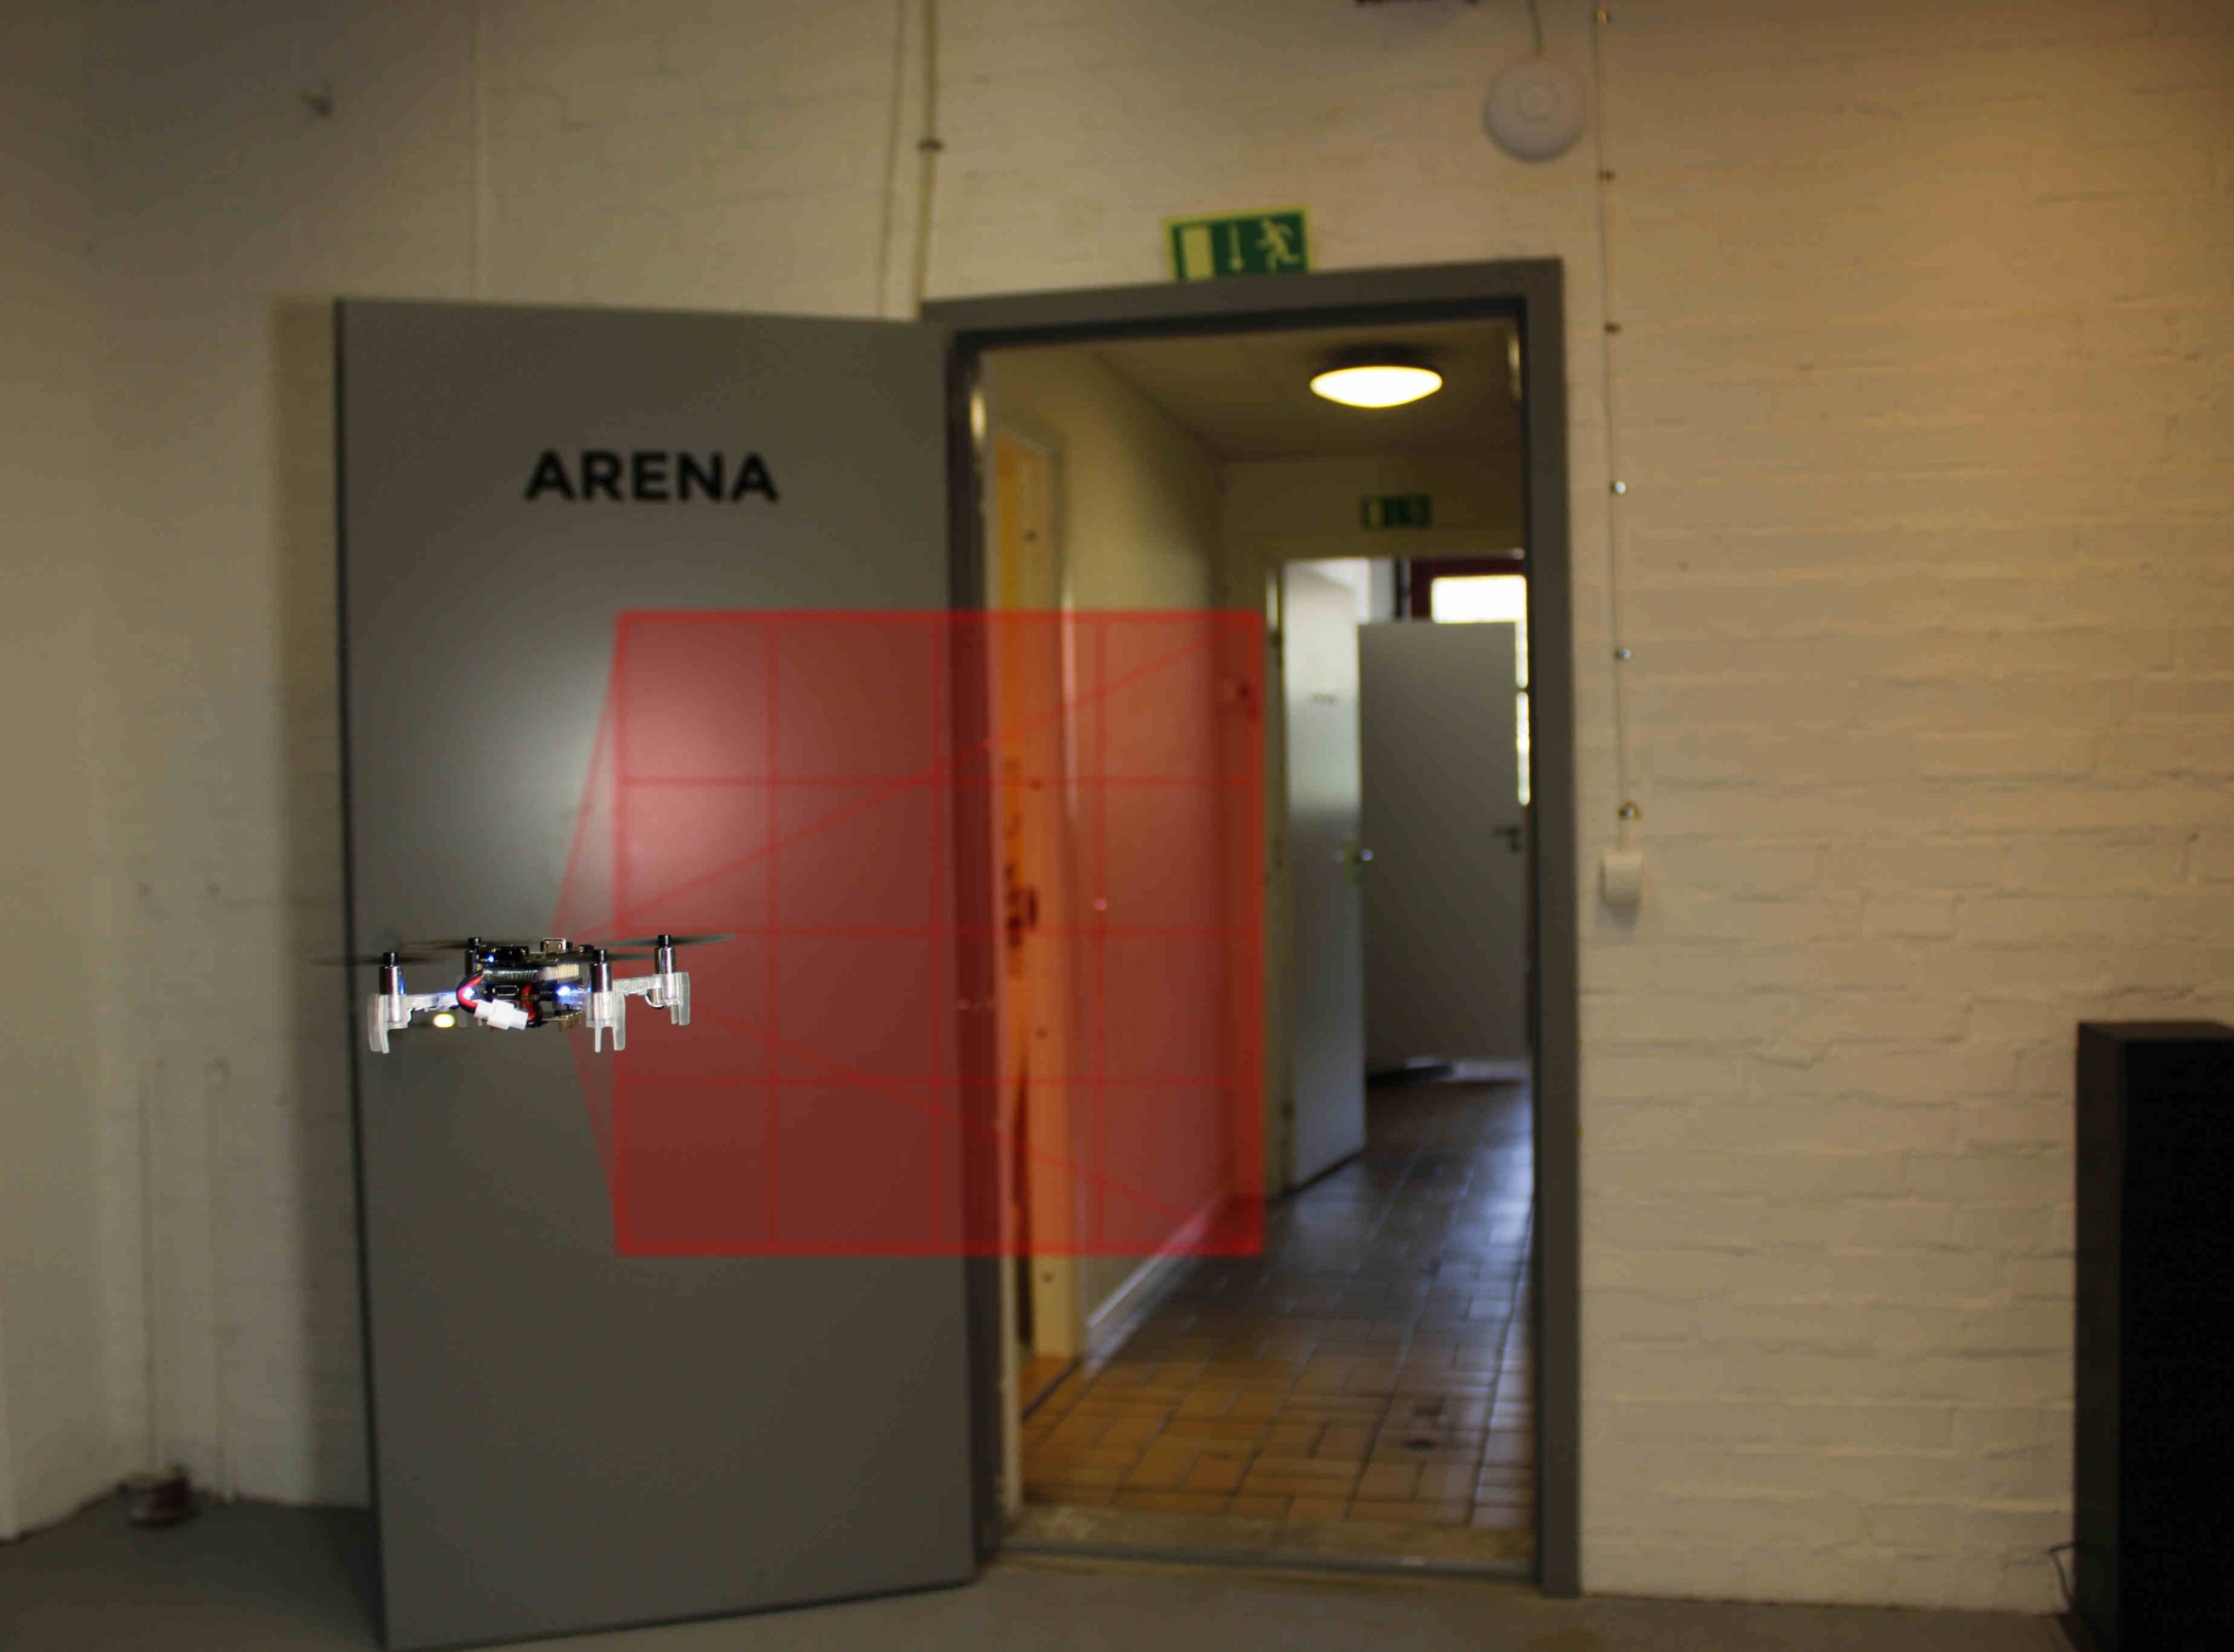
So, during my thesis I built a prototype deck for the Crazyflie which contained five multizone lidar sensors (VL53L5CX) and an ESP32-S3. The VL53L5CX sensors can output distances to a 8×8 grid, with a 45 degrees FoV at a rate of 15 hz. The purpose of the ESP32-S3 was to collect the data from the sensors and send it to a ground control station, either with WiFi, or, with the nRF radio on the Crazyflie. While the ESP32-S3 is quite overkill for only collecting data and send it, we weren’t sure of how much data that would be gathered from the sensors, so to be on the safe side we rolled with the ESP32-S3. Both the sensors and the microcontroller was very new at the time so it seemed like a good oportunity to try them out.

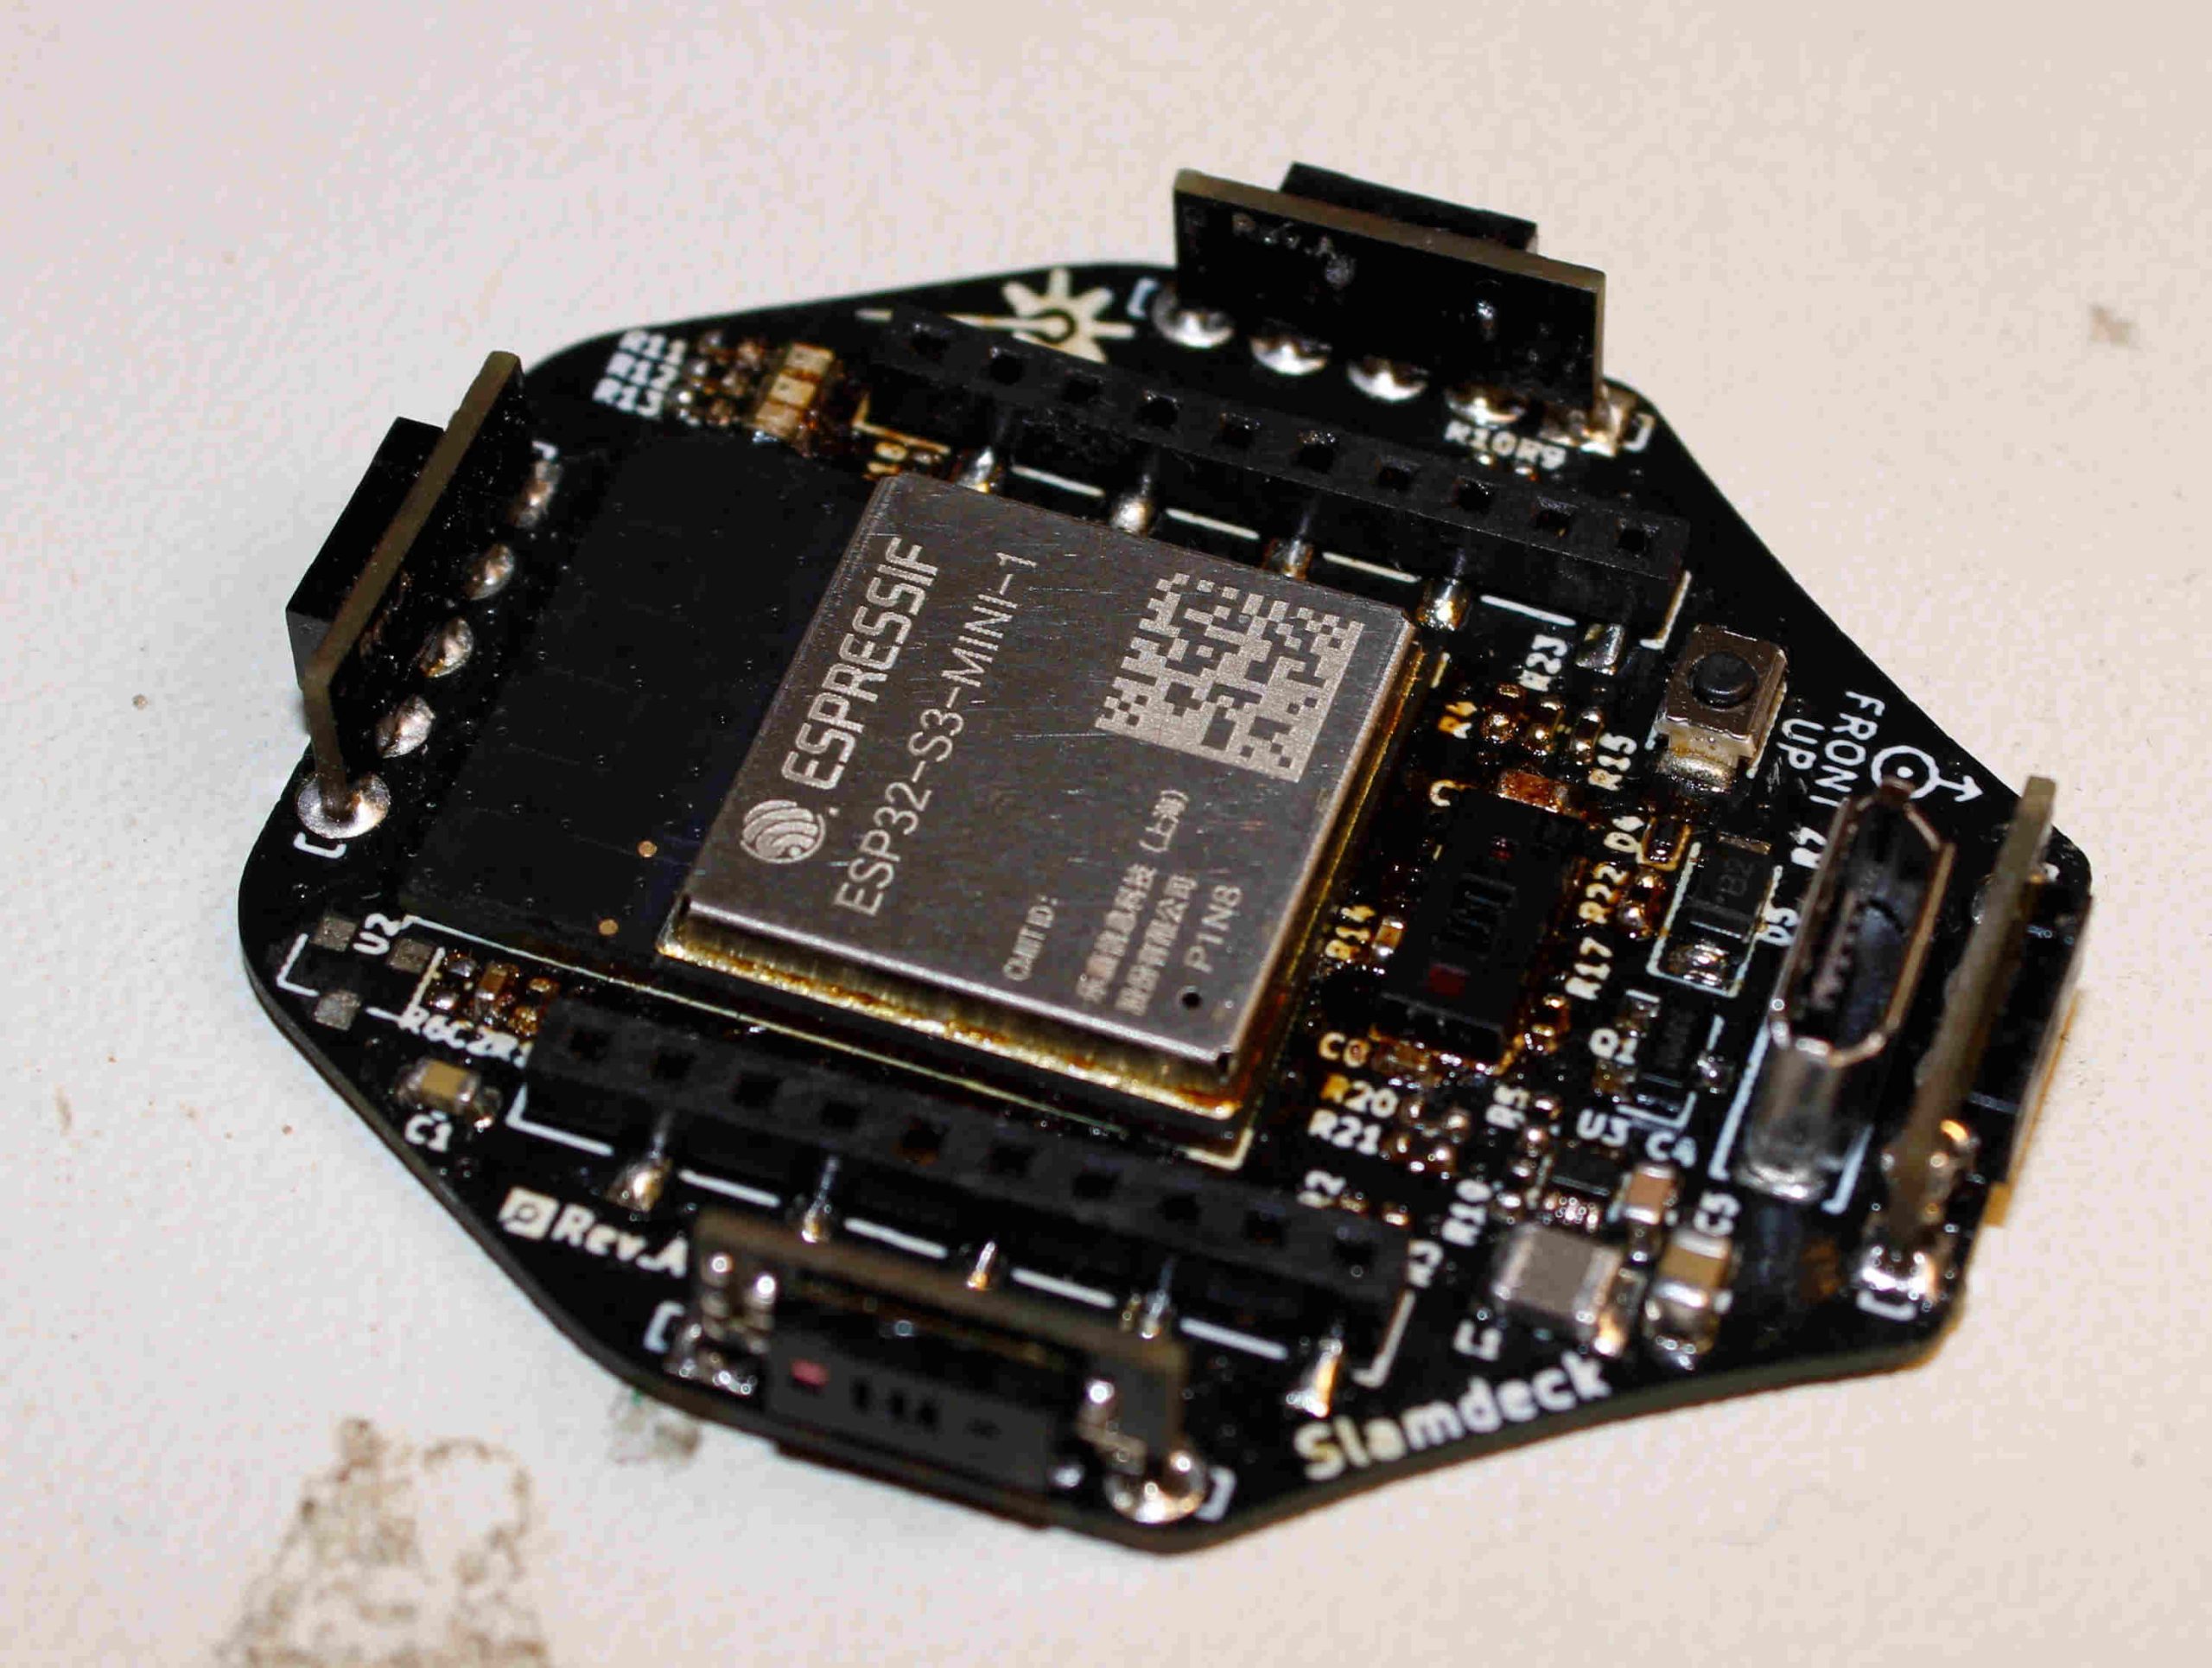
I designed the schematic in KiCad and got a lot of help from everyone here at Bitcraze while doing so, especially Tobias. Once the schematic was done I designed the PCB, ordered the components and then waited eagerly for the stuff to arrive. Once everything had arrived, I soldered all components and assembled the deck. I then wrote some firmware for the ESP32-S3, and the STM32 on the Crazyflie, and at last I wrote a simple GUI in PyQt to help visualize the data, both in 2D and 3D.

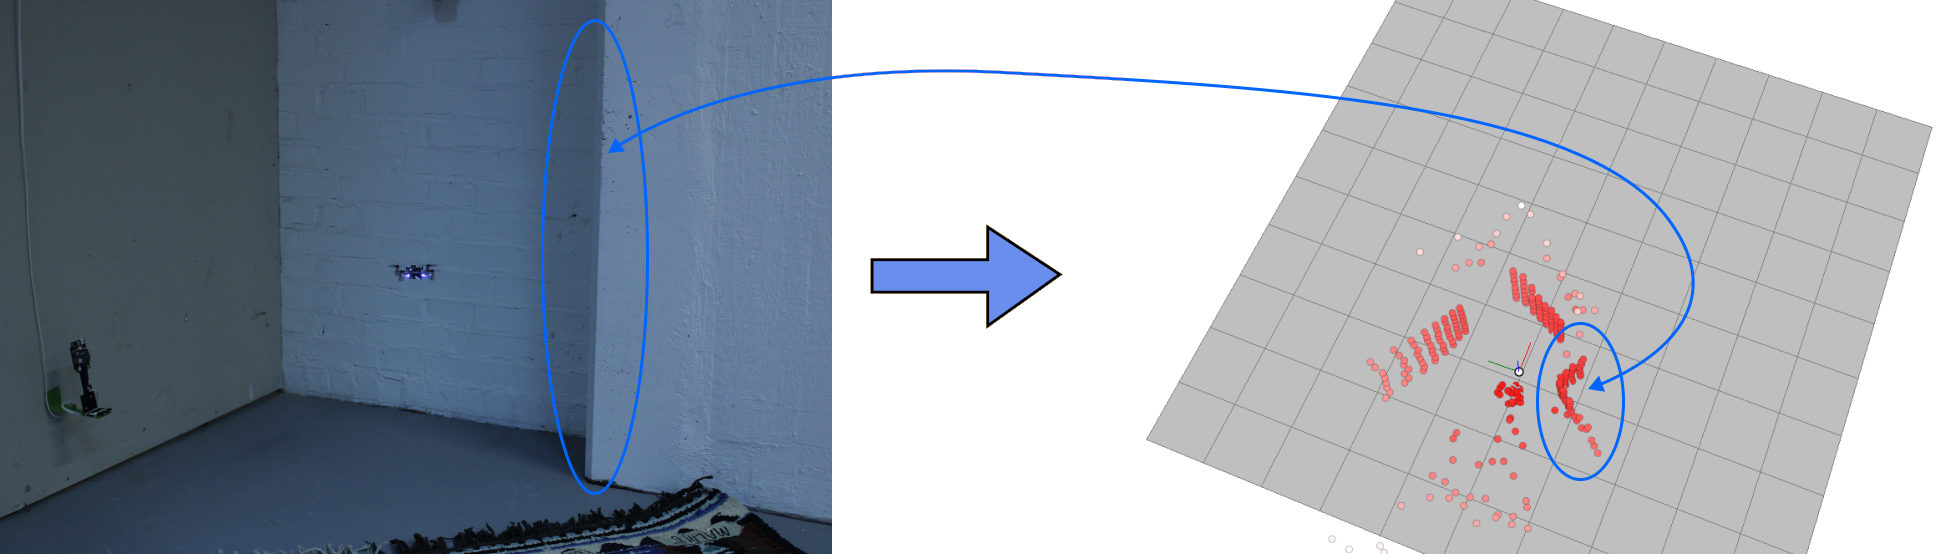
The deck was quite successful and while the GUI was very far from perfect, I think it did show that the deck has some nice potential and it was very cool to see the 3D point cloud in realtime while flying the Crazyflie! I tried sending the data over WiFi which worked perfectly well, and I also tried sending it through the nRF on the Crazyflie with the help of CPX, which also worked pretty well.

If you’re more curious about the thesis, feel free to check it out here, and the github repository can be found here.

I finished the thesis in the beginning of the summer, and I have been working part time here at Bitcraze since September and I’ve truly been loving! I think it’s been really cool to become a part of the team and work more on the regular stuff that the rest of the team does. It has been very interesting to see how the team works and cooperates on a daily basis. Something that striked me was just how many products and different features and services we handle here, with only six people!

Fortunately and unfortunately, I will be moving to Gothenburg next week which means that my time at Bitcraze is over, for this time. I have learned a lot from everyone here and truly appreciate all the love and support, which actually started before I even started my Bachelor’s degree.

Cheers and (early) Merry Christmas,
Victor

Hey, Victor here!

I’ve been flying FPV drones for some time and while I usually fly bigger drones (3-5 inch props) I have always wanted to put an analog camera on the Crazyflie to fly it in FPV. So, a few weeks ago I put together a simple FPV deck using off-the shelf components! The deck simply consists of a camera, VTX and a DC-DC converter, soldered onto a prototype deck.

The deck is very simple and consists of only four components and the price (as of writing) is approximately 50$ in total.

  1. Prototyping deck
  2. Camera: RunCam Atom 10x10mm 800TVL FPV Camera
  3. VTX: TBS Unify Pro Nano 5G8
  4. DC-DC converter: Voltage 5V boost converter (necessary since the camera and the VTX requries 5V.)

I did the wiring as follows:

I soldered the components onto the prototype deck and used some hot glue to attach the camera, as well as on and around the antenna to prevent it from breaking off when crashing. The deck weighs a total of 8.5 grams including connection pins.

I used the newly released upgrade kit on the Crazyflie which made it easier to fly since the motors and propellers makes the drone a lot faster and easier to control flying manually. The upgrade kit also increases the lift capacity of the drone, which is nice so that the extra weight of the camera deck doesn’t become a problem.

Radio Controller

When flying FPV race drones you typically want a nice radio controller and there are many options to choose from. I recently got myself a RadioMaster Zorro Radio Controller – 4-in-1 Multi-Protocol which supports a whole variety of different RC protocols, including the popular ones such as frsky, flysky and many more. You can run the popular OpenTX or EdgeTX firmware on it and the controller is equipped with multiple RF chips, whereas one of the chips is the nRF24L01. This means that we can control the Crazyflie with the controller! While I expected several hacks to make this work, thanks to the awesome Bitcraze community someone had already written support for the Crazyflie for the controller.

Below are the steps that I took to control the Crazyflie using a RadioMaster Zorro 4-in-1 controller. In short, we want two different firmwares: 1) Firmware for the remote controller (like the controller OS). 2) Firmware for the internal RF module. Please note that the details of the steps might change in the future, but hopefully it can still be helpful.

  1. Download the latest OpenTX or EdgeTX firmware.
  2. Clone the repository for the internal RF module: DIY Multiprotocol TX Module.
  3. Locate the file Multiprotocol/CFlie_nrf24l01.ino in the repository and set the address of the Crazyflie that you want to connect to in the method CFLIE_initialize_rx_tx_addr().
  4. Ensure that the #define CFLIE_NRF24L01_INO is uncommented in the file Multiprotocol/_Config.h
  5. Download Arduino IDE in order to build the code for the internal RF module.
  6. Open Arduino IDE from the Multiprotocol directory and build the code by Sketch -> Export Compiled Binary. This might take some time since the firmware is quite big. The binary can then be found in Multiprotocol/build/XXX.bin.
  7. Plug in the SD card of the remote controller or connect it to the computer using USB-C and start the controller as a storage device.
  8. Transfer the two firmware binaries to the firmware directory of the radio controller. Unplug the radio controller and install the EdgeTX/OpenTX binary as the radio firmware, and the Multiprotocol binary for the internal RF module.
  9. Create a new model and select the CFLIE protocol.

You should now be ready to fly! So turn on your Crazyflie and ensure that it’s on the address that you assigned in the CFLIE_initialize_rx_tx_addr() method in step 3. The radio should automatically find the correct channel so you shouldn’t have to worry about selecting the right channel.

Conclusions

I think the deck turned out really nice and it’s super cool to fly the Crazyflie in FPV! :) Some notes to consider:

  1. It’s possible to fly with the FPV deck with the normal motors and propellers of the Crazyflie but with the thrust upgrade kit the flying is easier and significantly more enjoyable since you can go a lot faster.
  2. Ensure that the battery is well and fully charged before flying.
  3. There’s no support for On-Screen Display (OSD) on this deck, but it would be a cool thing to test in the future. I believe that most flight controllers that supports onboard OSD has the MAX7456 or AT7456E chip, but there’s probably more ways to do it.
  4. The hot glue loosens up slightly from the heat dissipation of the VTX. I added some extra glue and it seems to hold quite well, even after multiple crashes.
  5. There are modules that contains the camera and the VTX in the same package, which might be a good/better option for the Crazyflie buying them separately and soldering them together.

Please let me know if you’ve found any mistakes in the text above or if you have any other cool ideas or hacks about FPV for the Crazyflie! :)

Cheers,
Victor

Hello everyone, this is Victor and I’ve spent another internship here at Bitcraze. You can read my blogpost from last year here https://www.bitcraze.io/2019/08/summer-internship/. I have learned a lot since last year so it has been fun to put my skills to test!

This summer I have spent my time on improving the cf-client. I’ve fixed a few bugs but mostly it has been about making small changes that improves overall functionality.

Some of the improvements that I’ve worked on:

  • Flight-control tab: Added logging of x and y-axis and changed the columns to more suitable groups. Also improved UI for assist mode.
  • Flashing dialog: Added support to flash both of the MCUs individually as well as choosing which one to flash (previously you could only flash the stm32 or both). Created an automatic firmware-release-downloader, so that you don’t have to download the files manually.
  • Log-config: Added grouping of log-configurations, that allows you to group the configs into categories. Also added small functionalities like double-click to add, remove configs etc.
  • Added sort-support for all list/tables.
  • Removed traces from Crazyflie 1.0 and support for x-mode, since it is no longer supported by the client.
  • Removed traces from python 2.

I hope that the functionalities will help you and make your experience with the client better. If you have any tips for further improvements, you’re more than welcome to leave a comment or contribute yourself. This is my last week for this summer, but I hope to see you all again and until then, fly safe!

Hello everyone, I’m Victor and you probably haven’t heard of me yet but I’ve got the awesome opportunity to spend some weeks during this summer working at Bitcraze. Working… Well, I’ve spent the majority of my time here getting invaluable experience, programming, flying with drones, eating incredible falafel and having fun so it’s really been a pleasure.

I’m quite new to both programming and electronics, so while I haven’t created any huge masterpieces of code yet, I did make a small program with a GUI that let you test the health of motors and propellers of the Crazyflie. You can run multiple ones simultaneously (I’ve tried up to 8, which works fine, even with a single radio, and you should be able to run many more) and it relies on using either Lighthouse or a Flow deck for positioning.
The propeller-test is essentially the same test as the one integrated with the cfclient, however the motor-test checks the thrust-levels of the motors (by hovering in the air for x seconds) to see if any of them are off and ranks them as good/bad. The default threshold is 15% but can be changed according to needs. The program is written in Python and uses tkinter to run the GUI application and the cflib to communicate with the Crazyflie. The script can be found here.

In the end of August I’m going to study Computer Science and Engineering which I’m extremely thrilled about and this has really been a perfect preparation for that! In the future I hope to contribute to the Crazyflie projects and learn more from the great team here at Bitcraze.

So until next time, fly safe!
Victor