If you’ve ever gone looking for a more advanced, or use-case-specific Crazyflie example (something beyond the basic single-feature ones), you’ve probably ended up digging through the cflib and crazyflie-firmware example folders. That’s about to change.
We’ve created a new repository: crazyflie-demos. It’s a dedicated place where both us at Bitcraze and the broader community can host self-contained, well-described Crazyflie demos.
Why a new repository?
The examples in the core Bitcraze repositories were meant to be kept focused: demonstrating one feature, one API, or one subsystem at a time. But real demos tend to grow beyond that pretty quickly. Once you start combining positioning systems, swarming, custom firmware apps, external sensors, or other integrations, things stop fitting naturally into the firmware or library repos.
crazyflie-demos gives those larger, more practical examples a proper home, and finally provides a good answer to the question: “where should I put this cool thing I built?”
Why not just a folder of examples?
We want to avoid the fate of some older example collections that gradually turned into an unmaintained pile of half-working demos and missing context.
The goal with crazyflie-demos is that every demo should be properly documented and actually runnable. That means clear descriptions, listed dependencies, and enough context to understand what’s going on without digging through source code for an hour.
Another important part is reproducibility: each demo is self-contained and uses pinned dependencies, so an example you clone two years from now should still work.
What’s in there already?
The repository is organized by demo type:
scripts/cflib: Host-side Python scripts using crazyflie-lib-python, covering the full Crazyflie API.
scripts/rust: Rust demos using crazyflie-lib-rs, showcasing its high-performance and native async support.
scripts/cflib2: Early demos for our new Python library, crazyflie-lib-python-v2, built on top of the Rust library. cflib2 doesn’t have a release yet, but we’re already writing demos for it to test the API and the performance.
firmware: Out-of-tree firmware apps that are flashed directly to the Crazyflie. Each demo carries its own crazyflie-firmware submodule so you’re always building against the right version.
hybrid: Demos that combine onboard firmware with a host-side script working together.
A place to share your work
A big motivation behind crazyflie-demos is making it easier to share work with the community.
If you’ve built something useful, or just a fun experiment using our products, this is the place for it. Not everything needs to live in its own repository or branch. A well-described demo here makes it easier for others to find, understand, and build on your work, and most importantly, to get inspired by it.
We’ll also be using this repository as the go-to reference whenever people ask for more use-case-specific examples, so good demos here will naturally help more people discover what’s possible with the Crazyflie ecosystem.
We’re happy to announce that release 2026.04 is now available. This update introduces a dedicated CRTP port for the supervisor subsystem and a radio startup gate for more reliable early connections, along with a number of smaller bug fixes and quality-of-life improvements. Alongside the release, we’re launching a new crazyflie-demos repository with self-contained examples demonstrating real-world use cases. Thanks to our community contributors for their valuable additions to this release.
Major changes
Demos repository The new dedicated crazyflie-demos repository hosts more complex examples that combine features or subsystems to demonstrate best practices and real-world use cases. Every demo in the new repository is self-contained, with pinned software versions.
CRTP supervisor port A new dedicated CRTP port provides direct access to the supervisor subsystem, consolidating supervisor-related commands that had historically ended up on unrelated ports. Arming, crash recovery, and emergency stop commands now go through this port instead of being spread across the platform and localization ports. The old ports still accept these commands for backward compatibility. The new port also exposes supervisor state (armed, flying, tumbled, crashed, etc.) through a direct query, so clients no longer need to set up a log block just to check supervisor status.
Radio startup gate The STM32 now signals the nRF51 when it’s ready to receive radio packets. Previously, if a client connected during boot, packets could arrive before the firmware was ready to handle them, causing lockups.
Lighthouse calibration saving fix Fixed a bug that made saving lighthouse calibrations unreliable: a signature mismatch in a memory-read failure callback could leave the memory subsystem locked, blocking further reads until reconnect.
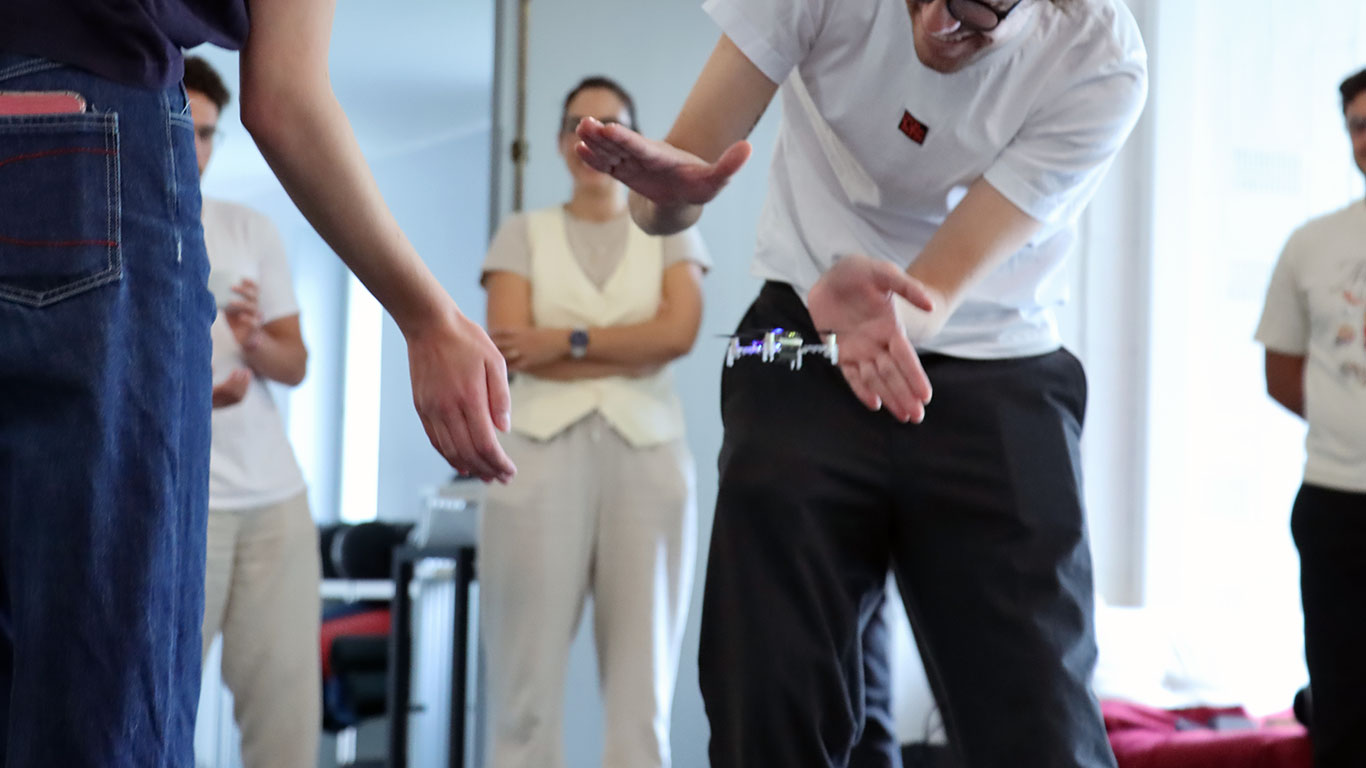
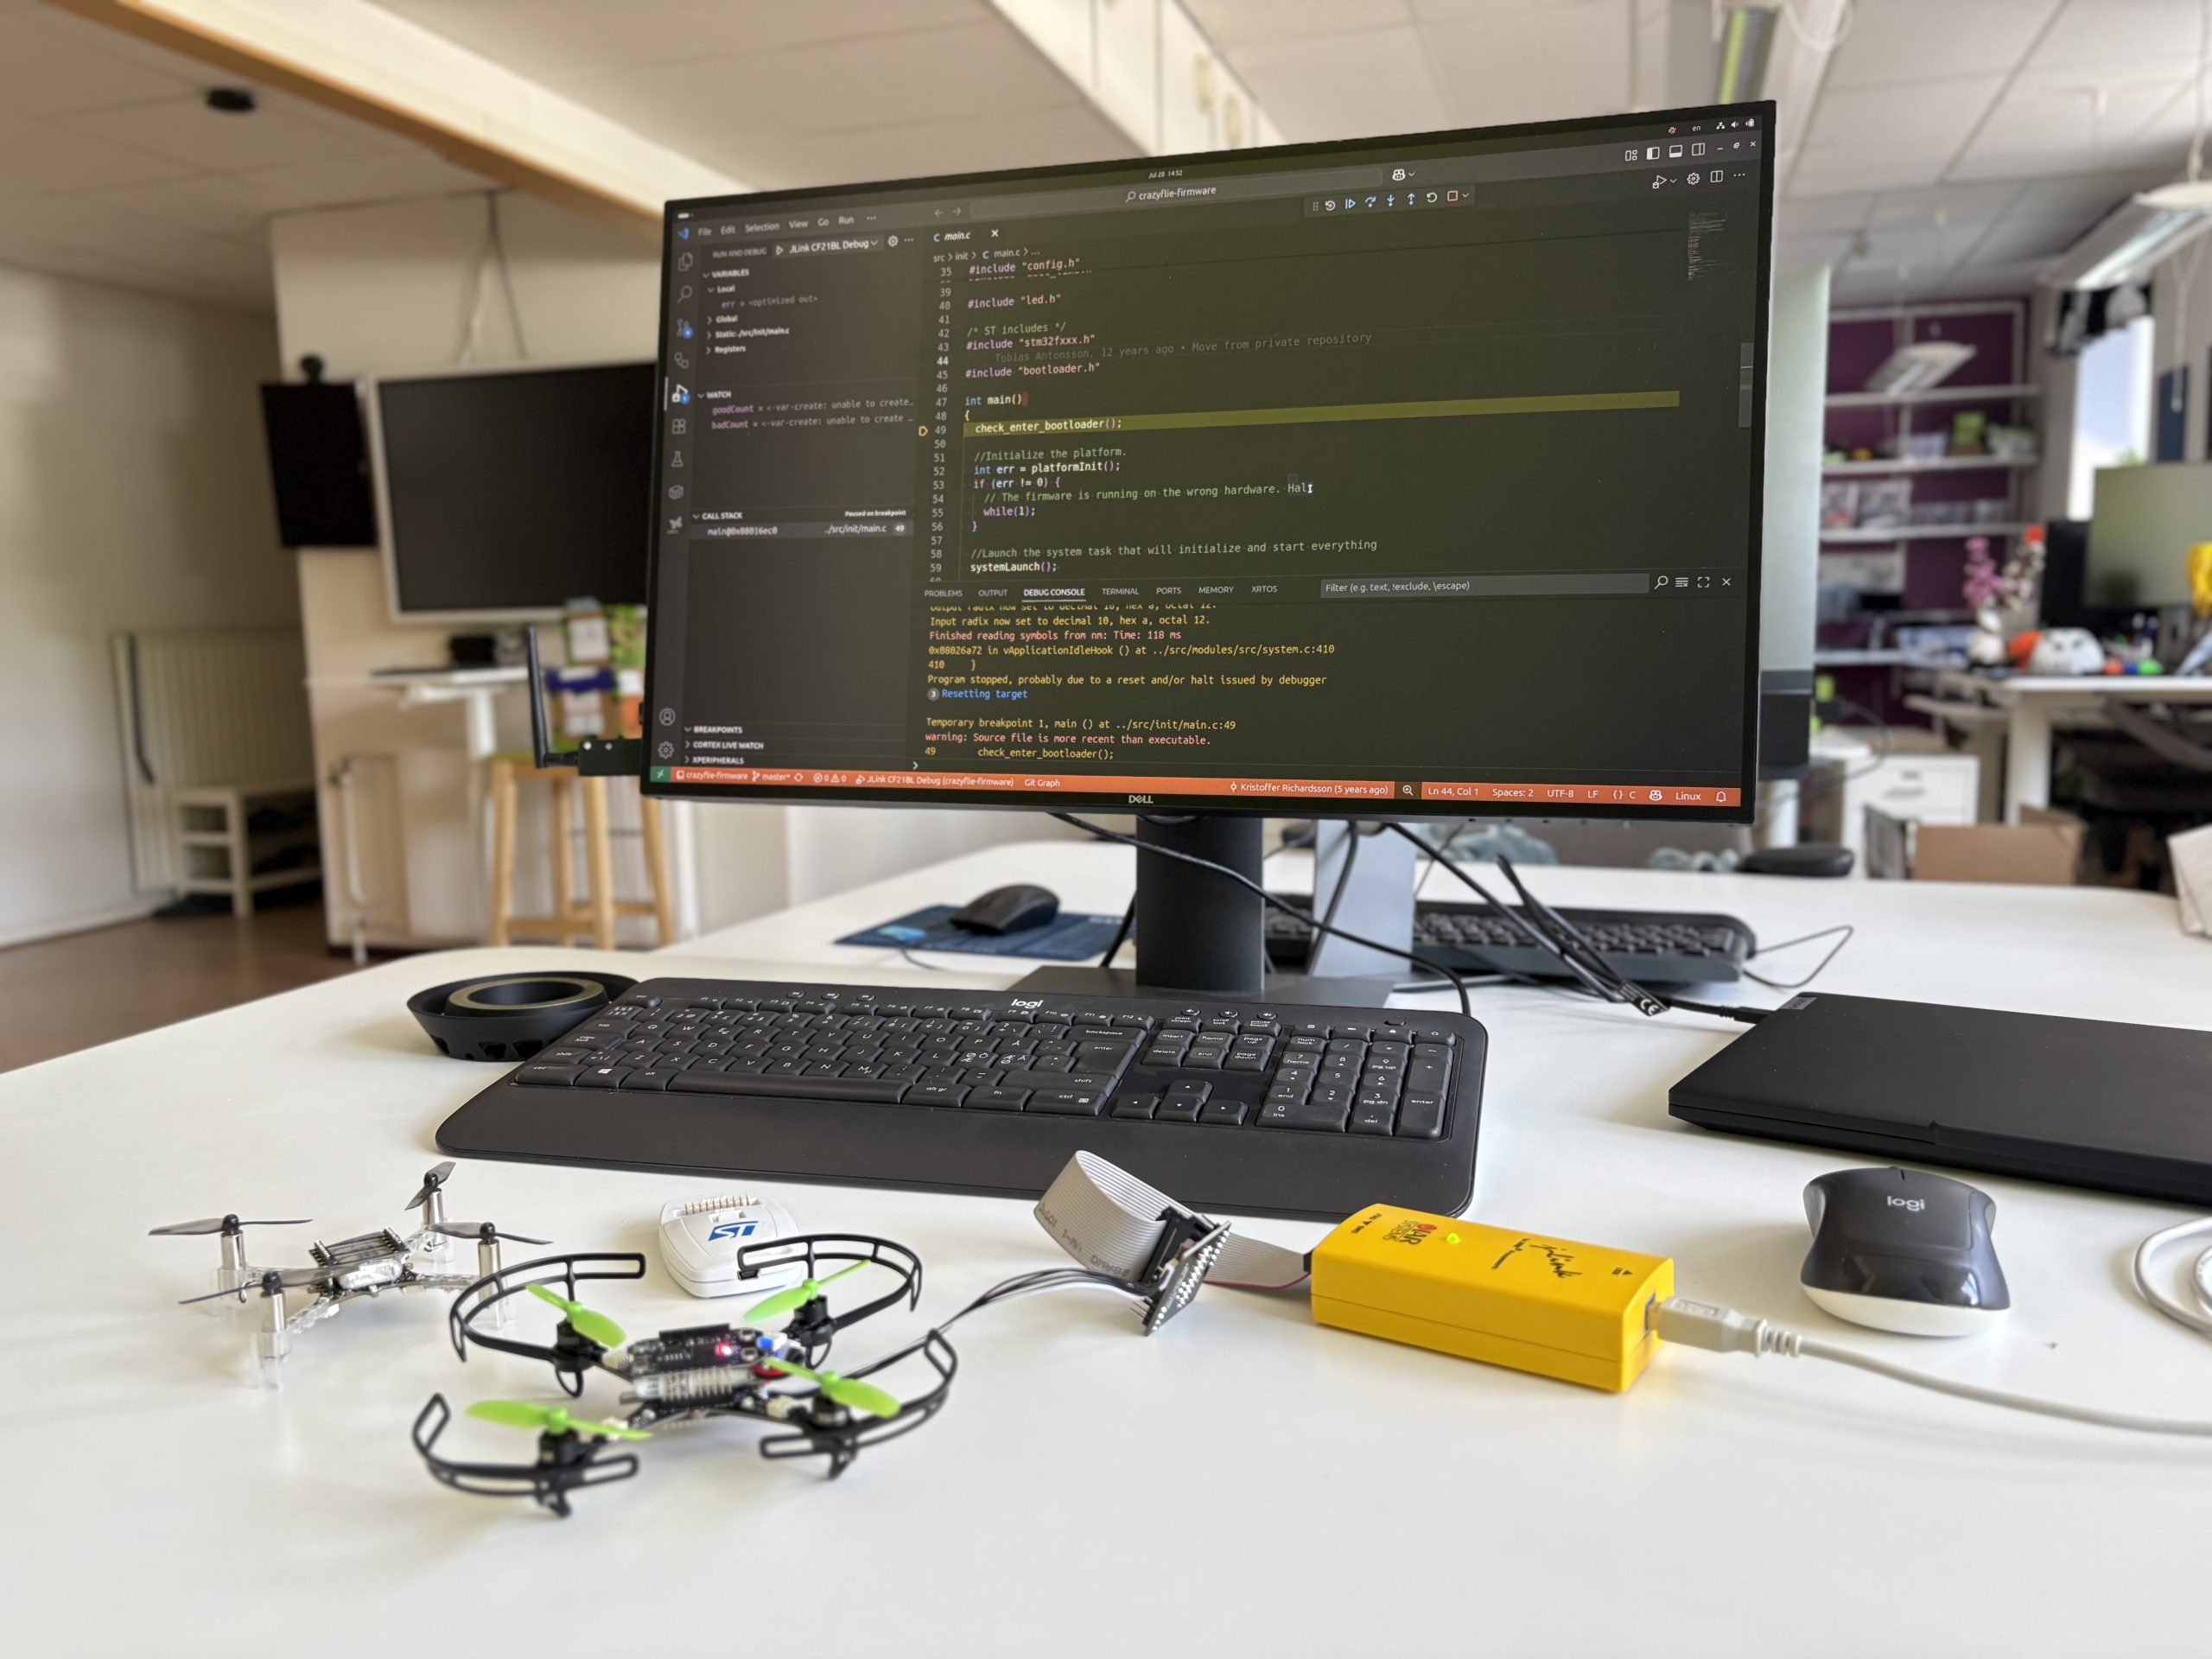
Debugging the Crazyflie using the debug-adapter kit gives you direct access to the STM32 with a hardware debugger. It makes it possible to pause execution, step through code, and inspect what’s happening in real time.
Even if you’re working mostly at a higher level, having this kind of visibility can be a huge time-saver when something unexpected happens. It’s a tool I use frequently when tracking down firmware issues or verifying low-level behavior.
We already have documentation for debugging the STM32 on the Crazyflie using ST-LINK and VS Code, but there are still a few missing pieces; like how to use J-Link, how to debug other platforms (like the Crazyflie 2.1 Brushless), and how enabling debug builds can help.
Debug Build
If you’re debugging and your breakpoints aren’t landing where you expect, or stepping seems unpredictable, or variables aren’t visible, it’s probably because the firmware was built with compiler optimizations enabled. When you select a debug build, the build system disables optimization by setting the compiler flag -O0, which preserves line-by-line correspondence between source code and machine instructions. This makes stepping and inspecting variables much more reliable.
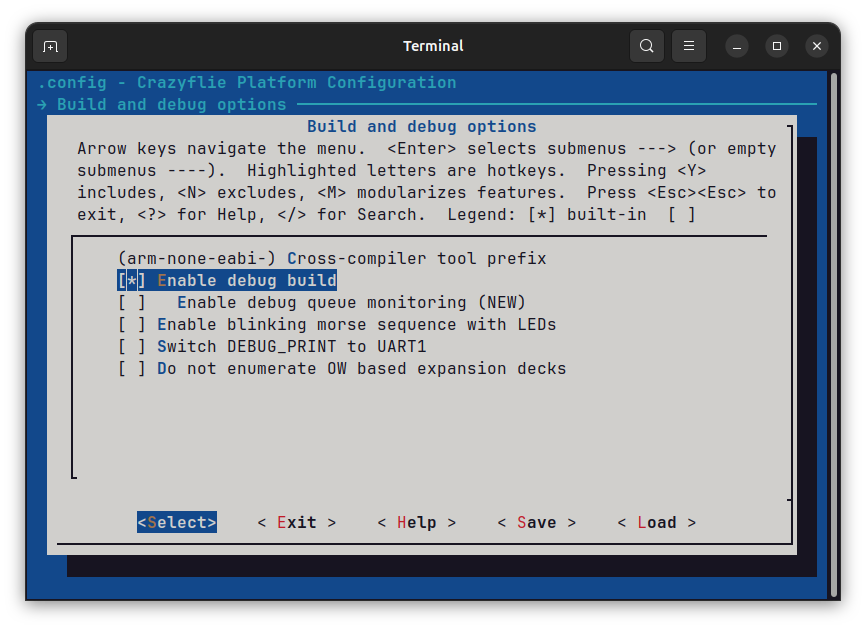
To enable a debug build, you need to set the CONFIG_DEBUG option in your Kconfig configuration. You can do this, for example, by running make menuconfig in a terminal. Then navigate to Build and debug options and select Enable debug build. After changing Kconfig options, re-run make to rebuild the firmware with the new configuration.
Enabling debug build Kconfig option through menuconfig
VS Code Debug Configuration
With debug builds enabled, you’ll get more predictable stepping and reliable breakpoints. The next step is setting up your debugger. Below is a launch.json configuration for VS Code that supports both ST-Link and J-Link, and works with Crazyflie 2.x and the 2.1 Brushless.
To use this setup with a different platform, like the Flapper, just change the executable field to point to the correct .elf file. By default, starting a debug session in VS Code will erase and reflash the firmware, so make sure the firmware is built beforehand. If you need to attach to a running target without flashing, you’ll need to modify the launch.json to skip loading the binary.
Swarm robotics has undergone rapid evolution and is now used in real-world applications. At the center of this exciting journey is the Crazyflie. Although small, its capabilities make it ideal for swarming applications in research, education, and prototyping.
Small and Safe for Indoor Use
The Crazyflie 2.1+ is a nano-quadcopter that weights only 29g. Crazyflie swarms are safe to interact with and can fly in confined spaces like labs or classrooms. If the maximum recommended payload of 15g is not enough for your application, the Crazyflie 2.1 Brushless is a suitable alternative, as it has a recommended payload of 40g. These two platforms are compatible, allowing them to cooperate within a mixed swarm of your preference.
Setting Up a Crazyflie Swarm
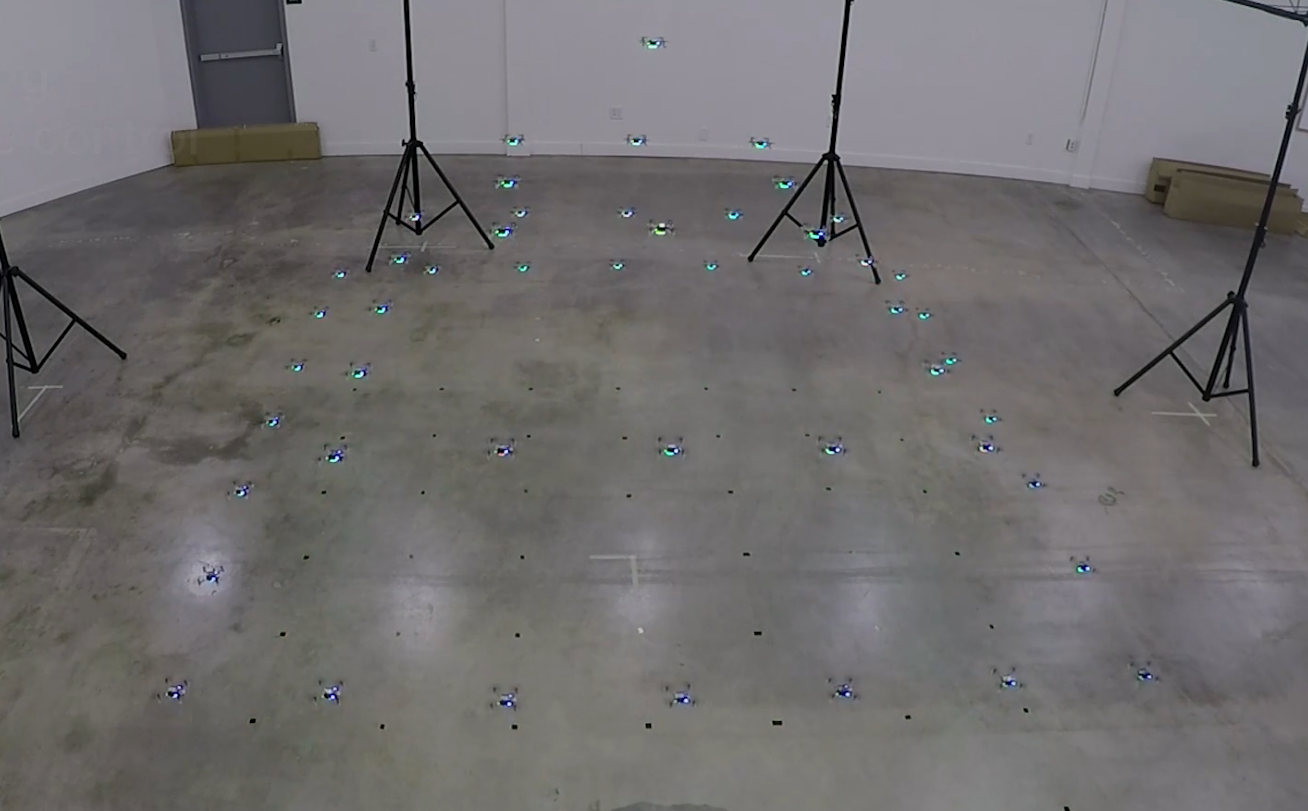
Transitioning from a single Crazyflie to a swarm setup requires certain adjustments. Depending on the amount of data that you want to transfer to and from your Crazyflies, you might need to use more Crazyradio 2.0 dongles. We recommend 3-4 Crazyflies per radio but under ideal conditions each one can handle up to 15 drones. To get the most out of your swarm, you will also need an external positioning system. This could be a Lighthouse positioning system, a Loco positioning system or a Motion Capture system. This allows each Crazyflie to know its absolute position in space. A very interesting swarming project is Crazyswarm where they managed to fly a swarm of 49 Crazyflies using 3 Crazyradios and different positioning systems.
The Crazyswarm project. You can find the full video here.
Available Swarming Frameworks and Examples
To make your introduction to a Crazyflie swarm smoother, our python library contains a swarm class. It allows the user to control each drone in the swarm simultaneously, sending commands either in parallel or sequentially. The library also includes examples that demonstrate the capabilities of a Crazyflie swarm. For users interested in exploring advanced decentralized swarm schemes, we support firmware that enables peer-to-peer communication. This is at an experimental level and has been used for the decentralized brushless swarm demo and for the ICRA 2025 demo.
Getting Started
Interested in building your first swarm? Explore our swarm bundles featuring multiple platforms and positioning systems that suit your research or development needs. If you are new to the Crazyflie ecosystem, make sure to follow the step-by-step swarm tutorial to better understand the setup process, communication flow, and control mechanisms involved in operating a drone swarm.
We are happy to announce that release 2024.10 is now available! Special thanks to our community contributors for their valuable input and code contributions in this release!
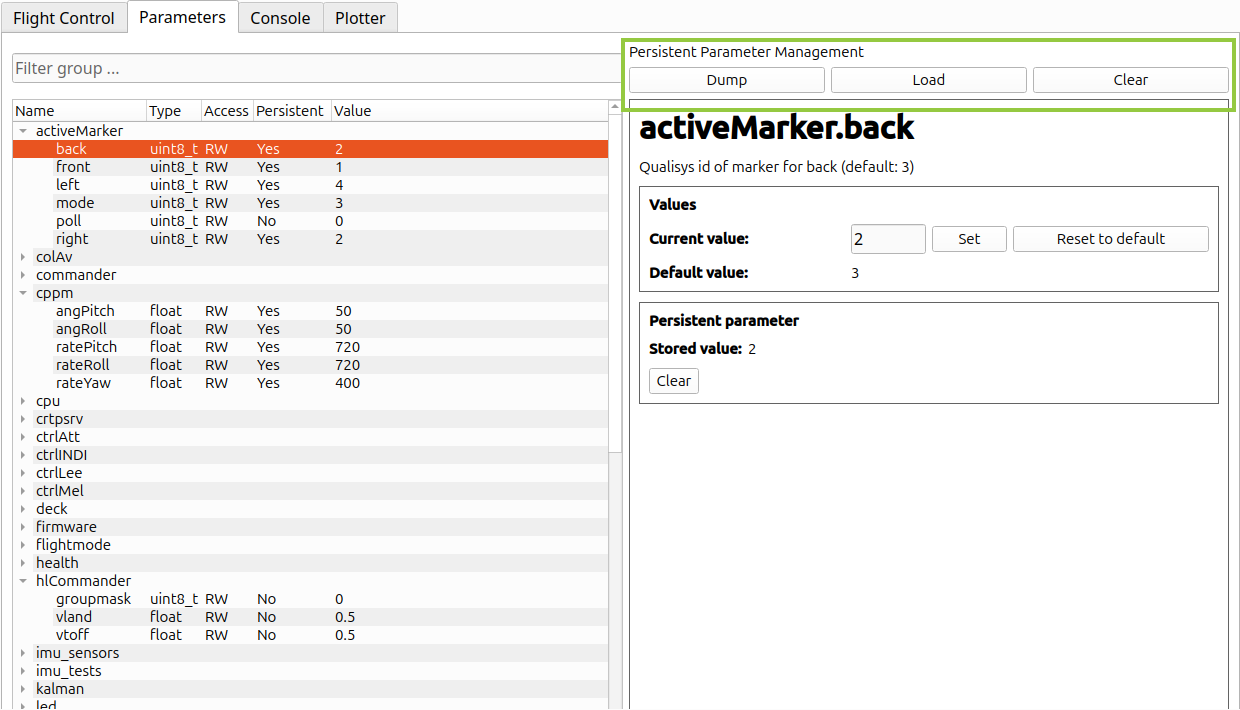
We are happy to announce the latest updates to the Crazyflie client and Python library. Major changes include improved persistent parameter management, enhanced plotting with new x-axis manipulation features, and new default logging configurations (for PID tuning). Minor updates include bug fixes and documentation improvements.
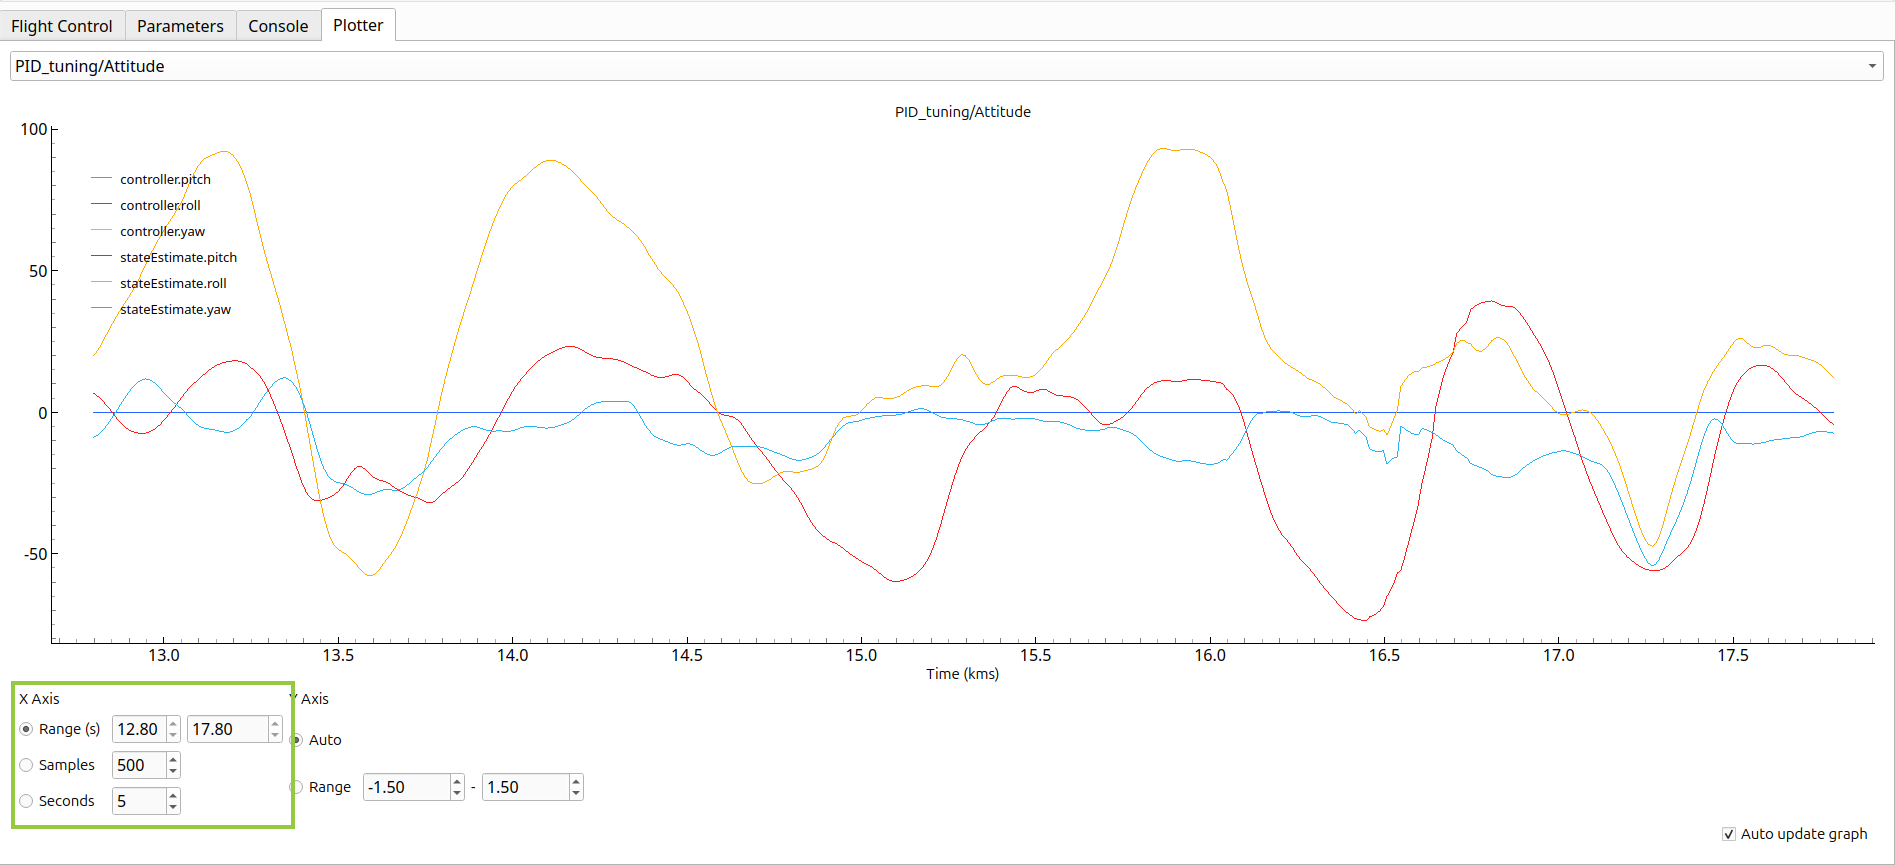
Updated plotter tab. Besides the existing option for a number of samples, users can now set x-axis limits to a number of seconds or a time range.Updated parameters tab. Users can now mass dump/load persistent parameters to/from a file, or clear all stored persistent parameters.
It’s been over a little year since we started the ROS Aerial Robotics community group together with the Drone Code Foundation, and it is still going strong (blogpost 1, blogpost 2). Since there is a nice mix of people joining the meetings from different backgrounds and drone operating systems, we have had quite a few discussions and overviews of various topics. For instance, we’ve explored courses in Aerial Robotics and other subjects in previous meetings. An important goal of the group has been to make it easier for people to get started with flying robotics, which we’ve achieved by collecting essential information in the ‘Aerial Robotic Landscape’.
Starting out in Aerial Robotics
Let’s cut to the chase: Aerial Robotics is a very challenging field to get started in. Not only do you need a comprehensive understanding of which hardware to acquire, but users also face a multiple choices. These decisions include selecting the right autopilot, simulator for testing ideas, and necessary sensors to achieve autonomy. Unlike the well-established Turtlebot in other robotics domains, there isn’t a universally accepted and field-tested getting-started development drone in the aerial robotics world. While we at Bitcraze would love everyone to go for the Crazyflie, we recognize its limitations. Like, it may not handle outdoor flights with GPS or carry heavy cameras effectively. Our goal, as the ‘Aerial Robotics Community group,’ is to make it easier for beginners by providing users with information about the hardware and software they truly need.
Drone Code Foundation and Bitcraze AB had a keynote speech together at ROSCon 2023 about getting started in Aerial Robotics called ‘Up, Up, and Away: Adventures in Aerial Robotics’. Please take a look at the talk here on Vimeo.
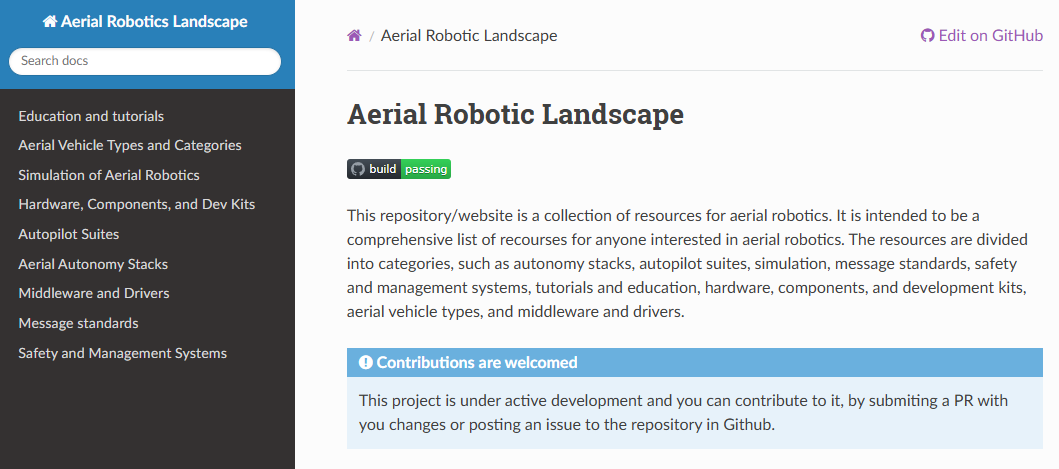
The Aerial Robotics Landscape website
The Aerial Robotics Landscape serves as a repository of information related to all things Aerial Robotics. It started out in the GitHub repository, and it grew due to the discussions held at the aerial robotics community group meetings. Additionally, contributions from both group members and external contributors have played an important role (you can explore the merged PRs).
As the pages and tables expanded, it became clear that a better representation was necessary than just the mere README documentation on the GitHub repository. The group therefore experimented with MKDocs, creating a website in the ‘Read the Docs’ theme. This is a similar theme that important packages within in the ROS ecosystem use, such as the ROS documentation, as well as ROS 2 packages like Nav2 and Crazyswarm2.
The Aerial Robotics Landscape is a dynamic , where development kits emerge while others are discontinued, new simulators rise while some remain unsupported, and autopilot and autonomy features evolve monthly. This ever-changing landscape demands constant updates and additions. We try to do this to the best of our ability, but we can’t do it alone — we need your help.
If you believe that your favorite hardware platform is missing from the landscape, or if you’ve recently developed a new planning algorithm for fixed-wing vehicles or created a YouTube course on optical-based flight, please contribute by means of a pull request to the GitHub repository. We’ve put together a guide on how to contribute to the Aerial Robotics Landscape here. Let’s make the website useful together!
If you’d like to join the ROS aerial Robotics meetings, please take a look at our community github repository for joining information. The next meeting is the 5th of June, 4 PM UTC and was announced on ROS discourse.
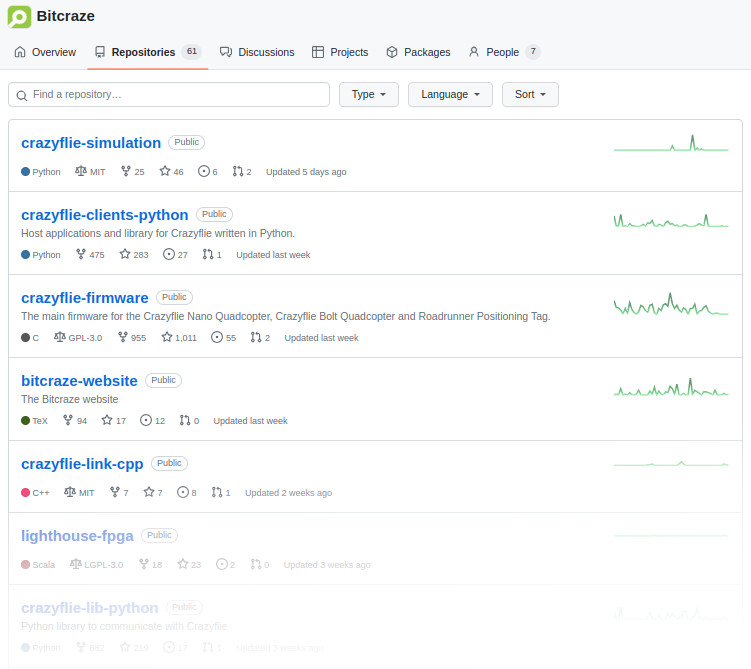
The Bitcraze organization page on github contains some 60+ repositories and if you are looking for a specific piece of code it might be hard to know where to find it. In this blog post we will try to describe how the repositories are organized and hopefully make it easier to understand where to start your search.
The Bitcraze repositories contain code and information related to a wide range of applications and products, some might be of interest to many users, while others have a smaller audience. Examples are software for the Crazyflie and decks, but also things like simulation, tests, hardware and our web site. As we try to be as open as possible most of the content we produce will end up in a repository, which obviously increases the number of available repos over time. For most users there is usually only a handful of repositories that are of interest though so let’s create some order.
The main repositories
There are three repositories that are the hot spots of most functionality, these are usually the first place to look and the only repositories most users will ever use. You can find quick links to these repos in the “Pinned” section on the Bitcraze github start page.
The repositories are:
crazyflie-firmware – the source code for the STM processor firmware on the Crazyflie. This is where most of the important Crazyflie functionality is implemented, such as controllers, estimators, motor control and communication with decks. If you want to change a behavior in the Crazyflie itself, look here.
crazyflie-lib-python – the python library used to communicate with the Crazyflie. This is used to control a Crazyflie remotely. Use it if you want to use a script to control a Crazyflie, also contains lots of examples of how to do common tasks.
crazyflie-clients-python – a the python client that is used to connect to the Crazyflie. The client is simply a GUI that uses the python lib to communicate with the Crazyflie. Everything that is done in the Client can also be done by a script using the python library.
Another source of quick links to common and important repositories can be found on our web, on the Repository overview page. This page also contains short descriptions of the repositories.
Related repositories
Many of our products are implemented as multiple sub-systems, perhaps using different languages or technologies and running in separate hardware, in most cases we separate these sub-systems into their own repositories. The rule of thumb is that these repositories are named in a similar way to indicate that they are related, for instance lighthouse-bootloader and lighthouse-fpga that contain code for the lighthouse-deck. However note that in most cases there will also be related functionality implemented in the main repos as well, in the Lighthouse deck case for instance, most of the actual positioning functionality is in the crazyflie-firmware repo while Lighthouse system management is implemented in the lib and client.
Bootloaders
When powering up a CPU there must be a small piece of code available that sets up the basic configuration of the device to enable it to communicate with other parts of the system, like memories and such. This code is usually called a bootloader. Bootloaders are rarely changed and in most cases written to the device as a part of the factory production process. They have their own repositories and you can find a bunch of them, named XXXXXX-bootloader. Bootloaders are not that interesting and can be ignored by most users.
History
Some repositories might have names that do not make sense in the current context, this is most likely due to historical reasons. We might have given a repository a name that seemed to be descriptive at that time, but as time goes by it might not be as good any more. An example is the range of “LPS-XXXXX” repositories that contains code for the Loco Positioning System. Originally LPS meant “Local Positioning System” as this was the only positioning system we had, but when we also created the Lighthouse system we changed the meaning of LPS to “Loco Positioning System”. A better naming of the repositories would perhaps be “Loco-XXXX”?
A similar transition also exists for the Crazyflie that has evolved from Crazyflie 1 to Crazyflie 2.0 and 2.1. Some repositories (named “crazyflie-XXX”) were created when Crazyflie 1 was released and have evolved to be compatible with Crazyflie 2.X, while some other repositories (named “crazyflie2-XXX”) were created when Crazyflie 2.0 was released. Even though crazyflie-firmware is not compatible with Crazyflie 1 anymore, it still has the old name.
Retired code
Some repositories are obsolete, maybe they contain experimental code that is no longer of interest or perhaps the functionality has been implemented elsewhere. We try to archive these repos and if you are looking for current functionality you can safely ignore any repository that is marked with the “Public archive” flag in github.
Still unclear
There is a short description in each repository that is intended to describe the contents. It is possible (likely) that the description was written a long time ago, with a different context and that it might not be as helpful as intended. If this is the case, just ask us. Drop a question in our discussions forum or send us an email, we try to help as much as we can!
A big part of our work is to provide examples, getting-started guides and other documentation to get users started quickly. Documentation should be up-to-date, be understandable and detailed but, at the same time, not overwhelming. Examples should cover common applications and, most importantly, teach how to create your own projects. This is a never-ending task as our eco-system constantly evolves.
In recent weeks we have updated many parts of the AI-deck documentation and examples – this process is not finished (and will never be), but we thought giving you an overview about what we think most struggle with as well as what we updated would be interesting – especially as we see many AI-deck related questions in the discussions. We saw that many struggle with understanding the whole communication chain and the importance to update all microcontrollers in it – so we will first give an overview on how everything is connected and then dive into where to find documentation, which examples already exist and how to get started with an own project on GAP8. Note that this post is centered around the GAP8; we do not go into detail about the NINA WiFi.
Here we go:
How does the AI-deck fit into the Crazyflie Eco-System? How does it communicate?
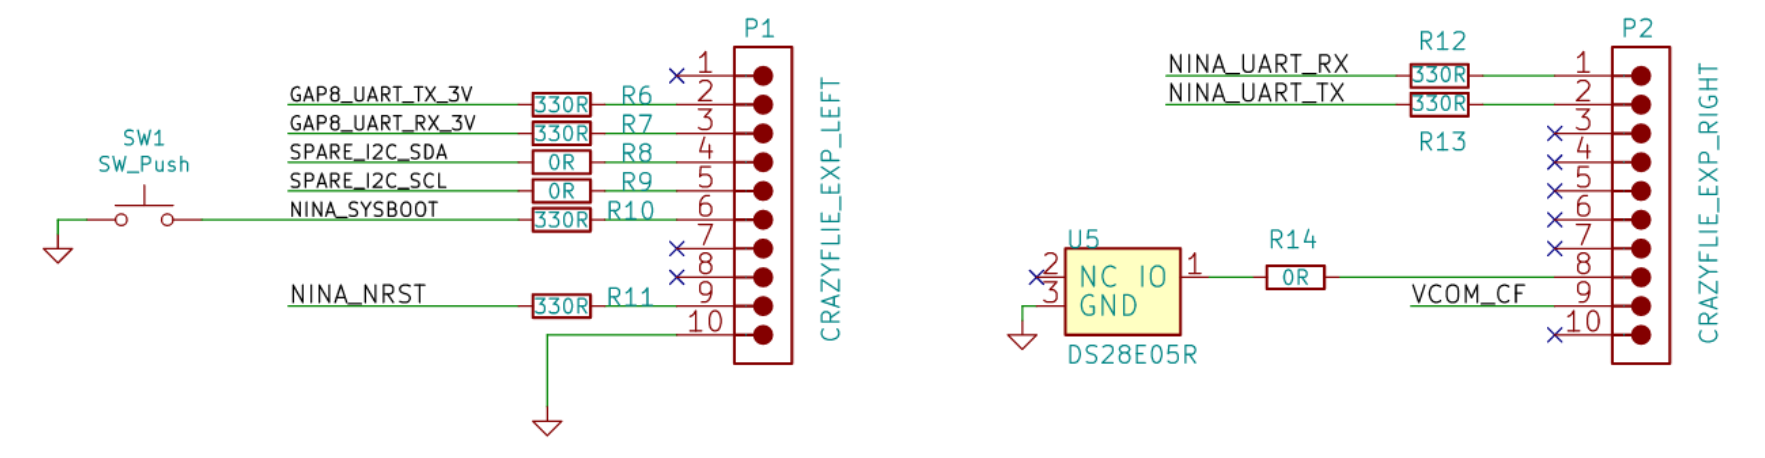
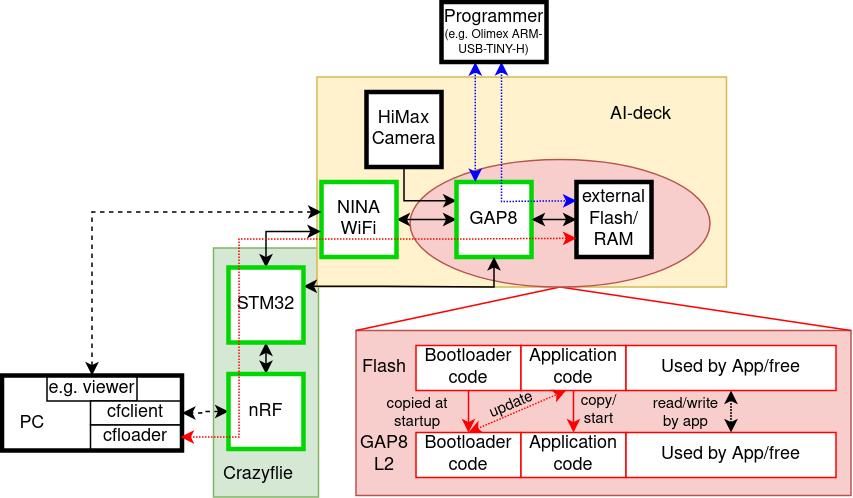
As with all other decks, the AI-deck is connected over expansion headers. It gets power directly from the battery (VCOM), and both microcontrollers (GAP8 and the NINA WiFi module) are connected to the STM32 via UART.
AI-deck expansion header connections.
To send messages between all those microcontrollers, the CPX protocol was introduced. As the NINA and GAP8 are also connected (via SPI), we have redundant information paths – so per definition, we always route over the NINA.
Now how can we send code to the GAP8 for it to run?
GAP8 always executes code from L2 (second-level RAM), as it has no internal flash. However, it can load code into L2 over a HyperBus interface from external flash memory on startup (which it does if a fuse is blown, however this is already done on your AI-deck and out of scope here). As GAP8 has only volatile memory, it must always load code from exactly the same flash address. To make it possible to update applications easily, we implemented a bootloader, a minimal program which is the first thing to run on startup. The bootloader can either update the application code in flash or copy it into L2, and, if the code is valid, run it. Why is this easier? First, you don’t need to connect a programmer, as the bootloader can read data over other peripherals (in our case SPI from the NINA module). Second, it is safer – if the update fails (and you, for some reason, end up with random code where your application should be) the firmware code will not be valid (the hash computation will fail) and GAP8 will not jump to the corrupt application code but instead safely stay in the bootloader.
As the chain for the over-the-air update with the bootloader is rather complex, we illustrate the ways to flash GAP8 in the image below.
the blue path illustrates how you can program over JTAG – you can either write code directly into L2 to run it (this is volatile memory, the code will disappear if you power cycle) or you can write it into flash (over GAP8), such that it is loaded on startup (if you overwrite the bootloader, not recommended) or with the bootloader.
the red path is using the cfloader. Meaning it sends your code over the Crazyradio to the nRF, then further to the STM32, from there to the ESP32 (the NINA WiFi module) and from there to the GAP8. This path uses CPX messages; you can read more about it in the CPX documentation.
System Architecture of a Crazyflie with an AI-deck connected.
Where is the documentation?
We have tutorials as well as repository documentation. Tutorials guide you through all the steps needed to run a specific example, while the repository documentation aims to document the general infrastructure and examples in more detail (but without all not directly related steps such as flashing a bootloader, updating other firmware, etc.).
So when you use your AI-deck for the first time, you should start with the getting started guide. Then you are most likely interested in a more detailed explanation about the used infrastructure, such as the GAP8 including the SDK, how to flash, which examples exist and how to run them, etc. So now you should check out the repository documentation.
As we are mostly speaking about GAP8 here, we should also mention that there is of course also documentation for it outside of Bitcraze. GAP8 is produced by Greenwaves, who provides references and has a public SDK on github – meaning one can actually look up the code for all drivers, look at open issues or even contribute with pull-requests.
Which examples exist? What are they there for?What did we update?
This example is there to get you started with your own applications – it provides a minimal implementation of how to send something to the cfclient console from the GAP8 and is explained in detail in the next section of this post.
The camera test is, as it says, to test the camera – however, it sends the image over JTAG, so if you don’t have a debugger and/or don’t want to overwrite the bootloader this is not an example for you.
This example uses filters to find faces in images – be a bit careful, though, as it is very sensitive to noisy backgrounds and, for example, blonde hair. However, along with nice image processing examples, it now also implements the streaming of the images in configurable resolution, a fun feature we recently added!
The classification demo is our AI demo which recognizes parcels. Here we recently fixed the CPX initialization, so it can again send results to the console in the cfclient!
The send character over UART example was neither updated nor tested with the newest docker (yet).
How do I write my own code on gap8?
Now we’ll walk you through a minimal example of how to send Hello World from GAP9 to the cfclient console.
C Code
We start with the main file (which we called hello_world_gap8.c and is found here) by including some dependencies:
#include "pmsis.h" for the drivers
#include "bsp/bsp.h" for some configuration parameters (pad configurations for connecting to memory, camera, etc.)
#include "cpx.h" for using the CPX functions to send our hello world to the console
Then we have to write our main function:
int main(void)
{
return pmsis_kickoff((void *)start_example);
}Code language:JavaScript(javascript)
We call pmsis_kickoff() to start the scheduler and an event kernel, giving it a pointer to the function we want to execute. This function is what we write next (insert it above the main function, such that it is found in the code of the main).
First we need to initialize the pads according to our configuration (the configuration is automatically chosen with sourcing the ai_deck.sh, which is automatically done in the docker) with pi_bsp_init(). Then we need to initialize CPX (which initializes for example the SPI connection to the NINA WiFi), to be able to send CPX packets. You find more information in the CPX documentation. Now we are ready for our while loop, in which we want to send “Hello World” to the console (called LOG_TO_CRTP). To not keep the busses overly busy we only want to send it every second, so we wait before we repeat.
Makefile
The Makefile is hierarchical – meaning we have hidden files that do most of the work and need to include $(RULES_DIR)/pmsis_rules.mk in the last line of the Makefile.
We start with defining where the io should go – possibly are host or uart (this is actually not used in this example, but if you’d add a printf, this would define where it goes). Then we define the operating system we want to use – we can use pulpos or freertos. We chose this as freertos is way more advanced (we are paying for this with some overhead, but in most cases, it will be worth it).
io=uart
PMSIS_OS = freertos
In the next step we need to set the name of our application (this defines the file names of the build output), include the sources (meaning our main c file as well as the two c files CPX needs) and include the header files directory (header files in the same directory as the Makefile should automatically found, but our CPX header files are in a library directory). Make sure all the relative paths are correct for your folder structure.
As a last step, we want to set some compiler flags. Firstly, we want to compile optimized, so we add -O3. Then we add -g to embed debug information. As we use timers for CPX we also need to add two additional defines to ensure all functions we need are included: the configUSE_TIMERS=1 and the INCLUDE_xTimerPendFunctionCall=1 defines.
Where in this example, [binary] has to be replaced with examples/other/hello_world_gap8/BUILD/GAP8_V2/GCC_RISCV_FREERTOS/target.board.devices.flash.img, and the CRAZYFLIE_URI is something like radio://0/80/2M/E7E7E7E7E7.
Now you can connect to your drone with the cfclient and should see a CPX: GAP8: Hello World print every second.
Note: The LED will not blink as in most other examples, as we did not implement a task which does this.
We hope this blog post helps you get started with your own awesome applications faster!
We have worked hard last week to get a new fresh release out before the summer months are on our doorstep. Not only that we would like to make sure that important bugs are fixed before some of us go on our holiday, but also to be able to display our new AI deck features! Here is an overview of what has been changed
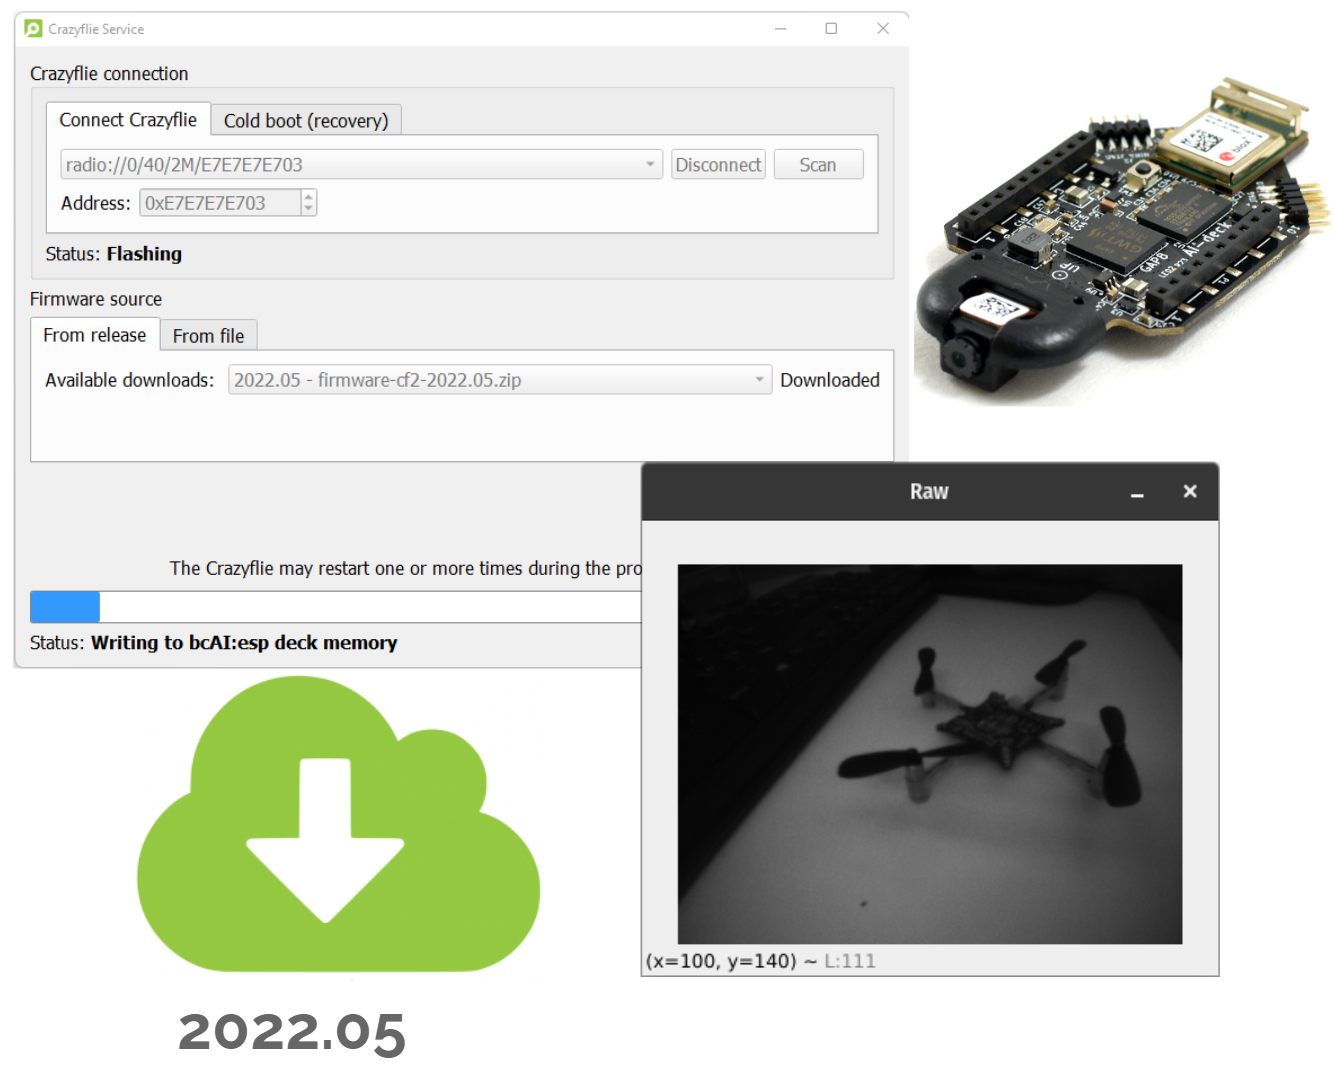
AI deck over air flashing
As you can probably see in the release notes of both the python libraries and the firmware, most of our changes are focused on making it possible to develop for the AI deck without using a programmer all the time. If the STM and NRF firmware of the Crazyflie is fully updated, and the ESP firmware on the AI deck, it should now be possible to flash an AI deck example binary with a Crazyradio! For older versions of the AI deck 1.X (Rev A to C) it is unfortunately still necessary to use the JTAG programmer one last time to flash a bootloader on the GAP8, but after that it should not be needed anymore.
In the light of the work we have done for the AI deck, we also have started to implement a new, inter MCU protocol called the Crazyflie Packet Exchange. Since with the AI deck, we are adding 2 additional microprocessors to the Crazyflie architecture, it was crucial to handle the communication between all platforms and communication channels properly. Currently the functionality is mostly enabled to tailor Wifi streaming and console printouts for the AI deck, but it is meant to be a generic protocol which in the future, should be able to handle more combinations like for instance, command messages through wifi?
For the last part of the Grand tour trip, we had a hackathon with the IMRC lab of TU Berlin and our close collaborator Wolfgang Hönig, in which we managed to convert the PID controller, Mellinger controller and the motor mixing into python bindings, which can be used in the experimental simulator of the Crazyflie.
There is no Pypi release of these, you will need to pull the latest crazyflie-firmware repo and build the bindings with ‘make bindings_python’
Additional fixes
We have some additional fixes to both the python libraries and firmware. For the STM we have updated the STD peripheral library and solved several build issues. For the cfclient, we fixed a lot of issues that were caused by either the latest version of python, as it was more stricter with type definitions, and some issues QT. Moreover, the LED ring headlight functionality has been restored, and the cfbridge.py script, used for the PX4 crazyflie 2.1 tutorial, is re-added, since it suddenly disappeared a few releases ago.
Update and Feedback
Make sure to update your cfclient with ‘pip install cfclient –upgrade’ and to reflash the new stable firmware. For AI deck users, try out our our new tutorial to try out both CPX, the over air flashing and the wifi example. The new AI deck functionalities has been subjected to some limited testing so if there is anything wrong or unclear, please let us know in the forum! The feedback will help the AI deck to become a more stable product for development, so we would be very grateful if you would be able to help out with that.