If you haven’t watched it already, make sure to watch the TED talk “Raffaello D’Andrea: Meet the dazzling flying machines of the future”!
We are super excited to see that they use the Crazyflie 2.0 drones for the firefly swarm demo in the end of the talk. After all, our goal is to enable people to test their ideas, so this awesome demo makes us thrilled!
While digging around in our office looking for a board we found a piezo buzzer we bought a while back. The reason for buying it was to test some buzzer functionality to the Crazyflie 2.0, but we forgot about it. But now that we found it again we got to work :-) We documented the build in our hacks section on the wiki, but here’s a quick run down.
Here’s a Vine with the result (enabling sound is a good idea :-) )
On a side note Seeedstudio will start shipping out the CCW propeller replacements this week. If you still haven’t filled in the replacement form it’s not too late, here’s the form.
We are really happy to announce that we are starting the pre-order for the Crazyflie 2.0 today! After spending nearly 10 months doing development, we have reached a point where we are very happy with the design and the performance. Now all we have to do is to kick off the production and that’s where the pre-order comes in.
During the next three weeks we will be taking pre-orders for the Crazyflie 2.0 and related products. After the three weeks has passed we will start the production and the current estimate for shipping the products is the second week of December. As a reward to users that want to help us out by pre-ordering our products, we are lowering the prices with about 15% until the 16th of October when the pre-order ends.
So, just to clarify:
Pre-order end: 16th of October
Estimated shipping: Second week of December
If you want to know more about the Crazyflie 2.0 and what it’s about, then have a look at the Crazyflie 2.0 product page. It explains a bit about the communication (Bluetooth LE and Crazyradio), the expansion boards and gives you an idea what you could use the platform for. The Crazyflie 2.0 developed with developers in mind, so it features thins like wireless firmware upgrade, real-time parameter setting/getting and data logging using graphs. To make it easier for developers to get going we provide a pre-installed virtual machine that contains most of our tool-chains for building firmware and software, as well as KiCad for the hardware design.
For the Crazyflie 2.0 pre-order we aren’t just making the Crazyflie 2.0 available, we are launching a full set of products to support it. Here’s the list of the main products and the expansion boards that are included in the pre-order:
Crazyflie 2.0: The next generation of our flying open development platform with lots of new features
Crazyradio PA: The same mechanical footprint and price as the current Crazyradio, but now with a power amplifier that we have tested to above 1km range (line-of-sight) with the Crazyflie 2.0
Debug adapter kit: An easy way to debug the nRF51 and STM32F4 on the Crazyflie 2.0 by using an adapter board for connecting a standard 20-pin/100mil JTAG or 10-pin/50mil Cortex-debug cable
LED-ring expansion board: Fly into the night in style with this expansion board featuring 12 bright RGB LEDs that can be individually controlled and two strong white front-facing LEDs
Qi expansion board: Charge your Crazyflie 2.0 without any wires with this inductive charging expansion board using Qi
Breakout expansion board: Easy solderless prototyping with a board designed to fit a breadboard to try out your designs on the ground
Prototype expansion board: With space for prototyping and access to all the pins in the Crazyflie 2.0 expansion port there’s lots of possibilities with this board
We are also including all the spare parts in the pre-order to make sure that everyone gets a chance to get what they need together with their Crazyflie 2.0. Here’s the list of parts:
For the release we wanted to make a video explaining a bit the new platform, but since we have been really short on time we’re not done yet. Instead we are publishing a short video showing the Crazyflie 2.0 in action together with the LED-ring expansion board. The video also features the traffic light hack we did a few weeks ago.
Have a look at the Getting Started page for the Crazyflie 2.0 for assembly instructions or the wiki documentation for the project to see how to assemble the new solderless Crazyflie. There’s also some Expansion port documentation available as well as User Guide. We are still working on filling out more of the documentation, so bare with us. With the hardware completed we are now refocusing on the firmware and software. We have built in lots of neat features into the new Crazyflie 2.0 hardware that we now need to add software support for. So over the coming months we will be working on the iOS/Android apps and the Crazyflie PC client as well as the firmware. We will of course keep everyone updated of the progress here on our blog. Once the Crazyflie 2.0 products start shipping we will publish all the code and hardware design on our GitHub.
Starting with the pre-order of the Crazyflie 2.0 we are also lowering the price for the current version of the Crazyflie. The Crazyflie Nano Quadcopter 10-kit is lowered from $149 to $116 and the bundle with the Crazyradio is lowered from $179 to $146. So if you can’t wait until December then have a look at the current version over at Seeedstudio.
Finally it’s getting really close and we are very excited to say that the pre-order of the Crazyflie 2.0 will start this week! We will post more details about it during the week, until then here’s a short teaser from our release video :-)
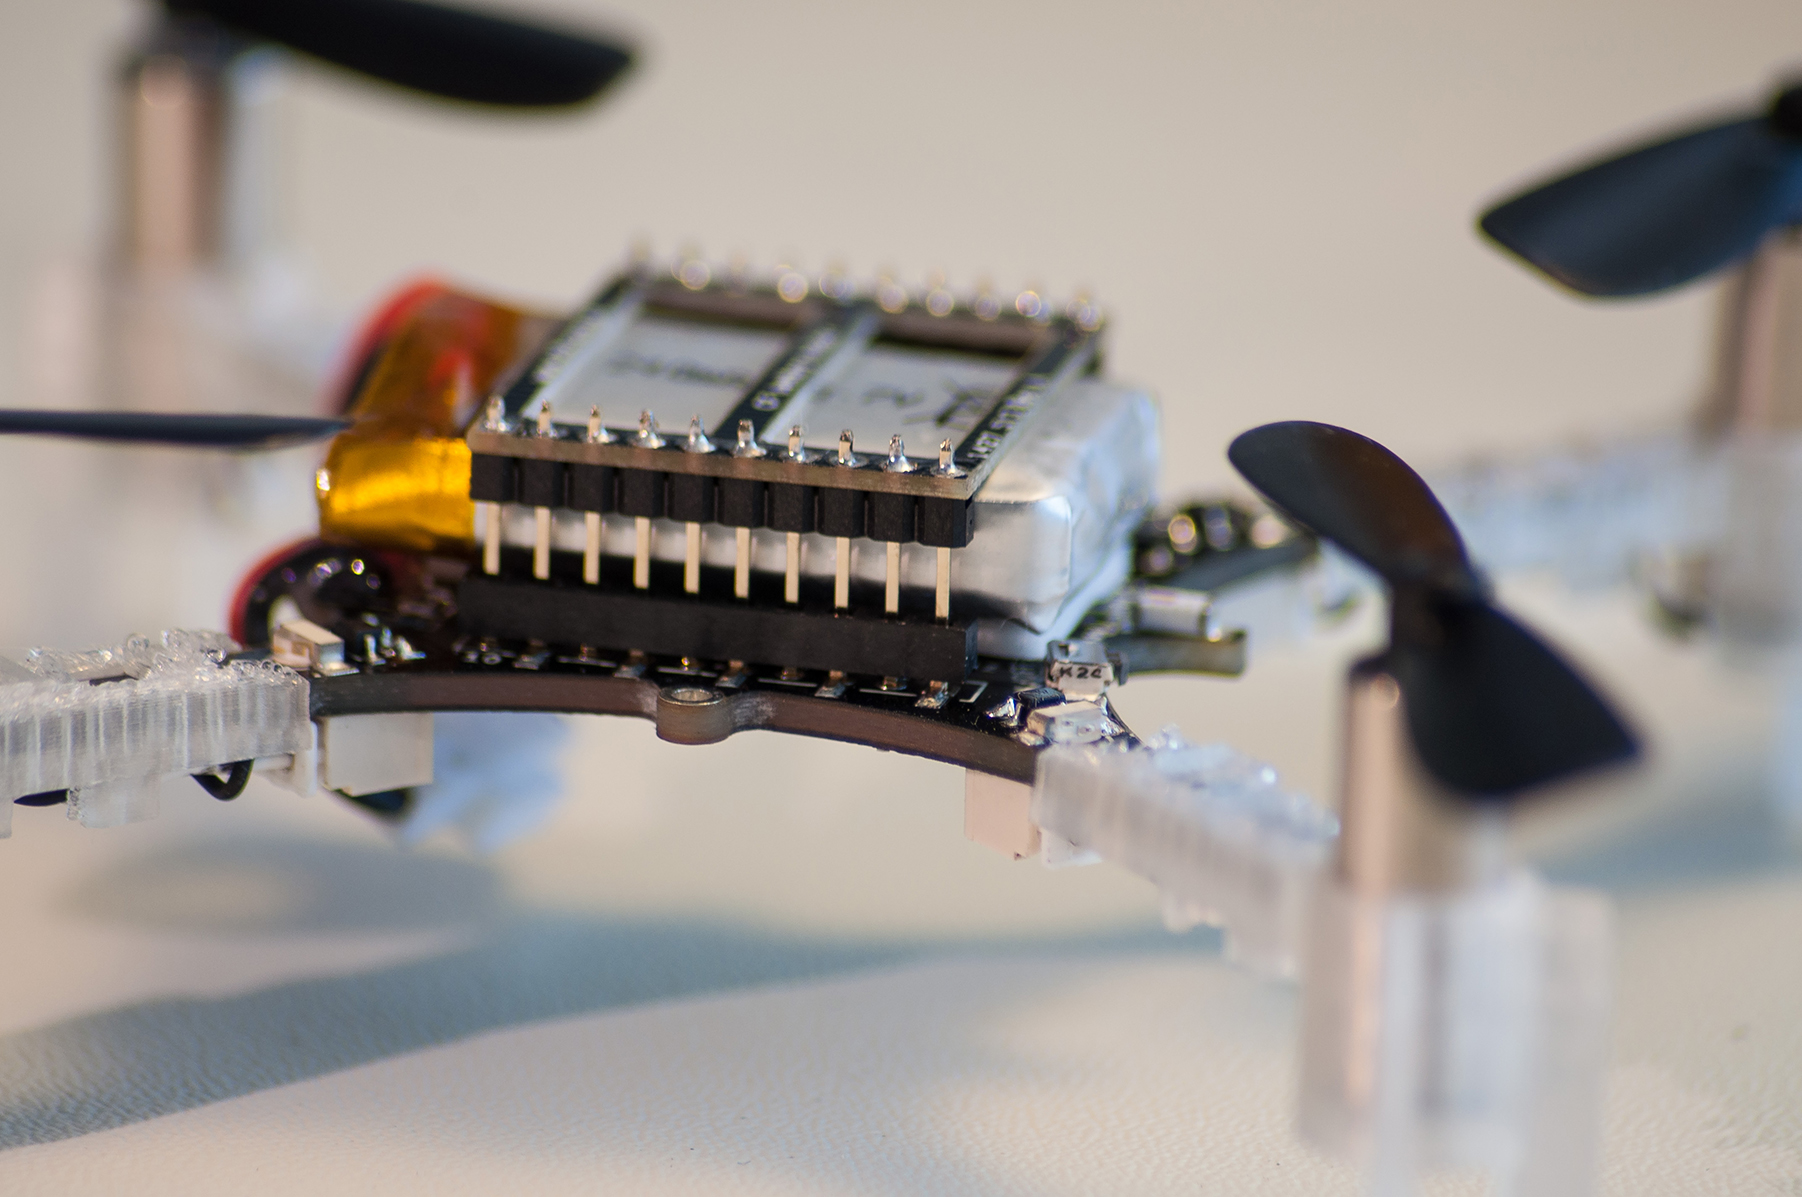
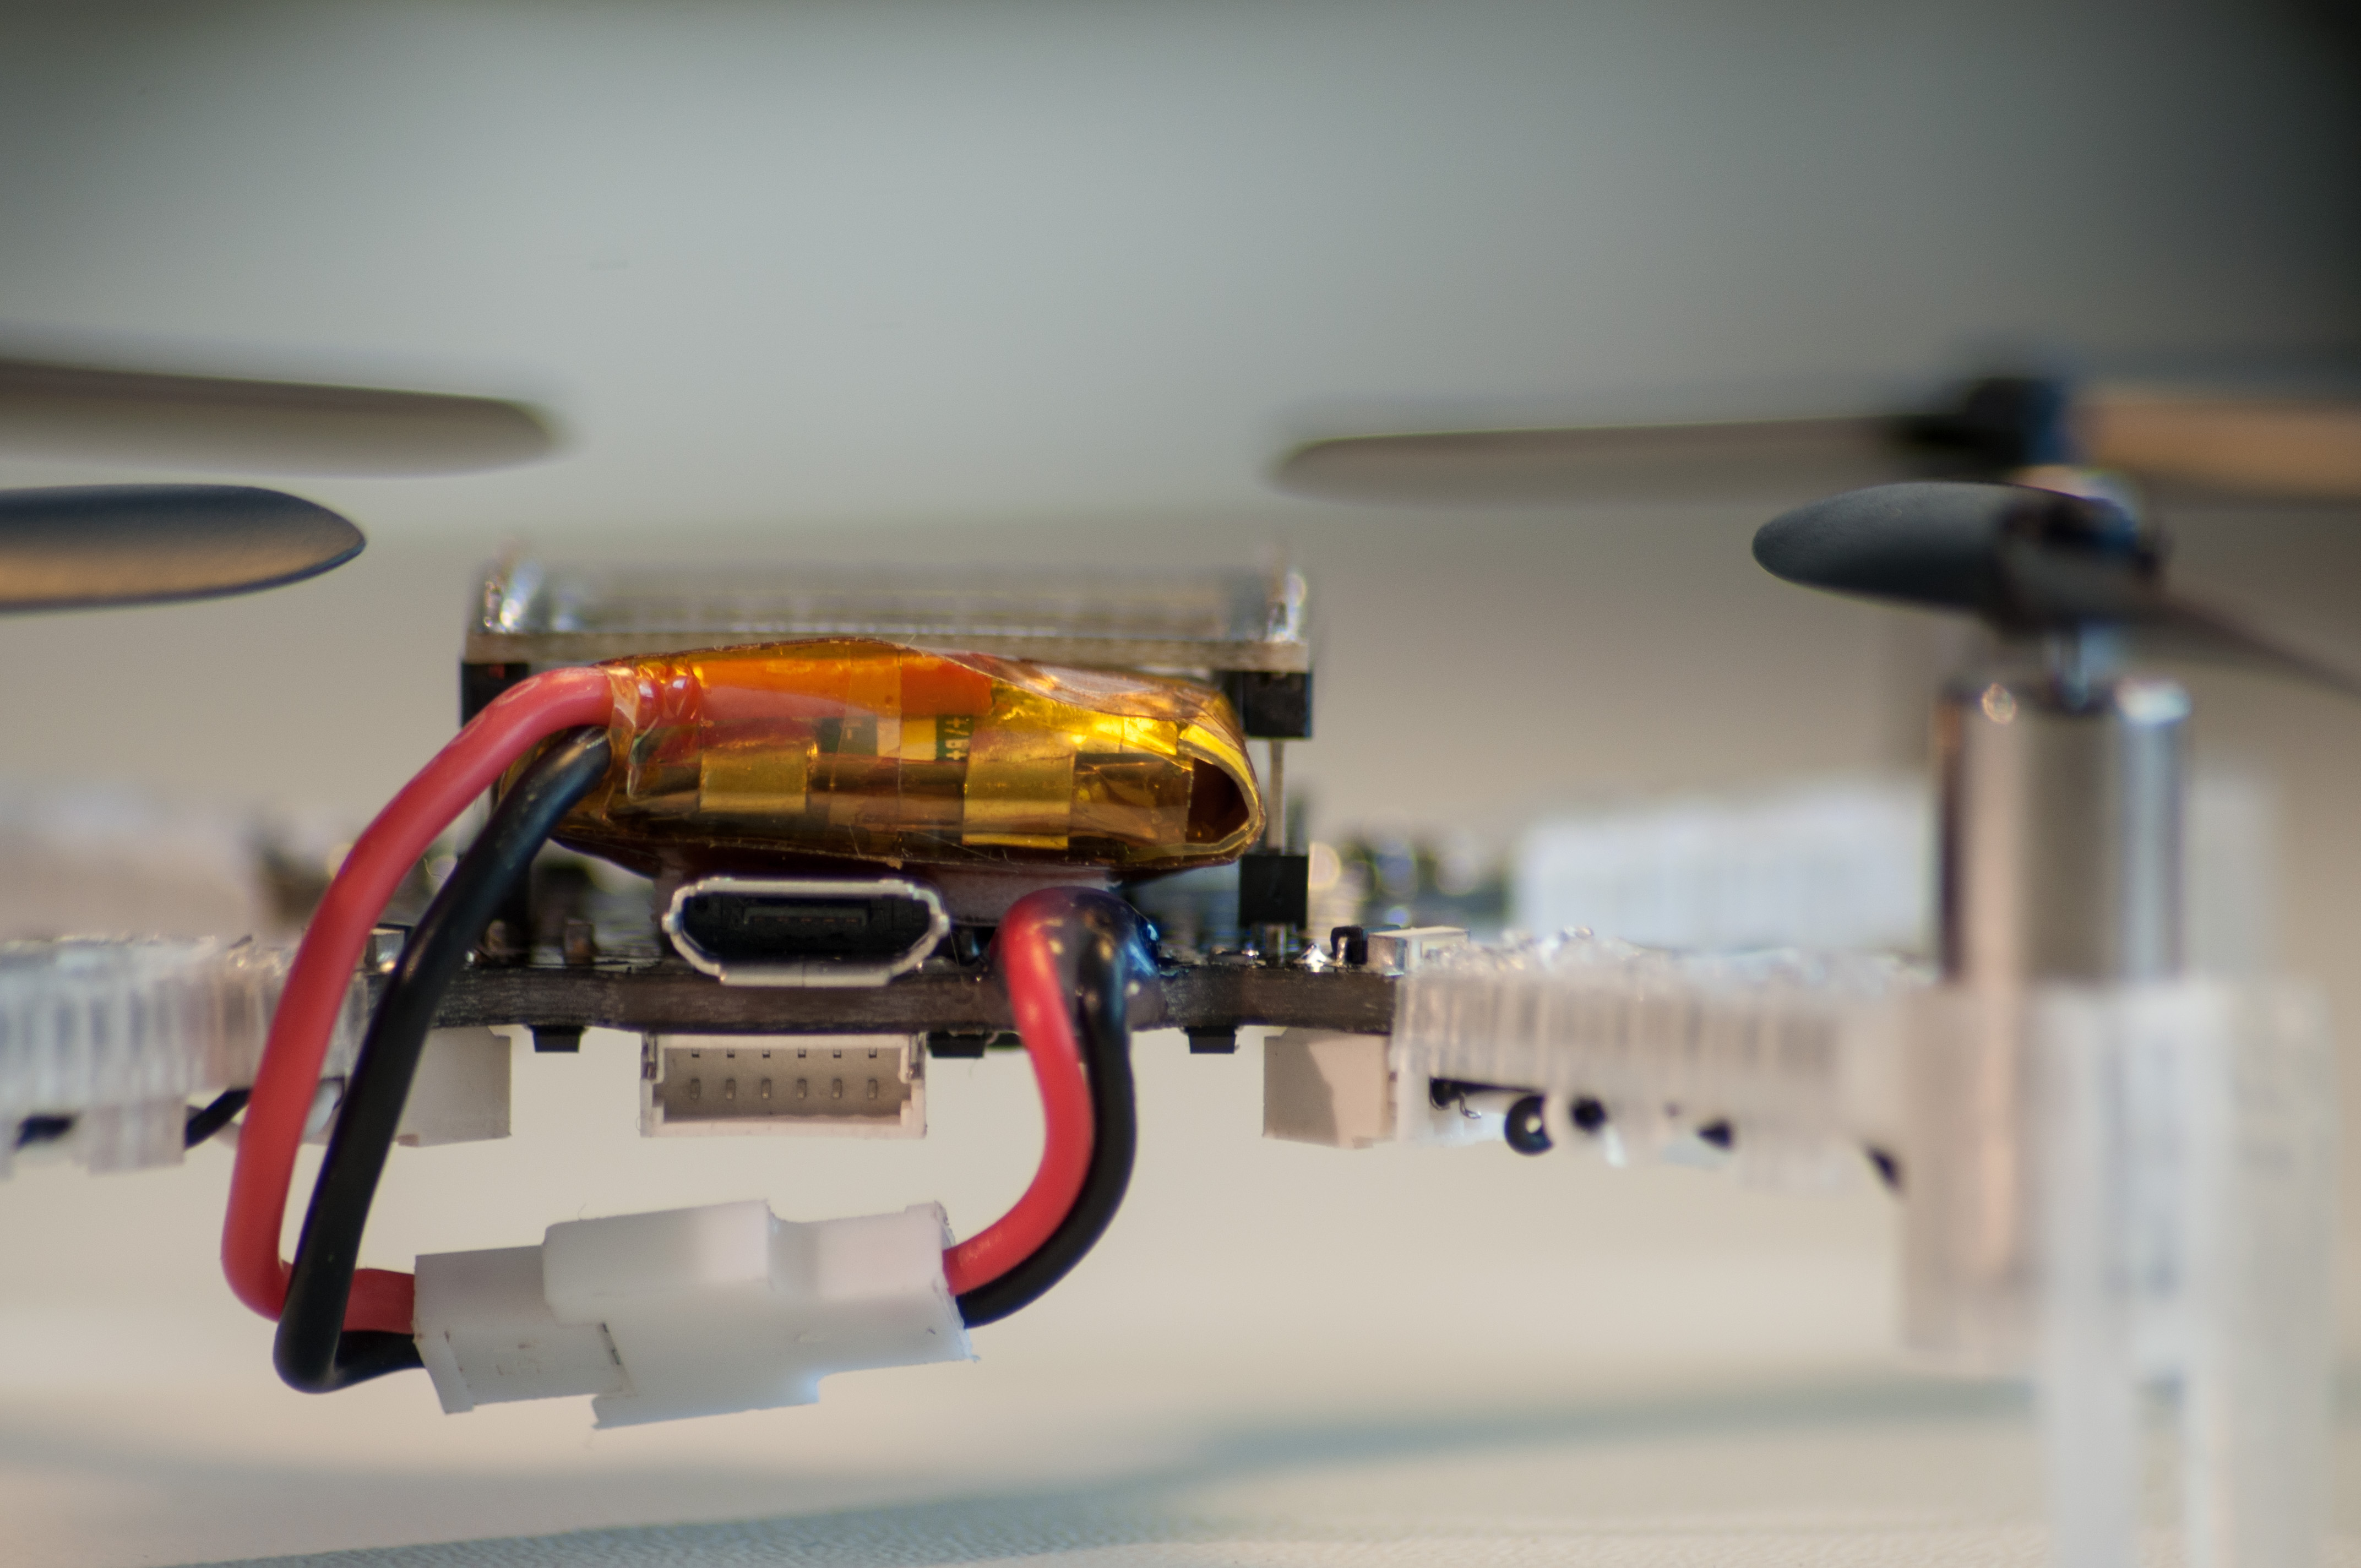
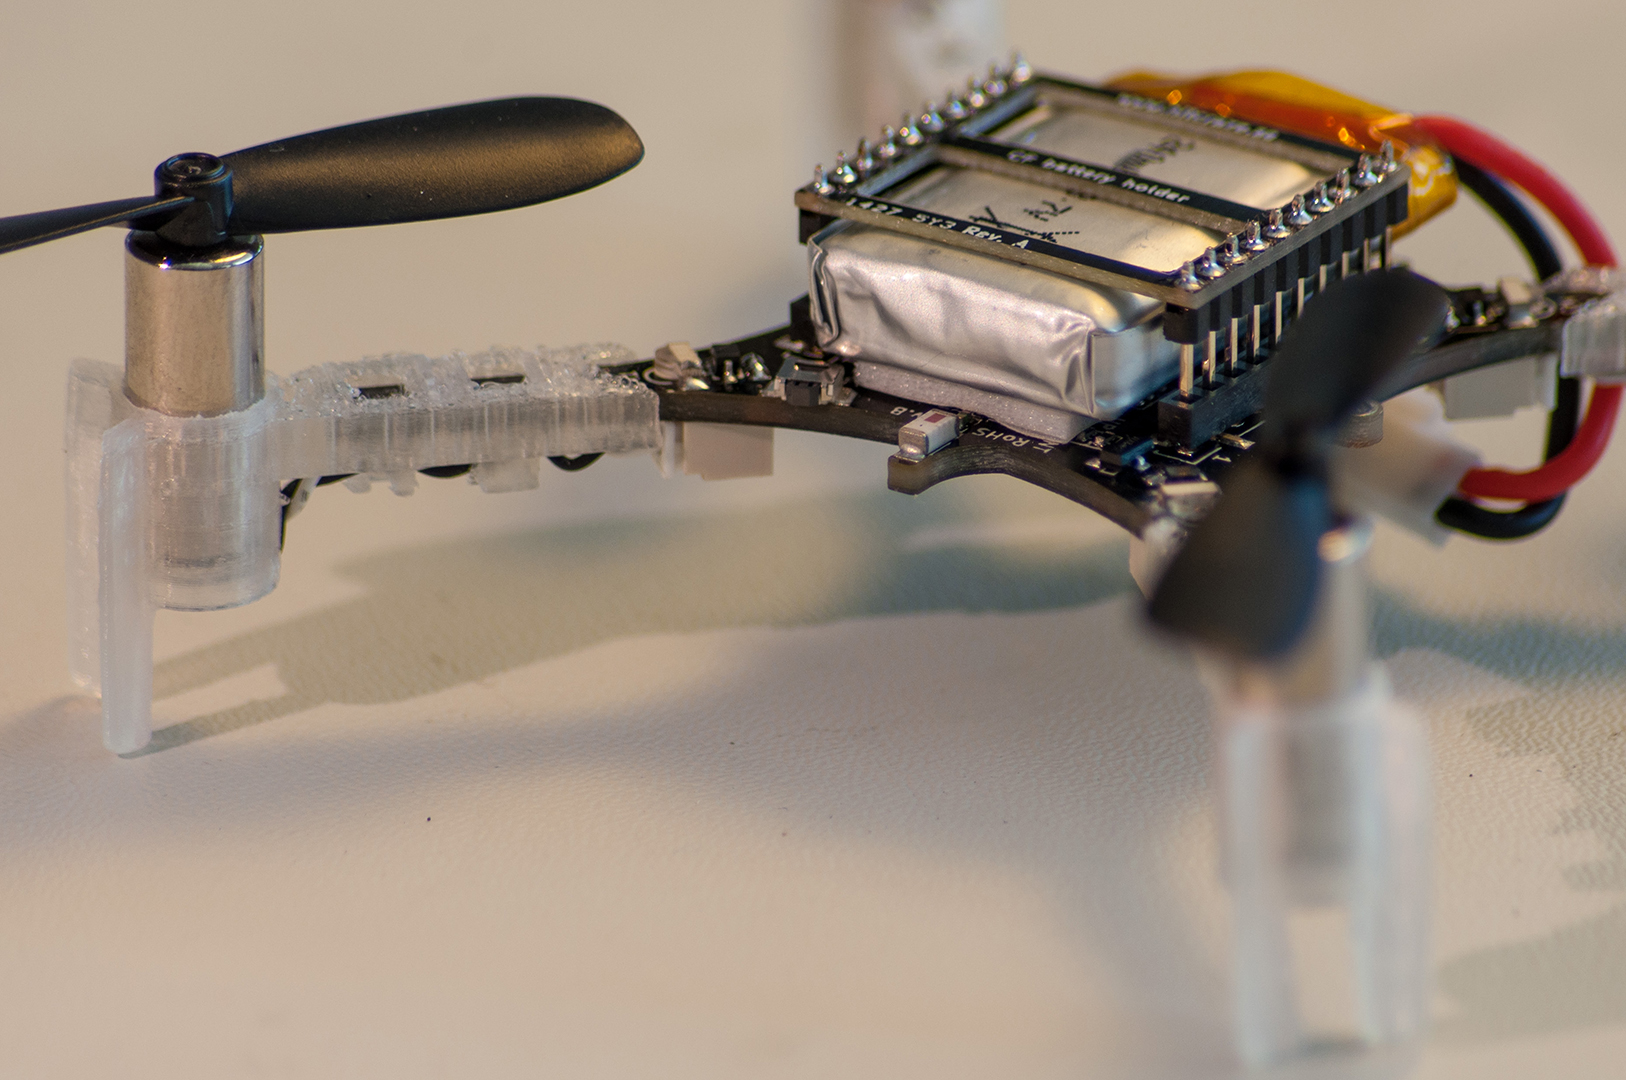
With the help of our new intern Mattias we finally got around to shooting a short video and taking photos of the Crazyflie 2.0 prototypes. We are really excited to finally show the new version and we are looking forward to getting some feedback from our readers. We are currently finalizing the design of the motor mounts, so for the video and photos we are using 3D printed prototypes printed in our Ultimaker. The design used in the photos is pretty close to the final design, which will also be transparent. The Crazyflies shown doesn’t have any expansion boards attached, instead there’s just a PCB that holds the battery.
This week we were planning on recording some FPV videos around the office with a new transmitter that gives us better range. But after battling with our USB capture device for a while we finally gave up. We will have to try to find a better one (that hopefully works in Linux!). But until then here’s two videos. First one from BBC is about the exciting future for flying robots (thanks to phenoptix for tipping us off to this one) and the second one is the recording from our presentation at Devoxx France a couple of months ago. The presentation is in French and you can pretty quickly guess who is the native French speaker and who is not :-)
It’s been a while since we summed up things happening in the community so here’s some of the things that are happening. There’s lots of more things, so if you think we are missing something, then post it in the comments below.
Ralph has been doing some work on an semi-automatic flip feature in the client. There’s more info on the forum and video below.
Last week we tested some modifications made by otto for a headfree mode (i.e yaw only rotates the platform, not the referance direction). It’s a really nice feeling just rotating without taking care of the direction you are going in :-) There’s more information and links to code on the forum.
The SHERPA project have been working on swarm algorithms using a vision system and the Crazyflie.
Geof from Centeye have been working on optical flow stabilization using the Crazyflie. He has a prototype board working and there’s lots of information in the forum about this build. To see the results have a look at the video below.
Thanks to Victor the Deviation firmware for Devo-7e (custom firmware for Devo RC-controllers) now has support for the Crazyflie (needs hardware hack). If you would like to give it a try have a look at the code or grab one of the nightlies.
Researchers at the University of Tokyo have been testing a new concept for a HoverBall using the Crazyflie. Imagine throwing a ball into the air that doesn’t come down (well not right away at least..). Here’s some more info and a picture.
We have also seen some nice stand alone controllers for the Crazyflie, one by MidLifeCrisis (more info here) and one by ivandevel (video below) . There’s also more info in the forum.
There also some updates on the work done by Oliver on the Kinect tracking of the Crazyflie. A demo video is shown below (it looks great!) and there’s more information on the forum.
And finally here’s a nice video we found on Youtube showing position control of the Crazyflie using a VICON system.
Continuing our post last week here’s a video showing the Adafruit NeoPixel ring and some of the effects that we did. The client code still needs some cleaning up, but the firmware is pushed here.
The firmware implementation includes two parameters, ring.neffect and ring.effect. The first parameter is used to know how many effects are implemented and the second one is used to set the index of the effect that should be used. For our current implementation we just loop though all the effects with either a joystick button or using the thumb together with the Leap Motion. It’s also possible to use these parameters directly from the UI as seen in this blog post.
Some of the effects we implemented are just blinking patterns, but we also wanted the ability to show feedback from the firmware using the ring. This has been enabled by adding an API in the firmware to access variables exposed though the logging framework. Using this API the firmware can access the same variables in the logging as the client. This enables all kinds of fun possibilities. In the video you can see (blurred) our implementation showing which direction the Crazyflie is tilting, but we have also been working on showing thrust (think rocket :-) ) as well as other things. We have done our best to implement a couple of effects, but there is so much more cool effects that could be done. So the firmware allows for custom effects and also for mixing multiple effects together (see this code).
A while ago we posted a tutorial on how to modify the firmware to add logging/parameters and to plot/modify them from the client. We have done a continuation on this tutorial to show how to modify the client to integrate logging and parameters directly into the UI (like we have done on the flight tab). For the tutorial we use our virtual machine to do the development and running the code. Since we continue on the concepts and design made in the first video, it might be a good idea to see that one first.
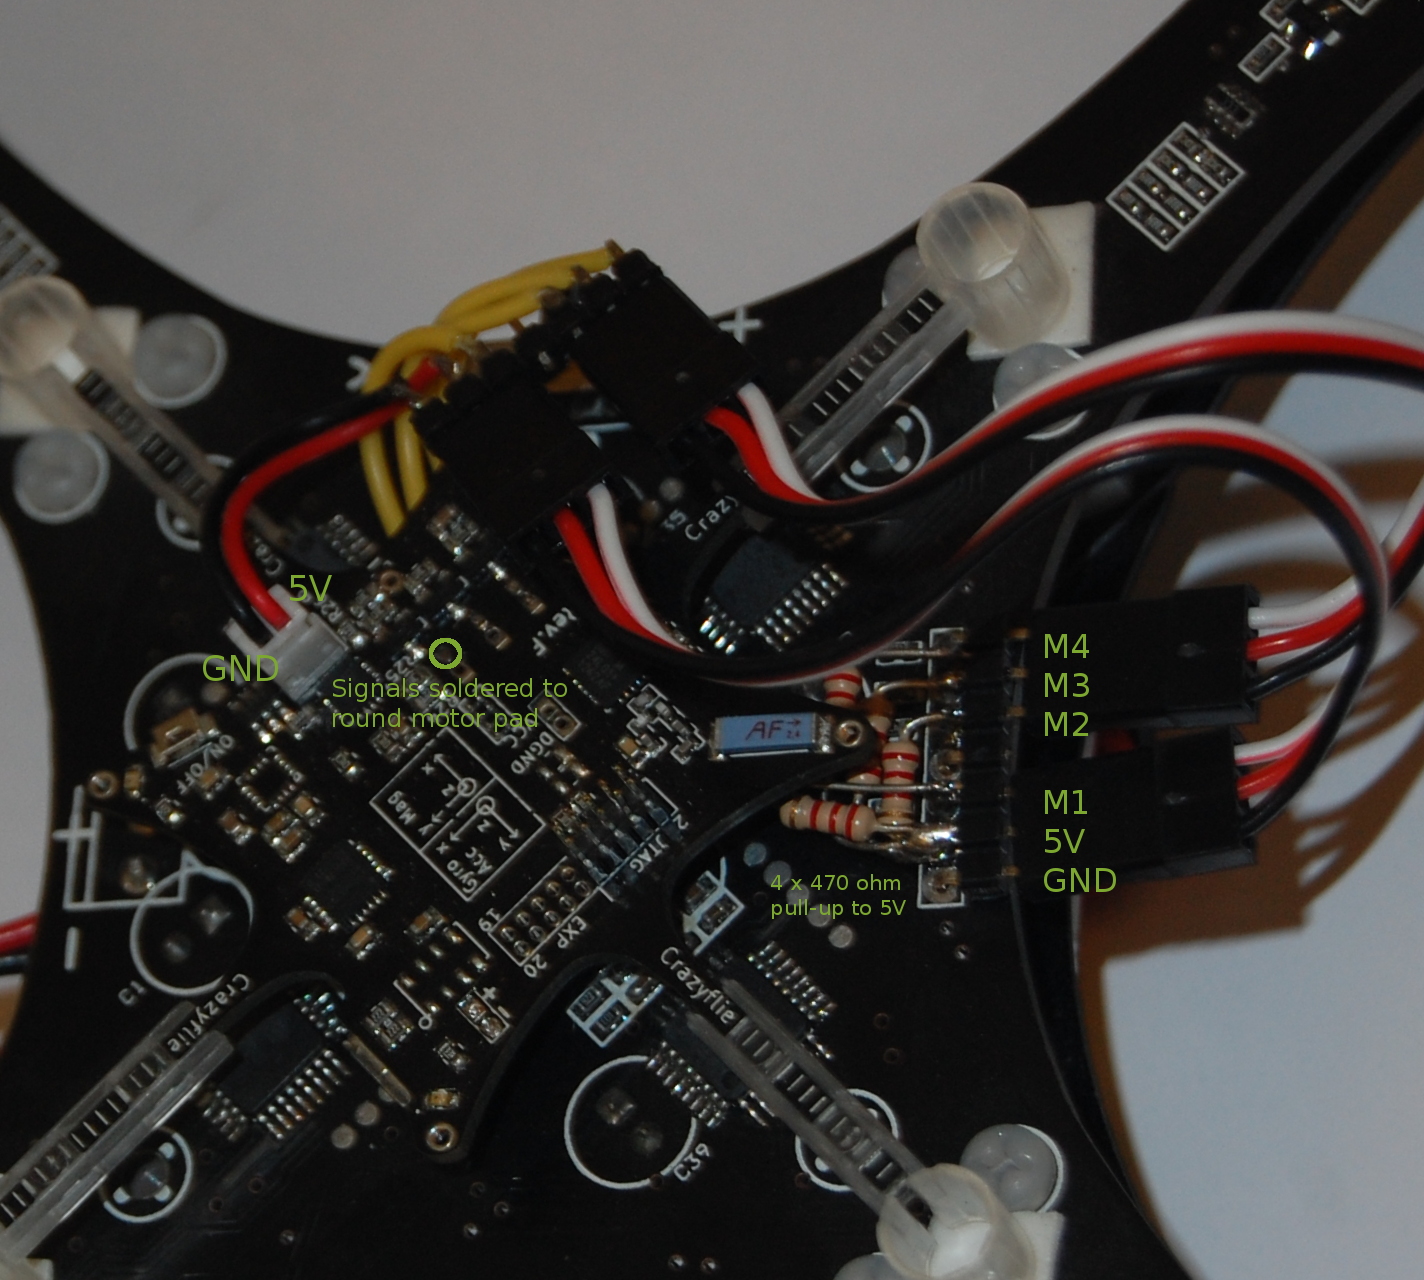
A while ago I started working on a brushless motor control driver for the Crazyflie. I implemented most of it but did not really have time to test it. Recently we have gotten some request and questions about it so we took some time to do some further testing.
Implementing a brushless motor control driver can be done in many ways. If you have brushlesss motor controllers that can be controlled over I2C that could have been one way but usually the brushless motor controller (BLMC) take a PWM input. This is most commonly a square wave with a period of 20ms and a pulse width of 1-2 ms high, were 1 ms is 0%, and 2 ms is 100%. A period of 20 ms means a frequency of 50Hz. This is most often a high enough update rate for R/C electronics like servos etc. but when it comes to BLMC that is not the case. Therefore many new BLMC can read a much higher update rate of up to 400 Hz were the pulse still is 1-2 ms high. That way you can match the BLMC input to the update rate of the stabilization control loop and increase stability. In the code we added a define BLMC_PERIOD where this can be set.
To test this we wanted a frame which was quick to setup and found this. It is based of a PCB just like the Crazyflie and has the four motor controllers with it, perfect! The built in BLMC are based on an the Atmel MCU Atmega8 which is very commonly used in the R/C BLMC which means it is possible to re-flash them with the SimonK firmware. This is know to be a great firmware and enables fast PWM update rate etc. So we built and flashed the firmware configured for the tgy6a which is compatible and it worked right away, yay!
Now we only had to connect the Crazyflie to the BLMC:s on the frame. The BLMC electrical interface for the PWM signal is often a 5V interface but the Crazyflie runs on 2.8V. 2.8V would in most cases be treated as an high input and can probably be used directly but there is no simple way to connect this signal on the Crazyflie. Instead one way is to use the existing motor connectors and the pull-down capability that is already there. Then it is also possible to pull this signal to 5V with a resistor to get a 5V interface so this is what we did. To power the Crazyflie we took the connector of an old battery and soldered it the 5V output of the frame.
Now it was just a matter of testing it! However as size increases so does the potential damage it can make. We therefore took some precaution and tied it down. First we tested the stability on each axis using the stock values and it worked really well so we decided to not tune it further. The only issue was that suddenly one of the BLMC mosfets burnt. We replaced it and it worked again but don’t know why it burnt. Later when we flew it something was still strange so we have to investigate this.
We will upload the code as soon as it has been cleaned up. Please enjoy a short video of the journey :)


