A big part of our work is to provide examples, getting-started guides and other documentation to get users started quickly. Documentation should be up-to-date, be understandable and detailed but, at the same time, not overwhelming. Examples should cover common applications and, most importantly, teach how to create your own projects. This is a never-ending task as our eco-system constantly evolves.
In recent weeks we have updated many parts of the AI-deck documentation and examples – this process is not finished (and will never be), but we thought giving you an overview about what we think most struggle with as well as what we updated would be interesting – especially as we see many AI-deck related questions in the discussions.
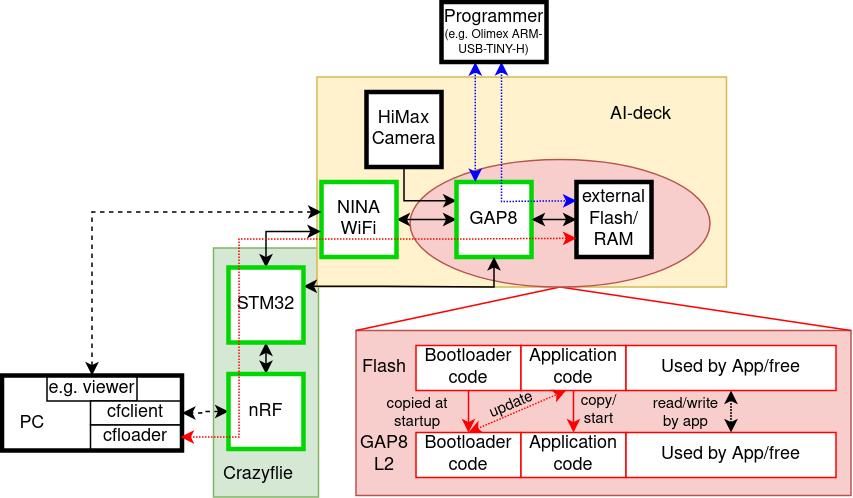
We saw that many struggle with understanding the whole communication chain and the importance to update all microcontrollers in it – so we will first give an overview on how everything is connected and then dive into where to find documentation, which examples already exist and how to get started with an own project on GAP8. Note that this post is centered around the GAP8; we do not go into detail about the NINA WiFi.
Here we go:
How does the AI-deck fit into the Crazyflie Eco-System? How does it communicate?
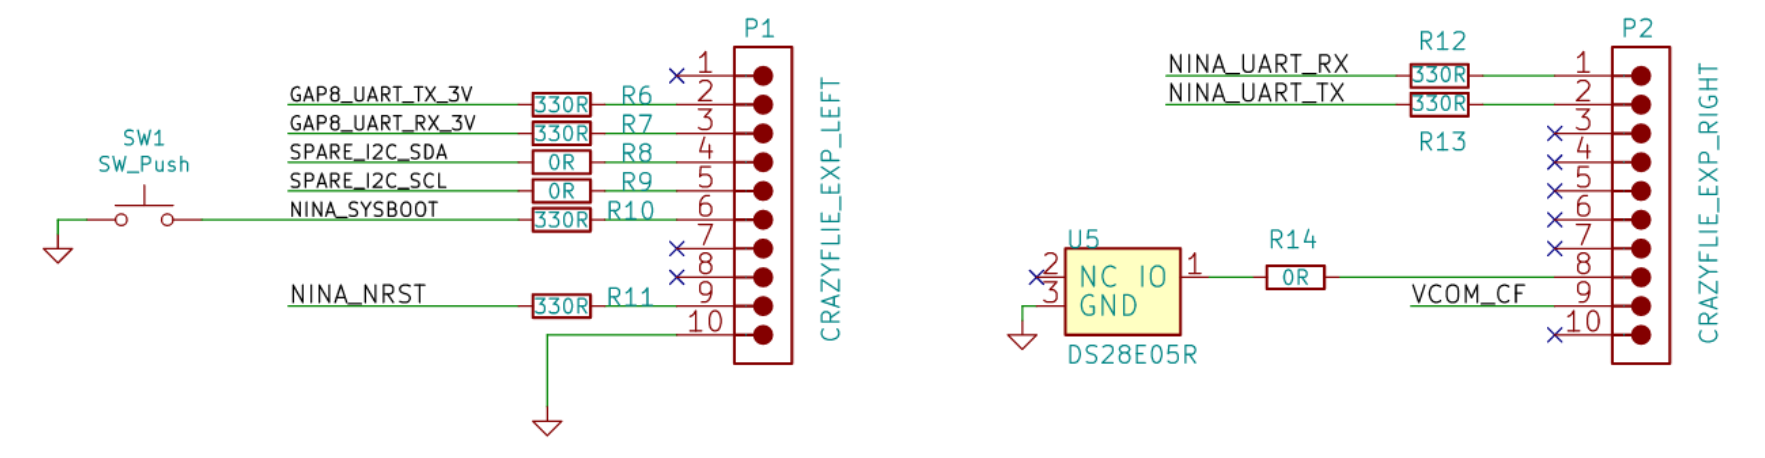
As with all other decks, the AI-deck is connected over expansion headers. It gets power directly from the battery (VCOM), and both microcontrollers (GAP8 and the NINA WiFi module) are connected to the STM32 via UART.
To send messages between all those microcontrollers, the CPX protocol was introduced. As the NINA and GAP8 are also connected (via SPI), we have redundant information paths – so per definition, we always route over the NINA.
Now how can we send code to the GAP8 for it to run?
GAP8 always executes code from L2 (second-level RAM), as it has no internal flash. However, it can load code into L2 over a HyperBus interface from external flash memory on startup (which it does if a fuse is blown, however this is already done on your AI-deck and out of scope here). As GAP8 has only volatile memory, it must always load code from exactly the same flash address. To make it possible to update applications easily, we implemented a bootloader, a minimal program which is the first thing to run on startup. The bootloader can either update the application code in flash or copy it into L2, and, if the code is valid, run it. Why is this easier? First, you don’t need to connect a programmer, as the bootloader can read data over other peripherals (in our case SPI from the NINA module). Second, it is safer – if the update fails (and you, for some reason, end up with random code where your application should be) the firmware code will not be valid (the hash computation will fail) and GAP8 will not jump to the corrupt application code but instead safely stay in the bootloader.
As the chain for the over-the-air update with the bootloader is rather complex, we illustrate the ways to flash GAP8 in the image below.
- the blue path illustrates how you can program over JTAG – you can either write code directly into L2 to run it (this is volatile memory, the code will disappear if you power cycle) or you can write it into flash (over GAP8), such that it is loaded on startup (if you overwrite the bootloader, not recommended) or with the bootloader.
- the red path is using the cfloader. Meaning it sends your code over the Crazyradio to the nRF, then further to the STM32, from there to the ESP32 (the NINA WiFi module) and from there to the GAP8. This path uses CPX messages; you can read more about it in the CPX documentation.
Where is the documentation?
We have tutorials as well as repository documentation. Tutorials guide you through all the steps needed to run a specific example, while the repository documentation aims to document the general infrastructure and examples in more detail (but without all not directly related steps such as flashing a bootloader, updating other firmware, etc.).
So when you use your AI-deck for the first time, you should start with the getting started guide.
Then you are most likely interested in a more detailed explanation about the used infrastructure, such as the GAP8 including the SDK, how to flash, which examples exist and how to run them, etc. So now you should check out the repository documentation.
As we are mostly speaking about GAP8 here, we should also mention that there is of course also documentation for it outside of Bitcraze. GAP8 is produced by Greenwaves, who provides references and has a public SDK on github – meaning one can actually look up the code for all drivers, look at open issues or even contribute with pull-requests.
Which examples exist? What are they there for? What did we update?
- Hello world (new) [Code][Documentation]
This example is there to get you started with your own applications – it provides a minimal implementation of how to send something to the cfclient console from the GAP8 and is explained in detail in the next section of this post.
The camera test is, as it says, to test the camera – however, it sends the image over JTAG, so if you don’t have a debugger and/or don’t want to overwrite the bootloader this is not an example for you.
- WiFi video streamer [Code][Documentation]
The most classic example – this example is used in the getting started guide and streams video over WiFi.
- Face detection example (updated) [Code][Documentation]
This example uses filters to find faces in images – be a bit careful, though, as it is very sensitive to noisy backgrounds and, for example, blonde hair. However, along with nice image processing examples, it now also implements the streaming of the images in configurable resolution, a fun feature we recently added!
- Classification demo (updated) [Code][Documentation]
The classification demo is our AI demo which recognizes parcels. Here we recently fixed the CPX initialization, so it can again send results to the console in the cfclient!
The send character over UART example was neither updated nor tested with the newest docker (yet).
How do I write my own code on gap8?
Now we’ll walk you through a minimal example of how to send Hello World from GAP9 to the cfclient console.
C Code
We start with the main file (which we called hello_world_gap8.c and is found here) by including some dependencies:
#include "pmsis.h" for the drivers
#include "bsp/bsp.h" for some configuration parameters (pad configurations for connecting to memory, camera, etc.)
#include "cpx.h" for using the CPX functions to send our hello world to the console
Then we have to write our main function:
int main(void)
{
  return pmsis_kickoff((void *)start_example);
}Code language: JavaScript (javascript)
We call pmsis_kickoff() to start the scheduler and an event kernel, giving it a pointer to the function we want to execute.
This function is what we write next (insert it above the main function, such that it is found in the code of the main).
void start_example(void)
{
  pi_bsp_init();
  cpxInit();

  while (1)
  {
      cpxPrintToConsole(LOG_TO_CRTP, "Hello World\n");
      pi_time_wait_us(1000*1000);
  }

}Code language: JavaScript (javascript)
First we need to initialize the pads according to our configuration (the configuration is automatically chosen with sourcing the ai_deck.sh, which is automatically done in the docker) with pi_bsp_init().
Then we need to initialize CPX (which initializes for example the SPI connection to the NINA WiFi), to be able to send CPX packets. You find more information in the CPX documentation.
Now we are ready for our while loop, in which we want to send “Hello World” to the console (called LOG_TO_CRTP). To not keep the busses overly busy we only want to send it every second, so we wait before we repeat.
Makefile
The Makefile is hierarchical – meaning we have hidden files that do most of the work and need to include $(RULES_DIR)/pmsis_rules.mk in the last line of the Makefile.
We start with defining where the io should go – possibly are host or uart (this is actually not used in this example, but if you’d add a printf, this would define where it goes).
Then we define the operating system we want to use – we can use pulpos or freertos. We chose this as freertos is way more advanced (we are paying for this with some overhead, but in most cases, it will be worth it).
io=uart
PMSIS_OS = freertos
In the next step we need to set the name of our application (this defines the file names of the build output), include the sources (meaning our main c file as well as the two c files CPX needs) and include the header files directory (header files in the same directory as the Makefile should automatically found, but our CPX header files are in a library directory). Make sure all the relative paths are correct for your folder structure.
APP = hello_world_gap8
APP_SRCS += hello_world_gap8.c ../../../lib/cpx/src/com.c ../../../lib/cpx/src/cpx.c
APP_INC=../../../lib/cpx/inc
As a last step, we want to set some compiler flags. Firstly, we want to compile optimized, so we add -O3. Then we add -g to embed debug information.
As we use timers for CPX we also need to add two additional defines to ensure all functions we need are included: the configUSE_TIMERS=1 and the INCLUDE_xTimerPendFunctionCall=1 defines.
APP_CFLAGS += -O3 -g
APP_CFLAGS += -DconfigUSE_TIMERS=1 -DINCLUDE_xTimerPendFunctionCall=1
Compile and Flash
For this section we assume you are in the ai-deck-examples directory.
Now we want to compile using docker:
docker run --rm -v ${PWD}:/module --privileged bitcraze/aideck tools/build/make-example SRC_DIR clean allCode language: JavaScript (javascript)Where SRC_DIR is the location of your code, here it is examples/other/hello_world_gap8.
Note: You don’t always need to “clean” if you don’t modify the Makefile. It should be fine to save some time by skipping this.
And finally we want to flash using the OTA updater:
cfloader flash [binary] deck-bcAI:gap8-fw -w CRAZYFLIE_URICode language: CSS (css)Where in this example, [binary] has to be replaced with examples/other/hello_world_gap8/BUILD/GAP8_V2/GCC_RISCV_FREERTOS/target.board.devices.flash.img, and the CRAZYFLIE_URI is something like radio://0/80/2M/E7E7E7E7E7.
Now you can connect to your drone with the cfclient and should see a CPX: GAP8: Hello World print every second.
Note: The LED will not blink as in most other examples, as we did not implement a task which does this.
We hope this blog post helps you get started with your own awesome applications faster!
At least one link in post is wrong.
Camera test link for code points to hello world example.
I failed to find repo with this post to make PR.
Is there separate repo for blogposts?
Ah no this part of the website is based on wordpress! But I’ll change it for you.
thanks for notifying us!