A couple of weeks ago, I was visiting 34C3, the Chaos Communication Congress, with Fred. The trip was not ‘official’ business for Bitcraze but more of a personal interest, the Congress is a great place to be and I hope to be able to go next year. While there, we found out that Foosel was there too, she is the developer and maintainer of the Octoprint project (Our 3D printer would be much less useful without Octoprint …). It was awesome to finally meet her in real life, she has been in the Crazyflie comunity since the beginning and we have never been able to meet even though we did a couple of maker faire in Germany.
Meeting the community in person is always awesome, this is one of the best part of going to conferences.
At the end of the month we will be at FOSDEM in Belgium, Fred will be there too, he is planning to demo Crazyflie at the Eclipse booth. If anyone else is coming please let us know, we can improvise a Crazyflie meetup there.
Later in the year, in good Bitcraze style, we have not planned anything yet. Last year we went to ICRA which was a very good experience and we might be leaning for IROS this year. Let us know if there is any conference at which you would like to meet us and we will consider going.
It is now the first day in 2018 and a good day to look back at 2017. Its been a busy year as always and we have had a lot of fun during the year. One of the first things popping up is that things takes so much longer then we think. Luckily we are working with open source and the progression is not only dependent on us as we have awesome help from the community. We are already really excited about what’s coming in 2018, looking forward to working together with so many great people!
Community
The Crazyflie 2.0 is still gaining attention and are becoming more and more popular among universities around the world. We see interest from researchers working with autonomous systems, control theory, multi-agent systems, swarm flight, robotics and all kinds of research fields, which is really great. This means that a lot of exciting work have been contributed by the community, so here is a small summary of what has happened in the community during the year.
In the beginning of the year the Multi-Agent Autonomous Systems Lab at Intel Labs shared how the Crazyflie 2.0 is used in their research for trajectory planning in cluttered environments. We wrote a blog post about this if you want learn more about their work. The Crazyflie showed up on the catwalk of Berlin Fashion week being part of fashion designer Maartje Dijkstras futuristic creation TranSwarm Entities”, a dress made out of 3D prints accompanied by autonomously flying Crazyflies.
For the third year Bitcraze visited Fosdem. We had a good time and got to hang out with community members like Fred how did a great presentation about what’s new in the Crazyflie galaxy. During the conference we took the opportunity to present the Loco positioning system and demo autonomous flight with the Crazyflie controlled by the Loco positioning system. In the demo we flew with the non-linear controller from Mike Hammer using trajectory generation from Marcus Greiff.
We have had a few interesting blog post contributions during the year from major universities. Including a guest post written by researchers at Carnegie Mellon University. The researchers are using the Crazyflie 2.0 drone to create an adaptive multi-robot system. Similar work has been done by the researchers at the Computer Science and Artificial Intelligence Lab at MIT were they have been studying coordination of multiple robots, developing multi-robot path planning for a swarm of robots that can both fly and drive.
We have also had two interesting guest blog post from the GRASP Laboratory at University of Pennsylvania, the “A Flying Gripper based on Modular Robots” and “ModQuad – Self-Assemble Flying Structures“. Inspired by swarm behavior in nature, for instance how ants solve collective tasks, both projects explore the possibilities of how multiple Crazyflies can work together to perform different missions.
During the fall Fred took the time to pay us a visit at the office in Sweden and worked together with us. He is making great progress on the Java Crazyflie lib that is going to be used in the Android client as well as in PC clients. It will allow to connect and use a Crazyflie from any Java program, there has already been some successful experimentation done using it from Processing.
Some other great news is that thanks to Sean Kelly the Crazyflie 2.0 is now officially supported by the Betaflight flight controller firmware. Betaflight is a flight controller firmware used a lot in the FPV and drone racing community.
Finally The Crazyswarm project, by Wolfgang Hoenig and James A. Preiss from USC ACTlab has been presented at ICRA 2017. It is a framework that allows to fly swarms of Crazyflie 2.0 using a motion capture system. There is currently some work done on merging the Crazyswarm project into the Crazyflie master branch, this will make it even easier to fly a swarm of Crazyflie. In the meantime the project is well documented and can be used by anyone that has a couple of Crazyflies and a motion capture system.
Hardware
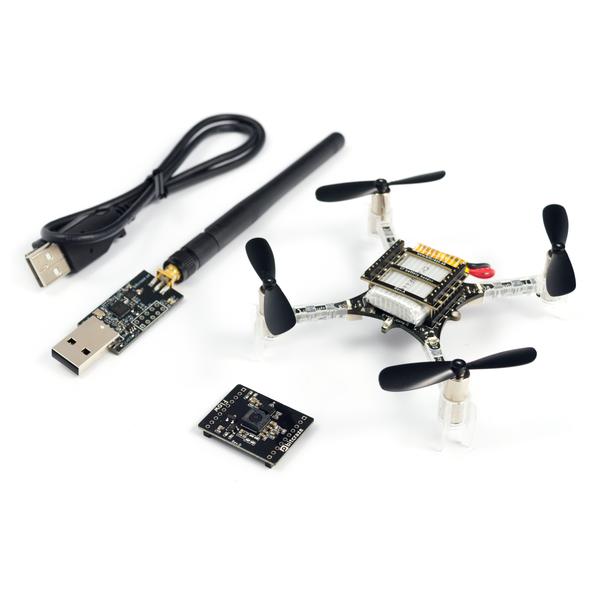
During 2017 we released four new products. Beginning with the Micro SD-card deck which e.g. makes high speed logging possible. Then the Z-ranger that enables a height hold flight mode up to 1m above ground. We like to call it drone surfing as that is very much what it feels like when flying. We ended by releasing two boards, Flow deck and Flow breakout, in collaboration with Pixart containing their new PMW3901 optical flow sensor. The Flow deck enables scriptable flight which is very exiting. That lead us to release the STEM drone bundle which we hope will inspire people to learn more about flying robotics.
Hardware prototypes, our favorite sub-category, are something we have plenty of lying around here at the office. To name a few, a possible Crazyradio 2, the Loco positioning tag, the Crazyflie RZR, the Glow deck or Obstacle avoidance/SLAM deck. It takes a long time making a finished product… Hopefully we will see more of these during 2018!
Software
At the same time we released the Flow deck we also released the latest official Crazyflie 2.0 FW and client (2017.06). This enables autonomous capabilities as soon as the Flow deck is inserted by automatically turning on the corresponding functionality. Just before that, the loco positioning was brought out of early access with improved documentation and simplified setup. Since then a lot of work has been put into making a release of TDoA and improving overall easy of use. With the TDoA2 and automatic anchor estimation starting to work pretty well we should not be far from a new official release!
We would like to end 2017 with a big thank you to our users and community with this compilation video. Make sure to pump up the volume!
This year we decided to celebrate the holiday by painting a Christmas tree, rather than dressing one like last year. What better way to do this that with the flow deck, a LED-ring and a long exposure photo. To check out all the yummy details and how to DIY check out this hackster project we made. Also as an Christmas extra we made this light painting video with the LED-ring mounted on top of the Crazyflie 2.0 and a bit of video editing. To be able to mount the LED-ring on top we hacked together an inverting deck. Not a bad idea and something we aim to release in the future!
Getting started
For those of you that was lucky and got a Crazyflie 2.0 under the Christmas tree, here is a short intro to get you started.
When you are comfortable flying the Crazyflie you might feel that it is time for the next step, to make use of the flexibility of the platform. After all it is designed to be modified!
Check out the “Getting started with development” tutorial to set up your development environment, build your first custom firmware and download it to the copter.
Maybe you want to add a sensor or some other hardware? Heat up your soldering iron and dive in to it! Find more information about the expansion bus on the wiki. The wiki is the place to look for all product and project documentation.
All source code is hosted on github.com/bitcraze and this is also where you will find documentation related to each repository.
Open source is about sharing, creating something awesome together and contribute to the greater good! Whenever you do something that you think someone else could benefit from, please contribute it! If you were curious or confused about something, someone else probably will too. Help them by sharing your thoughts, insights and discoveries.
Can not find the solution to a problem? Don’t understand how or what to do? Have you read all documentation and are still confused? Don’t worry, head over to the forum and check if someone else had the same problem. If not, ask a new question on the forum and get help from the community.
We’ve been seeing an increase in the demand for a “programmable drone”, where users can easily give simple commands though scripting and the Crazyflie 2.0 following them. In order for this to work well you need a closed-loop control, i.e you need a reference system to see how you’re moving. Previously this was only possible using external camera systems or bulky on-board cameras. But a while ago we released the Flow deck which solves this problem. Thanks to the mouse-like sensor the deck contains it enables the Crazyflie 2.0 to see how it’s moving along the floor. Suddenly it’s possible to give commands like “move 1 m forward” or “fly in a clock wise circle with the radius of 1 m”.
To make it easier for users to pick out the parts needed we’ve put together a discounted STEM drone bundle. It contains all the parts needed for scripting the flight. If you have a gamed-pad or a Bluetooth LE enabled phone you can of course fly it manually as well :-)
The Loco Positioning System (LPS) default working mode is currently Two Way Ranging (TWR), it is a location mode that has the advantage of being pretty easy to implement and gives good positioning performance for most use cases and anchor setups. This was a very good reason for us to start with it. Though, TWR only supports positioning and flying of one or maybe a couple of Crazyflies, while it is not a solution to fly a swarm.
One solution to fly a swarm is an algorithm called Time Difference of Arrival (TDoA). We have had a prototype implementation for a while but we experienced problems with outliers, most of them where due to the fact that we where loosing a lot of packets and thus using bad data.
To solve these issues, TDoA2 makes two changes:
Each packet has a sequence number and each timestamps is associated with the sequence number of the packet it has been created from
The distances between anchors are calculated and transmitted by the anchors
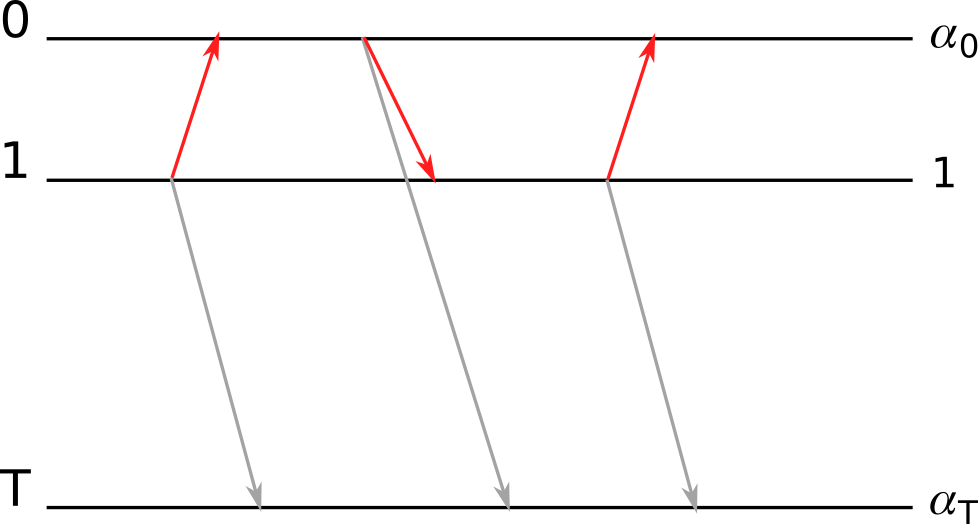
A slightly simplified explanation follows to outline why this helps (a more detailed explanation of how TDoA works is available in the wiki).
We start by assuming that all timestamps are available to the tag, this is done by transmitting them in the packets from the anchors to the copter.
The end goal is to calculate the difference of time of arrival between two packets from two different anchors. Assuming we have the transmission time of the packets in the same clock, all we need to do is to subtract the time between the two transmissions with the time between the two receptions:
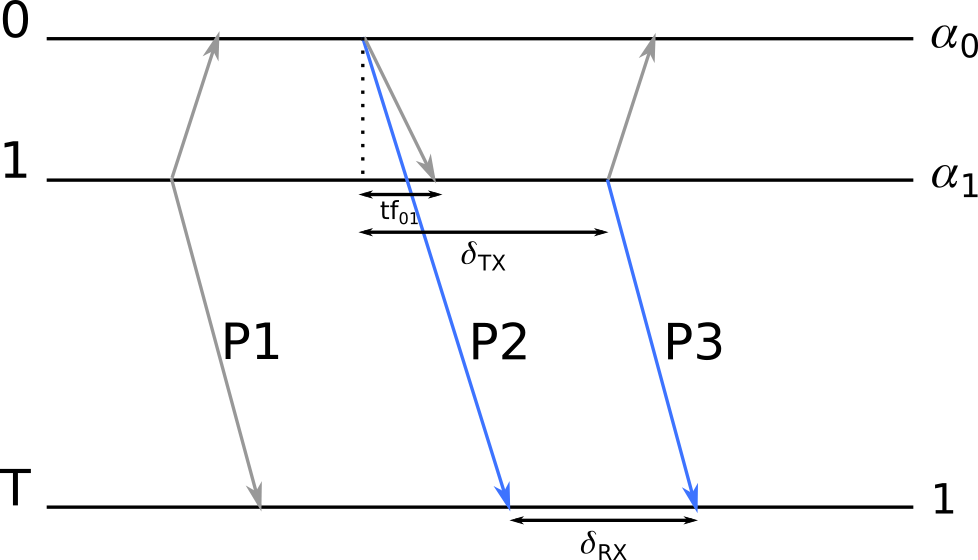
0 – anchor 0, 1 – anchor 1, T – Tag (that is the LPS deck on the Crazyflie)
To do so we need to have the time it took for the packet to travel between the two anchors, this will enable us to calculate the transmit time of P2 in anchor 1, this can be done by calculating the TWR time of flight between the two anchors, this would require the tag to receive 3 packets in sequence:
So now for the part where TDoA2 helps: previously we had to have the 3 packets in sequence in order to calculate a TDoA, if any one of these where missing the measurement would fail or worse, it could give the wrong result. Since we did not have sequence numbers, it was hard to detect packet loss. Now that we have sequence numbers, we can understand when a packet is missing and discard the faulty data. We also do not have to calculate the distance between anchors in the tag anymore, it is calculated by the anchors themselves. This means that we can calculate a TDoA with only two consecutive packets which increases the probability of a successful calculation substantially.
To reduce packet loss even more, we have also added functionality to automatically reduce the transmission power of the NRF radio (the one talking to the Crazyradio dongle) when the LPS deck is detected. It has turned out that the NRF radio transmissions are interfering with UWB radio reception, and since most indoor use cases does not require full output power we figured that this was a good trade-off.
The results we have seen with the new protocol is quite impressive: TDoA is usually very sensitive to the tag being inside the convex hull, so much so that with the first TDoA protocol we had to start the Crazyflie from about 30cm up to be well within the convex hull. This is not required anymore and the position is still good enough to fly even a bit outside of the convex hull. The outliers are also greatly reduced which makes this new TDoA mode behave very close to the current TWR mode, but with the capability to locate as many Crazyflies as you want:
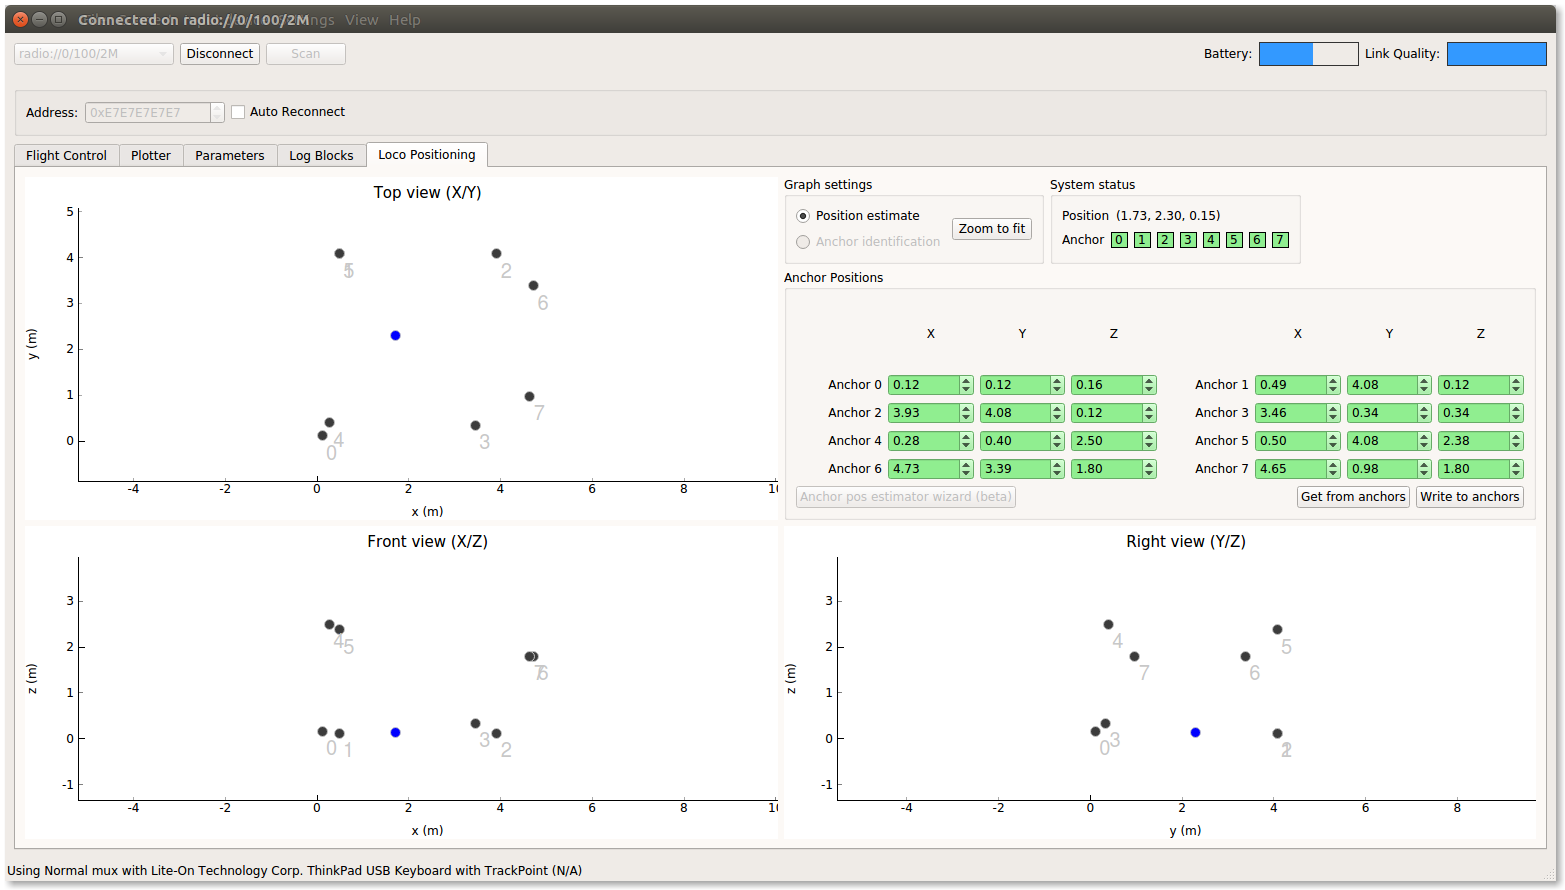
Added to that, we have also implemented anchor position handling in the TDoA2 protocol and this means that it is now as easy to setup a system with TDoA2 as with TWR:
We are now working on finishing the last functionality, like switching between algorithms (TWR and TDoA) and on writing a “getting started guide”. When that is done TDoA will become an official mode for the LPS.
In the mean time, if you are adventurous, you can try it yourself. It has been pushed in the master branch of the Crazyflie firmware and the LPS node firmware. You should re-flash the Crazyflie firmware, both STM32 and nRF51, from master and the anchors from master too.
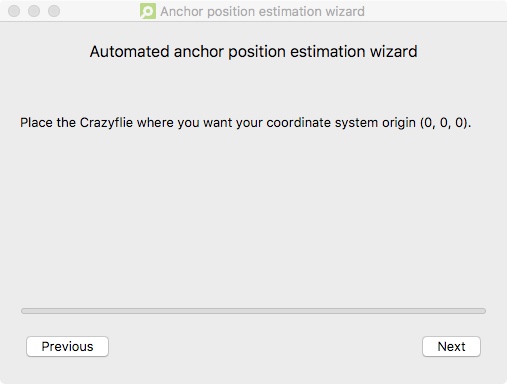
As I wrote about in a previous blog post, I have been working on an anchor position estimation algorithm in the Crazyflie Client. The algoritm uses ranging data from the Loco Positioning system to estimate where the anchors are located, and thus remove the need to measure their positions in the room. I have finally reached a point where I think it is good enough to let it out from the lab and it has been pushed to the client repository.
A button has been added to the Loco Positioning tab that opens a wizard. In the wizard the user is asked to place the Crazyflie in certain positions to record ranges and define the coordinate system. If all goes well, the estimated anchor positions are transfered to the anchor position fields in the Loco Positioning tab. If the user is happy with the result the next step is to write the positions to the anchors and start flying!
Now to the disclaimer: the results may not always be perfect – surprise! We have not tested the algorithm a lot but it seems to give decent results, at least it can be useful as a base for manual corrections and sanity checks. Some of the estimated positions are pretty good, while others might be a meter or so off. The conclusion is that you should not trust it blindly, check that the estimated positions seem reasonable before flying.
Currently the system only supports Two way ranging, but extending it to TDoA should not be too complicated. There are probably many possible improvements that can be done, and we hope that everyone that finds this interesting and have ideas of how to do it will give it a go. After all, it is open source and we would love to see contributions refining the functionality, now that there is a base to build from.
Any feed back is welcome, let us know if it works or not in your setup!
Modular robots can adapt and offer solutions in emergency scenarios, but self-assembling on the ground is a slow process. What about self-assembling in midair?
In one of our recent work in GRASP Laboratory at University of Pennsylvania, we introduce ModQuad, a novel flying modular robotic structure that is able to self-assemble in midair and cooperatively fly. This work is directed by Professor Vijay Kumar and Professor Mark Yim. We are focused on developing bio-inspired techniques for Flying Modular Robots. Our main interest is to develop algorithms and controllers for self-assembling modular robots that can dock in midair.
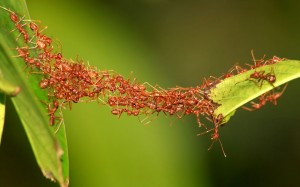
In biological systems such as ant or bee colonies, collective effort can solve problems not efficient with individuals such as exploring, transporting food and building massive structures. Some ant species are able to build living bridges by clinging to one another and span the gaps in the foraging trail. This capability allows them to rapidly connect disjoint areas in order to transport food and resources to their colonies. Recent works in robotics have been focusing on using swarm behaviors to solve collective tasks such as construction and transportation.Docking modules in midair offers an advantage in terms of speed during the assembly process. For example, in a building on fire, the individual modules can rapidly navigate from a base-station to the target through cluttered environments. Then, they can assemble bridges or platforms near windows in the building to offer alternative exits to save lives.
ModQuad Design
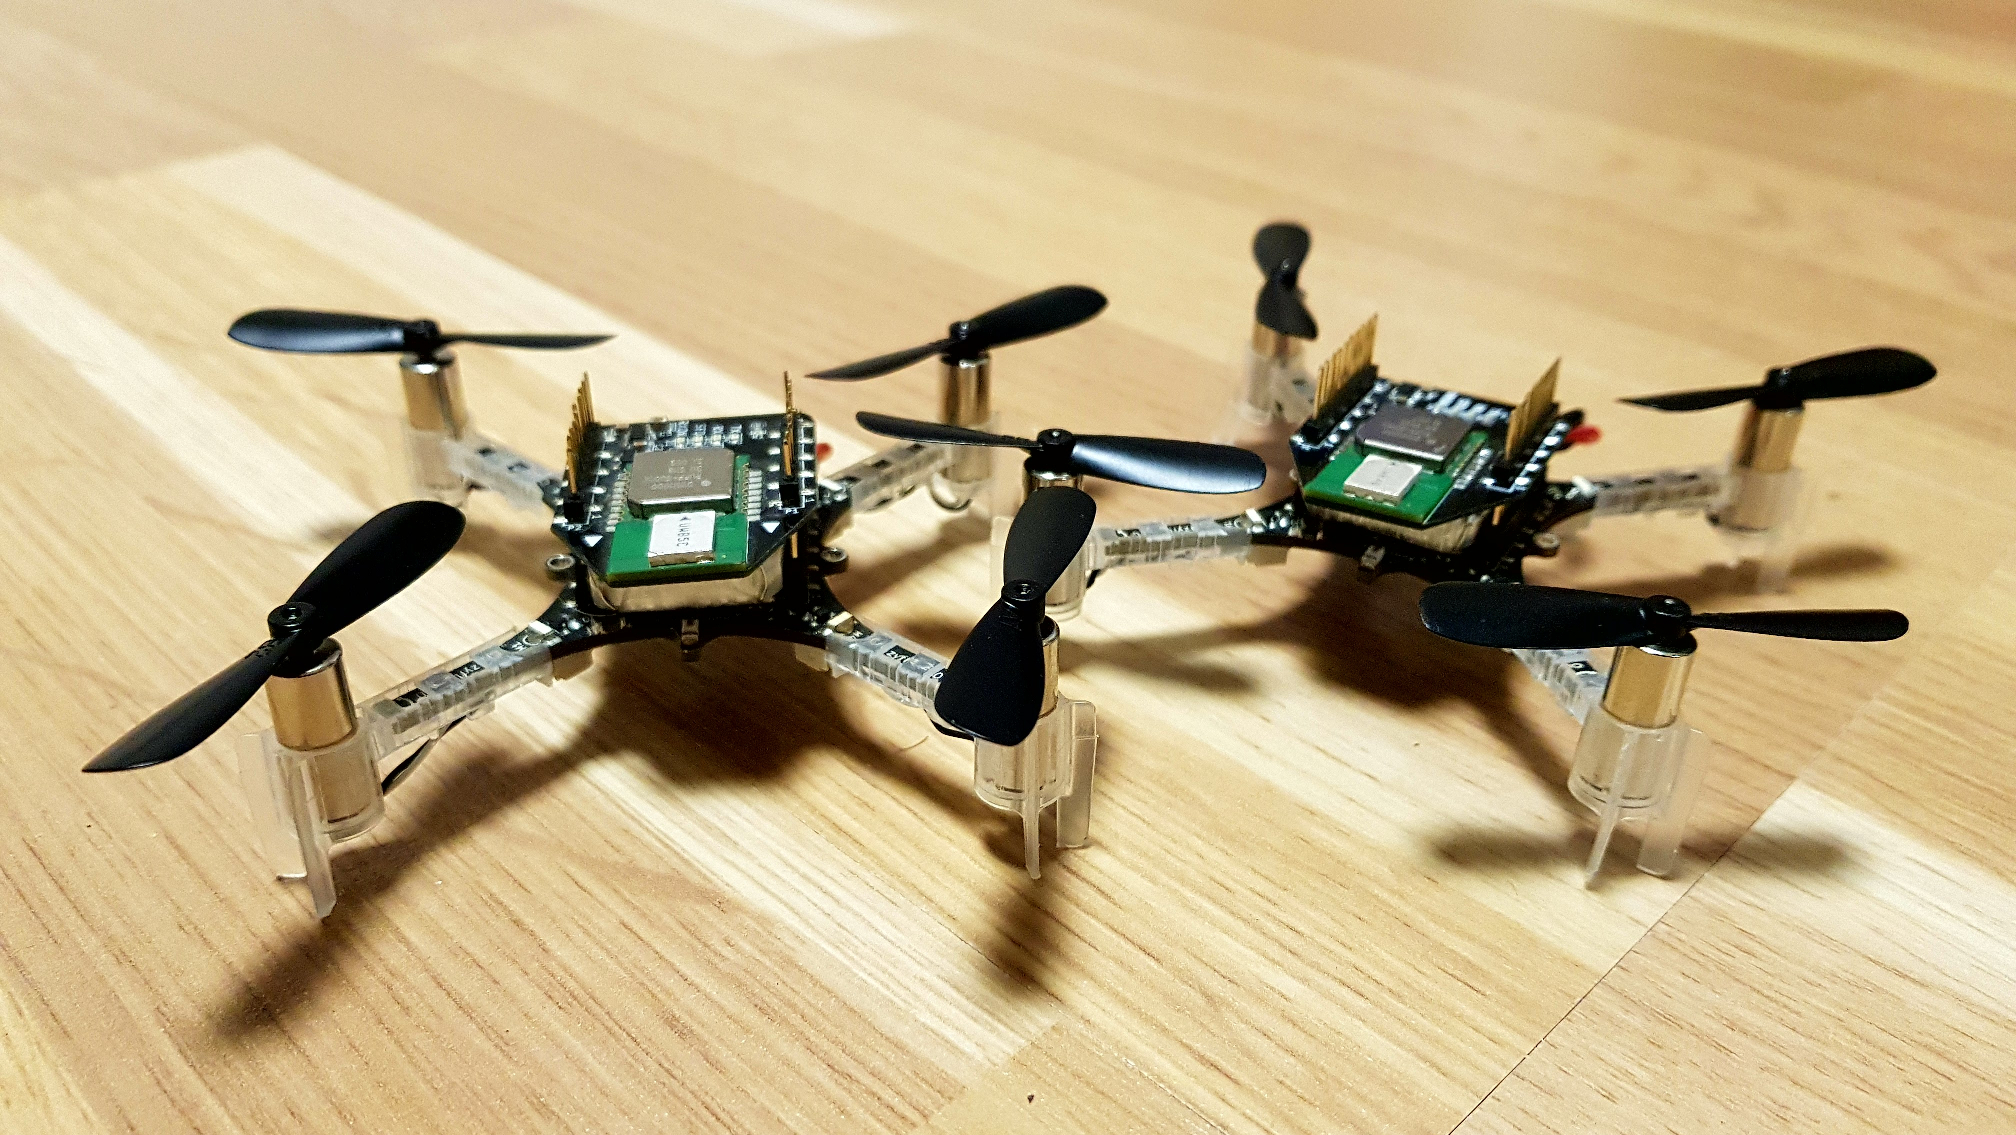
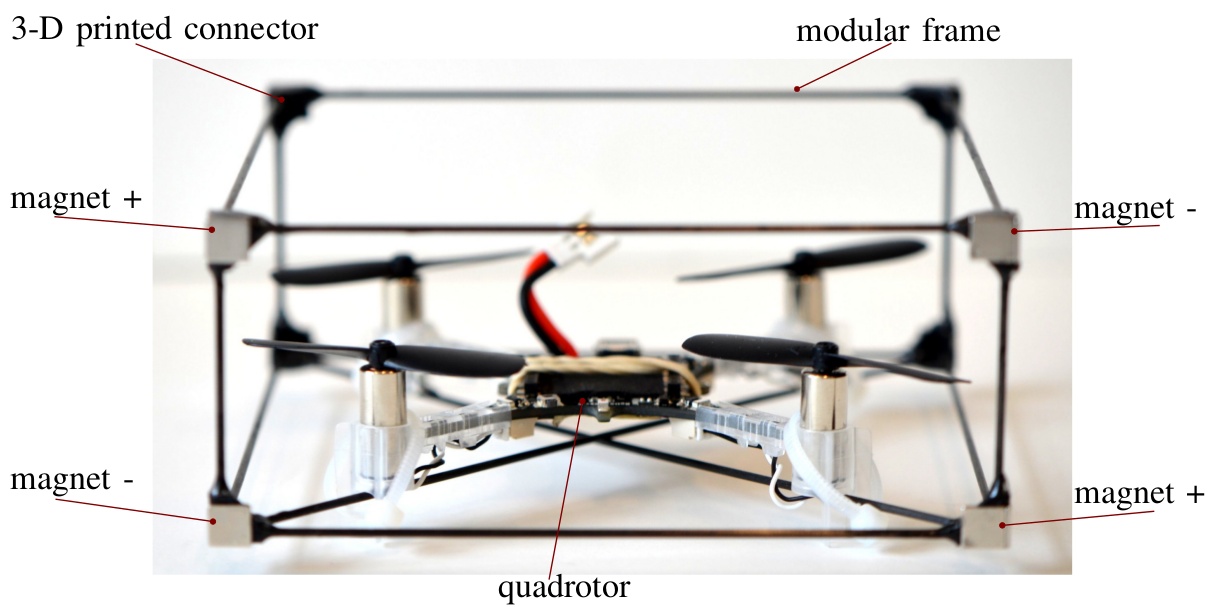
The ModQuad is propelled by a quadrotor platform. We use the Crazyflie 2.0. The vehicle was chosen because of its agility and scalability. The low-cost and total payload gives us an acceptable scenario for a large number of modules.
Very light-weight carbon fiber rods connected by eight 3-D printed ABS connectors form the frame. The frame weight is important due to tight payload constraints of the quadrotor. Our current frame design weighs 7g about half the payload capability. The module geometry has a cuboid shape as seen in the figure below. To enable rigid attachments between modules, we include a docking mechanism in the modular frame. In our case, we used Neodymium Iron Boron (NdFeB) magnets as passive actuators.
Self-Assembling and Cooperative Flying
ModQuad is the first modular system that is able to self-assemble in midair. We developed a docking method that accurately aligns and attaches pairs of flying structures in midair. We also designed a stable decentralized modular attitude controller to allow a set of attached modules to cooperatively fly. Our controller maximizes the use of the rotor forces by generating the maximum possible moment.
In order to allow the flying structure to navigate in a three dimensional environment, we control thrust and attitude to generate vertical and horizontal translations, and rotation in the yaw angle. In our approach, we control the attitude of the structure in a decentralized manner. A modular attitude controller allows multiple connected robots to stably and cooperatively fly. The gain constants in our controller do not need to be re-tuned as the configurations change.
In order to dock pairs of flying structures in midair, we propose to have two flying structures: the first one is hovering and waiting, meanwhile the second one is performing a docking action. Both, the hovering and the docking actions are based on a velocity controller. Using a velocity controller, we are able to dock multiple robots in midair. We highlight that docking robots in midair is one of the fastest ways to assemble structures because the building units can rapidly move and dock in three dimensional environments. The docking system and control has been validated through multiple experiments.
Our system takes advantage of robot swarms because a large number of robots can construct massive structures.
This work was developed by:
David Saldaña, Bruno Gabrich, Guanrui Li, Mak Yim, and Vijay Kumar.
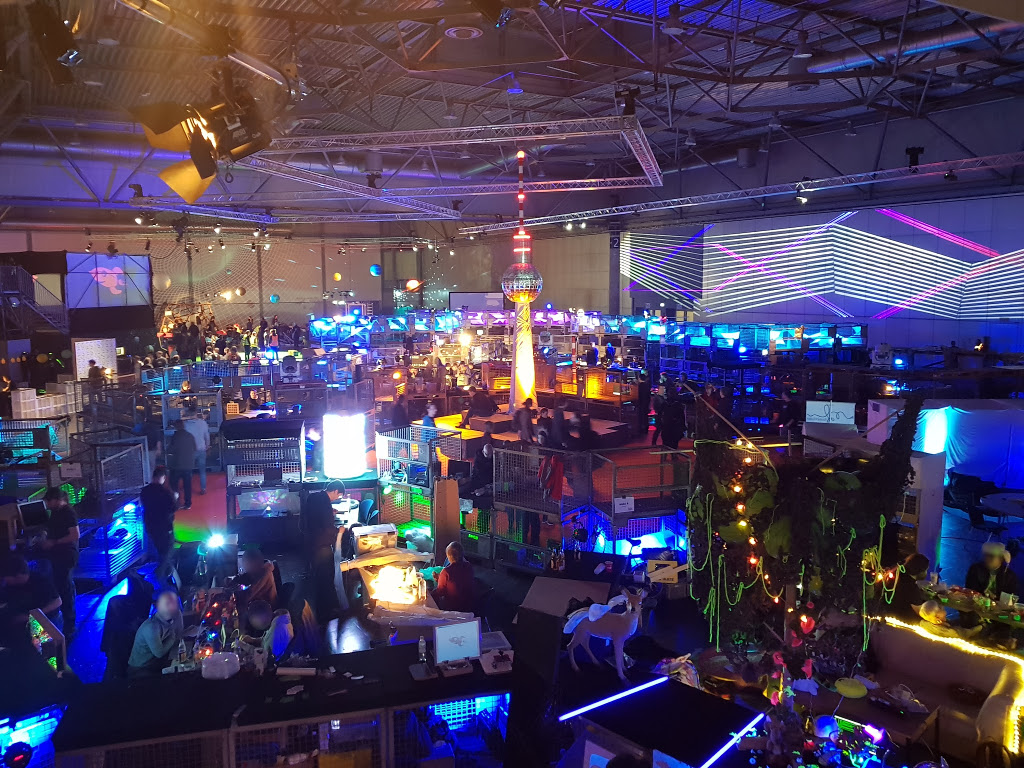
So we are now back in the cold and dark Sweden after about a weeks visit to a warm and nice Shenzhen, China. Every time we go there something major has happened. When we visited last time, about a year ago, cash was king. Now apparently payments are done with QR codes, even in small lunch restaurants. And I was kind of proud about the BankID and Swish payments we have here is Sweden, until now… Another observation we did was that there are now a lot of colorful rental bikes which can be found about everywhere and which can be rented for around 1 RMB/hour. A great way of resource sharing and pushing Eco-friendly transportation. It has it downside though as piles of bikes could be commonly found and e.g. written about by theguardian.
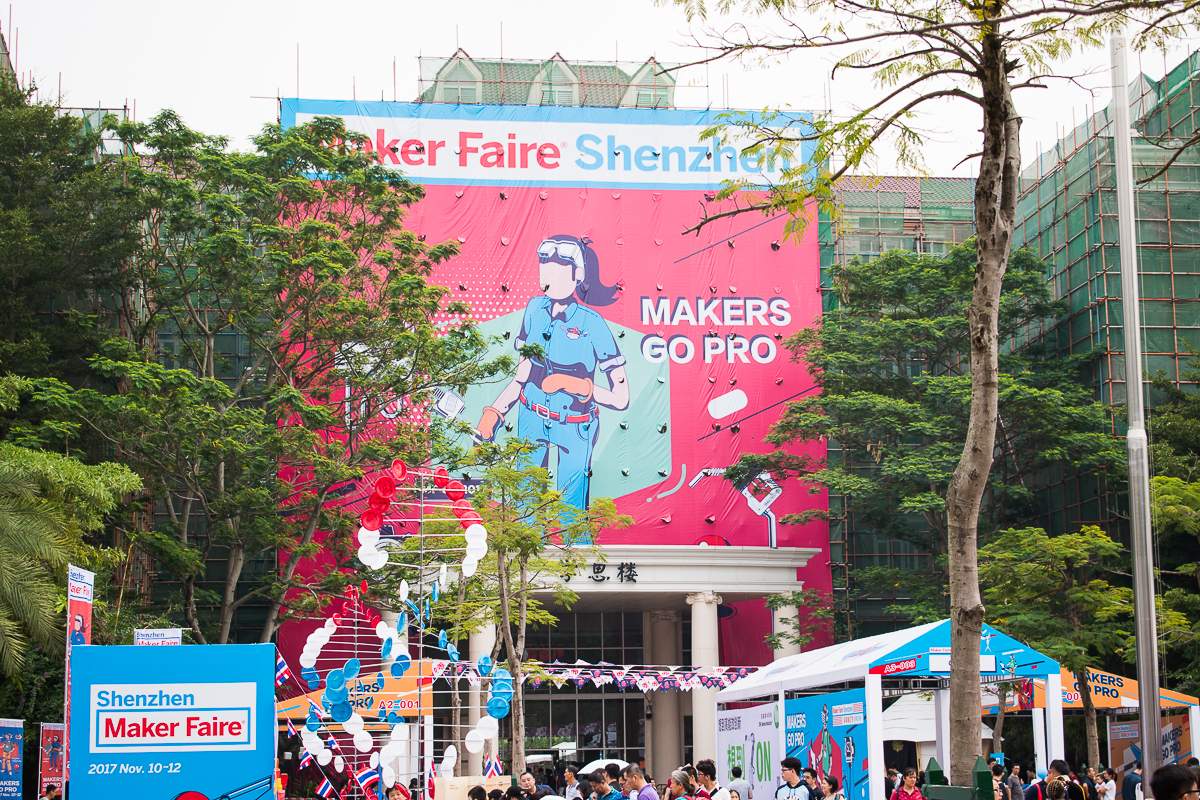
Aside from the above observations the Maker Faire Shenzhen was one of the reasons we came to visit. As Shenzhen is called the “the silicon valley for hardware” we had pretty high expectations when coming to the Maker Faire. Even though it was a great Faire it did not really reach our high expectations but it is growing fast and I’m pretty sure in a couple of years it is the Maker Faire to be at. A quick summarize, robotics was one of the top categories of products on the faire. 3D printers which are popular on European and US faires was not that common which surprised us. Now let the pictures do the talking:
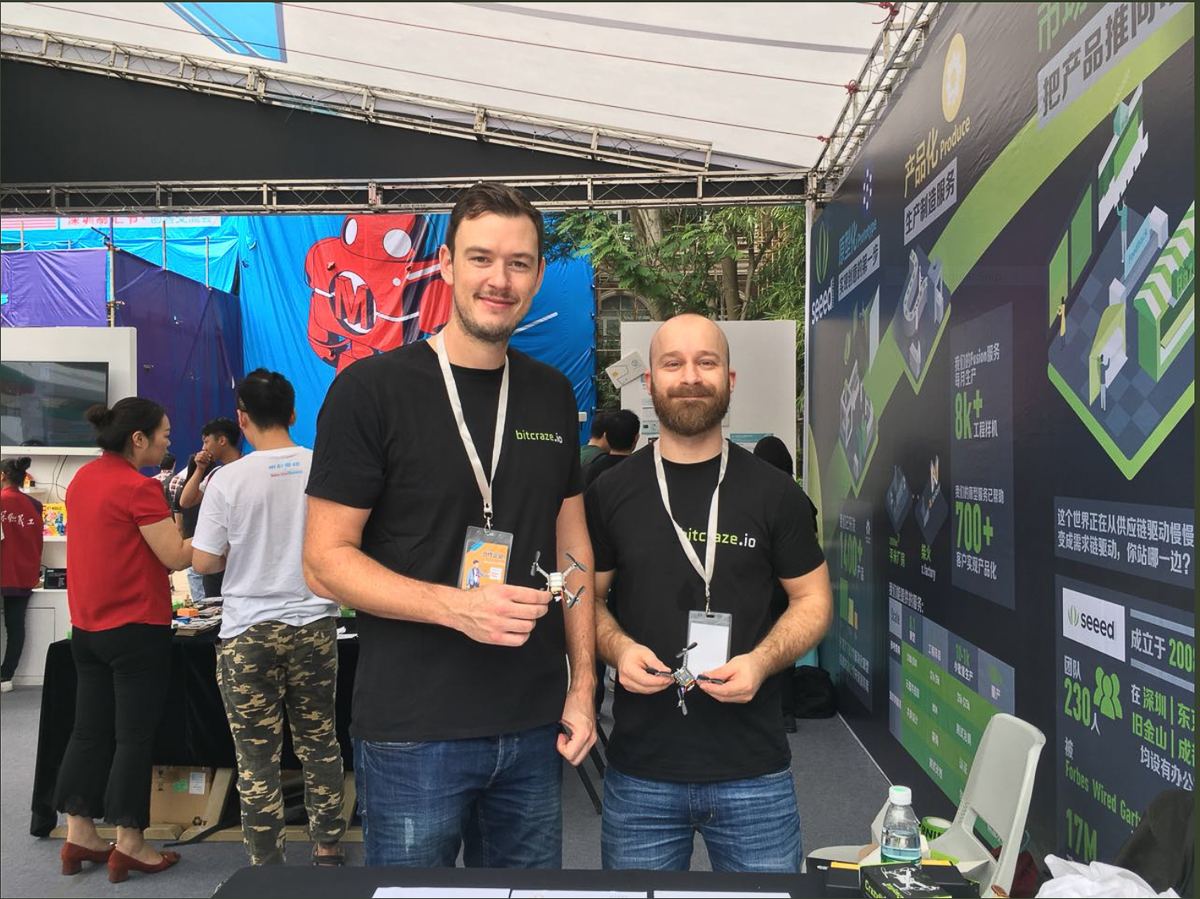
We exhibited on the faire sharing booth with Seeedstudio where we showed an autonomous sequence on top of a table using the flow deck. By pressing a button, the Crazyflie 2.0 would take of, fly in a circle, come back and land roughly in the same spot. It was a very engaging demo catching many peoples attention and especially the kids. The kids constantly wanted to press the button and interact with the Crazyflie.
All the interaction made us very happy and next time we will try to add the obstacle avoidance deck to make it even more engaging.
Unfortunately the Crazyradio PA is out of stock in our store and is estimated back around December 1. Until then please checkout our distributors for availability.
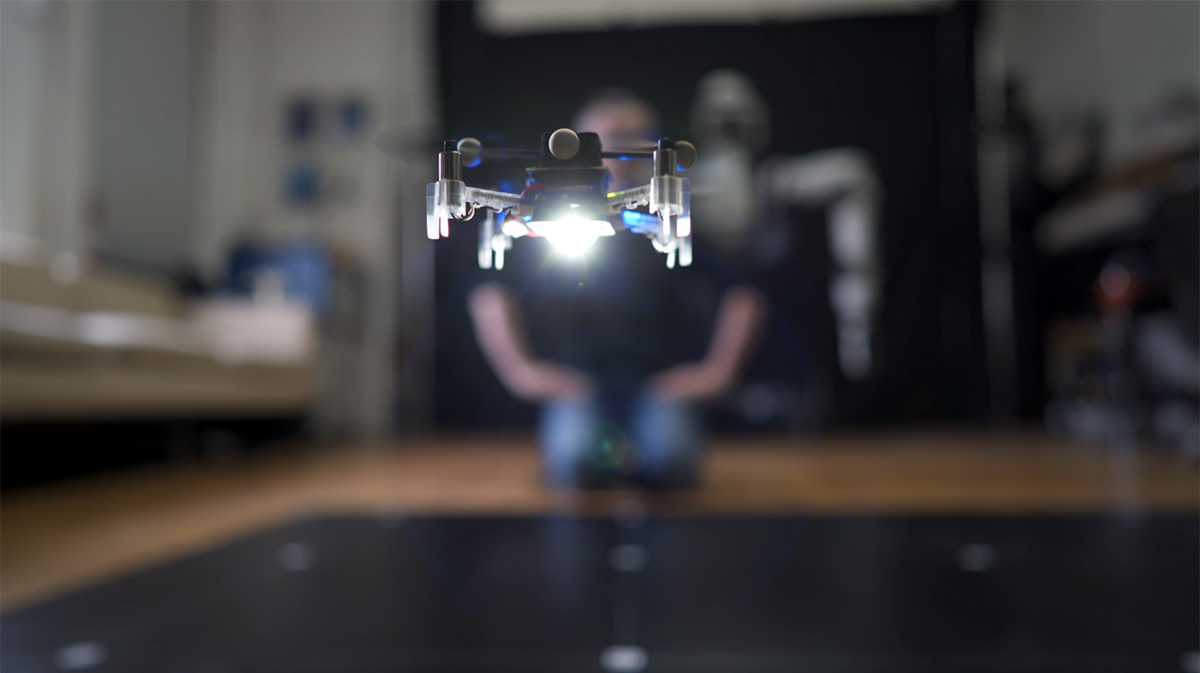
Grasping objects is a hard task that usually implies a dedicated mechanism (e.g arm, gripper) to the robot. Instead of adding extra components, have you thought about embedding the grasping capability to the robot itself? Have you also thought about whether we could do it flying?
In the GRASP Laboratory at the University of Pennsylvania, we are concerned about controlling robots to perform useful tasks. In this work, we present the Flying Gripper! It is a novel flying modular platform capable of grasping and transporting objects with the help of multiple quadrotors (crazyflies) working together. This research project is coordinated by Professor Mark Yim and Professor Vijay Kumar, and led by Bruno Gabrich (PhD candidate) and David Saldaña (Postdoctoral researcher).
Inspiration in Nature
In nature, cooperative work allows small insects to manipulate and transport objects often heavier than the individuals. Unlike the collaboration in the ground, collaboration in air is more complex especially considering flight stability. With this inspiration, we developed a platform composed of four cooperative identical modules where each is based on a quadrotor (crazyflies) within a cuboid frame with a docking mechanism. Pair of modules are able to fly independently and physically connect by matching their vertical edges forming a hinge. Four one degree of freedom (DOF) connections results in a one DOF four-bar linkage that can be used to grasp external objects. With this platform we are able to change the shape of the flying vehicle during flight and use its own body to constrain and grasp an object.
Flying Gripper Design and Motion
In the proposed modular platform, we use the Crazyflie 2.0. Its battery life lasts around seven minutes, though in our case battery life time is reduced due to the extra weight. The motor mounting was modified from the standard design, we tilted the rotors 15 degrees. This was necessary as more yaw authority was required to enable grasping as a four-bar. However, adding this tilt reduces the lifting thrust by 3%. Axially aligned cylindrical Neodymium Iron Boron (Nd-FeB) magnets, with 1/8″ of diameter and 1/4″ of thickness are mounted on each corner enabling edge-to-edge connections. The cylindrical magnets have mass of 0.377g and are able to generate a force of 0.4 kg in a tangential connection between two of the same magnets. This forms a strong bond when two modules connect in flight. Note that the connections are not rigid – each forms a one DOF hinge.
The four attached modules results in a one DOF four bar linkage in addition to the combined position and attitude of the conglomerate. The four-bar internal angles are controlled by controlling the yaw attitude of each module. For example, two modules rotate clockwise and other two modules rotate counter-clockwise in a coordinated manner.
Grasping Objects
Collaborative manipulation in air is an alternative to reduce the complexity of adding manipulator arms to flying vehicles. In the following video we are able to see the Flying Gripper changing its shape in midair to accomplish the complex task of grasping a wished coffee cup. Would you like some coffee delivery?
This work was developed by:
Bruno Gabrich, David Saldaña, Vijay Kumar and Mark Yim
We have recently released a few products with optical flow sensors (the Flow deck and the Flow Breakout board) without really talking about the concept of optical flow. So we though we would dedicate this weeks post to it.
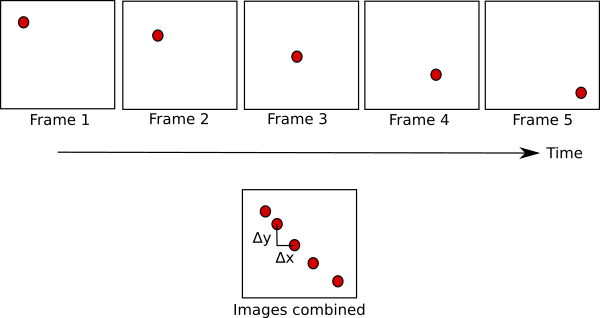
The most common example of optical flow is probably a computer mouse. Turning the mouse over you’ll see a strong light that’s used to illuminate the surface so that a camera can clearly see the surface. When running, the camera will identify features in the surface below it and track their motion between frames. As you move the mouse to the left, features will move to the right.
In the example below you can see a feature being tracked over time.
The feature is tracked from frame to frame and the output is the distance that the feature moved since the previous frame.
The functionality of an optical flow sensor of course depends on being able to find features to track, a surface that is very uniform will be hard to track since all the frames will look the same. If you’ve ever tried using a mouse on a glass table or reflective surface you’ve probably seen that it doesn’t work.
The same concept is used in our Flow products. It also happens that the manufacturer of the chip we use, PixArt, is a world leader in optical mouse sensors. They have applied the same concepts as for the mouse but with a different lens that gives the camera the ability to track features further away (80mm – inf). Like the mouse this is dependent on finding features to track, which might be problematic on poorly lit surfaces or on surfaces that are very uniformly colored. On the other hand if the area is too lit up from the ceiling above you when you fly you might start tracking your own shadow on the floor.
One of the issues with using optical tracking from a flying platform is that you need to know the distance to the features. In the case of the mouse you will know that the features are right under the mouse, but in the case of the flying platform you won’t know this from only looking at the image. Think about sitting on a plane and watching the ground move, it’s really slow. But your movement along the ground will actually be really fast. For our Flow products we’ve added the VL53L0x ToF distance sensor to measure the distance to the surface that’s being tracked. This completest the equation so if you’re further away from the features that are being tracked this will be taken into account. Note that the accuracy of the tracking will decrease when the distance increases since the difference between frames becomes smaller and harder to detect.
An optical flow sensor can also be used to track motion of other objects instead. Suppose the optical flow sensor is fixed and pointing sideways, then it will detect objects passing in front of it, for instance counting people passing a doorway, or it could be used as a touch less mouse.