We have also been working on some new products that are not ready for the store yet, these include the Crazyflie 2.1 brushless, an improved lighthouse deck and some other things we will write about in coming blog posts – stay tuned for exciting news!
The big picture when it comes to the software is that there has been some work done on estimators and controllers, including “out-of-tree support” to make it easy to add to your own. We have worked on support for brushless motors, including safety features like the supervisor and arming functionality. The client has been upgraded to use PyQt6 instead of PyQt5.
There has been a bit of a focus on stability, partly by us in the infinite flight project, but also at TU Delft in their 24/7 swarm.
As always when writing the yearly looking back blog post, we are amazed at all the things that have been going on during the year. Thanks for joining us on our journey!
I joined Bitcraze back in 2015 and I have had a fantastic time during my 8 years in the company, but I have decided to move on to new adventures and I will leave Bitcraze after Christmas.
This summer I visited Karlskrona, an old naval city in Sweden, and happened to pass by a school that teaches traditional wooden boat building. I have done various types of wood work in my spare time before and the idea of learning more about boat building full time got stuck in my head and refused to go away. In January I will start to learn about how to build boats in the Nordic clinker tradition that dates back to before the viking age, this style of boat building is also on the UNESCO intangible heritage list!
Building boats might seem very different from developing small quads, but there is a similarity in learning, evolving skills and explore new areas, even though in a different field. Exploration and learning is very much what I like and have been doing at Bitcraze, in so many fields ranging from the obvious ones related to robotics such as control theory, positioning systems, embedded programming and so on, but also in the many areas related to running a company. After all we are only 6 persons and I have had the opportunity to be involved in everything from sales, marketing, IT, organization, the office, flight lab, production and much more. One field that I have a strong interest in is how to organize a company and I’m especially happy that I have had the possibility to try all sorts of ideas related to self organization at Bitcraze.
I’d like to thank everyone at Bitcraze for an awesome time, we’re almost always moving close to the speed of light, in a relaxed way! I would also like to thank all the interesting people I have met through the years, it is very inspiring to see what you are doing with the Crazyflie and other products, I hope you all continue to do funky stuff!
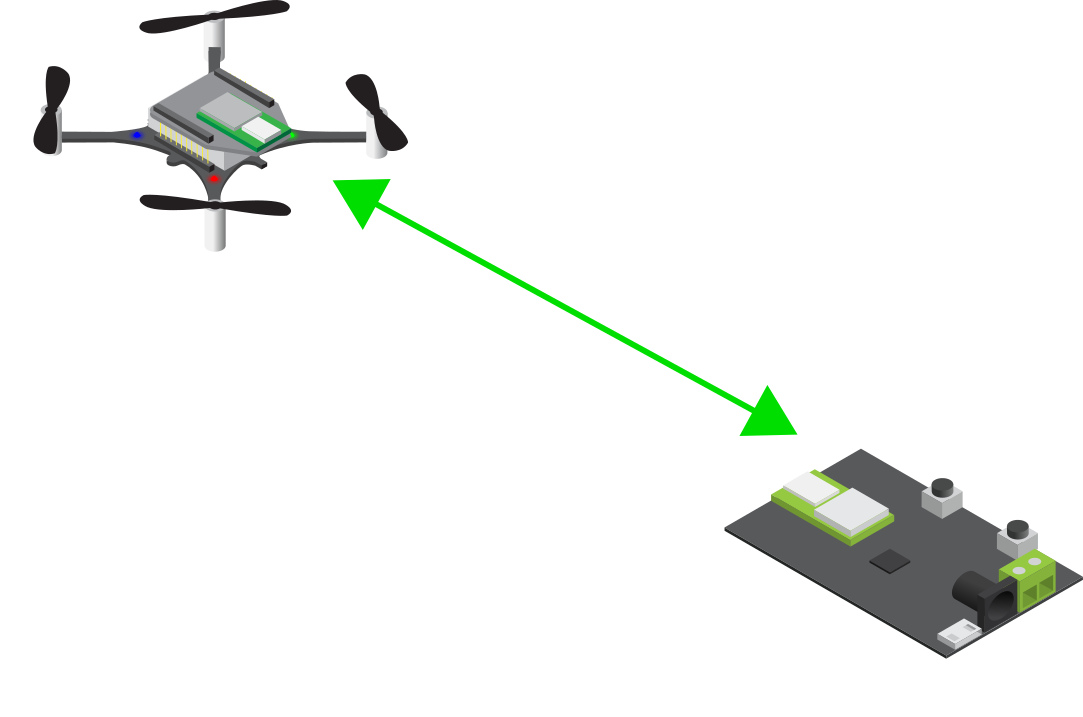
When we originally wrote the TDoA3 implementation for the Loco Positioning System back in 2017 we had the idea of adding functionality to also enable the Crazyflies to send UWB packets in some situations, AKA TDoA3 Hybrid mode. We did not have the time to implement that idea back then, but through the years there have been some interest in the functionality and recently I finally got around to do it as a Fun Friday project. Annoying enough it was not that complicated and only took a couple of hours, I should have done it earlier!
We wrote a bit about the hybrid mode in an earlier blog post and there is also a github issue with some discussions on the topic. The short version of the functionality is that a Crazyflie at selected times switches from only passively receiving UWB packets from the anchors, to also actively transmitting packets and doing Two Way Ranging (TWR) with the peers in the network.
One use case is for a Crazyflie to simply participate in the TWR traffic to give it ranging information for improved position estimation. This can for instance be useful when flying outside the convex hull where TDoA positioning degrades rapidly while TWR works pretty well.
Another funky use case is to extend a Loco positioning system by using TWR to fly outside the convex hull and land somewhere. At this point the Crazyflie switches role and acts as an anchor instead by including its position in the transmitted packets and enabling other Crazyflies to use the transmissions for TDoA or TWR position estimation.
It is also possible to go even more dynamic and transmit the estimated position while flying and thus act as a flying anchor. There are complications when doing this with multiple Crazyflies as they use information from each other and the estimated positions probably will diverge if errors are not handled in a proper way, but at least there is now a framework where this type of functionality could be added. See the references to research in the area in the previous blog post.
The implementation is very experimental and has not been merged to master yet, but if you are interested you can find it in the krichardsson/hybrid-mode branch (PR #1330). There are a few new parameters that changes the behavior such as turning on/off transmissions, using TDoA or TWR data for position estimation and what to include in transmitted packets. Please see the implementation and documentation for details. Also note that the hybrid mode functionality is not compiled by default and must be enabled in the build configuration to be available.
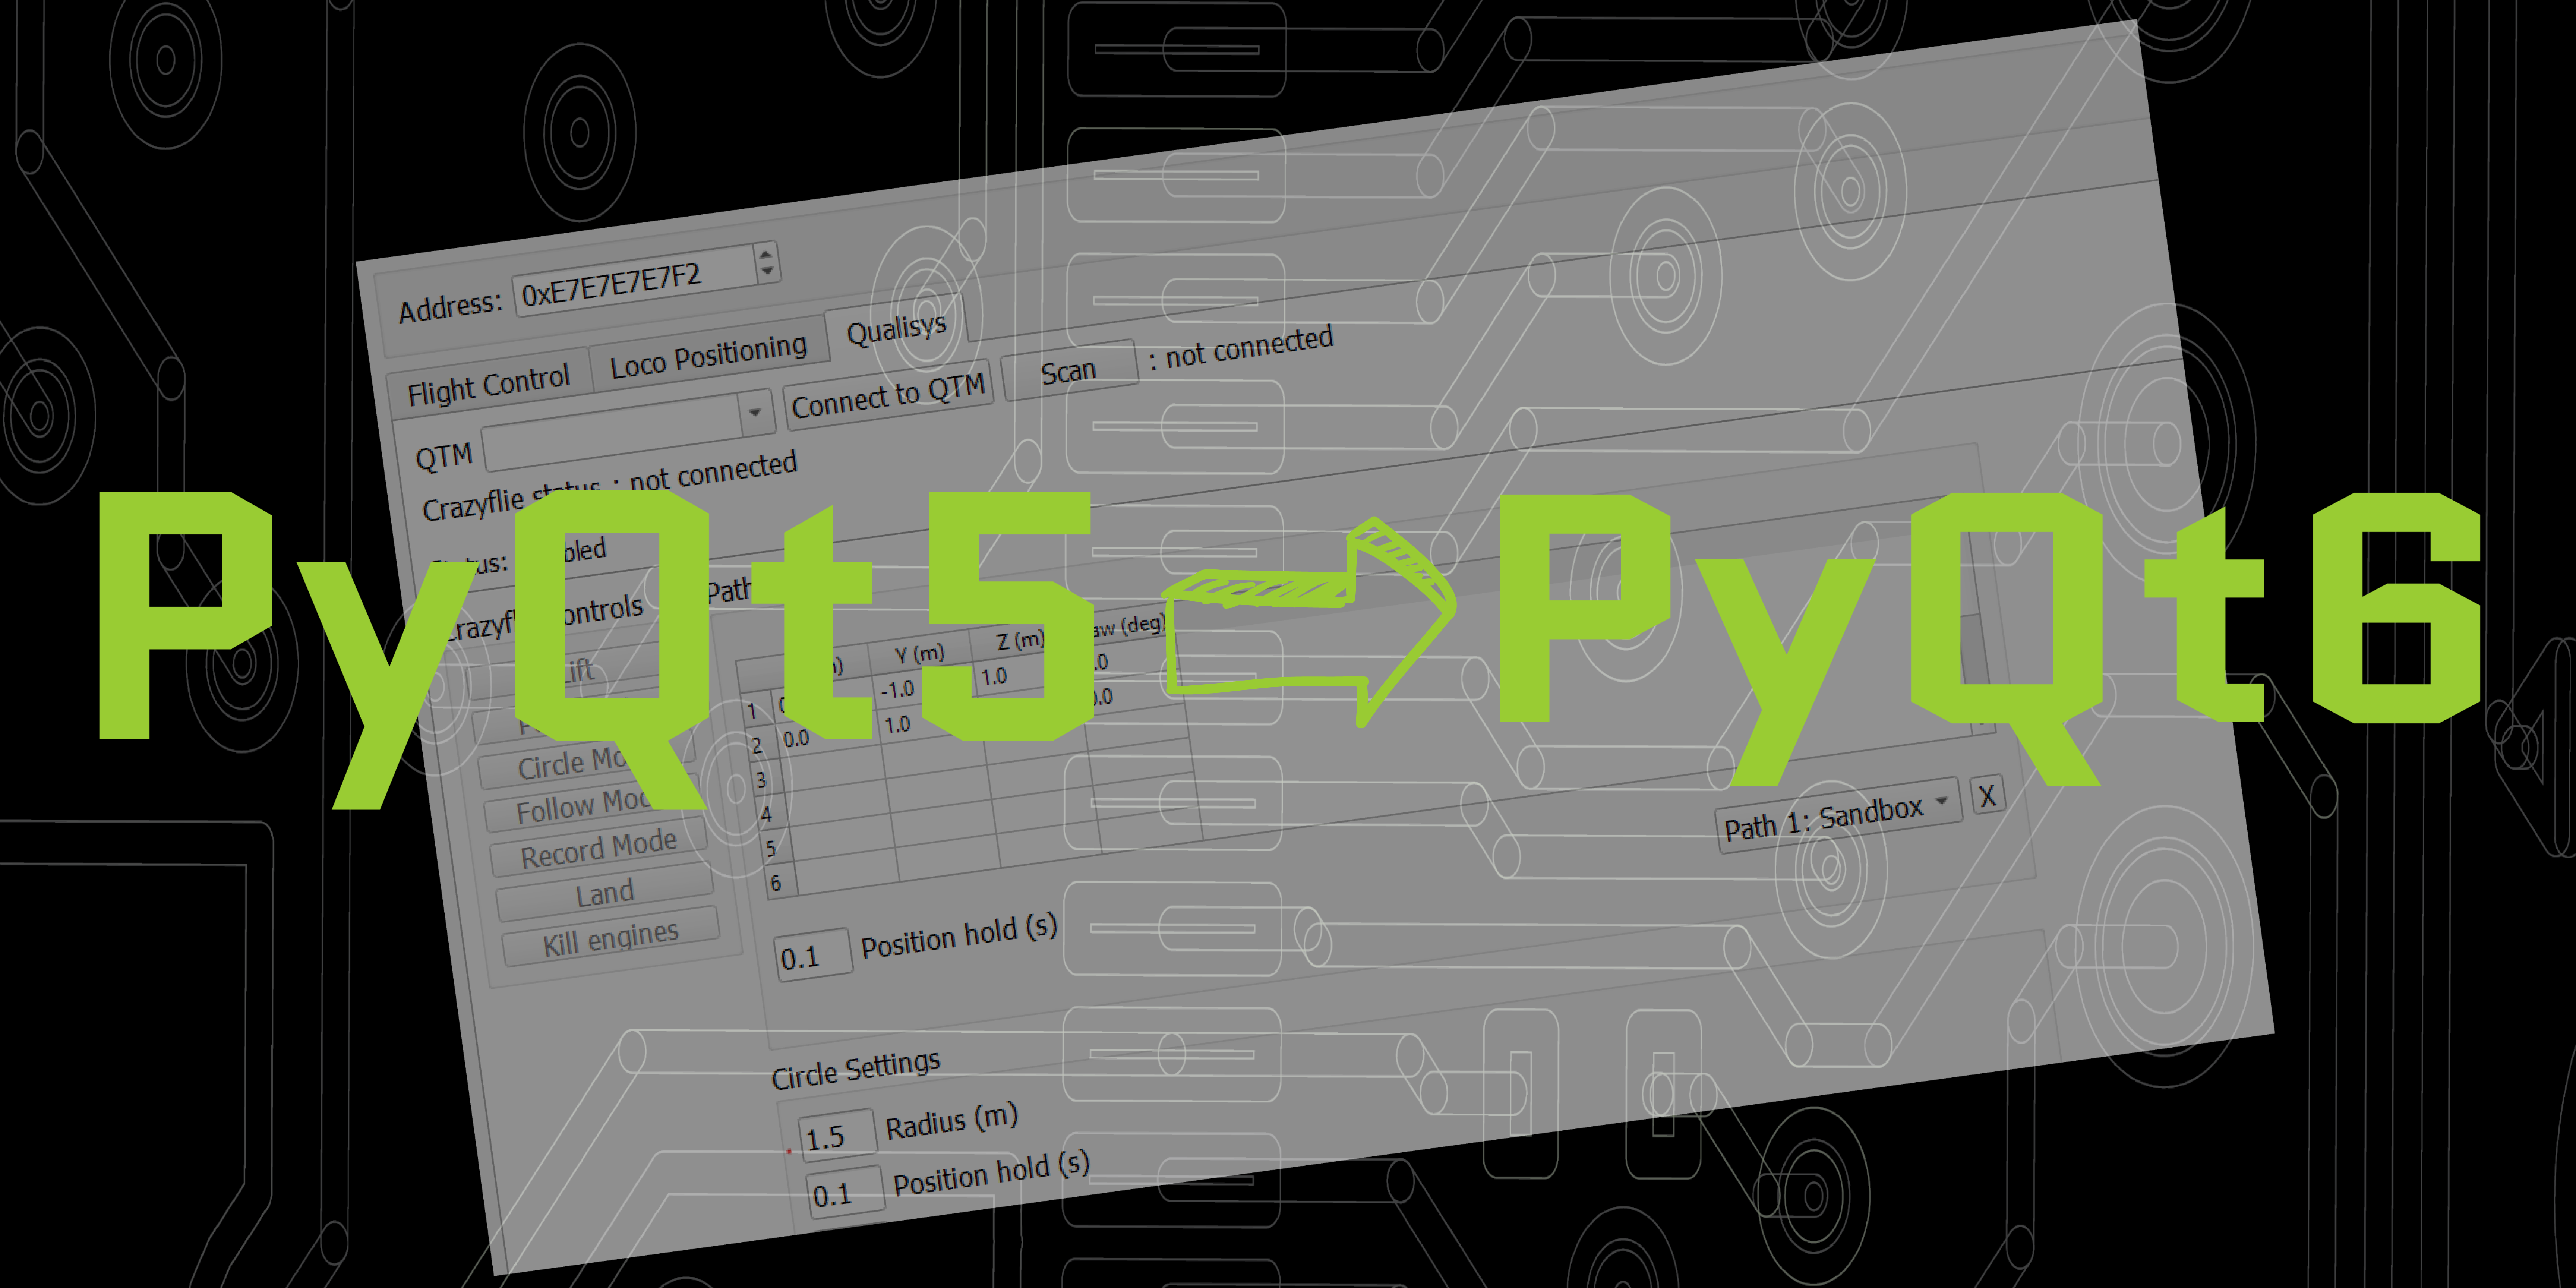
The python client is based on Qt and we have been using version 5 so far. Qt5 has been replaced by Qt6 quite some time ago and as Qt5 is not really maintained any more, we have been looking at switching to Qt6 for a long time. Finally we have taken the step, this blog post will outline what has changed.
The switch to PyQt6 is not that complicated for the majority of the client code base, apart from some minor changes in various classes, the biggest update is that enumerations are handled differently. If you check out the changes in the pull request you will see that imports have changed for obvious reasons
The main blocker for doing this change has been that the Qualisys tab was using a library that used to be available in PyQt5 but that has not been added to PyQt6, we ended up removing the Qualisys tab to be able to move on. The Qualisys tab was originally contributed by Qualisys for demo purposes and it had two nice areas of functionality that we would like to re-implement:
Motion capture positioning. It was very easy to connect a Qualisys mocap system and feed the position information to the Crazyflie for automated flight.
Trajectory support. It was possible to fly some simple trajectories, for instance a circle which is nice for testing and demos.
The idea is to re-implement the mocap connectivity using the libmotioncapture library from Crazyswarm2, as an extra bonus this would support all major mocap systems. For the trajectory part, we would like to add this as a new tab that can be used by any positioning systems, mocap, Loco, Lighthouse or flow deck. If you are interested in helping out with this, let us know!
The state of the code
The changes for PyQt6 have been merged into the master branch. It seems to work but we have not tested all functionality yet, please let us know if you run into any problems or weird behavior.
When you have pulled in the code from github you will also have to re-install all dependencies by running
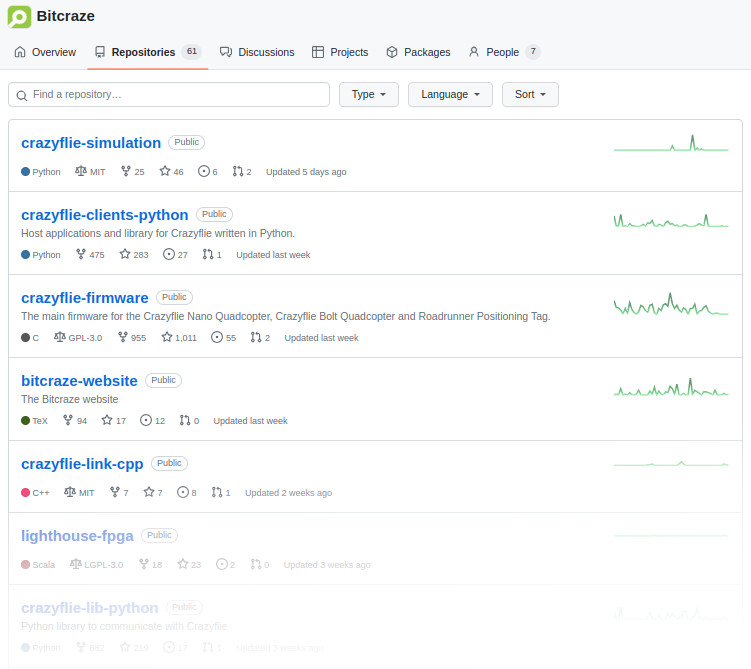
The Bitcraze organization page on github contains some 60+ repositories and if you are looking for a specific piece of code it might be hard to know where to find it. In this blog post we will try to describe how the repositories are organized and hopefully make it easier to understand where to start your search.
The Bitcraze repositories contain code and information related to a wide range of applications and products, some might be of interest to many users, while others have a smaller audience. Examples are software for the Crazyflie and decks, but also things like simulation, tests, hardware and our web site. As we try to be as open as possible most of the content we produce will end up in a repository, which obviously increases the number of available repos over time. For most users there is usually only a handful of repositories that are of interest though so let’s create some order.
The main repositories
There are three repositories that are the hot spots of most functionality, these are usually the first place to look and the only repositories most users will ever use. You can find quick links to these repos in the “Pinned” section on the Bitcraze github start page.
The repositories are:
crazyflie-firmware – the source code for the STM processor firmware on the Crazyflie. This is where most of the important Crazyflie functionality is implemented, such as controllers, estimators, motor control and communication with decks. If you want to change a behavior in the Crazyflie itself, look here.
crazyflie-lib-python – the python library used to communicate with the Crazyflie. This is used to control a Crazyflie remotely. Use it if you want to use a script to control a Crazyflie, also contains lots of examples of how to do common tasks.
crazyflie-clients-python – a the python client that is used to connect to the Crazyflie. The client is simply a GUI that uses the python lib to communicate with the Crazyflie. Everything that is done in the Client can also be done by a script using the python library.
Another source of quick links to common and important repositories can be found on our web, on the Repository overview page. This page also contains short descriptions of the repositories.
Related repositories
Many of our products are implemented as multiple sub-systems, perhaps using different languages or technologies and running in separate hardware, in most cases we separate these sub-systems into their own repositories. The rule of thumb is that these repositories are named in a similar way to indicate that they are related, for instance lighthouse-bootloader and lighthouse-fpga that contain code for the lighthouse-deck. However note that in most cases there will also be related functionality implemented in the main repos as well, in the Lighthouse deck case for instance, most of the actual positioning functionality is in the crazyflie-firmware repo while Lighthouse system management is implemented in the lib and client.
Bootloaders
When powering up a CPU there must be a small piece of code available that sets up the basic configuration of the device to enable it to communicate with other parts of the system, like memories and such. This code is usually called a bootloader. Bootloaders are rarely changed and in most cases written to the device as a part of the factory production process. They have their own repositories and you can find a bunch of them, named XXXXXX-bootloader. Bootloaders are not that interesting and can be ignored by most users.
History
Some repositories might have names that do not make sense in the current context, this is most likely due to historical reasons. We might have given a repository a name that seemed to be descriptive at that time, but as time goes by it might not be as good any more. An example is the range of “LPS-XXXXX” repositories that contains code for the Loco Positioning System. Originally LPS meant “Local Positioning System” as this was the only positioning system we had, but when we also created the Lighthouse system we changed the meaning of LPS to “Loco Positioning System”. A better naming of the repositories would perhaps be “Loco-XXXX”?
A similar transition also exists for the Crazyflie that has evolved from Crazyflie 1 to Crazyflie 2.0 and 2.1. Some repositories (named “crazyflie-XXX”) were created when Crazyflie 1 was released and have evolved to be compatible with Crazyflie 2.X, while some other repositories (named “crazyflie2-XXX”) were created when Crazyflie 2.0 was released. Even though crazyflie-firmware is not compatible with Crazyflie 1 anymore, it still has the old name.
Retired code
Some repositories are obsolete, maybe they contain experimental code that is no longer of interest or perhaps the functionality has been implemented elsewhere. We try to archive these repos and if you are looking for current functionality you can safely ignore any repository that is marked with the “Public archive” flag in github.
Still unclear
There is a short description in each repository that is intended to describe the contents. It is possible (likely) that the description was written a long time ago, with a different context and that it might not be as helpful as intended. If this is the case, just ask us. Drop a question in our discussions forum or send us an email, we try to help as much as we can!
When the Crazyflie was created the intended use case was manual flight with one drone. Over the years we have added support for positioning, swarms, autonomous flight and all sorts of nice features, and it has all been built on top of the original code base. Some of the original code is actually untouched after 7-8 years and needless to say, there is a slight worry that we might have taken design decisions back then that will come back and bite us in new use cases. This blog post will outline some of the work we have been doing to handle this problem by setting up an autonomous system where a Crazyflie is continuously flying – the infinite flight project.
The original design essentially assumed one Crazyflie that is controlled by one computer with one Crazyradio. On the computer the user was running the python client and controlling the flight manually with a game pad. The user might have restarted the Crazyflie before each flight, or at least when changing battery.
Now fast forward to the current situation where a swarm of Crazyflies might be controlled by multiple radios, each connecting to multiple Crazyflies. The Crayflies are flying autonomously, perhaps getting their current position from the Lighthouse system, or via radio based on information from a mocap system. Maybe telemetry data is sent back to the ground while commands for trajectories to the Crazyflies go in the other direction. In some systems the Crazyflies use wireless charging to be able to run continuously.
Obviously the current situation is very different from the original design with new or changed requirements. One is the extended use of the radio, and this is something that we have been talking about in some previous blog posts and we will not discuss that here. This blog post will instead be about one other important topic: long term stability.
In the original design, the Crazyflie was restarted often, maybe before each flight. This means that the code did not run for a very long time, so what happens if we use wireless charging and keep the firmware running for days? Will there be a problem? We decided to find out by starting an internal project we called “Infinite flight”. The idea was to set up a system with a Crazyflie with a Qi-charger for wireless charging and a Lighthouse deck for positioning. An app in the Crazyflie takes off, flies a trajectory and lands for recharging when the battery is out, the cycle is then repeated for as many times as possible. By doing this, we hoped to find any software problems in the firmware that might show up after some time, finding hardware that is worn out over time or other finding other issues. Spoiler alert: we have not reached infinity yet, but we have got a bit closer :-)
The setup is fairly straight forward, the firmware is based on the app used in the demo we used at IROS and ICRA, with some modifications. We have a ground station computer that collects data, it tries to continuously maintain a connection and re-establish it if it is lost. We log as much as possible to be able to analyse problems and understand what happened. We also added some tools to make it easier to visualize and dig in all the log data. The usual work flow has been to
Start the Crazyflie and run the app
Wait for something to go wrong (sometimes days)
Analyze what happened and figure out if something needs to be changed
Update and start over again
A surprising number of runs failed fairly quickly, only after a few flights. The reason has usually been some sort of handling error or problems with the test software, but some have been of more general interest or bugs.
Stopped logging
We had a problem where the logs from the Crazyflie in the ground computer stopped without any apparent reason. It turned out to be related to the session-less nature of the CRTP protocol, there is no good way to determine if a session is alive or not, other than using a timeout. It turned out that there is a timeout in the Crazyflie firmware (that was not fresh in our memories) that stops logging if no packets are received for a while. The rationale is to avoid having old logs running if a client is disconnected. In our case we lost communication for a short period of time and the firmware simply stopped the logging. The python lib on the other hand had a longer timeout and did not have the view that the connection was lost. The solution we used is to set up the logs again if we don’t receive logging for a while (we fixed an issue in the python lib related to this)
In the future com stack we plan to have proper session handling which should remove this problem.
Controller tuning
We have been using various flavors of Crazyflies in the tests, including some prototypes. We had some issues with one prototype that we did not understand, it had a hard time hitting the landing pad when landing. It turned out that the STM that was used in the prototype was reused from an old Crazyflie and it had some weird PID controller settings stored as persistent parameters. With the persistent parameters cleared, it worked as expected.
We have played a bit with tuning the controller, but the default settings are fairly OK and we used them most of the time.
Some of the prototypes we used had some glitches or irregularities, it is very hard to hand solder PCBs. These problems are only related to a specific hardware individual and can cause some unexpected behavior which takes time to figure out.
Landing pad edge
The landing/charging pad we use (also used in our demos) generally works fine, it has a “slope” towards the center which helps the Crazyflie slide to the correct position. If the Crazyflie miss the landing too much though, it will end up on the edge with one leg on the ground and an angle away from the center. In this case it sometimes fails to take off properly and crash. We solved this by adding a foam pad around the landing pad to “raise” the surrounding floor the the same level as the landing pad and thus reduce angle.
Lighthouse bug
There is a known bug in the lighthouse deck that prevents it from receiving data at certain angles. We had some cases where our landing pad was located in a spot where we lost tracking of both the active base stations for some yaw angles. If the Crazyflie happened to land in that exact yaw angle, it lost the position while charging and it did not know its current position when it should take off again. This was solved by moving the landing pad to a different position.
Not yet investigated possible problems
One possible known problem is the system tick counter in FreeRTOS. The counter is a 32-bit unsigned word and it is increased every millisecond. The counter is used in the firmware as the internal “clock” to determine for instance how long ago the estimator was updated or to determine when to execute some piece of code the next time. This counter will wrap after 2^32 ms, that is around 7 weeks, and we don’t really know what will happen.
Results and conclusions
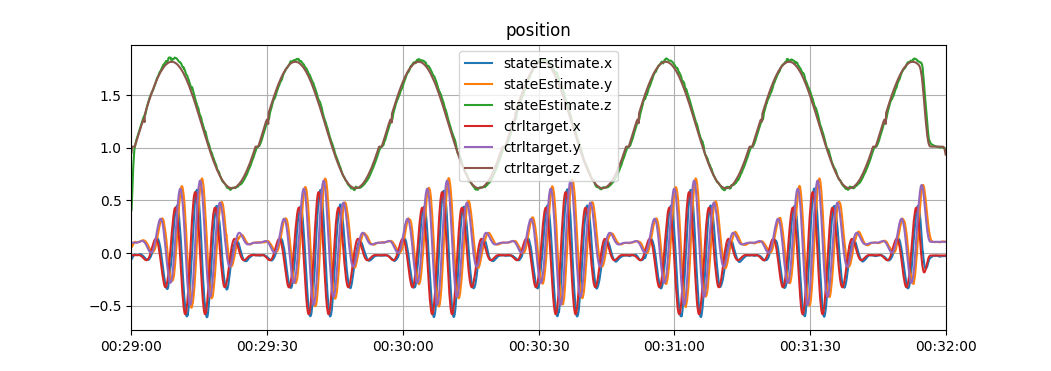
The longest we managed to keep the system running was 5 days. We had a slow charging cycle and only flew 57 times. In this session, the flight time was very stable between 5:30 and 5:45 for all flights. This test was done with a standard Crazyflie 2.1 with a motor upgrade kit.
The second longest session was 3 days, in this case we used a brushless prototype and pushed the charging very hard. We ended up doing 276 flights but the battery was pushed beyond specs and being too warm and charged too fast, it degraded over time and the flight time was reduced to only 2-3 minutes at the end.
We believe we have fixed most of the long term stability issues, but it is hard to know. There might be bugs lurking in the firmware that only show up under very special conditions. What we do know is that it is possible to fly for 5 days!
We’re happy to announce that there is a new release of the software for the Crazyflie ecosystem! The new release is called 2023.06 and is available for download on github or through the python client.
Major changes
The main addition is an extended supervisor framework and updated arming functionality.
Extended supervisor framework
The purpose of the supervisor is (will be) to keep an eye on the Crazyflie and make sure that everything is fine. If it detects a problem it can take action to hopefully handle the situation in a way that is better for the Crazyflie as well as people close by. The supervisor taps into the stabilizer loop and has the power to take control of the motors when needed.
The current version actually behaves very much like the previous version, but the underlying framework has been re-written to enable better handling in the future. There are now well defined states that the Crazyflie goes through for preflight checks, when flying and after landing.
Arming
Basic arming functionality has been added, mainly intended for larger platforms with brushless motors. A manual action is required after preflight checks have passed, to let the Crayflie know that a human is in control. If the system is not armed, it is not possible to fly.
Arming is required by default for the Bolt platform. For the Crazyflie 2.X, there is an auto-arming feature that immediately arms the platform when the preflight checks have passed, that is it works like it used to do.
If you use a BigQuad deck, auto-arming will also be enabled by default (as it uses the Crazyflie 2.X platform) and the firmware should be rebuilt with the MOTORS_REQUIRE_ARMING kbuild config flag set to enable manual arming.
The arming functionality is built on top of the supervisor.
Updates to the python client
An arming button has been added to the flight tab in the client to support the new arming functionality.
An emergency stop button has also been added to the top of the client window that shuts down the motors immediately.
Updates to the python library
A new CRTP message has been added to arm/disarm the system. The CRTP version has been updated to version 6.
Note, if you are controlling a Bolt from a script (or any other platform with arming enabled) you have to send an arming message to the platform before you can fly.
Release details
The following versions were released. See each release for details.
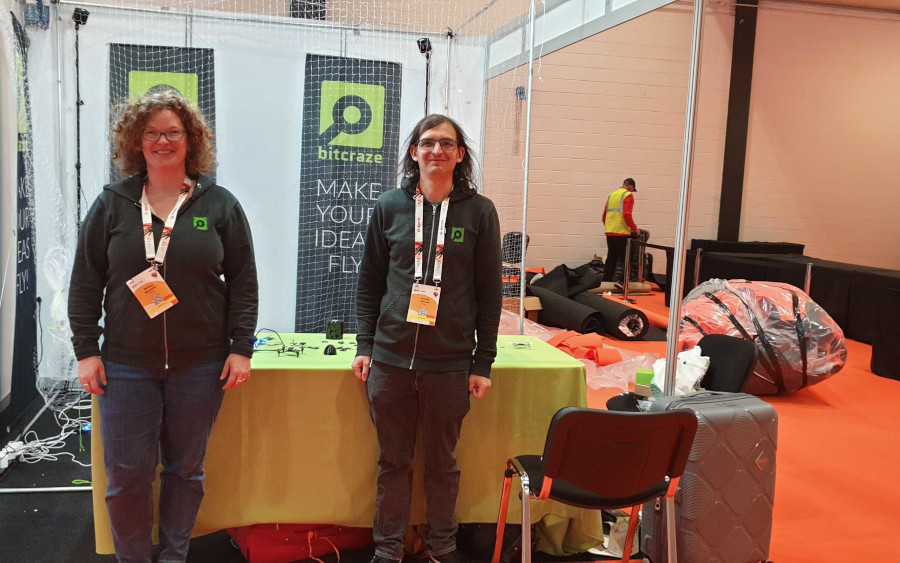
As mentioned in a previous blog post, we have a both at ICRA in London this week. If you are there too, come and visit us in booth H10 and tell us what you are working on!
Barbara and Arnaud is getting the booth ready
We are showing our live autonomous demo and our products in the booth, including the flapping drone Flapper Nimble, don’t miss it!
The autonomous demo
The decentralized autonomous demo that we are showing is based on technologies in the Crazyflie ecosystem. The general outline is that Crazyflies are autonomously flying in randomized patterns without colliding. The main features are:
Positioning using the Lighthouse positioning system, all positioning estimation is done in the drone. The Lighthouse positioning system provides high accuracy and ease of use.
Communication is all peer-to-peer, no centralized functionality. Each Crazyflie is transmitting information about its state and position to the other peers, to enable them to act properly.
Collision avoidance using the on-board system without central planing. Based on the position of the other peers, each Crazyflie avoids collisions by modifying its current trajectory.
Wireless charging using the Qi-deck. When running out of battery, the Crazyflies go back to their charging pads for an automatic re-fill.
The App framework is used to implement the demo. The app framework provides an easy way of writing and maintaining user code that runs in the Crazyflie.
We are happy to answer any questions on how the technology works and implementation details. You can also read more about the demo in the original blog post by Marios.
Developer meeting
The next developer meeting is next week, Wed June 7 15:00 CEST and the topic will be the demo and how it is implemented. If you want to know about any specific technologies we used, how it is implemented or if you are just curious about the demo in general, please join the developer meeting. We will start with a presentation of the different parts of the demo, and after that a Q&A. As always we will end up with a section where you can ask any question you like related to our ecosystem. Checkout this announcement on our discussion platform for information on how to join.
In this blog post we will take a look at the new Loco positioning TDoA outlier filter, but first a couple of announcements.
Announcements
Crazyradio PA out of stock
Some of you may have noticed that there are a lot bundles out of stock in our store, the reason is the transition from Crazyradio PA to the new Crazyradio 2.0. Most bundles contain a radio and even though the production of the new Crazyradio 2.0 is in progress, the demand for the old Crazyradio PA was a bit higher than anticipated and we ran out too early. Sorry about that! We don’t have a final delivery date for the Crazyradio 2.0 yet, but our best guess at this time is that it will be available in about 4 weeks.
Developer meeting
The next developer meeting is on Wednesday, April 5 15:00 CEST, the topic will be the Loco positioning system. We’ll start out with around 30 minutes about the Loco Positioning system, split into a presentation and Q&A. If you have any specific Loco topics/questions you want us to talk about in the presentation, please let us know in the discussions link above.
The second 30 minutes of the meeting with be for general support questions (not only the Loco system).
The outlier filter
When we did The Big Loco Test Show in December, we found some issues with the TDoA outlier filter and had to do a bit of emergency fixing to get the show off the ground. We have now analyzed the data and implemented a new outlier filter which we will try to describe in the following sections.
Why outlier rejection
In the Loco System, there are a fair amount of packets that are corrupt in one way or the other, and that should not be part of the position estimation process. There are a number of reasons for errors, including packet collisions, interference from other radio systems, reflections, obstacles and more. There are several levels of protection in the path from when an Ultra Wide Band packet is received in the Loco Deck radio to the state estimator, that aims at removing bad packets. It works in many cases, but a few bad measurements still get all the way through to the estimator, and the TDoA outlier filter is the last protection. The result of an outlier getting all the way through to the estimator is usually a “jump” in the estimated position, and in worst case a flip or crash. Obviously we want to catch as many outliers as possible to get a good and reliable position estimate and smooth flight.
The problem(s)
The general problem of outlier rejection is to decide what is a “good” measurement and what is an outlier. The good data is passed on to the state estimator to be used for estimating the current position, while the outliers are discarded. To decide if a measurement is good or an outlier, it can be compared to the current position, if it is “too far away” it is probably an outlier and is rejected. The major complication is that the only knowledge we have about the current position is the estimated position from the state estimator. If we let outliers through, the estimated position will be distorted and we may reject good data in the future. On the other hand if we are too restrictive, we may discard “good” measurements which can lead to the estimator loosing tracking and the estimated position drift away (due to noise in other sensors). It is a fine balance as we use the estimated position to determine the quality of a measurement, at the same time as the output of the filter affects the estimated position.
Another group of parameters to take into account is related to the system the Crazyflie and Loco deck are used in. The over all packet rate in a TDoA3 system is changed dynamically by the anchors, the Crazyflie may be located in a place where some anchors are hidden, or the system may use the Long Range mode that uses a lower packet rate. All these factors change the packet rate and his means that the outlier filter should not make assumptions about the system packet rate. Other factors that depend on the system is the physical layout and size, as well as the noise level in the measurements, and this must be handled by the outlier filter.
In a TDoA system, the packet rate is around 400 packets/s which also puts a requirement on resource usage. Each packet will be examined by the outlier filter, why it should be fairly light weight when it comes to computations.
Finally there are also some extra requirements, apart from stable tracking, that are “nice to have”. As a user you probably expect the Crazyflie to find its position if you put it somewhere on the ground, without having to tell the system the approximate position, that is a basic discovery functionality. Similarly if the system looses position tracking, you might expect it to recover as soon as possible, making it more robust.
The solution
The new TDoA outlier filter is implemented in outlierFilterTdoa.c. It is only around 100 lines of code, so it is not that complex. The general idea is that the filter can open and close dynamically, when open all measurements are passed on to the estimator to let it find the position and converge. Later, when the position has stabilized, the filter closes down and only lets “good” measurements through. In theory this level of functionality should be be enough, after the estimator has converged it should never lose tracking as long as it is fed good data. The real world is more complex, and there is also a feature that can open the filter up again if it looks like the estimator is diverging.
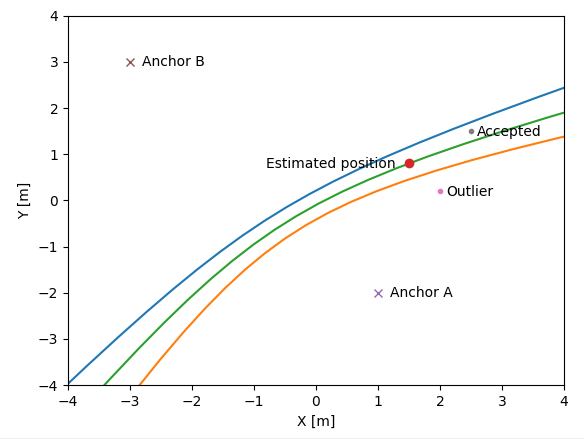
The first test in the filter is to check that the TDoA value (the measurement) is smaller than the distance between the two anchors involved in the measurement. Remember that the measurements we get in a TDoA system is the difference in distance to two anchors, not the actual distance. A measurement that is larger than the distance between the anchors is not physically possible and we can be sure that the measurement is bad and it is discarded.
The second stage is to examine the error, where the error is defined as the difference between the measured TDoA value and the TDoA value at our estimated position.
float error = measurement - predicted;
This error does not really tell us how far away from the estimated position the measurement is, but it turns out to be good enough. The error is compared to an accepted distance, and is considered good if it is smaller than the accepted distance.
sampleIsGood = (fabsf(error) < acceptedDistance);
The area between the blue and orange lines represents the positions where the error is smaller than some fixed value.
The rest of the code is related to opening and closing the filter. This mechanism is based on an integrator where the time since the last received measurement is added when the error is smaller than a certain level (integratorTriggerDistance), and remove if larger. If the value of the integrator is large, the filter closes, and if it is smaller than a threshold it opens up. This mechanism implements a hysteresis that is independent on the received packet rate.
The acceptedDistance and integratorTriggerDistance are based on the standard deviation of the measurement that is used by the kalman estimator. The idea is that they are based on the noise level of the measurements.
Feedback
The filter has been tested in our flight lab and on data recorded during The Big Loco Test Show. The real world is complex though and it is hard for us to predict the behavior in situations we have note seen. Please let us know if you run into any problems!
The new outlier filter was pushed after the 2023.02 release and is currently only available on the master branch in github (by default). You have to compile from source if you want to try it out. If no alarming problems surface, it will be the the default filter in the next release.
We’re happy to announce that the 2023.02 release is available for download!
The main new features of this release are:
Out of tree controllers
We have made it easier to add a new controller to the firmware in the Crazyflie. Controllers can now be added in an app, the same way as an estimator can be added. The main advantage is that all the code is contained in the app which makes it easy to upgrade the underlying firmware when new releases are available. You can read about how to use this feature in the firmware repository documentation.
Support to configure ESCs with BLHeli Configurator
On brushless Crazyflies, ESCs can now be configured using the BLHeli Configurator. See PR #1170
A UKF (Unscented Kalman Filter) state estimator has been added
An Unscented Kalman Filter (UKF) estimator has been added based by Klaus Kefferpütz from the paper ‘Error-State Unscented Kalman-Filter for UAV Indoor Navigation‘. The estimator is still slightly experimental and does not yet support all positioning methods (see this issue). Because of this, it is not available by default, but you can try it by enabling it using kbuild! You can read about the UKF estimator in the repository documentation.
Platform filter in client flash dialog
A filter has been added to the bootloader dialog in the client to make it easier to find the correct release. Releases are now filtered based on platform to avoid the clutter of mixing releases for cf2, tag, bolt and flapper.
Stability and bug fixes
We have fixed several bugs in the firmware and client software that, but you can check the release notes for each of these for further details.
We have created a simple deprecation policy to clarify future changes of the APIs. The short version is that we from now on will mention deprecated functionality in release notes and that the deprecated functionality will remain in the code base for 6 months before it is removed. Please see the development overview for more information.


