Category: Software

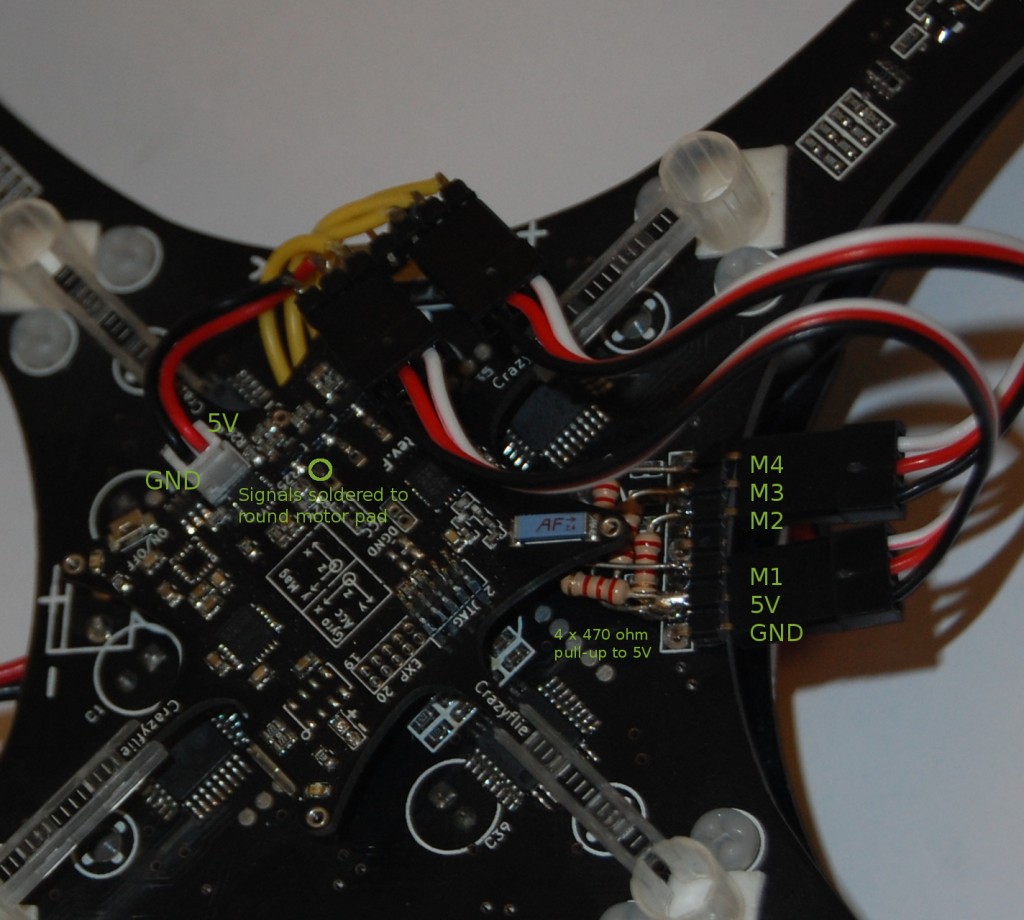
For a while Invensense’s gyros has been the MEMS sensors to use in multirotor  applications due to their good performance and vibration rejection. ST Microelectronics are also big when it comes to MEMS sensors but their gyros has not been that good when it comes to handle vibrations. In the beginning if 2013 they released the 3-axis gyro L3GD20 which are advertised to improve this and we thought we finally would do an investigation. So we bought a Pololu  AltIMU-10 board which has ST sensors and also the iNEMO module, LSM9DS0, which is a very sweet 9-axis 4x4x1mm chip. After a bit of a soldering exercise we got them both attach to an accompanying Crazyflie. The AltIMU-10 board we glued to the bottom and connected to the expansion I2C buss. The LSM9DS0 was a bit trickier and we removed the MPU6050 and used some of its components for the LSM9DS0 so we could glue it up-side down to the board. I think the picture speaks for itself. After some quick and dirty coding we managed to get them both working and flying. The flying capability is very similar to the MPU6050 and we can’t really tell the performance apart. We will have to investigate it in more detail and for that we are adding a SD Card breakout to write raw data from all sensors at full speed. That will be the exercise for next week so stay tuned!


[pe2-gallery album=”http://picasaweb.google.com/data/feed/base/user/115721472821530986219/albumid/5941229033309217905?alt=rss&hl=en_US&kind=photo” ]

It’s been a long time now since we released new versions of our software. So it’s about time :-)

Here are some highlights from the releases:

  • Altitude hold support in firmware, PC client and Raspberry Pi SD-card image
  • Bitcraze VM upgraded to Saucy Salamander (13.10)
  • Lot’s of bugfixes

One of our big topics of discussion at Bitcraze is how to release and when to release software. Our plan has changed over time and this time around we are trying something new. First off the version naming is (as before) constructed using the year and month. New for this release is that we decided to make a beta release before making the real release. If the feedback is good on the beta, we will just rename the release after a week of testing.

When it comes to handing the issues in Bitbucket we have tried an approach were we minimize administration. After every release we create a new milestone named after the last release (i.e 2013.11+). Everything that is supposed to go into the next release is then added to this milestone. When we do a new release all the resolved issues/implemented features that are closed and added to this milestone makes up the change log. Issues that are not resolved are moved to the next milestone.

The discussion we have had for the last week resolves around the release schedule and whether or not do do a pre-release (release candidate). Up until now we have had the goal to do feature-based releases (although there haven’t been that many releases…) but we have now started leaning towards trying period-based releases. We feel that it’s very easy to drag on and not release a new version since we want more and more features and fixes in it. Ideally we would select a few that would go in and then stick to it, but we are having a hard time doing this. Below is a quick outline of the idea we have for the future releases:

The idea is to release a new version of the firmware/client about every two months (8 weeks). First we create a new milestone that we assign issues/features that we think we will be able to fit in (i.e for the next release this would then be 2014.01). After 7 weeks we branch and create a release candidate that the community can download and try. If any major bugs are found they are fixed and then the release is done. Our goal with this is to release more often, even if the releases might contain less things.

So what do you think about doing period-based releases instead? We think that the community should have a say in this, since you are the ones using the releases. So go ahead and vote, we know you want to!

How should we do new releases of the firmware/software?

View Results

Loading ... Loading ...

The Crazyflie 10DOF has a pressure sensor that can be used as an altimeter. This sensors was waiting to be used and we had many contributors implementing altitude hold/hover mode for it. We recently merged one of the best working contributions to the main branch of both the Crazyflie client and firmware so that it is now a bit easier to experiment with it. The current code is based on the work done by omwdunkley who did a great initial job and you can read more about it in his post.

The altitude-hold is another control-loop that will try to keep the copter at the same altitude by using the altimeter and the accelerometer to sense the altitude and vertical speed. This is controlled by keeping a button pressed on the game-pad. When altitude hold is activated the thrust joystick axis controls the altitude set-point and thus are used to make the copter rise or fall.

Foam on the Crazyflie 10DOF altimeter

Foam on the Crazyflie 10DOF pressure sensor

From our test in a calm pressure stable room the altitude is held at roughly ±15cm. However we had some problems when we where moving around. The Crazyflie sometimes suddenly rose and went to the ceiling. After some debugging we found that the problem was mainly physical, the pressure sensor is exposed of dynamic pressure when flying. To fix that we cut some of the foam we have in the Crazyflie box (yes that was planed all along ;-), and we stuck it on top of the pressure sensor. Doing so greatly improve the stability when flying more aggressively! (Something we kind of knew from peoples suggestions but it is nice to see it working in reality)

This functionality still require some debugging, tuning and code clean-up, but if you want to test it just grab the latest version of the firmware and client from Bitbucket. To begin with check that the altitude hold function is well configured for you joystick mapping (we found that it is best set on the shoulder button of the thrust hand). The altitude lock will be activated as long as the button is pressed. It can be pressed while the copter is flying or while it is in the ground. If pressed when the copter is in the ground, you will have to press the thrust joystick up a bit to make the copter fly higher. We also recommend to be a bit experienced with flying the Crazyflie as the altitude hold sometimes requires a quick recovery manoeuvre ;-).

This Monday post we are devoting to the community development and we will try to give a short summary of what is going on there. We recently haven’t our selves had that much time to help out with this development, something we intend to change, so all credit goes to the community!

  • A port of the OpenPilot CC3D firmware to the Crazyflie done by webbn. Still under development but video already shows promising results.
  • Altitude hold functionality which is being developed in parallel by many, omwdunkley, phiamo, et. al. We hope we soon can contribute to this as well.
  • Improved thrust control which is being discussed a lot and hopefully we will soon see some ideas realized.
  • A Ruby cfclient written by hsanjuan.
  • The Android client with a lot of work from derf and sebastian.
  • The FPV implementation driven mainly by omwdunkley and SuperRoach. Omwdunkley has made an awesome HUD (Heads Up Display) which we hopefully sometime will see integrated into the cfclient. Check out the video!
We have probably forgotten some of the great development that has been going on recently and if that is the case please write a comment about it and we will update the post with it.

For the last couple of years (!) we have been discussing on and off about automatically flying the Crazyflie from a PC using OpenCV and a camera. We did a try a while ago using a PS3 Eye camera that wasn’t very successful. One of the issues we were having was detecting the distance from the Crazyflie to the camera. Another issue was a lag of about 1 second which made it impossible to control the Crazyflie using the video as input. So last week this discussion came up again and we finally decided to buy a Xbox360 Kinect. The image resolution is higher than the PS3 Eye and of course it has the ability to detect the distance from the camera to the objects it’s seeing.

Crazyflie and Kinect

The goal was to create a proof-of-concept application that shows that it’s possible as well as providing a stub for anyone that’s interested in doing more development. The application uses the normal image as well as the depth image from the Kinect to estimate where the Crazyflie is. This can easily be done by attaching a small colored ball to the Crazyflie and using a white background for flying. The images are processed and the current X/Y/Z co-ordinates given to a control loop. The control loop consists of thee PID regulators that will correct the roll/pitch/thrust that is sent to the Crazyflie to reach a X/Y/Z set-point in the image. The X/Y set-point can be selected by clicking the image or you can hold down the mouse button and drag it around. A cool feature that we would like in the future is to draw a geometric shape that the Crazyflie could follow. But there’s still a lot of work to be done with the control loop before we can achieve that.

After seeing the video you might be asking yourself where the James Bond theme music or the inverted pendulum is. Well, we are’t quite there yet and we will probably not even get near it. But still, this shows that the concept works. And for anyone that’s interested, it’s possible to do some basic trajectory planning algorithms at home with a Crazyflie and a Kinect.

For a more technical details have a look at the Kinect page in the hacks section of the wiki.

Last year we quickly hacked together a client for Android to show that it was technically possible to use the Crazyflie/Crazyradio on the platform. It worked, but it wasn’t very good. After that not much has happened, until now. Thanks to contributions being made by fredg02, Sebastian Sams and bug tickets from Sascha Heymann, the hackish prototype we did is now turning into something that is actually usable. It’s still under heavy development but there’s already some new features. Here’s a quick run-down of what’s been added:

  • An external controller can be used instead of on-screen thumb sticks
  • You can scan for Crazyflies
  • The same flight control settings that are in the cfclient are now available (i.e advanced mode, X-mode, max roll/pitch/yaw and thrust)

So the Android client works with phones and tables that support USB host or OTG. Anything else? Well, there just happens to be an Android platform that even comes shipped with an external controller…the Ouya! So if you have an Ouya and a Crazyflie you can just side-load and you are ready to go! Since we are used to the PS3 gamepad we had some issues getting used to the Ouya controller. If you have the same issue you can pair your PS3 controller with your Ouya and use it instead!

Once the software becomes more stable an APK will be released, but until then the repository with the code and issue tracker can be found here.

 copter_ouya

In order for users to be able to pilot the Crazyflie from platforms without a graphical user interface there’s now a headless client in the repository named cfheadless. It’s intended to be run the command-line and is still under development, but working.

The main reason it was made in the first place was to enable flying from the Raspberry Pi. The QT interface was very sluggish and it required all the QT dependencies to be installed. So the cfheadless client doesn’t depend on QT and doesn’t have a graphical user interface at all. For users to quickly get something working with the Raspberry Pi we prepared a pre-configured SD-card image that is based on the Raspian Wheezy. We didn’t remove anything from the image, we just added the things needed to fly the Crazyflie. It works out of the box with the Crazyradio and a PS3 controller. In order to switch to anther controller you will have to connect to the Pi and edit the configuration.

To use the image you have to edit the configuration if needed and then just connect your controller, power on the Crazyflie and lastly connect the Crazyradio. The cfheadless client will now automatically start and connect to the Crazyflie.

The image can be downloaded using this torrent or via direct download. The torrent is preferred since the direct download is limited to 6 simultaneous downloads. For more information on how to use the image have a look at the wiki page and if there’s any issues or suggestions drop by the project tracker at Bitbucker and add them. If you already have a Raspian image downloaded and running and you want to be able to use it with the Crazyflie then have a look at how we made the image or the hacks page with the original instructions.

Crazyflie and Raspberry Pi

There’s an updated version of the Bitcraze virtual machine out. The VM has all the pre-requisites for using the Crazyflie/Crazyradio and also the full development environment for our projects. Here’s a list of the improvements from version 0.2:

  • Upgraded version to of Xubuntu to 13.04
  • Improved README and instructions inside VM
  • Updated to the latest version of repositories
  • Added script for updating all the project repositories
  • Added pre-configured JTAG debugging for Eclipse using BusBlaster
  • Added KiCad and the Crazyradio design files

More information on the Bitcraze VM can be found here and it can be downloaded from this link. If you don’t want to download our virtual machine but instead make your own then have a look at this guide on the wiki.  It details how to get Xubuntu running in VirtualBox with all the pre-requisites for the development environment.

We have finished cleaning up the Crazyradio design files and they are now added to a Bitbucket repo. The project includes a cache file with all the components from our library that we have used. Once we are finished with cleaning up the component library it will also be uploaded.

It’s been yet another week with lot’s of ideas, contributions and discussions. Here’s some of the things we’ve seen the last week:

And of course thanks to everyone that keeps updating the wiki and helping out in the forums!

It’s been another busy week at Bitcraze. Unfortunately we are lagging a bit behind on pull-requests and such, but we are doing our best to catch up. Also development taking place in the forum has accelerated and we will try to summarize some of it next week.

The planning for the next batch is finished and it’s now going into production. Expected to be ready in the end of June. For this batch we have modified the motor-mounts to add some space at the bottom and also increased the size of the “stopper” at the bottom of the mount to keep the motor from popping out.

From now, as been requested, we will also start offer the parts of the kit separately: The Crazyflie 6/10-DOF, the Crazyradio and the antenna. Aside from this we will still be offering the previous kits and all the spare parts.

A new source version of the Crazyflie PC client has been uploaded to the Bitbucket page. Since this new version mostly fixes critical bugs related to mac, there’s no new version for the Windows installer.

For the next version of the windows installer we are looking at packaging and installing Crazyradio driver with the client. We are also looking at making Ubuntu packages accessible in a PPA as well as Fedora/OpenSuse packages. This would simplify the Client installation on Linux. ArchLinux already have a package in AUR  courtesy of Gergely Imreh.