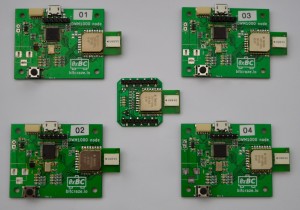
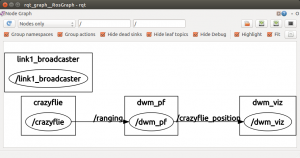
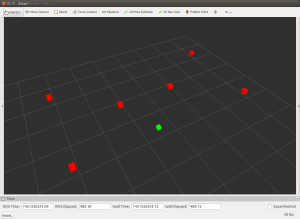
Blog

If you haven’t already noticed, you’re not on bitcraze.se. You’re actually on bitcraze.io (and on HTTPS). After a long week of researching, testing and holding our breaths, we’re finally on our new domain. You would think that it’s not very complicated, but as always the hole is deeper than you think… We will keep our old bitcraze.se address for a long time to come, but it will be redirecting to the io domain (this includes email). The only thing we have left to move is the forum, and it’s on it way.

A couple of weeks ago we wrote about our Monday post tradition where we post a blog-post every Monday. Sometimes we spend lots of time testing and documenting to come up with something to write, and sometimes it’s just a quick note. And that’s the way it’s been for years. But last week one of our community members (Wolfgang) offered to write a post about what he’s been up to in the USC ACT-lab. We were really excited about the offer and it spawned the idea of letting more people write guest posts. We’re really happy to see that there’s lots of interesting things happening in the community and we would really like people to get a chance to show off what they have been working on.

So if you’re working on something with your Crazyflie and would like to write a blogpost about it, drop us an email and we can see if we can fit it in!

Recently I got a Chromebook, mostly out of curiosity for this odd “computer that runs only a web browser”. While playing with Google dev tools I quickly saw a possibility to make a Crazyflie client as a Chrome app: the Chrome API provides USB connectivity,and HTML5 has a javascript gamepad API. A chrome app is designed to look and feel like a native application: the app does not require internet connection and is launched in its own window.

This week-end I finally got around to test it, it’s not pretty but it works :-)

crazyflie_chrome_client

The current functionality is:

  • Channel and datarate can be changed
  • Read input from a gamepad, the mapping is fixed to mode 3 and the sensitivity is fixed
  • Sends set-points to Crazyflie 33 times per seconds.

I haven’t had time to do any layout work on it (that is pretty obvious in the screenshoot :) ), but the plan is to use Angular Material to handle the GUI.

This is only a proof of concept but we are seeing a lot of potential: the Chrome app runs on Linux, Mac, Windows and Chromebook, is easy to install and is written in HTML/CSS/Javascript which seems to be a very popular platform nowadays.

I have pushed the code on Github so if anyone is interested in helping to shape up the app head to the forum to read the discussion about it.


When we were developing the Crazyflie, going from our hackish prototype to a production version, we decided to start posting a blog-post every week. Back then we always used to meet after work on Mondays to work on our project, so we named our “once-a-week” update “Monday posts”. The purpose of the posts was to show that things were happening behind the scenes, even if things looked pretty quiet. Developing something from scratch takes a lot of time and there’s not always something interesting happening, so the Monday-posts covered all sorts of things related to the project. We’ve written about the good times, the bad times and everything in between; covering tech, manufacturing, our community and trips that we’ve done.

It’s not always easy to come up with something to write about every week. Sometimes we spend lot’s of time investigating and writing about something (like RPM measurements part 1, 2 and 3) and sometimes it’s just a quick note about what’s happening. But we’ve made a point of always posting something (even on Christmas eve), and have been doing so every Monday since January 2012. So we were a bit shocked this week when we realized that it was Tuesday and we have missed posting something yesterday. But don’t worry, we’re still here and things are still happening :-)

Next month we will be attending the Bay Area Maker Faire. Last fall we visited the Maker Faire in Rome and really liked it! While there we met people from Make that invited us to the Bay Area for the next Maker Faire. It’s an awesome event with lots of technology and geeks around, so we’re really looking forward to it!

In other news we will be switching domain shortly to our bitcraze.io domain and also switching on SSL for the blog/wiki/forum. Our old bitcraze.se will still be around linking to the same site. The move is planned for this week, but like always there might be something else happening that postpones it.

Don’t forget that we still have the CCW-propeller replacement running. So if you have a Crazyflie 2.0 from the first batch and you are having issues with your propellers, then fill in the form and we will ship you a set of replacement propellers.

Last Saturday it was Arduino day 2015 and it happens that the Arduino office in Sweden is in the same building as ours. So we where invited and presented Crazyflie. It was a really fun event with a lot of interesting people passing  by and we had a lot of fun.

Arduino day 2015

There was also Helium balloon, which gave us a perfect occasion to use the blimp hack we did more than a year ago. We attached a brunch of ‘Arduino colored’ balloon to it and flew it around using the Deviation TX. It is definitly something we have to port to Crazyflie 2.o.

blimp_scaled

Finally as the event was hosted by Arduino, and we do not have Arduino compatibility (yet … ; ), we thought we would make something with Arduino and present it. We ended up making a Crazyflie Controller using an Arduino and using a thumb stick and ultrasonic distance sensor that was lying around the office. We attached everything to a glove to make it a ‘wearable’ controller.

arduino_glove


glove_action glove_closeup

The glove is working as follow: you place your hand over a hard surface (concrete floor or table), click the thumb-stick button to set the zero and from now-on rising the hand higher will increase the Crazyflie thrust. Then the thumb-stick can be used to steer the Crazyflie. The program is quite simple and implemented in a single loop.

Technically the most work has been put in enabling the serial port of the Crazyradio so that the Arduino can send commands to the Crazyflie using the Crazyradio directly without a computer. As there is a lot of pins available on Crazyradio and a voltage regulator capable of accepting up to ~16V, the aim has always been to be able to use it as a radio module for other system. Our first thought was PPM input, but now serial control will also be possible. We are still cleaning up the code and working on other new functionality on the Crazyradio. We plan to release a new firmware soon that will support PPM, UART and a more efficient USB protocol to communicate with many Crazyflies using one radio dongle.

As many out there think is is more fun to fly the Crazyflie rather then develop upon it (like we do :-)) we have quickly looked at ways to pilot it with a RC transmitter. This forum thread is a good starting point for a developer discussion. To summarize it a bit there are many ways of implementing it which all require more or less development and has different pros/cons

  • Attach the Crazyradio PA to the expansion module/port of an RC transmitter.
  • Implement the E-Sky transmitter protocol or other nRF24L01+ protocols in the nRF51.
  • Using the DeviationTx code and a nRF24L01+ module.
  • Attaching a RC receiver to the deck (expansion port) interface.

Today I will write a bit more about the DeviationTx as it is a great open source project and that it has support for the Crazyflie. It was over a year ago we got contacted by Victor who wanted to implement the Crazyflie protocol in the DeviationTx code base, which he did pretty quickly. We feel ashamed for taking so long to try it out. So during the weekend I freed up some time and gave it a shot. The DeviationTx project replaces the firmware in Walkera transmitters with a better one which has the possibility to support a great amount of RC models. However many of them use different transceivers modules so this must be added to the hardware. Well a bit of hardware hacking is always fun and we had a nRF24L01+PA module laying around. They have a module installation document but I found it easier follow this guide as I had the same type of module and transmitter (Devo7e).

devo7e nRF24L01 module

The module installation was done pretty quickly but what took time was to update the firmware. The instructions tells one to download the walkera update tool but I just couldn’t find it on their website, nor the original walkera devo7e firmware (which they recommend to test with first). Thankfully I could find one using google and ended up using this link. Next thing was to fire up a windows 7 virtual machine to install it in which it worked without problems. So did the flashing of the DeviationTx firmware, I flashed the nightly build 4.0.1 and copying the file system according to the instructions. What I forgot though was to edit the hardware.ini file to enable the module which I understood when the protocol selection had a star in front of the name <*CFlie> (OK, I admit, I thought the hardware wasn’t working at first…). Then I setup a new model using the <CFlie> and I used the Fixed ID to setup the address, The data rate and channel are combined in the fixed id using channel as lowest two decimal digits and the rate the first were 0, 1, and 2 for 250kbit/s, 1Mbit/s, and 2Mbit/s respectively. So channel 80 on 2Mbit/s is encoded as 280 and channel 80 on 250kbit/s as 80.

And boy I was happy when I saw the green led (radio com led) blink on the Crazyflie 2.0, but nothing happened when I pushed the trust… Then I remembered, we recently implemented a lock so that a zero thrust must be sent at least once for it to unlock (to prevent Crazyflie to fly away if the gamepad is not setup correctly and constantly sends 100% thrust :). Looking into the source code one could see the trust was at minimum 5535 which was never unlocking the thrust. Removing this lock in the Crayflie 2.0 firmware and it was flying! but in plus mode… The Deviation cflie module code seem to rotate the pitch/roll setpoints.

Next step will be to do some modifications to the Deviation cflie module for Crazyflie 2.0, adding code to unlock the thrust and disabling the axis rotation, then make a pull request to the DeviationTx project for everyone to enjoy.

A big thanks to the DeviationTx project and to Victor for the cflie module implementation! Ohh, and by the way, they are making a universialTx module that will support almost any RC model out there, including Crazyflie, can’t wait to see that.

While digging around in our office looking for a board we found a piezo buzzer we bought a while back. The reason for buying it was to test some buzzer functionality to the Crazyflie 2.0, but we forgot about it. But now that we found it again we got to work :-) We documented the build in our hacks section on the wiki, but here’s a quick run down.

  • Get a piezo buzzer and a Crazyflie 2.0 prototype deck
  • Solder it to the RX2/TX2 pins (pinout)
  • Clone and build custom firmware (dev-buzzer branch)
  • Play around with the parameters in the buzzer group
    • Set buzzer.effect for different effects
    • Set buzzer.melody for different melodies (with buzzer.effect = 2)

If you want to add new melodies or effects, have a look in the modules/src/buzzer.c file :-)

Here’s a Vine with the result (enabling sound is a good idea :-) )

On a side note Seeedstudio will start shipping out the CCW propeller replacements this week. If you still haven’t filled in the replacement form it’s not too late, here’s the form.

Lately we have merged a new input subsystem to the Crazyflie python client, it allows for more flexible input configuration like connecting more than one gamepad in training mode, or having external input like the LeapMotion appear as standard input. To test the flexibility of the new input system, on Friday, we implemented a ØMQ input driverØMQ is a library that permits to easily transmit messages between program. It is high speed, low latency and extremely easy to use. It has binding and implementation for a lot of programming language, which opens Crazyflie control to a lot more people and application.

The way it currently work is: You connect the graphical Crazyflie client and select ZMQ as input device. You connect the ØMQ socket and send json to it containing pitch/roll/yaw/thrust. And voila, you are controlling Crazyflie from your own program.

We just got a Kinect 2 and started playing around with it, suddenly the new ØMQ control became very useful. We already worked with the kinect long time ago so we had control code from back then. Also we wanted to quickly do a proof of concept so we started working with the Microsoft SDK to see what is possible, we are going to use libfreenect2 on Linux later. Finally we know how hard it was to control the thrust so we wanted a way to test pitch/roll first as a proof of concept. At the end of the day we ended up with this architecture in the office:

zmq_kinekt

The C++ implementation in visual studio detects the Crazyflie and sends coordinate to the Controller python script. The controller script is a stripped down version of or previous kinect experiment and only runs PID control loops to control pitch and roll, trying to keep Crazyflie at a fixed coordinate in space. Finally the Crazyflie client is setup in training mode with ZMQ handling pitch and roll and the gamepad handling thust and yaw. The gamepad can take-over completely in case of problem.

Thanks to ZMQ resiliance we can stop any part of the system and start it again, the connections automagically reappears. So we ended up with the following workflow:

  • Fly in the Kinect detection area
  • hand-over pitch/roll to the controller loop
  • When the Crazyflie starts oscillating or going away, take over control and land
  • Stop controller, modify things, restart

This was quite painless and nice. We ended-up connecting together very different systems and they just worked. We got so interested by the experiment that we now have a full ZMQ Crazyflie server on the work that would allow other program to do what is possible with the standard Crazyflie API: scan for Crazyflie, connect, read and write log and params.


Some time ago we decided that it would be nice to have a name for the Crazyflie expansion boards, a bit like the Arduino shields or the Beagle bone capes. We organized a poll on our website, that ended with cheating so we organized a local vote and flykit won. In second place was the deck. Over time we started liking deck more and more since it fits better with the actual look of the boards. Finally we pushed ourselves to decide on one and we went with deck. This comes from the naming of floor in ships, planes and (more importantly) space ships. We also though we could write a bit about the Crazyflie 2.0 expantion capabilities and the deck architecture. In this post we are forcing ourselves to say deck instead of expansion port, lets see how it goes :-).

On Crazyflie 2.0 decks can be installed both on top and bottom. Each deck we make has a symbol indicating its correct orientation:

deck_conf  Expansion board orientation


Lots of signals and functionality has been routed from the Crazyflie 2.0 to the deck port:

Connector_multiplexing


The OW pin is used to connect a One Wire memory with a specific data format, this allows Crazyflie 2.0 to know which board is connected and to activate automatically the right driver, so this is kind of plug-and-play. This is currently used to enable the LED ring deck driver. The aim is to develop an API that will allow anyone to easily create decks that would be automatically detected by Crazyflie.

The deck architecture opens lots of possibility. We’ve already made the LED ring that faces down, but it would be possible to make one that faces up as well. In the future we hope to have have ground facing camera, GPS boards, Camera boards. And more than one can be installed at the same time. We also investigate doing bigger expansion board for example to have Crazyflie acting as the brain for a bigger quad.

On the firmware front, we are finishing the merge of Crazyflie 1 and Crazyflie 2 firmware. Currently the source code for Crazyflie 1 and Crazyflie 2 is on two different branches which makes it harder to maintain both of them. We have come so far that we have a working merge that can compile and fly either for CF1 or for CF2. There are loots of cleaning up to be done before it can be pushed though but we are giving a heads up as the changes will affect forks that are doing rebase as well as pull requests.

When the schools closed for vacation last week Minc (the company accelerator where we have our office) hosted a “bring-your-children-to-work” day. The original idea came from Fredrik who works at the Swedish Arduino office (in the same building as us). One of the goals whas to let children see cool technology and to get a chance to try it out. We quickly jumped on this since we thought it would be fun for the children to fly. But we realized there was a bit of a safety problem letting Crazyflies go wild all around the place. So we dug up an old idea we had been discussing (yes, there’s lots of those..), the input-device MUX.

The idea is to allow combinations of input-devices to work together at the same time. There’s a couple of use-cases for this that we have been discussing in the past, like combining Kinect with a controller so you can take control if you loose tracking. But the most obvious one is a “learning” mode, where you could control roll/pitch from one device and thrust/yaw from another. Or having the possibility to take over control “on-the-fly” (no pun intended…) from one device to another. For us it makes it a lot easier to give a controller to people and say “Try it out!” if we can take over control just in case things start going bad.

So we started hacking around a bit and got it working, but there’s still lots of work to be done. We revised the architecture a bit for the input-device layer in the Crazyflie Python client from what we posted before. The main change is the multiplexer, which enables the user to open multiple input-devices at the same time and combine them. The other change is to connect other devices “higher-up” in the architecture, like the Leapmotion. Instead of connecting it as an input-device with a mapping, it is connected directly to the MUX and will give well scaled values for controlling. The same goes for other devices such as the Kinect and network connections (which would allow to control Crazyflie throw the client from any other software).

input-arch-mux


The hardest part will not be to code this, it will be to design the UI and configuration of this functionality. We have some sketches, but any ideas are welcome! In its current state you just select a MUX, then the devices that you want to use (master first, then slave). But there’s no way of configuring what values are taken from what device.

Check out this album to see a few photos from the “bring-your-children-to-work” day!

We have finally managed together with Seeedstudio to improve the CCW propellers and to setup a process to acquire a free set of CCW replacement props. As continuing from this post we have discovered that many of the CCW propellers from the first batch of Crazyflie 2.0 where a bit too unbalanced. Too be a bit more technical the tolerance distribution for the CCW propellers was a bit offset, so instead of the majority being decently balanced, many where unbalanced and needed balancing. This is not really a big issue and can pretty easily be corrected by balancing them with some tape according to this guide and we still recommend them to be balanced to get the best flight performance. We however think there where to many unbalanced propellers so we offer every one that bought a Crazyflie 2.0 kit from the first batch a free set of CCW propellers including shipping from China. To acquire a free set of CCW propellers please fill in this form.

Propeller guy