Author: Aris

If you have set up a Lighthouse positioning system with the Crazyflie before, you are familiar with the geometry estimation step. Walking around the room holding a Crazyflie, clicking a few buttons in a wizard dialog, and hoping that at the end you get a working configuration defining a global coordinate system.

The last part – the hoping – is what we have been working on fixing.

The problem with the old wizard

The old geometry estimation wizard did the job, but it felt like a black box. You would follow the steps, add multiple samples, click “estimate geometry” and wait. If the wizard failed, either by returning a clearly wrong estimation or by not returning anything at all, you got very little information to go on. Was it a bad sample? Was the line of sight of a base station blocked? The only real solution was to clear everything and start the entire process from scratch.

We wanted geometry estimation to feel less unpredictable, and more like a process you can actually see, steer, and understand.

What’s new?

  • Continuous geometry estimation.
  • Sample collection and modification.
  • Live feedback during geometry estimation.
  • Verification samples.
  • Updated UI.

Continuous geometry estimation

One of the biggest changes is found underneath: geometry estimation now runs continuously in the background. Every time you add a sample, the solver recomputes the geometry right away, using whatever data you’ve collected so far. That means you get live feedback instead of a final verdict, helping you understand if the last change you made improved the geometry estimation or not.

Sample collection and modification

The sample collection process has become more controlled. XYZ-space samples are no longer logged passively as you move the Crazyflie around the room. Instead, you collect each one separately by quickly rotating the Crazyflie at the required point.

Additionally, you can now access the data used for the geometry estimation. All recorded samples remain available, so you can modify them at any time. Any changes are automatically reflected in the geometry estimation, making it easy to correct mistakes or refine the result.

Being able to modify the samples, opens up workflows that were previously impossible. For example, moving the origin of the coordinate system or re-aligning the X-axis becomes as simple as collecting new samples. Similarly, if a base station is replaced or has moved, you can delete it and add the new or updated one by collecting only a few additional samples.

Live feedback during geometry estimation

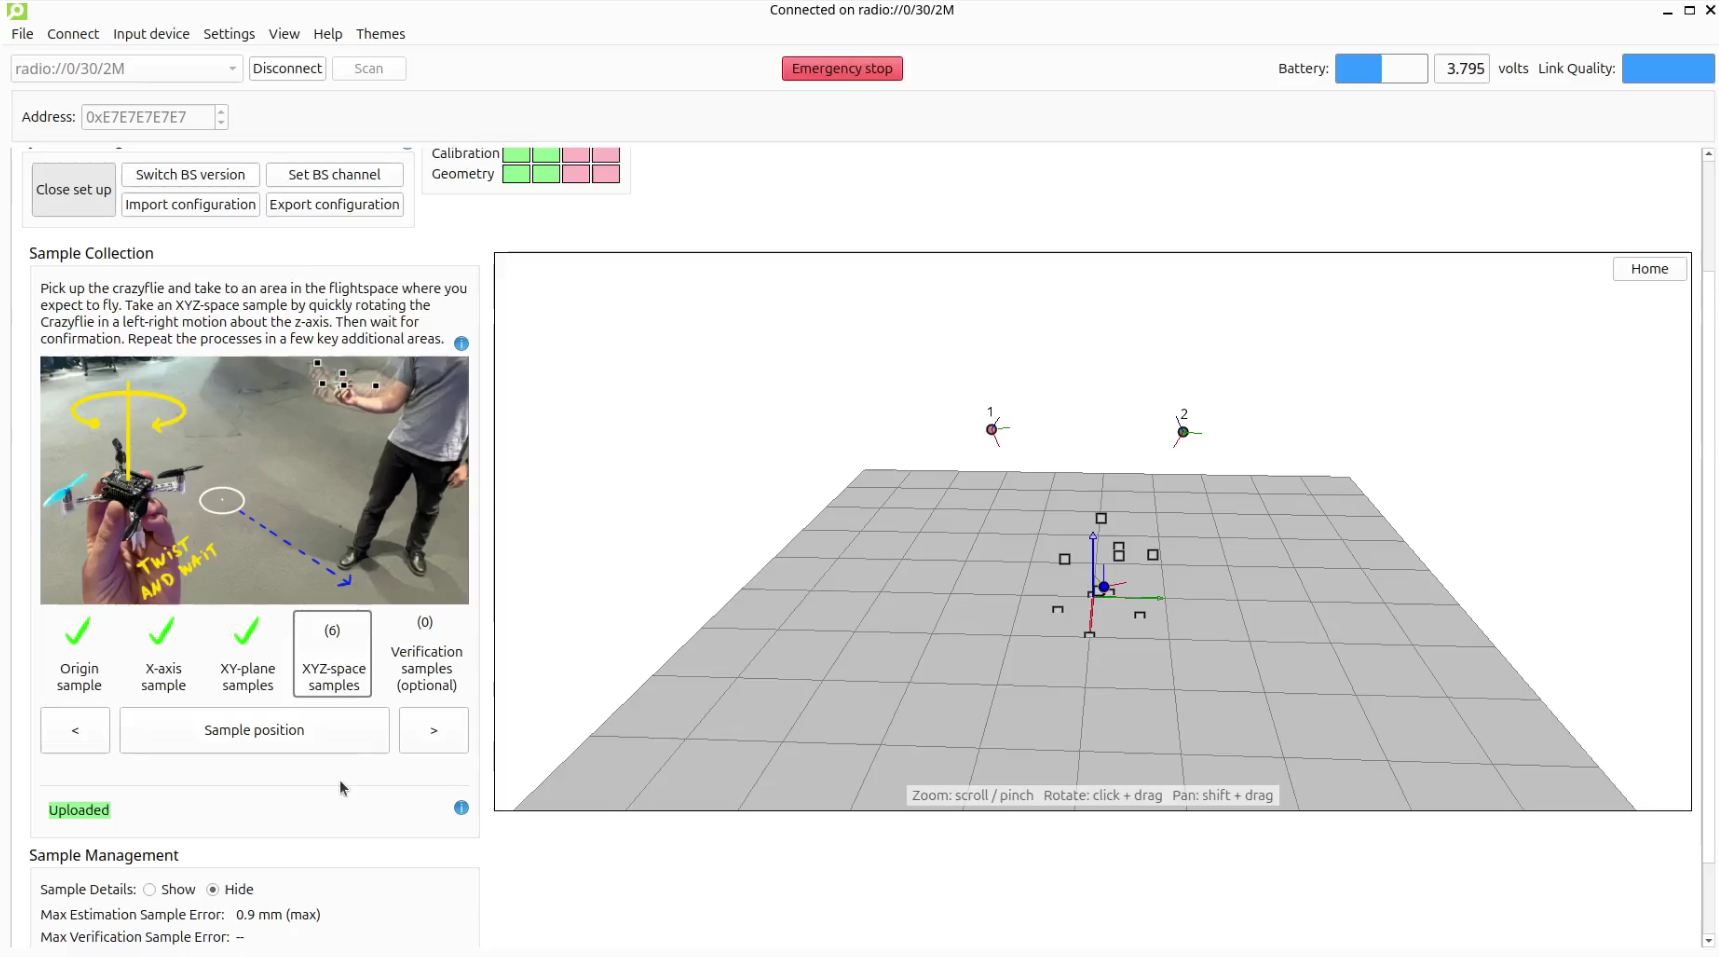
When setting up the lighthouse system, a status line tells you where things stand at all times: “Not enough samples” when the solver needs more data, “Updating…” when the solver is updating the geometry, “Uploading…” when the updated geometry is being written to the Crazyflie, and “Uploaded” when it’s confirmed. No more waiting with bated breath.

Whilst the live feedback avoids a heavily weighed pass-fail condition, much like the old system it does not guarantee that a truly accurate estimation has been uploaded to the Crazyflie, this is where the verification samples come into play.

Verification samples

This is one of the biggest advantages of this update. In addition to the samples used to estimate the geometry (estimation samples), you can now take verification samples. These are extra samples taken the same way, but not used for the estimation, giving you an independent check on how well the base stations agree on each verification sample’s position.

Previously, the only way to know if your geometry was actually good enough to fly on was to fly and see. Now the max verification sample error gives you a rough read on the quality of the geometry before the Crazyflie takes off. Then, if a particular part of the flight space isn’t well covered, you can add a few more XYZ-space samples to improve it.

Updated UI

The new workflow required a major update to the UI. We aimed to make it easier to adapt the system to your needs. This is done by having the ability to retrace your steps, allowing for more control during the set-up process. The design also has larger focus on guidance and feedback with more detailed graphics to guide you through and extra large visual confirmation for when you are collecting samples away form your screen. Additionally, the buzzer deck and any of the LED decks can now also provide confirmation.

The geometry estimation now lives directly in the Lighthouse Positioning tab instead of in a separate dialog. Click “Start set up” and the tab expands with a sample collection section, a 3D view of your base stations and samples, and (optionally) detailed tables of everything that’s been recorded.

This major update is part of the 2026.08 release. See the updated tutorial for Getting started with the lighthouse system to learn more. A special thanks to Joseph La Delfa (@cafeciaojoe) and Kristoffer Richardsson (@krichardsson) for their work that made this update possible.

We hope you enjoy it and are keen to hear your feedback!

We’re happy to announce that release 2026.08 is now available. This update ships a reworked lighthouse geometry estimator with a redesigned interactive Lighthouse tab, bidirectional DSHOT RPM telemetry, and a new deck supervisor for runtime deck health monitoring, along with a number of smaller bug fixes and quality-of-life improvements. Alongside the release, we’ve also shipped a fix for a long-standing lighthouse FPGA decode issue affecting simultaneous sensor hits. Thanks to our community contributors for their valuable additions to this release.

Major updates

Lighthouse geometry estimator rework
A large rework of the lighthouse base station geometry estimation (cflib + cfclient), replacing the old batch estimation script with a continuous, interactive workflow built into the client. Base stations and samples can now be added, removed, and verified live during a session, while the updated UI provides a live status feedback. Thanks to @krichardsson and @cafeciaojoe for their work in this project.

Bidirectional DSHOT and RPM telemetry
Motors driven over bidirectional DSHOT can now report their measured RPM back to the firmware. This feeds both telemetry and a new arming check: each motor is spun up and confirmed to actually be turning at the requested RPM before arming is allowed, catching a disconnected or seized motor before takeoff instead of after. Thanks to @EliaCareda for this contribution.

Deck supervisor
A new deck supervisor subsystem continuously monitors deck health at runtime, mirroring the role the platform supervisor plays for the flight controller itself. A deck that stops responding or reports a fault now surfaces an explicit error code instead of a simple alive/not-alive flag, so problems can be diagnosed rather than just detected.

Radio platform-packet handling moved into the nRF51 interrupt
All null CRTP platform packets — P2P, battery-voltage polling, bootloader, radio commands, safelink init — are now handled entirely inside the nRF51’s radio interrupt handler instead of being passed through safelink to the STM32. Battery-voltage queries in particular are answered directly from a packet rebuilt every ADC cycle, keeping this traffic off the application processor and giving these commands a fast, consistent response path.

Lighthouse FPGA: simultaneous sensor hit decode fix
Fixes a bug where a sweep crossing two sensors at (nearly) the same instant broke LFSR channel decoding and caused the firmware to discard the entire sweep block. This update belongs to the lighthouse-fpga repository. You can update your Lighthouse deck by flashing the 2026.08 release firmware via cfclient.

Persistent parameters settable from apps
Parameters marked PARAM_PERSISTENT can now be set from firmware apps, not just from a connected client, and their stored value is enforced/restored at boot.

Release overview

crazyflie-firmware release 2026.08 GitHub

crazyflie2-nrf-firmware release 2026.08 GitHub

cfclient (crazyflie-clients-python) release 2026.8 GitHub, PyPi

cflib (crazyflie-lib-python) release 0.1.33 GitHub, PyPi

Flying formations with a swarm is always fun to develop and watch, but it is also a great way to stress-test the software behind it. As part of the development of cflib2, we put it through one of its toughest tests yet: flying 49 Crazyflies in coordinated formations.

The entire swarm was controlled using a single Crazyradio 2.0, highlighting the combined improvements in cflib2 and Crazyradio firmware over the past few months.

The setup

The hardware configuration was relatively straightforward. We used 49 Crazyflie 2.1 Brushless drones, each one equipped with a bottom-mounted Color LED deck for vivid lighting effects. For positioning, we used the Lighthouse positioning system, covering the entire flight area, which was roughly 5x5x2m. Its accuracy allowed the Crazyflies to fly grid formations with just 0.4m spacing between them.

One of the big practical challenges when managing a large swarm is swapping the depleted batteries for charged ones. Thanks to the Crazyflie 2.1 Brushless PCB design, each drone can now charge while sitting on its charging dock, making it much easier to prepare the swarm for the next flight.

Flying the formations

The swarm performed a sequence of synchronized formations under the control of a central PC. Rather than streaming the full trajectories to every drone, the formations are built using the Crazyflie’s High-Level Commander. Each Crazyflie receives simple motion commands such as go to or spiral, and executes the corresponding trajectory onboard. At the same time, it receives commands for changing the color of the Color LED deck.

Using cflib2, these commands can be sent to all 49 Crazyflies through a singe Crazyradio 2.0, which was not possible with cflib.

Looking ahead

This demonstration is an exciting milestone for cflib2 and showcases what the new library makes possible. While controlling 49 Crazyflies is an impressive demonstration, cflib2 is designed to benefit projects of every size. Whether you are flying a single Crazyflie or coordinating a large swarm, the goal is to provide a faster, more scalable, and more robust communication library.

Most of the functionalities from cflib have already been migrated to cflib2, and development is continuing. For many applications, cflib2 is already ready to use, so if you would like to try it out, you can find the repository here.

Some Fun-Friday projects begin with a clear goal and a straight path to the finish line. The best ones, however, take you somewhere completely unexpected.

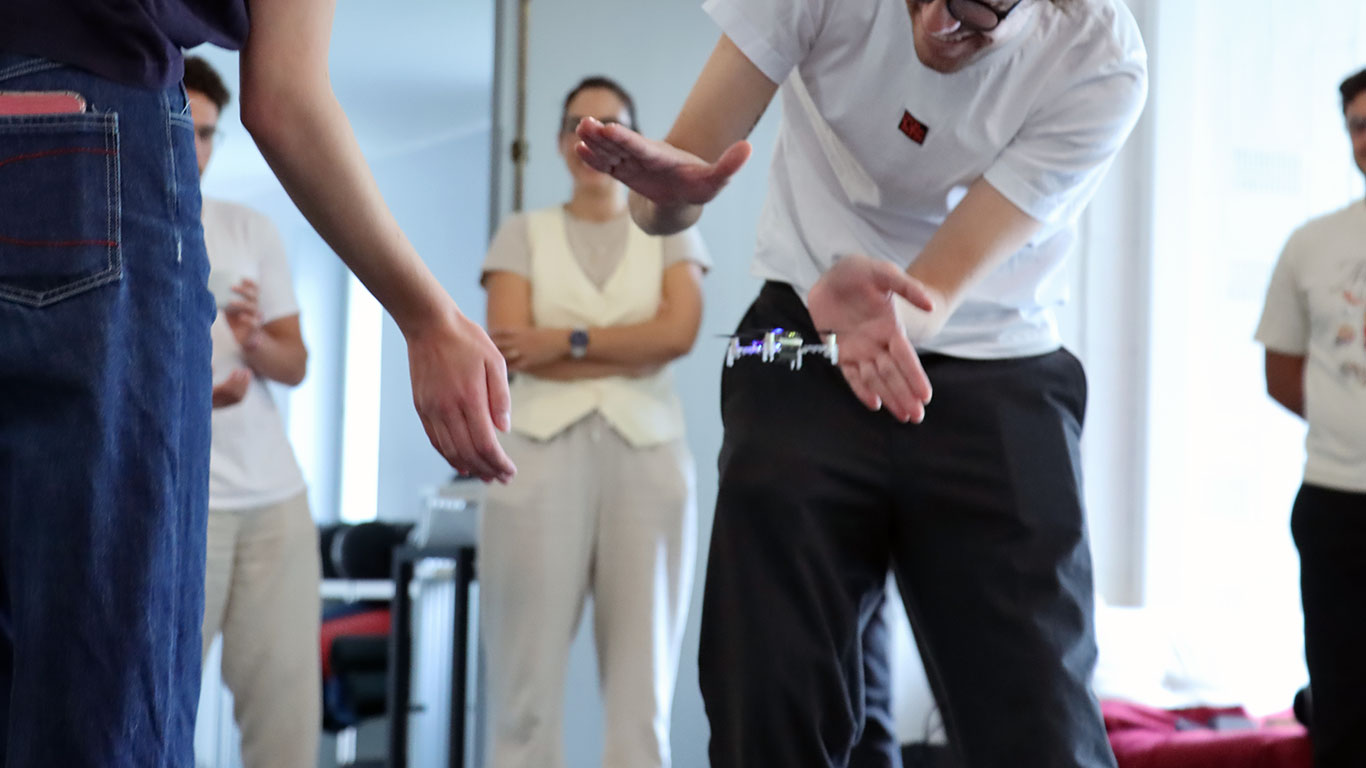
This project originally set out to build a device for determining spatial coordinates within a Lighthouse-covered flight area. Instead, it evolved into the Lighthouse Wand, a hand-held “magic wand” letting you grab and move drones in 3D space just by pointing at them.

How it works

The Wand is a Crazyflie platform with a Lighthouse positioning deck. That’s enough for it to know its own position and orientation in the room. When the button is pressed, it starts broadcasting those 6 numbers over Peer to Peer radio.

Any Crazyflie/receiver in the room on the same radio channel, listens to those packets and runs a simple “grasping” algorithm: while the wand line (positive x-axis) passes close enough to the drone, it builds up a confidence score. Once the score crosses a threshold, the drone is considered grasped. From that point on, it just keeps a specific distance from the wand, while being on the wand line.

When the button is released, the grasped drone either hovers in place, or lands, depending on the release height.

The Color LED deck on the receiver drone, gives you visual feedback: yellow while the Crazyflie is building up its confidence score, green when it’s grasped, and red when it’s landing.

A big advantage of this system is that all interactions run entirely onboard the Crazyflies, allowing them to operate without relying on the cfclient or cflib during flight.

The hardware design

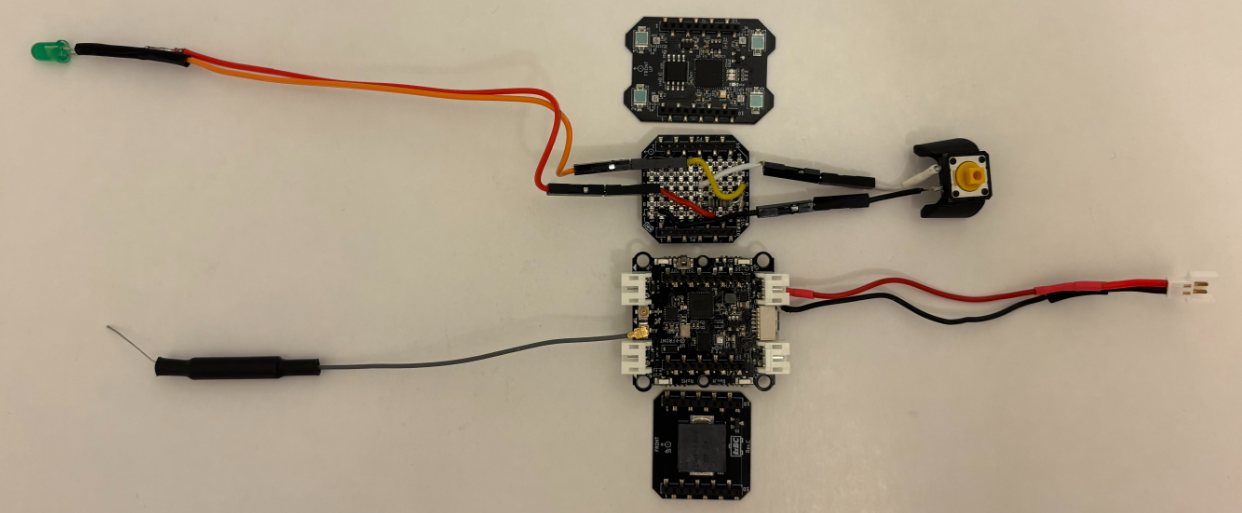
The wand is a Crazyflie Bolt 1.1 with a Lighthouse positioning deck and a Buzzer deck for audio feedback. To allow for user input, I created a simple “Button deck” based on the Prototyping deck utilizing the GPIO pins of the Crazyflie. It also includes an LED for visual feedback when the button is pressed.

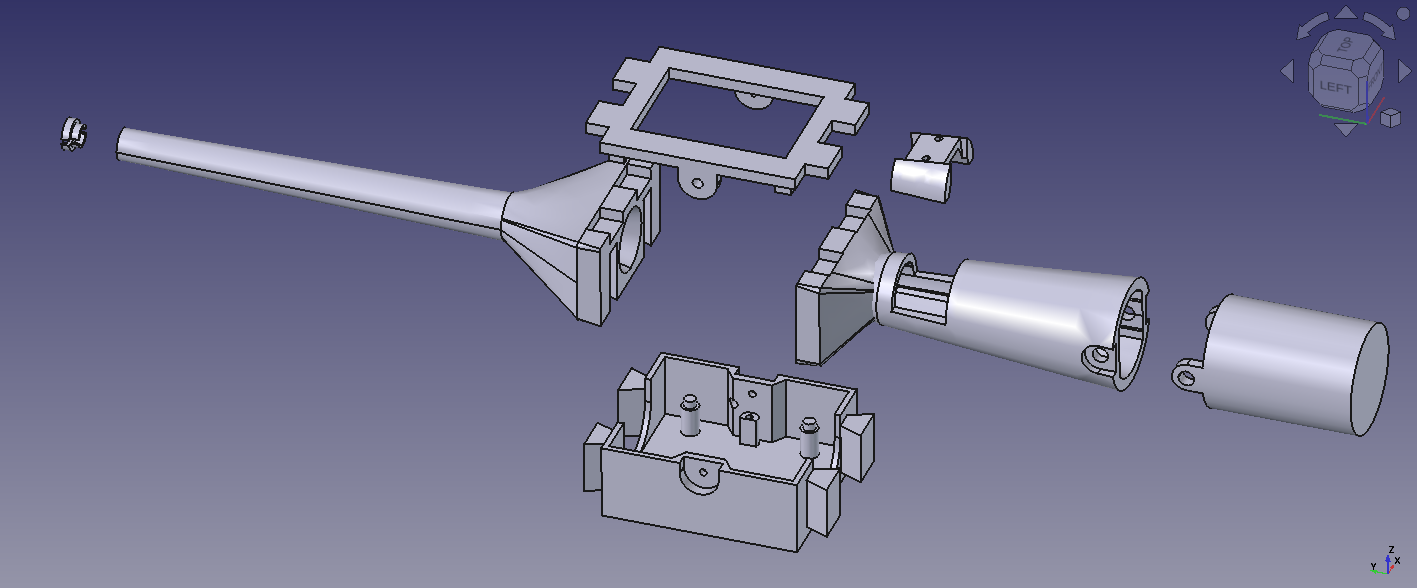
The casing is fully 3D printed in PLA and was designed to give the device a more wand-like feel in the hand. Its shape also makes it easier to hold, aim, and use intuitively during interaction.

The firmware design

Both the Wand and the receiver are firmware apps created on top of the crazyflie-firmware. In the design that I followed, there is a clean separation between the two parties. The wand is a pure broadcaster: it only reads its own pose and transmits it. All grasping logic and flight control run independently on each receiver. Since each receiver is fully autonomous, the system scales to any number of drones with no extra load on the wand.

Where to find the Lighthouse Wand?

A version of the Lighthouse wand is now integrated in our decentralized swarm demo, where it can be used to interact with multiple drones, while the collision avoidance algorithms are still on. This system was first showcased at the European Robotics Forum 2026 in Stavanger, and we’ll also be bringing it to ICRA 2026. If you’re there, stop by booth 91and try flying a bunch of Crazyflies yourself using the wand.

You can find the complete Lighthouse Wand project in this repository. It contains the firmware, the hardware files, and detailed documentation to build and experiment with the wand yourself.

If you’ve ever gone looking for a more advanced, or use-case-specific Crazyflie example (something beyond the basic single-feature ones), you’ve probably ended up digging through the cflib and crazyflie-firmware example folders. That’s about to change.

We’ve created a new repository: crazyflie-demos. It’s a dedicated place where both us at Bitcraze and the broader community can host self-contained, well-described Crazyflie demos.

Why a new repository?

The examples in the core Bitcraze repositories were meant to be kept focused: demonstrating one feature, one API, or one subsystem at a time. But real demos tend to grow beyond that pretty quickly. Once you start combining positioning systems, swarming, custom firmware apps, external sensors, or other integrations, things stop fitting naturally into the firmware or library repos.

crazyflie-demos gives those larger, more practical examples a proper home, and finally provides a good answer to the question: “where should I put this cool thing I built?

Why not just a folder of examples?

We want to avoid the fate of some older example collections that gradually turned into an unmaintained pile of half-working demos and missing context.

The goal with crazyflie-demos is that every demo should be properly documented and actually runnable. That means clear descriptions, listed dependencies, and enough context to understand what’s going on without digging through source code for an hour.

Another important part is reproducibility: each demo is self-contained and uses pinned dependencies, so an example you clone two years from now should still work.

What’s in there already?

The repository is organized by demo type:

  • scripts/cflib: Host-side Python scripts using crazyflie-lib-python, covering the full Crazyflie API.
  • scripts/rust: Rust demos using crazyflie-lib-rs, showcasing its high-performance and native async support.
  • scripts/cflib2: Early demos for our new Python library, crazyflie-lib-python-v2, built on top of the Rust library. cflib2 doesn’t have a release yet, but we’re already writing demos for it to test the API and the performance.
  • firmware: Out-of-tree firmware apps that are flashed directly to the Crazyflie. Each demo carries its own crazyflie-firmware submodule so you’re always building against the right version.
  • hybrid: Demos that combine onboard firmware with a host-side script working together.

A place to share your work

A big motivation behind crazyflie-demos is making it easier to share work with the community.

If you’ve built something useful, or just a fun experiment using our products, this is the place for it. Not everything needs to live in its own repository or branch. A well-described demo here makes it easier for others to find, understand, and build on your work, and most importantly, to get inspired by it.

We’ll also be using this repository as the go-to reference whenever people ask for more use-case-specific examples, so good demos here will naturally help more people discover what’s possible with the Crazyflie ecosystem.

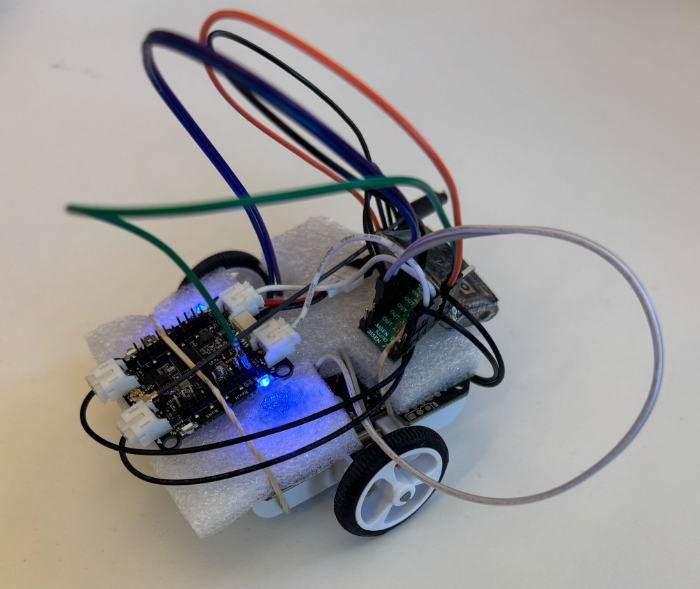
At Bitcraze, we spend a lot of time making things fly. Even though flying robots are, and will always be, fascinating to watch , every now and then it’s refreshing to try something different. Last Friday, I started exploring an idea that has been lying around for a while now: having a ground robot with the same Crazyflie infrastructure – the radio communication, the deck ecosystem and the cfclient connection. This robot is also known as the Crazyrat.

Fair warning: this is a first prototype, and it definitely looks like one. Jumper wires going in every direction, plastic foam and rubber bands to keep everything in place. But it drives, and it drives fast! That’s enough to call it a success and write about it.

Hardware

The entire vehicle was built around the Crazyflie Bolt 1.1, using its motor connectors, and specifically the S pins to drive a small H-bridge motor driver, enabling proper bidirectional DC motor control. To make it possible to drive the H-bridge, the motors must be configured as brushed.

For the motor driver, I used a Pololu DRV8833 Dual Motor Driver Carrier. I experimented with two different motor sets: one with a 75:1 gear ratio and one with 15:1. Even though the 75:1 motors offered better precision and were easier to drive, the 15:1 setup was the clear winner due to their speed.

The motors, the chassis and the power supply were taken from a Pololu 3pi+ robot.

Firmware

For the firmware, I used the Out-Of-Tree functionality of the crazyflie-firmware which makes it easy to integrate custom controllers. The controller itself is relatively simple. It maps pitch and yaw commands sent from the cfclient to throttle and steering respectively. Then, it sends the calculated values directly to the motors as PWM signals.

float throttle = -(setpoint->attitude.pitch / maxPitch);
float steer = -(setpoint->attitudeRate.yaw / maxYaw) * steerGain;

float left = throttle - steer;
float right = throttle + steer;

control->controlMode         = controlModePWM;
control->normalizedForces[0] = (left  > 0.0f) ?  left  : 0.0f;  /* M1 AIN1 left  fwd */
control->normalizedForces[1] = (left  < 0.0f) ? -left  : 0.0f;  /* M2 AIN2 left  rev */
control->normalizedForces[2] = (right > 0.0f) ?  right : 0.0f;  /* M3 BIN1 right fwd */
control->normalizedForces[3] = (right < 0.0f) ? -right : 0.0f;  /* M4 BIN2 right rev */Code language: PHP (php)

The Crazyrat in action

To test the prototype, I used a gamepad and drove it through the cfclient – no modifications are required. Here’s a video showing the capabilities of the Crazyrat using the 15:1 motor setup.

What’s Next

This project was a really fun learning experience on the potential and the limitations of the ground robots. These are some of the directions I plan to explore in the future:

  • Robust design – Design a proper chassis, clean up the wiring and make the whole vehicle smaller, to fit better in the Crazyflie ecosystem.
  • Deck integration – Use either the Lighthouse or the LPS deck for positioning and the Multi-Ranger deck for obstacle detection.
  • Experiment – Explore heterogeneous multi-agent swarming scenarios with the Crazyrat and the Crazyflie.

With spring just around the corner, we thought it was the perfect excuse to make our Crazyflies bloom. The result is a small swarm demo where each drone flies a 3D flower trajectory, all coordinated from a single Crazyradio 2.0. This blog post walks through how it works and highlights two things that made it possible: the new Color LED deck and the Crazyflie Rust library.

The Color LED deck

There are two Color LED decks for the Crazyflie – one mounted on top and one on the bottom – each with its own individually controllable LED via the standard parameter interface. In this demo we use the one mounted on the bottom to give color to the flowers, along with the Lighthouse deck for accurate positioning in space.

The deck opens up a lot of creative possibilities for swarm demos as well as clear visual feedback about what each drone is doing.

Fast swarm connections with the Crazyflie Rust library

Getting five drones connected quickly on a single Crazyradio used to be a real bottleneck. The Crazyflie Rust library introduces a lazy-loading parameter system. Parameter values are not downloaded at connect time; instead, they are fetched only if the API user explicitly accesses them.

Additionally, caching the TOC (Table of Contents) makes it trivial to persist it locally and reuse it on every subsequent connection. In practice this means that after connecting to each drone once, all future connections are nearly instantaneous. The cache is keyed by the TOC’s CRC32 checksum, so it automatically stays valid as long as the firmware doesn’t change, and it’s identical between drones with the same checksum.

The library also uses Tokio’s async runtime, which means all Crazyflie connections start at the same time without waiting for each other. Combined with generally higher communication performance in the Rust implementation, these features significantly reduce the startup overhead, making the swarm feel reliable and responsive, which would require much more effort with the current Python library.

Generating the trajectories

The flower shapes are generated in Python using this script. It produces two .json files per drone (one stem{n} and one petals{n}) containing all the waypoints to fly through. The trajectories are then uploaded to the drone as compressed poly4d segments, a compact format that the Crazyflie’s onboard high-level commander can execute autonomously. Both trajectories are expressed relative to each drone’s initial position, so the formation geometry is entirely determined by where you place the drones on the ground before takeoff.

Putting them all together

The flight sequence is pretty straightforward:

1. Build the trajectories as waypoints on the host.

2. Connect to all drones simultaneously.

3. Upload each drone’s compressed trajectories in parallel.

4. Fly the trajectories while switching the LED colors.

Everything after the connection is driven by Tokio’s join_all, so the swarm stays in sync without any explicit synchronization logic – the drones are just given the same commands at the same time.

The full source code is available at this repository (Python for trajectory generation, Rust for flying).

We’re excited about where the Rust library is heading. It’s improving the communication with the Crazyflie and allows us to increase dramatically the number of Crazyflies per Crazyradio, leading to bigger and more reliable swarms. If you build something cool with it, let us know!

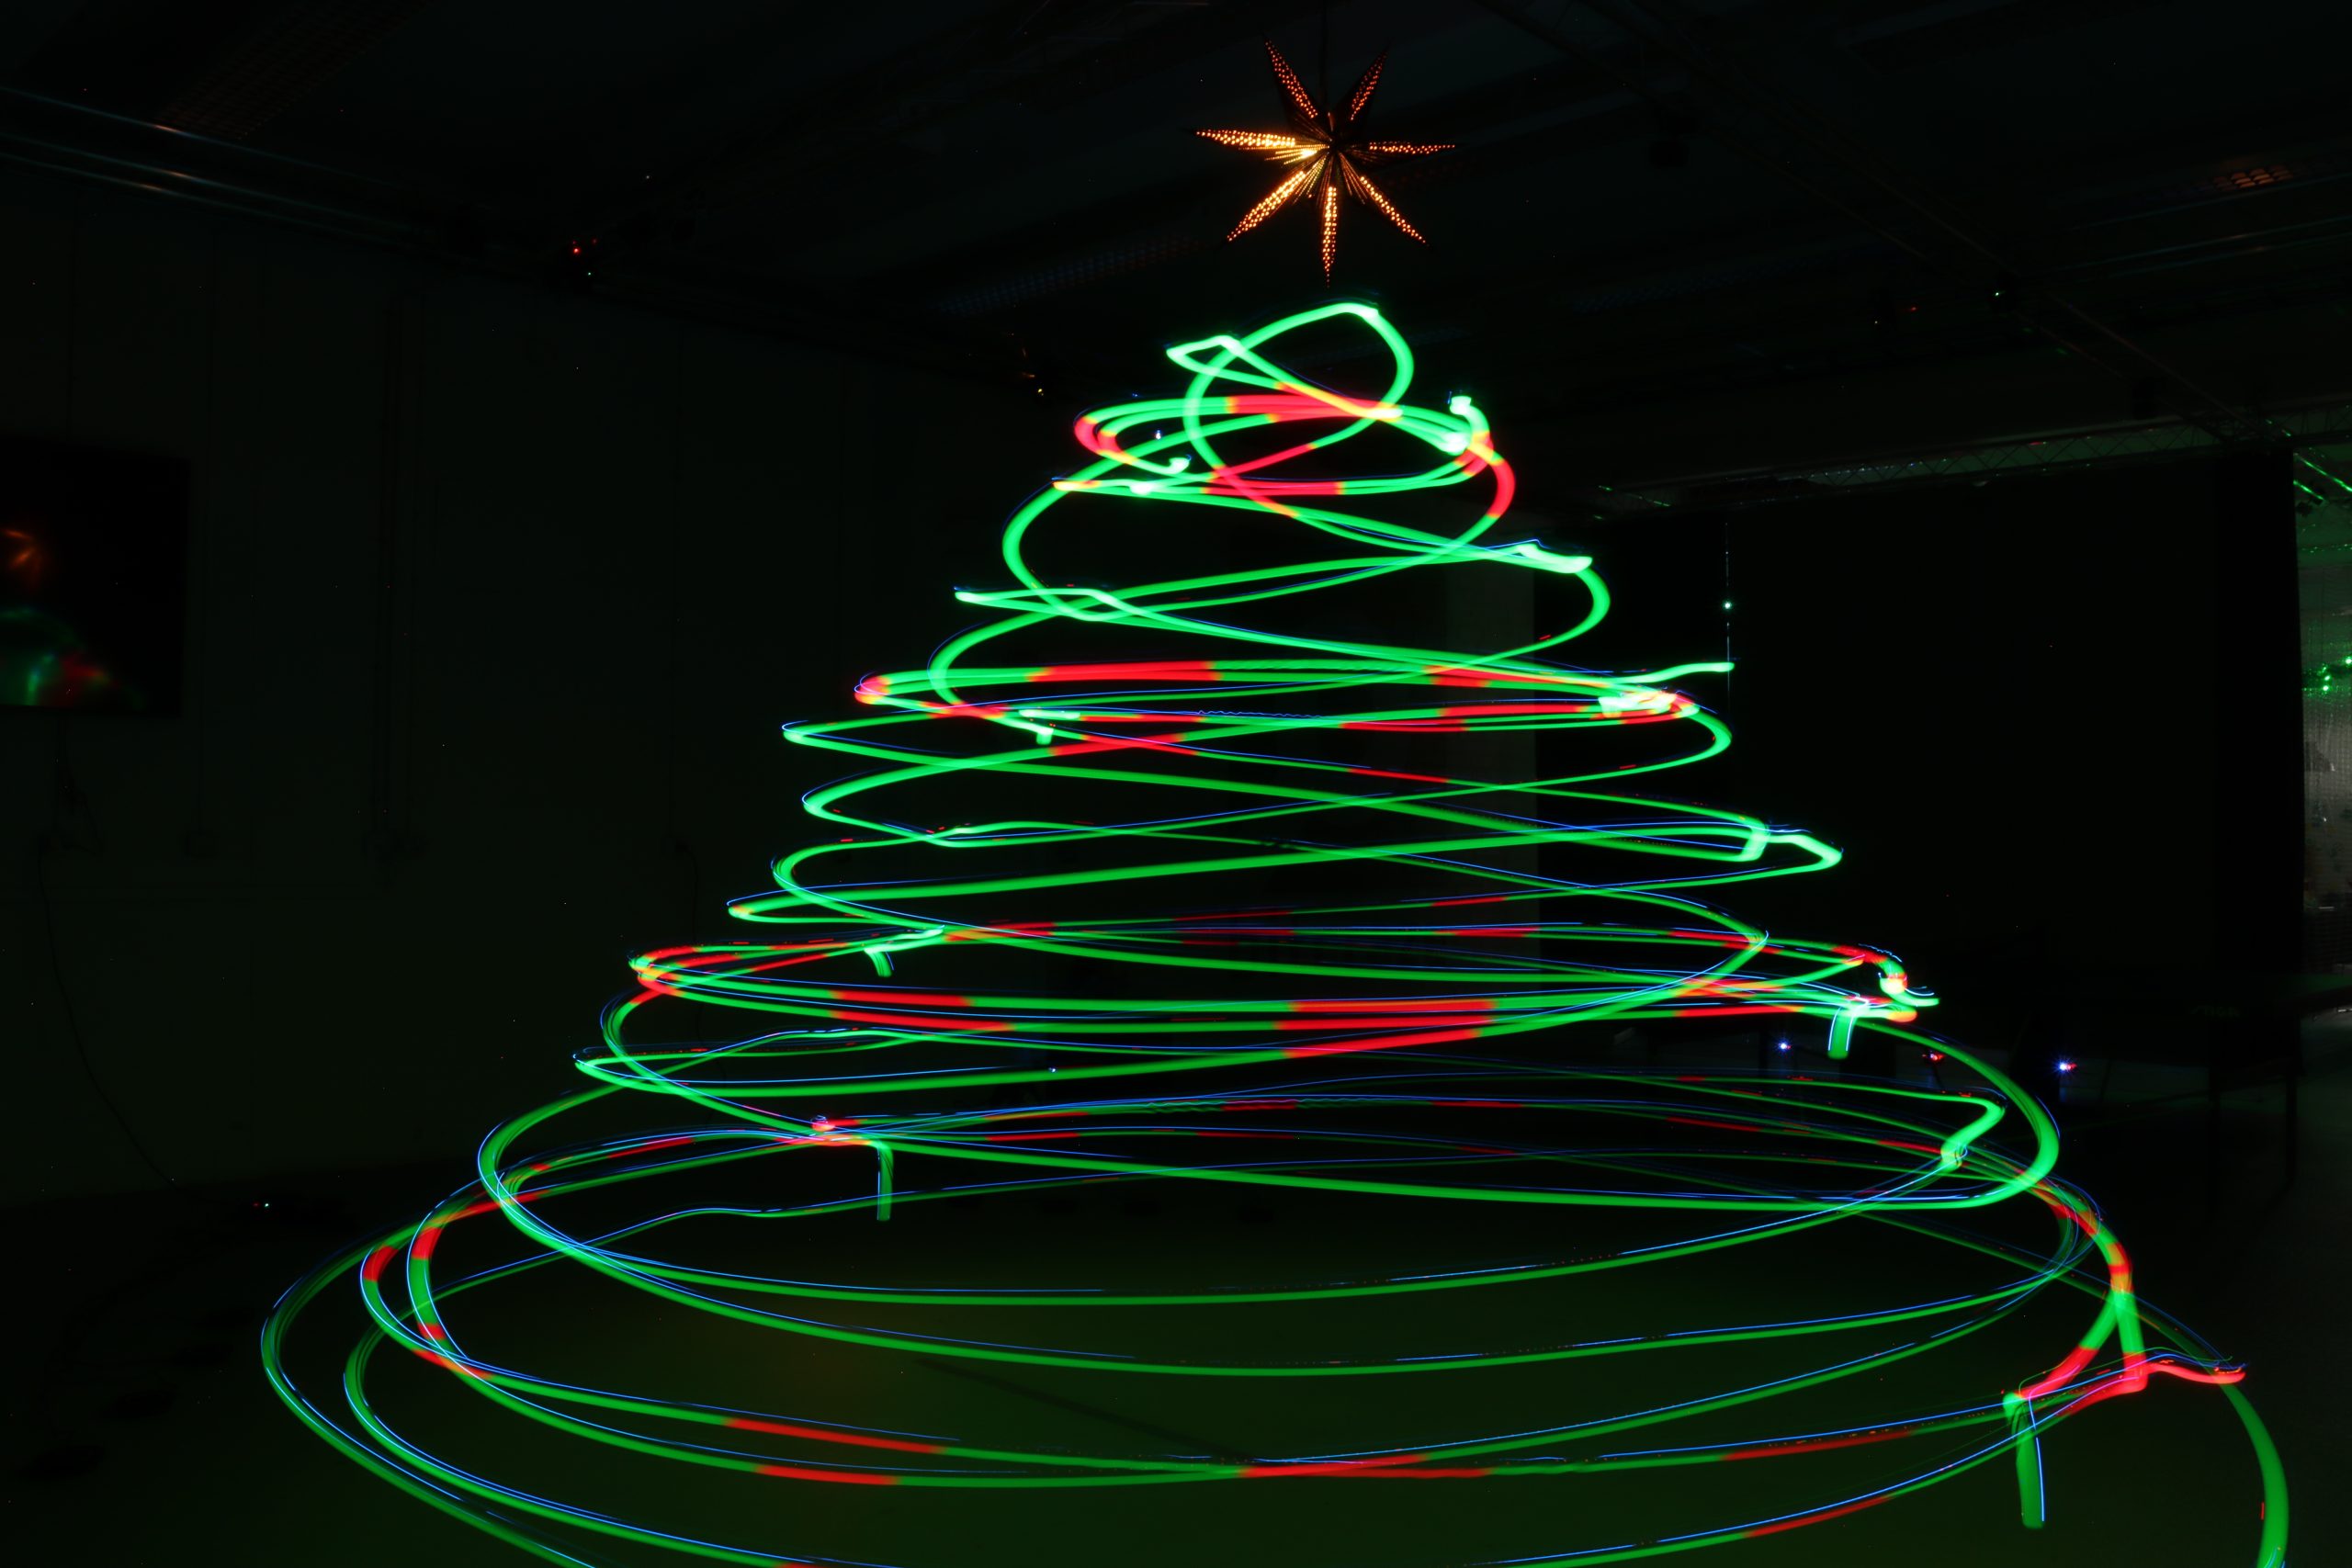
Christmas is getting close, and while most people are just starting to hang lights and decorate their tree, we decided to go a little bigger and a whole lot brighter. Instead of adding tinsels and ornaments, we set up a swarm of 8 Crazyflie 2.1 Brushless drones with the upcoming Color LED decks along with some long-exposure photography magic, and decorated our flying arena with a Christmas tree made of Crazyflies.

How it works

The project is split into two parts: the firmware side that controls the Color LED decks and the script that is responsible for the choreography of the swarm.

The Firmware

Instead of lighting the LEDs based on time or commands, each Crazyflie uses its 3D position to decide on the correct color. This makes the whole communication with the central computer easier. Inside the firmware, multiple virtual spheres are created in the flight arena, just like ornaments floating in a tree-shaped structure. Whenever a Crazyflie flies into one of these spheres, its Color LED deck switches instantly from green to red. When it flies back out, it glows green again. Since we’re taking a long-exposure photo, the whole color pattern begins when the drones are ready to perform the choreography and stops when they start landing.

The Script

The python script is pretty simple. It commands a swarm of Crazyflies to perform a coordinated spiral choreography resembling a Christmas tree outline in 3D space. Each drone takes off to a different height, flies in spiraling circular layers, and changes radius as it rises and descends, forming the visual structure of a cone when viewed from outside. To pull this off with the current state of the cflib, we used 3 Crazyradios 2.0 and the high level commander.

A Testbed for Crazyradio 2.0 Improvement

Lately, we have been looking again at improving the radio communication with the Crazyflie. A prototype featuring a new USB communication mode for the Crazyradio was ready just in time for testing with the Christmas tree demo.

This new mode makes Crazyradio 2.0 much more efficient when communicating with swarms. With it, we were able to fly the same demo using only one Crazyradio 2.0 instead of 3 with the connection time to the swarm greatly accelerated. This demonstrates the efficiency of the new mode.

The new mode is called “inline setting mode” since it works by inlining all radio settings with the packet data, negating the need to issue time-costly USB setup requests. It is currently a Pull Request to Crazyradio 2.0 and the Rust Crazyradio driver. Support for Crazyswarm/ROS and CFLib will be implemented and when we know that the protocol works out for all libs, we will merge and release support for the new mode. It will be enabled by default so you will get the benefits from upgrading the Crazyradio 2.0 firmware and lib. We will talk more about it when it is released, in the mean time do not hesitate to test and feedback on the PRs ;-).

Demo source code

You can find the project’s repository as well as the rust version on Github. The python version was used for the picture and video, and the Rust one behaves identically.

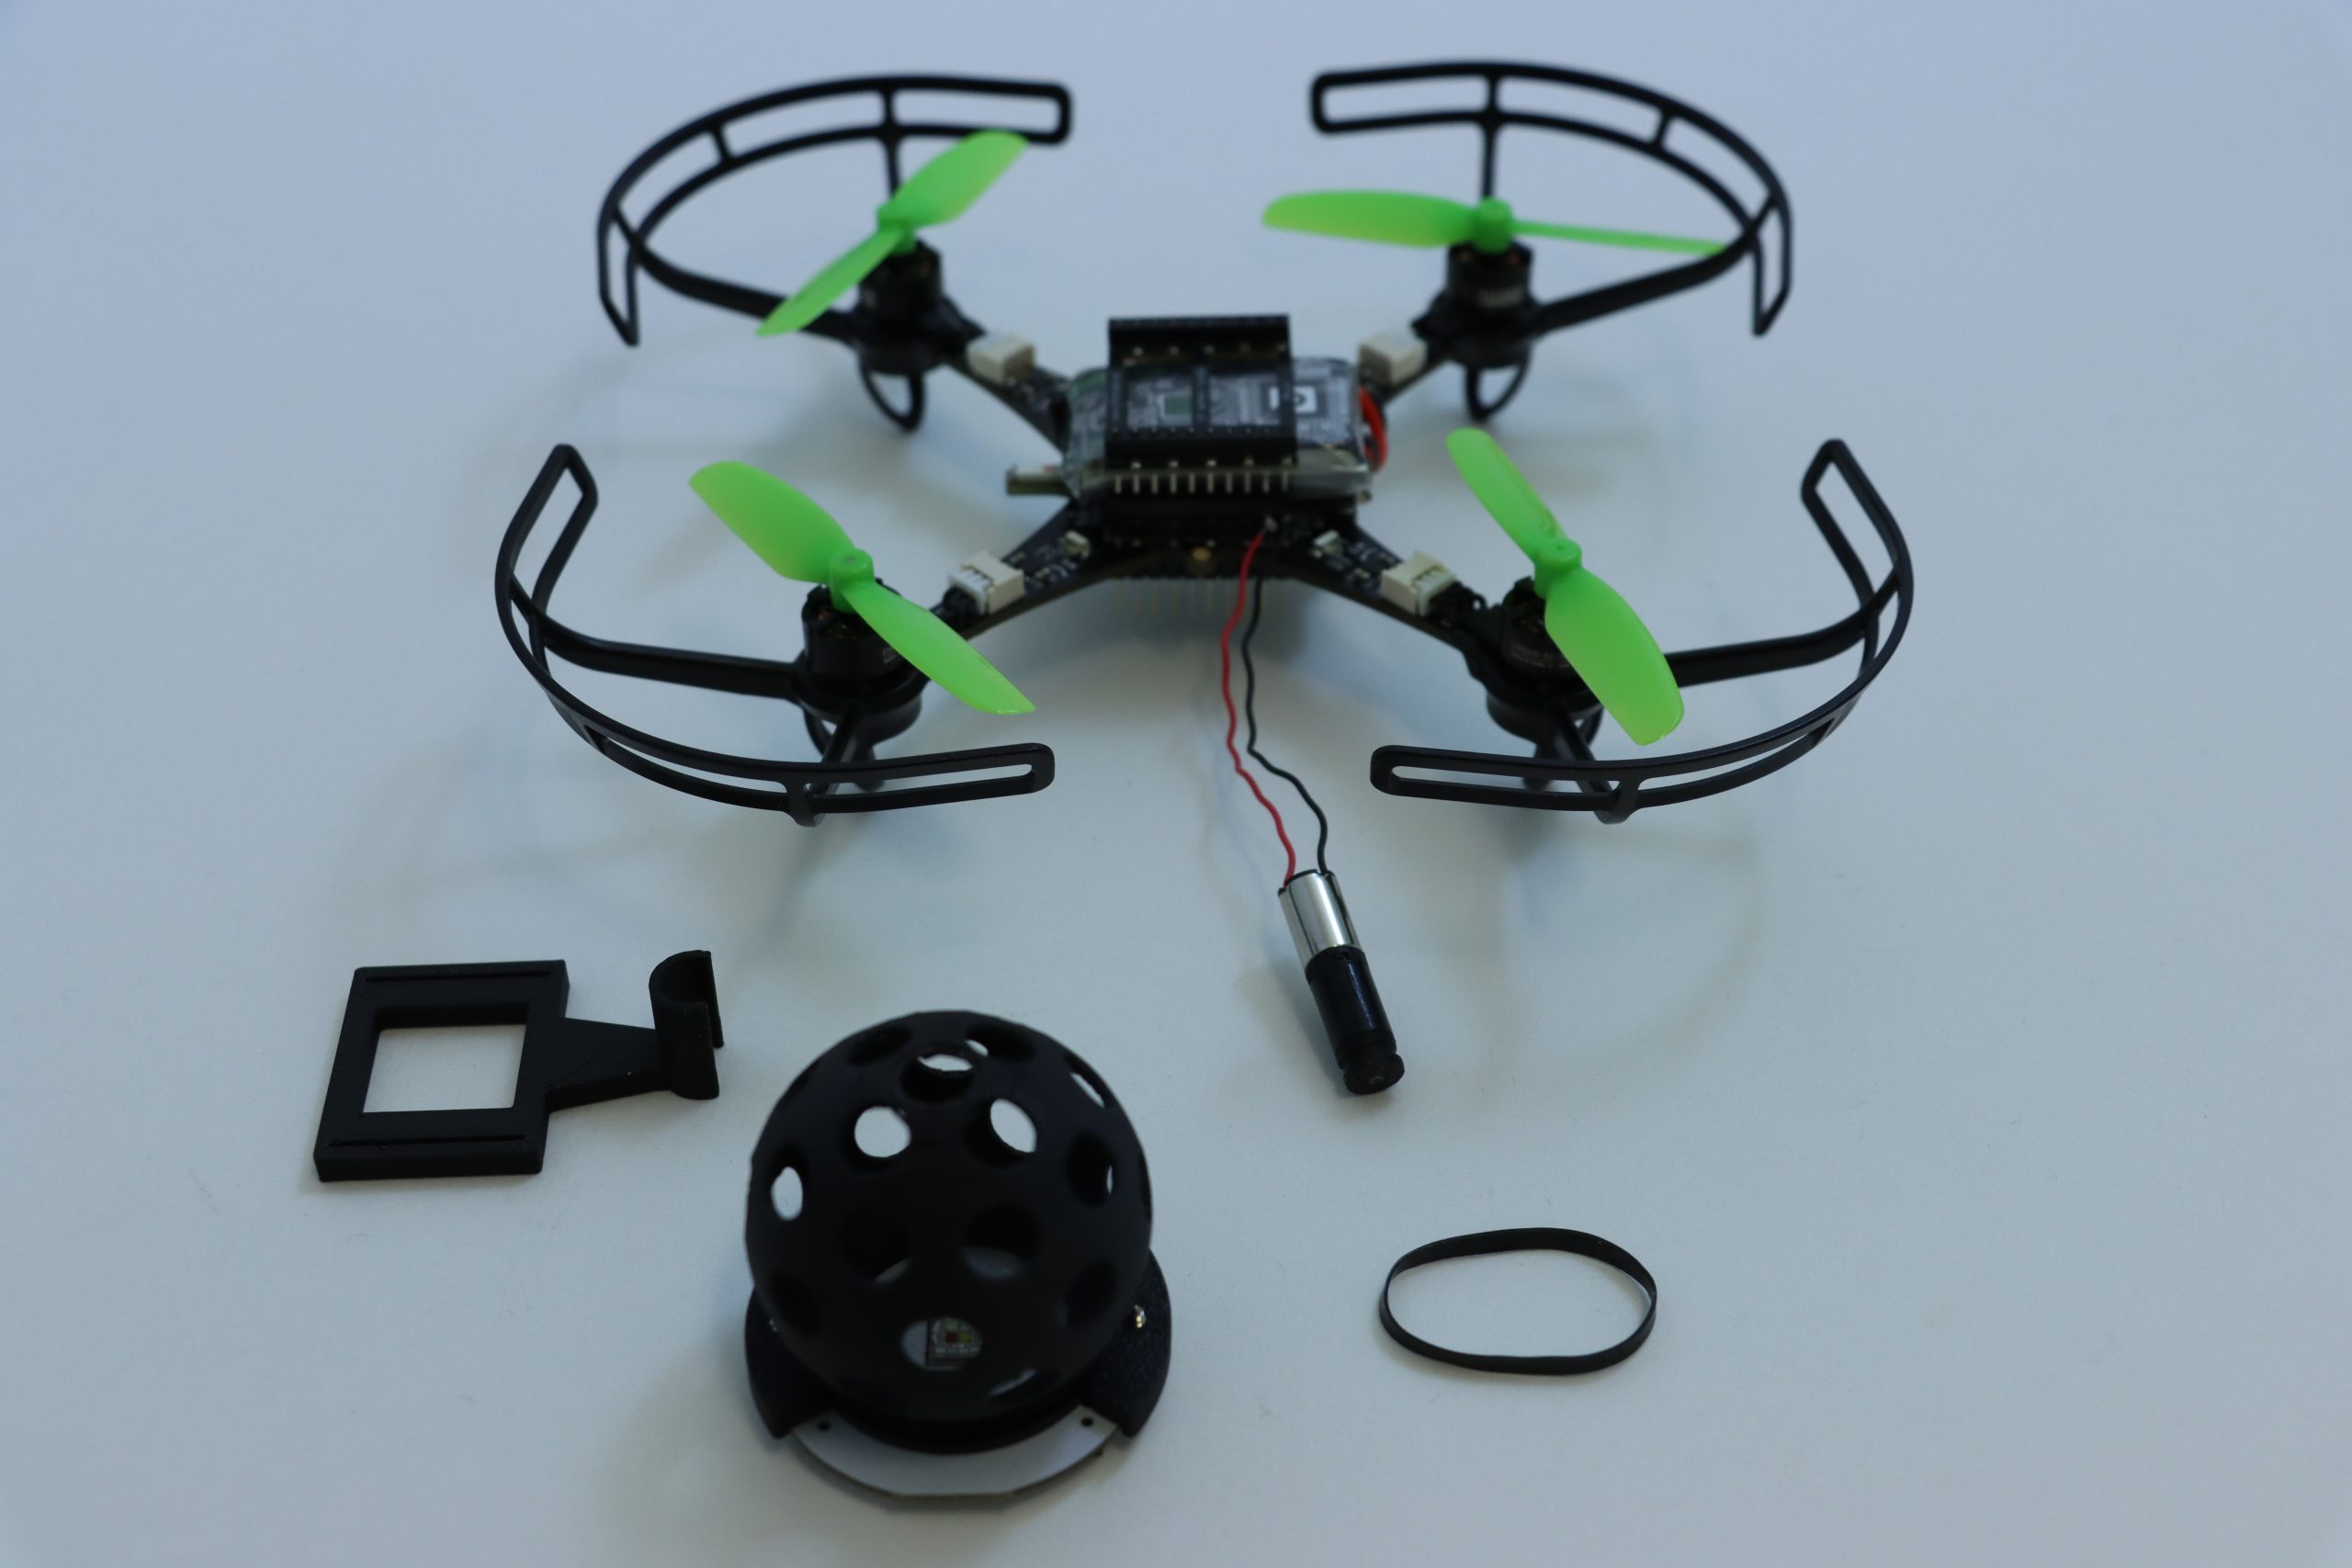
It’s always a good feeling to wrap up the week with a Fun Friday project – especially when it involves some questionable mechanical additions to a Crazyflie platform. This time, I decided to test the capabilities of the upcoming Color LED deck by turning it into a Disco deck.

Mechanics

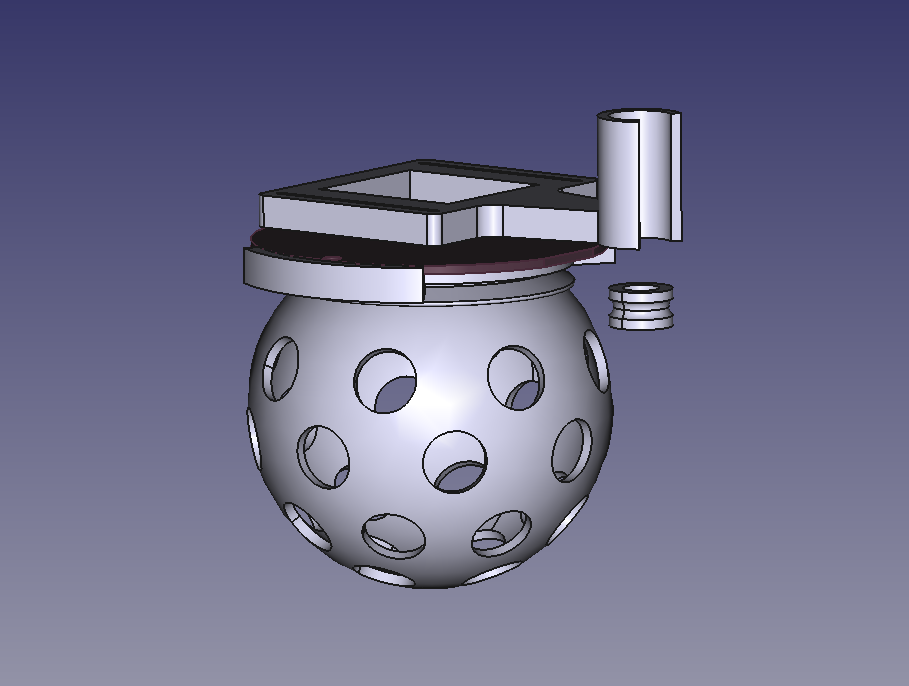
The core of the Disco Deck is pretty simple: a 3D-printed disco ball mounted directly on top of the Color LED Deck with a couple of screws. To bring it to life, I added a Sub-Micro Plastic Planetary Gearmotor and used a rubber band as a drive belt to transfer the rotation. It’s a lightweight, low-tech solution that works surprisingly well with the Crazyflie 2.1 Brushless. All the structural parts were designed to be easily 3D printed in PLA, and they fit on a single print plate for a quick build. You can find all the part files here.

Electronics & Firmware

On my first attempt, I connected the motor directly to VCC and GND, which meant it started spinning as soon as the Crazyflie powered up. This turned out to be a problem as the vibrations prevented the Crazyflie from completing its initialization sequence, since it needs to remain completely still for about one second at startup. The proper fix was to connect the motor to one of the GPIO pins (IO_4) along with GND. For the firmware, I added a new deck driver for setting the IO_4 output to low during initialization and controlling it through a parameter.

Next Steps

The biggest limitation of the current Disco Deck design is the landing. The disco ball extends below the length of the Crazyflie 2.1 Brushless legs, which means the drone can’t take off or land horizontally – not even when using the standard Crazyflie 2.1 Brushless charging dock. To fix this, I’m planning to design a custom charging dock that also works as a stable landing platform for the Party drone.

If you’re interested on the process, you can check out the project repository for any updates.

You might already be familiar with the Crazyflie’s presence in numerous publications across various research fields. However, in this blog post, we’ll return to the basics and showcase some robotics concepts that can be taught using our platform.
The Crazyflie has already found its way into several classrooms such as the “Introduction to Robotics” in the Mechanical & Aerospace Engineering Department at Princeton University, the “Introduction to Control of Unmanned Aerial Vehicles” at UC Berkeley and the “Embedded control systems” at Chalmers University of Technology.
Whether you’re designing a robotics course for undergraduates or developing advanced labs for graduate students, here’s some fields where the Crazyflie can help your students grasp the fundamentals of modern robotics.

Basic Drone Principles

How does the quadcopter generate enough thrust? In which direction should the motors spin? How does the shape of a propeller affect performance?
As an introduction to drones and specifically quadcopters, students can explore these basic principles behind how they work. Then, by flying them, they can better understand the three axes of motion, roll, pitch and yaw and even find out their limitations, such as the ground effect.

Control Systems

What is the difference between controllers? How does a different controller tuning affect performance? How does an estimator work? What types of commands can be sent to a drone?
The Crazyflie platform offers a rich “playground” for exploring the stabilization process from sensor acquisition to motor control, that we often call “stabilizer module“. This includes a variety of controllers, estimators and commanders that can be modified to visualize results in the real world. Also, with the firmware being open-source and modular, it is relatively easy to build your own controller or estimator and integrate it to the platform.

Localization

How can a drone know its position and orientation in 3D space? What is the difference between a local and a global positioning system?
With a wide variety of deck sensors and positioning systems, students can find ways to control the Crazyflie through relative or absolute position/attitude commands. The different sensing methods used in these systems are also interesting to explore – for example, IR signals from the Lighthouse Positioning System, UWB radio from the Loco Positioning System, or optical flow data from the Flow deck v2.

Autonomous Navigation

How could the Crazyflie perform a collision-free trajectory? What is the most efficient way of flying from point A to point B?
In the field of autonomous navigation, the Crazyflie can be treated like any other moving robot by applying existing path planning algorithms or testing newly developed ones. Environment-aware problems are always exciting to work on and the Multi-ranger deck makes them feasible.

Swarm Robotics

What happens when you add another Crazyflie to your setup? How could multiple Crazyflies operate in a swarm? How could you make sure that they won’t collide? What is the difference between a centralized and a decentralized swarm?
Scaling a system up is always challenging but also fascinating. The examples provided in our Python library help you get a swarm in the air, but it’s up to you and your students to explore how the Crazyflies should coordinate and cooperate.

Small Drone, Big Educational Impact

The Crazyflie ecosystem is a fully capable robotics lab in the palm of your hand. Its flexibility, safety, and robust API support make it ideal for hands-on learning in a wide variety of robotics fields. Integrating the Crazyflie into a university robotics curriculum, gives students the chance to explore, test, fail, and fly their way to mastery.