Flying formations with a swarm is always fun to develop and watch, but it is also a great way to stress-test the software behind it. As part of the development of cflib2, we put it through one of its toughest tests yet: flying 49 Crazyflies in coordinated formations.
The entire swarm was controlled using a single Crazyradio 2.0, highlighting the combined improvements in cflib2 and Crazyradio firmware over the past few months.
The setup
The hardware configuration was relatively straightforward. We used 49 Crazyflie 2.1 Brushless drones, each one equipped with a bottom-mounted Color LED deck for vivid lighting effects. For positioning, we used the Lighthouse positioning system, covering the entire flight area, which was roughly 5x5x2m. Its accuracy allowed the Crazyflies to fly grid formations with just 0.4m spacing between them.
One of the big practical challenges when managing a large swarm is swapping the depleted batteries for charged ones. Thanks to the Crazyflie 2.1 Brushless PCB design, each drone can now charge while sitting on its charging dock, making it much easier to prepare the swarm for the next flight.
Flying the formations
The swarm performed a sequence of synchronized formations under the control of a central PC. Rather than streaming the full trajectories to every drone, the formations are built using the Crazyflie’s High-Level Commander. Each Crazyflie receives simple motion commands such as go to or spiral, and executes the corresponding trajectory onboard. At the same time, it receives commands for changing the color of the Color LED deck.
Using cflib2, these commands can be sent to all 49 Crazyflies through a singe Crazyradio 2.0, which was not possible with cflib.
Looking ahead
This demonstration is an exciting milestone for cflib2 and showcases what the new library makes possible. While controlling 49 Crazyflies is an impressive demonstration, cflib2 is designed to benefit projects of every size. Whether you are flying a single Crazyflie or coordinating a large swarm, the goal is to provide a faster, more scalable, and more robust communication library.
Most of the functionalities from cflib have already been migrated to cflib2, and development is continuing. For many applications, cflib2 is already ready to use, so if you would like to try it out, you can find the repository here.
Some Fun-Friday projects begin with a clear goal and a straight path to the finish line. The best ones, however, take you somewhere completely unexpected.
This project originally set out to build a device for determining spatial coordinates within a Lighthouse-covered flight area. Instead, it evolved into the Lighthouse Wand, a hand-held “magic wand” letting you grab and move drones in 3D space just by pointing at them.
How it works
The Wand is a Crazyflie platform with a Lighthouse positioning deck. That’s enough for it to know its own position and orientation in the room. When the button is pressed, it starts broadcasting those 6 numbers over Peer to Peer radio.
Any Crazyflie/receiver in the room on the same radio channel, listens to those packets and runs a simple “grasping” algorithm: while the wand line (positive x-axis) passes close enough to the drone, it builds up a confidence score. Once the score crosses a threshold, the drone is considered grasped. From that point on, it just keeps a specific distance from the wand, while being on the wand line.
When the button is released, the grasped drone either hovers in place, or lands, depending on the release height.
The Color LED deck on the receiver drone, gives you visual feedback: yellow while the Crazyflie is building up its confidence score, green when it’s grasped, and red when it’s landing.
A big advantage of this system is that all interactions run entirely onboard the Crazyflies, allowing them to operate without relying on the cfclient or cflib during flight.
The hardware design
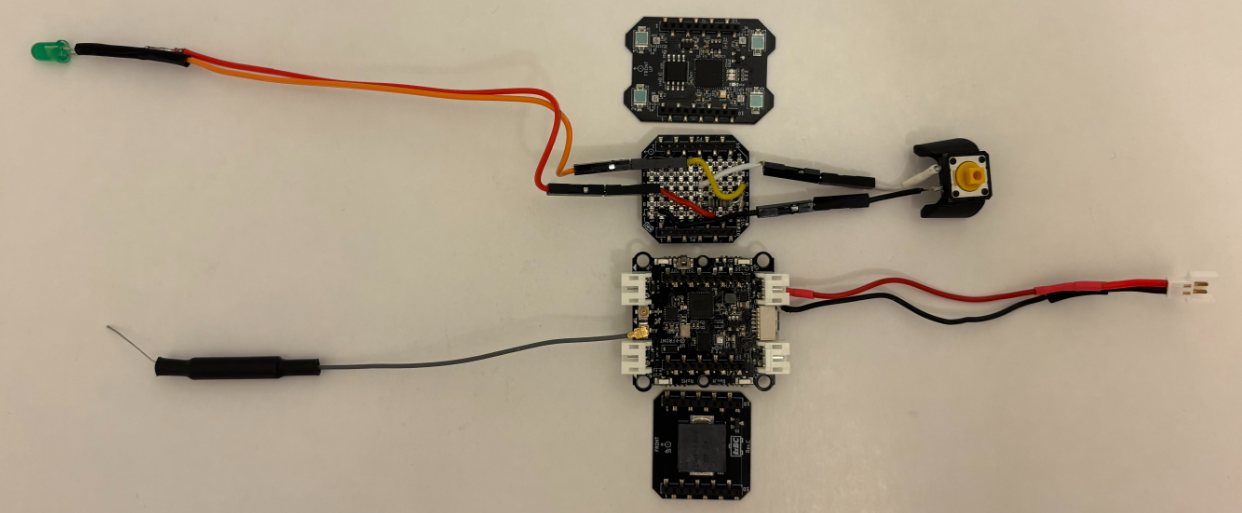
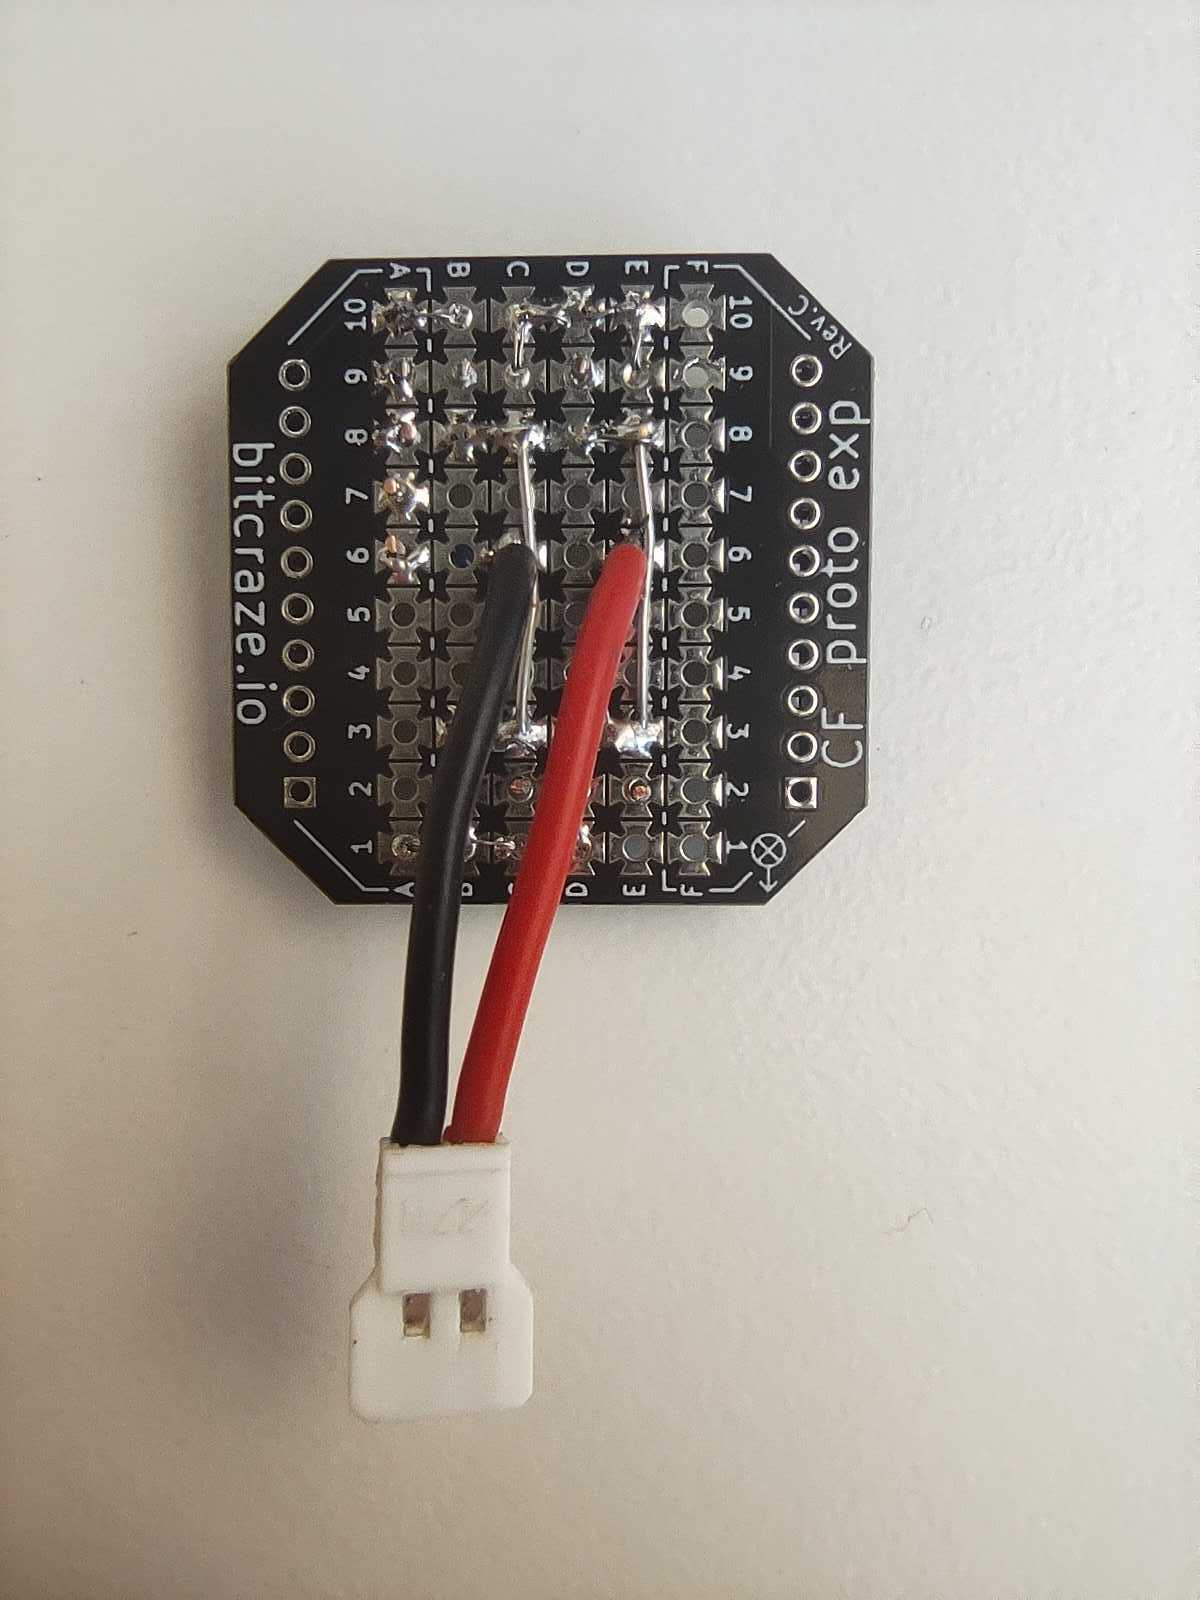
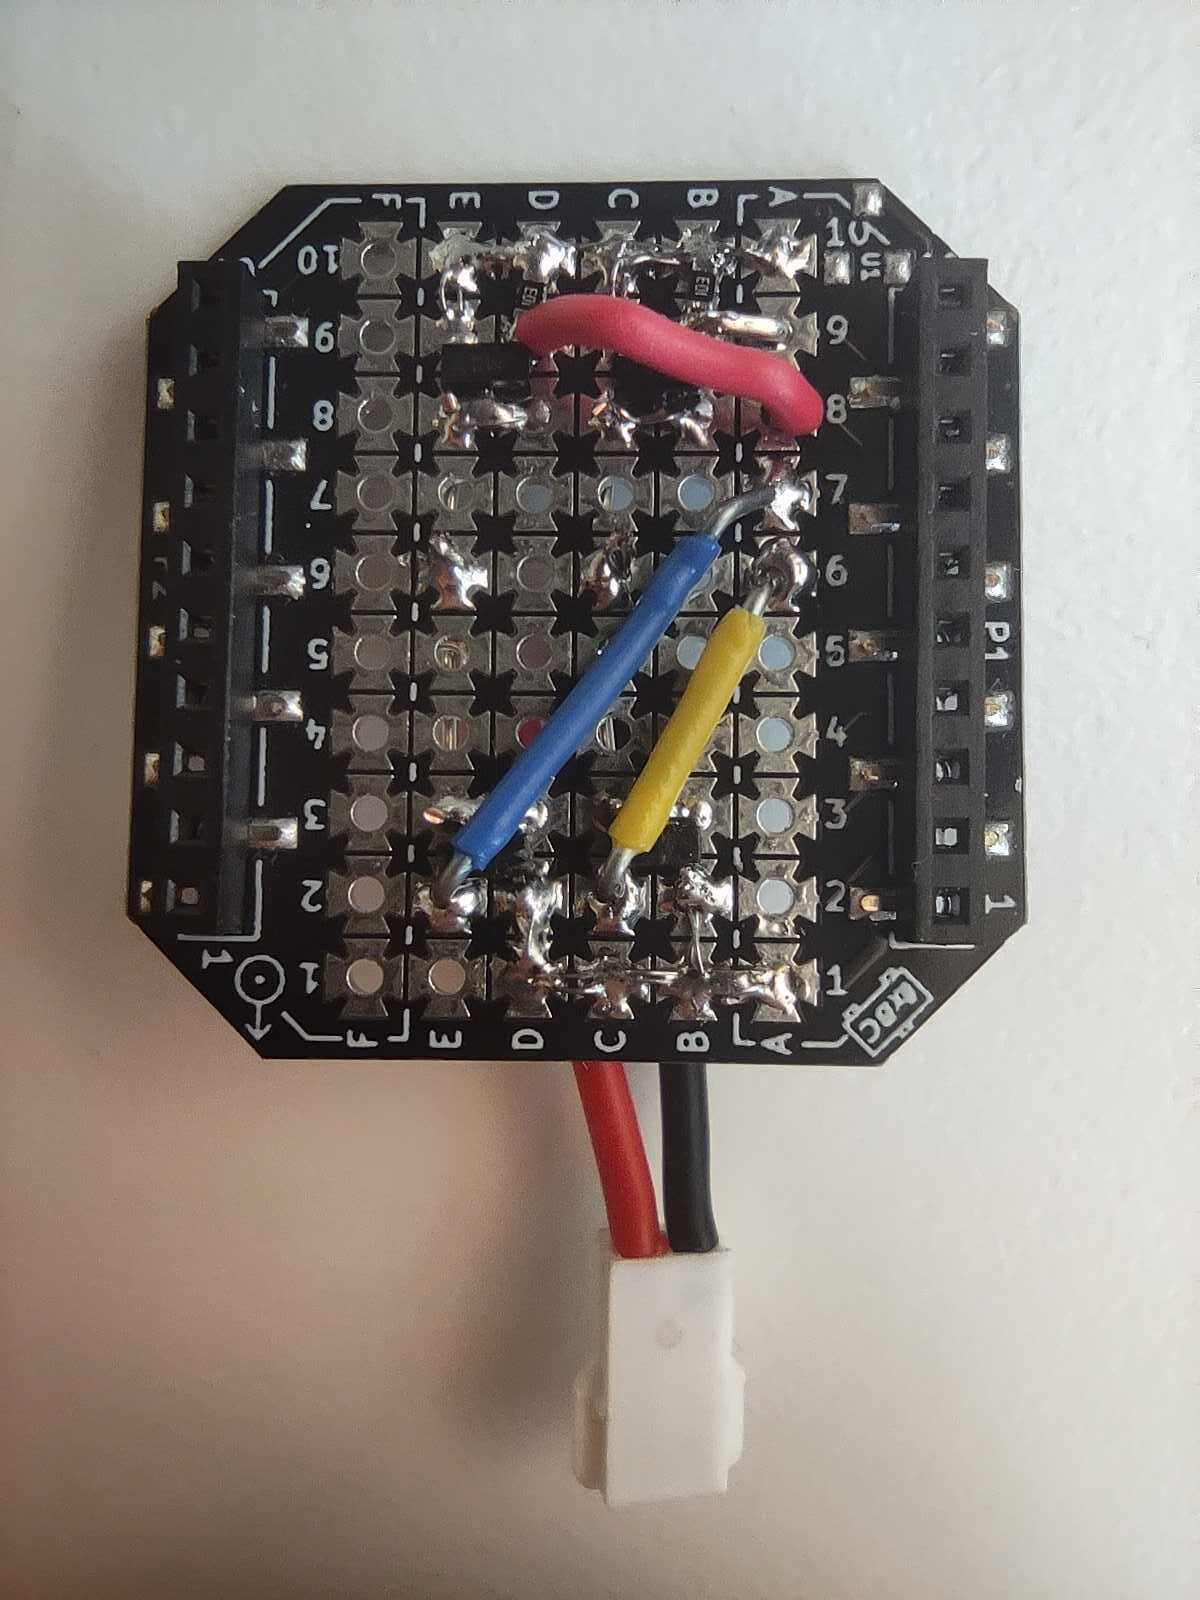
The wand is a Crazyflie Bolt 1.1 with a Lighthouse positioning deck and a Buzzer deck for audio feedback. To allow for user input, I created a simple “Button deck” based on the Prototyping deck utilizing the GPIO pins of the Crazyflie. It also includes an LED for visual feedback when the button is pressed.
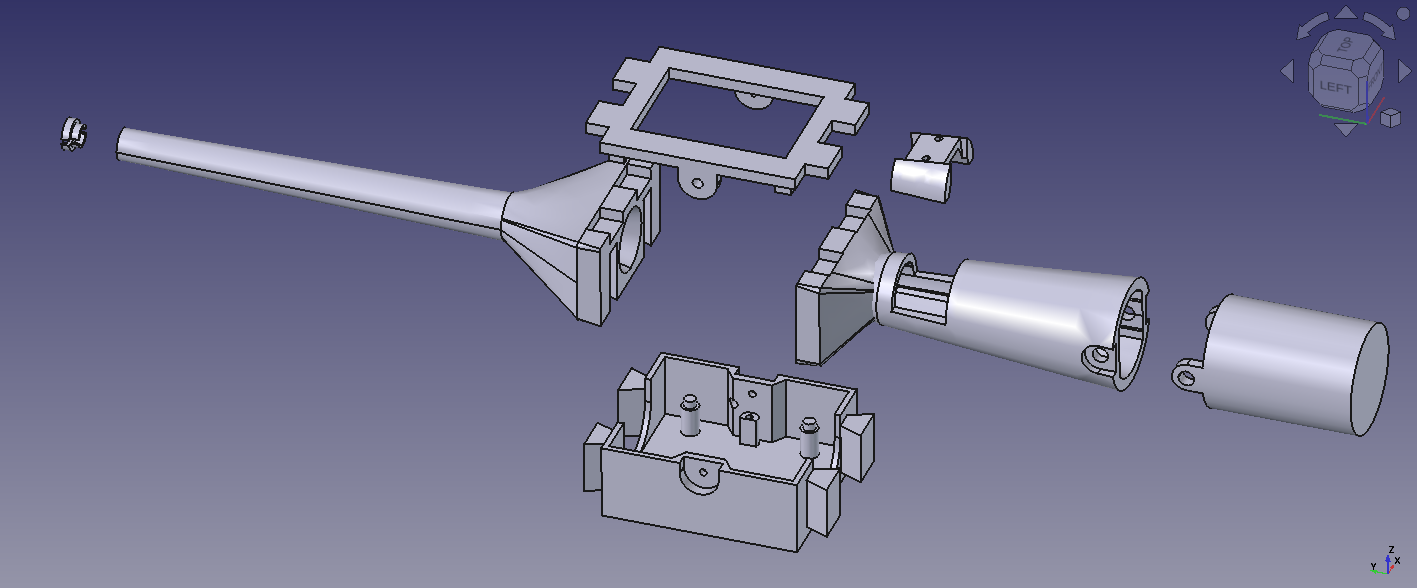
The casing is fully 3D printed in PLA and was designed to give the device a more wand-like feel in the hand. Its shape also makes it easier to hold, aim, and use intuitively during interaction.
The firmware design
Both the Wand and the receiver are firmware apps created on top of the crazyflie-firmware. In the design that I followed, there is a clean separation between the two parties. The wand is a pure broadcaster: it only reads its own pose and transmits it. All grasping logic and flight control run independently on each receiver. Since each receiver is fully autonomous, the system scales to any number of drones with no extra load on the wand.
Where to find the Lighthouse Wand?
A version of the Lighthouse wand is now integrated in our decentralized swarm demo, where it can be used to interact with multiple drones, while the collision avoidance algorithms are still on. This system was first showcased at the European Robotics Forum 2026 in Stavanger, and we’ll also be bringing it to ICRA 2026. If you’re there, stop by booth 91and try flying a bunch of Crazyflies yourself using the wand.
You can find the complete Lighthouse Wand project in this repository. It contains the firmware, the hardware files, and detailed documentation to build and experiment with the wand yourself.
The ability to attach expansion decks to the Crazyflie platforms without modifying their electronics allows experimenting with different hardware components. Most existing decks contain different types of sensors that are used for positioning and collecting data. On this Fun Friday project that has been running for the past couple of months, I explored adding mechanical principles to the Crazyflie with the long-term goal to create a working claw to grab and transfer objects.
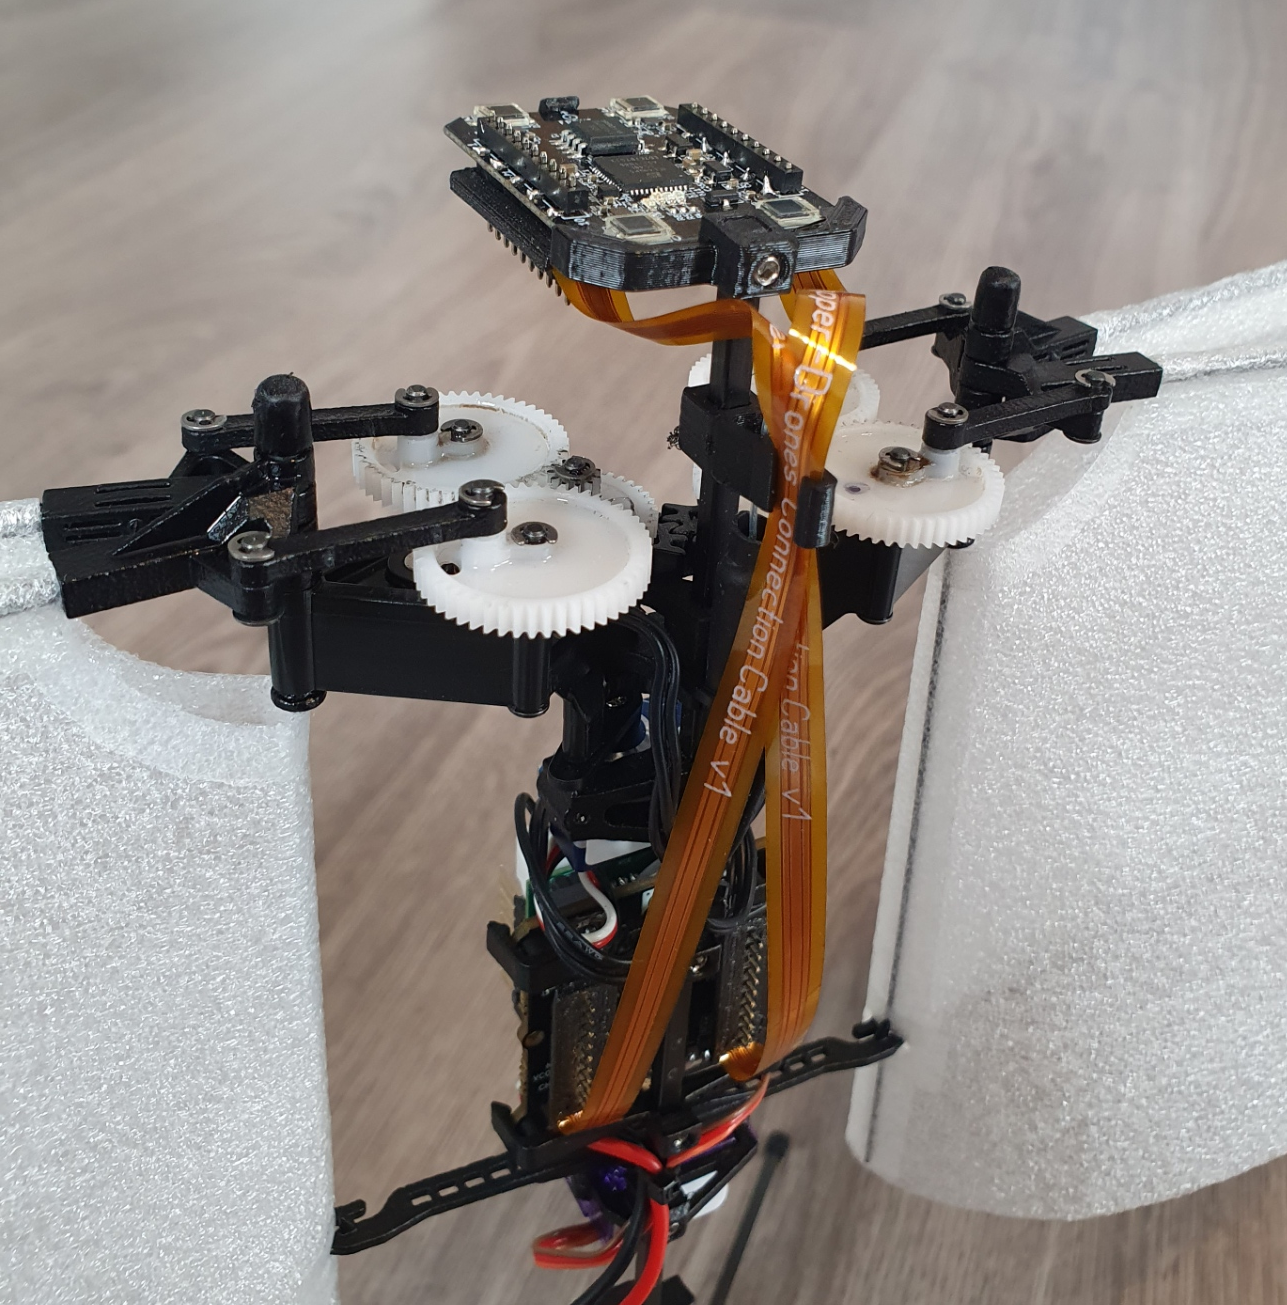
The claw
The claw mechanism is built on a DC motor. The motor shaft is connected to a worm gear, which drives the claw to open or close depending on the direction of rotation. All the parts are 3D printed and designed from scratch.
The deck
Making the DC motor rotate in both directions requires reversing its polarity, which can be done using an H-bridge. So, the deck controlling the claw, is essentially an H-bridge that uses VCC 3V, GND and 4 GPIO pins on the Crazyflie. This way it can be compatible with the Lighthouse positioning deck. The circuit consists of 4 Mosfets (2 P-type and 2 N-type) and 2 pull-down resistors.
How it works
When designing a custom deck for the Crazyflie, you need to initialize it with its own drivers. The drivers for the H-bridge deck contain 2 basic functions; the one that opens the claw and the one that closes it. They are triggered using 2 float parameters (clawOpen and clawClose), and remain active for the number of milliseconds specified by the value of each parameter.
Experiments
Since the entire claw setup weighs 29g, I used 2 Crazyflie 2.1 Brushless drones, to equally share the weight, while one of them controls the claw. Together, they can lift up to 74g. A fishing line is attached underneath each drone and the claw can slide along it, keeping it always centered between them. For the load, I used a Crazyflie 2.1+ with a lighthouse deck attached and its motors removed, to reduce its weight. When the script starts, the initial positions are collected and a flight sequence for the swarm is created based on them. Then, the swarm takes off and approaches, grabs, lifts and transfers the load.
Next steps
The initial goal of grasping and transferring objects with a flying claw has been achieved. However, in the future I plan to make the system more robust and easy to use. Some points that I might focus on:
Making the whole setup lighter – replace the current motor with a lighter one, print with lighter materials.
Improve the controller tuning to damp the oscillations and make the flight more stable.
Implement a control system to keep track of the claw’s state – add limit switches.
We have some very busy weeks behind us and ahead! As we are working hard on releasing the new CF Brushless, we have been preparing for the upcoming ROSCon in Odense Denmark next week (see this previous blogpost) and we also featured on the latest OpenCV live episode as well! So more about both in this blogpost.
OpenCV Live! Demo Driven Development
We were featured as guests on the latest OpenCV Live! episode hosted by Phil Nelson and Satya Mallick, where we went through a bit of the history of the start of Bitcraze and all of the (crazy) demos done with the Crazyflie in the last decade. We have done a similar topic for our latest developer meeting, but for this episode we put the focus more on vision based demos, since OpenCV has been definitely used in the past at Bitcraze for various reasons! Just type in OpenCV in the top right search barto check out any of the blogs we have written.
During the OpenCV live episode of the 10th of October, Arnaud and Kimberly told the backstories of these demos that went from a manual flight fail where Arnaud flew the Crazyflie 1.0 in Marcus’ hair, using OpenCV and Aruco markers for positioning to flying a swarm in your kitchen. It was really fun to do and alos one lucky listener managed to answer the two questions the host Phil asked at the end, namely “Where does the name Crazyflie come from?” and “Why is the last part (‘-flie’) spelled this way?” and won a STEM ranging bundle. If you’d like to know the answers, go and watch the latest OpenCV! Live episode ;) Enjoy!
ROSCon – What to expect?
So next week we will be present as Silver Sponsor at ROSCon Odense, namely on Monday 21th and Wednesday 23rd of October. The Bitcraze booth will be located on number 21 so that should be near the coffee break place! We will have are old trusty cage with some upgrades with a nice ROS demo which is similar to the one explained in this Crazyflie ROS tutorial we have written a while ago, but then the swarming variant of it. We also hope to show a Brushless Crazyflie Prototype, and a new camera deck prototype, along with anything else we can find lying around at our office :D.
Moreover, Arnaud will be given a presentation on the lighthouse positioning system, namely at Wednesday 23rd of October 14:40 (2:30 pm) called ‘The Lighthouse project: from Virtual Reality to Onboard Positioning for Robotics’. The lighthouse positioning system will also be the system that we will demo at our booth so if you’d like to see it for yourself, or perhaps (during downtime) hack around together with us, you are more than welcome to do so! Check out the Bitcraze ROSCon Eventpage for more details about our demo or the hardware we will show.
Whenever we show the Crazyflie at our booth at various robotics conferences (like the recent ICRA Yokohama), we sometimes get comments like ‘ahh that’s cute’ or ‘that’s a fun toy!’. Those who have been working with it for their research know differently, but it seems that the general robotics crowd needs a little bit more… convincing! Disregarding its size, the Crazyflie is a great tool that enables users to do many awesome things in various areas of robotics, such as swarm robotics and autonomy, for both research and education.
We will be showing that off by giving a live tutorial and demonstration at the Robotics Developer Day 2024, which is organized by The Construct and will take place this Friday, 5th of July. We have a discount code for you to use if you want to get a ticket; scroll down for details. The code can be used until 12 am midnight (CEST) on the 2nd of July.
The Construct and Robotics Developer Day 2024
So a bit of background information: The Construct is an online platform that offers various courses and curriculums to teach robotics and ROS to their users. Along with that, they also organize all kinds of live training sessions and events like the Robotics Developer Day and the ROS Awards. Unfortunately, the deadline for voting in the latter has passed, but hopefully in the future, the Crazyflie might get an award of its own!
What stands out about the platform is its implementation of web-based virtual machines, called ‘ROSJects,’ where ROS and everything needed for it is already set up from the start. Anyone who has worked with ROS(2) before knows that it can be a pain to switch between different versions of ROS and Gazebo, so this feature allows users to keep those projects separate. For the ROS Developer Day, there will be about five live skill-learning sessions where a ROSject is already preconfigured and set up for the attendees, enabling them to try the tutorial simultaneously as the teacher or speaker explains the framework.
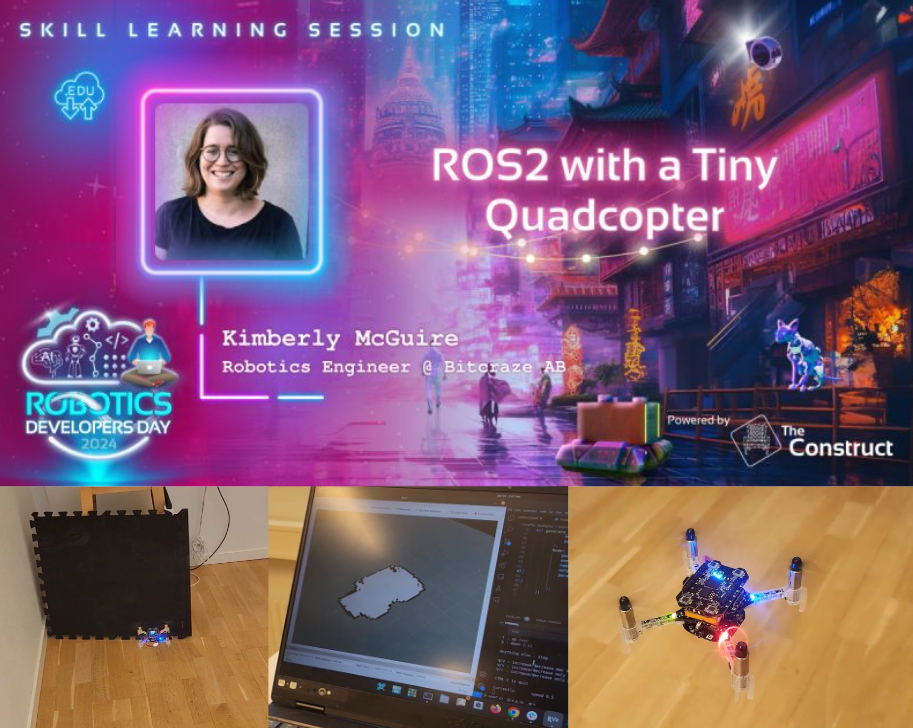
Skill learning session with the Crazyflie
One of the earlier mentioned skill learning sessions is, of course, one with the Crazyflie! The title is “ROS 2 with a Tiny Quadcopter,” and it is currently planned to be the first skill learning session of the event, scheduled at 15:15 (3:15 pm) CEST. The talk will emphasize the use of simulation in the development process with aerial robotics and iterating between the real platform and the simulated one. We will demonstrate this with a Crazyflie 2.1 equipped with a Lighthouse deck and a Multi-ranger deck. Moreover, it will also use a Qi-charging deck on a charging platform while it patiently waits for its turn :D
What we will be showing is a simple implementation of a mapping algorithm made specifically for the Crazyflie’s Multiranger deck, which we have demonstrated before at ROSCon Kyoto and in the Crazyswarm2 tutorials. What is especially different this time is that we are using Gazebo for the simulation parts, which required some skill learning on our side as we have been used to Webots over the last couple of years (see our tutorial for that). You can find the files for the simulation part in this repository, but we do advise you to follow the session first.
You can, if you want, follow along with the tutorial using a Crazyflie yourself. If you have a Crazyflie, Crazyradio, and a positioning deck (preferably Lighthouse positioning, but a Flowdeck would work as well), you can try out the real-platform part of this tutorial. You will need to install Crazyswarm2 on a separate Ubuntu machine and add a robot in your ROSject as preparation. However, this is entirely optional, and it might distract you from the cool demos we are planning to show, so perhaps you can try this as a recap after the actual skill learning session ;).
Here is a teaser of what the final stage of the tutorial will look like:
Win a lighthouse explorer bundle and a Hands-On Pass discount
We are also sponsors of the event and have agreed with The Construct to award one of the participants a Crazyflie if they win any contest. Specifically, we will be awarding a Lighthouse Explorer bundle, with a Qi deck and a custom-made charging pad similar to the ones we show at fairs like ICRA this year. So make sure to participate in the contests during the day for a chance to win this or any of the other prizes they have!
It is possible to follow the event for free, but if you’d like to participate with the ROSjects, you’ll need to get a hands-on pass. If you haven’t yet gotten a hands-on ticket for the Robotics Developer Day, please use our 50% off discount code:
On a side note, we will be at the Robotics: Science and Systems Conference in Delft from July 15th to 19th, 2024—just about two weeks from now. We won’t have a booth as we usually do, but we will be co-organizing a half-day workshop titled Aerial Swarm Tools and Applications (more details on this website).
We will be organizing this workshop together with our collaborators at Crazyswarm2, as well as the developers of CrazyChoir and Aerostack2. We’re excited to showcase demos of these frameworks with a bunch of actual Crazyflies during the workshop, if the demo gods are on our side :D. We will also have great speakers, including: SiQi Zhou (TU Munich), Martin Saska (Czech Technical University), Sabine Hauert (University of Bristol), and Gábor Vásárhelyi (Collmot/Eötvös University).
It’s not often a blog post happens on the 25th of December, so this time, you’re having a treat with some new Bitcraze prototypes as a present from us! If you have time to get away from the Christmas table, there’s something we’d love you to watch:
Now let’s try to see if you noticed all the new stuff you see in this video!
Our new flight lab
We teased it, but in the beginning of December, we got our extended flight lab! We added 110 m2 to our flight space. It was a rush to have everything ready for the video – we cleaned everything, painted the walls and the green logo, set up the positioning system without our truss… But now we’re happy to show you how big the space is! Even if it’s hard to convey the real size on camera.
The Crazyflie 2.1 brushless
We already talked about it in this blog post, but the brushless has made significant progress and we feel confident that you will get your hands on it in 2024. Here, we use the extra power for a fast and agile flight. It also was very stable and didn’t crash once during the shooting!
The Lighthouse V2
Yes, you counted right! The Brushless flew with 16 base stations! We’ve worked really hard this past three months to create a new Lighthouse deck – the Lighthouse deck 2.0. It could get its position from 16 base stations. That’s 4 times more than what was previously possible! It behaved consistently well during the different tries, and we are really happy with the result. Right now, it’s just a prototype, but we’re hoping to get it to the next step in the coming months.
The contact charging station
Marcus created a power charger for the Brushless that doesn’t need any extra deck to allow for charging. It connects with the brushless feet. It has also the cool feature of changing LEDs indicating the status (idle, charging or charged). It is also a prototype, and we don’t know if this will end up being a product
The high-power LED
This is trickier to see, but it’s not our usual LED ring that the brushless carries. It’s a new, powerful LED underneath. It is so powerful that it nearly blinded us when we tried it for the first time. We put a diffuser on it, and it allowed the Crazyflie to be visible at such a high pace! This is a prototype too of course and we’re not sure if we will release it, but it’s fun to use for this kind of project.
Other announcements
During this week, our office is closed- we take this week to celebrate and rest a little before 2024. This means that shipping and support will be greatly reduced.
But we’re back the week after- at a somewhat reduced pace though. The developer meeting on the 3rd of January is maintained but without any presentation. We’ll take this time to answer any questions you have and talk a little! The details are here.
Bitcraze got their presents this year: a handful of working prototypes! We hope we got your wishes too, merry Christmas to you!
Today, Lennart Bult from Emergent Swarns presents us with this project of a 24/7 swarming demo. Enjoy!
Over the last few months our team has been working on creating a 24/7 swarming demo. Initially tasked by Guido de Croon and Chris Verhoeven from TU Delft MAVLab and the TU Delft Robotics Institute, we set out to find our way within the Crazyflie ecosystem to gradually increase the size and capabilities of the swarm. In this article we will first talk about some of the work and methods that we used. After that, we will introduce the TU Delft Science Centre Swarming Lab and talk about some applications of swarming drones.
Developing the 24/7 swarm
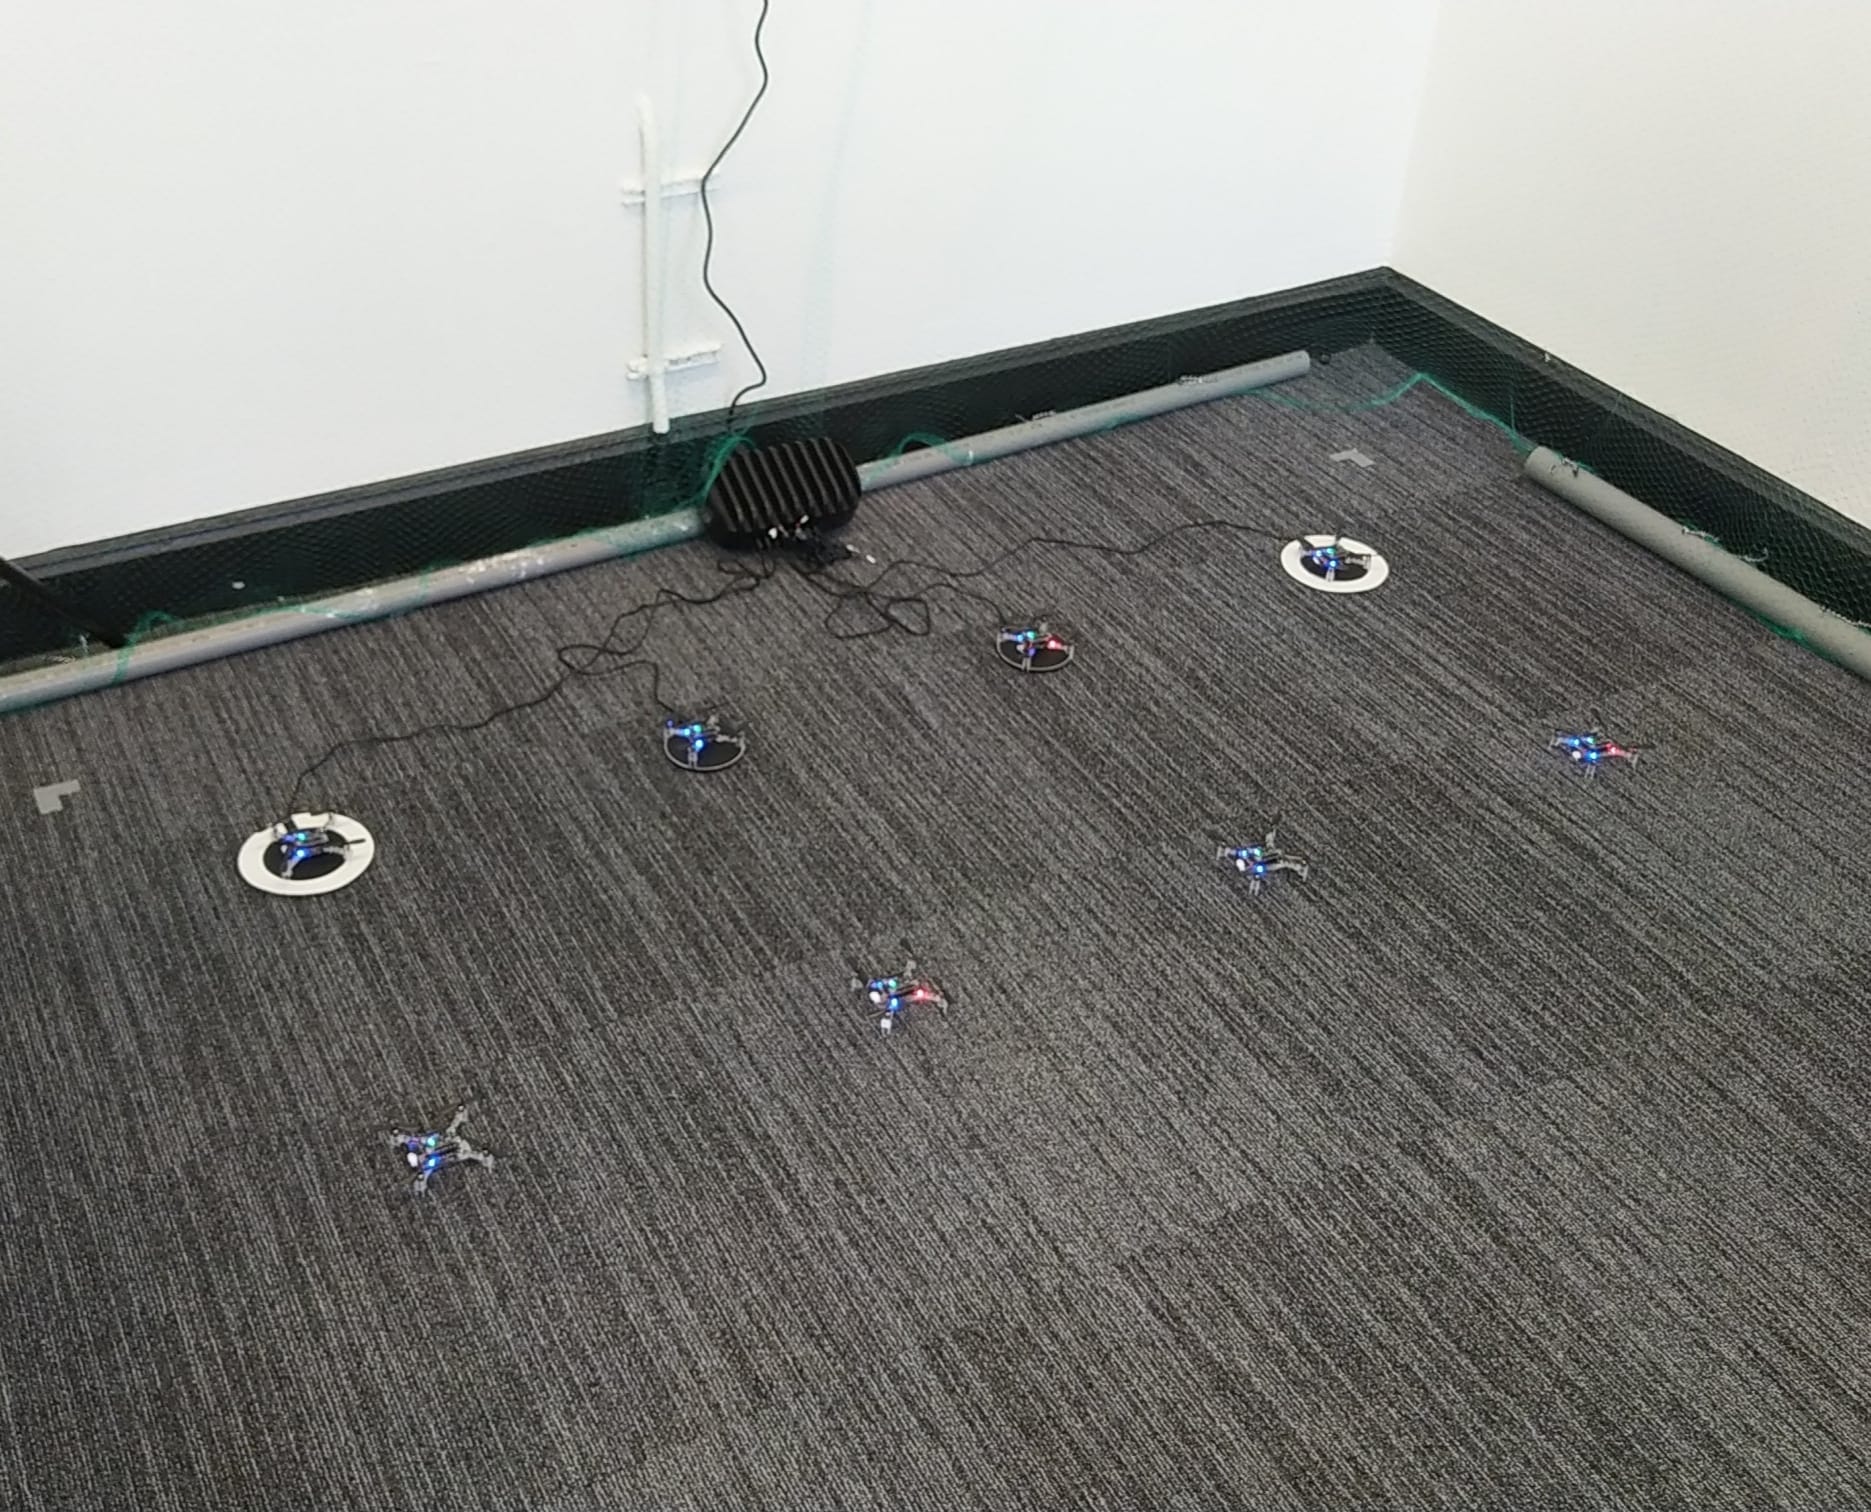
The project started in February with the goal of creating a physical swarm capable of real-time collision avoidance with drones and static obstacles. We started out with three drones equipped with the Flow Deck, and by setting them up in a clever way we could perform the first collision avoidance and landing tests. We were impressed with the performance we got out of the Flow Deck, however, eventually, it is mostly a battle against the drift of the position estimate, that is, we could increase some of the margins on the collision avoidance only so far before we would either fly out of the test zone or collide with another drone. Luckily with short test flights, we were able to see some of the flaws in our algorithms and correct them before testing with the new setup.
Setup after the first expansion to eight drones.
After a few weeks of testing we got approved for the first swarm expansion, five more drones and a Lighthouse positioning setup. This is when we could do our first real tests with the collision avoidance algorithm, which, much to our own surprise, worked on the first try. This is also when we first posted a project update on LinkedIn. There were however a lot of bugs that still needed to be worked out, and a lot of system experience still to be gained. After flying for a bit longer we noticed that some of the drones would flip quite often, which is when we discovered that we needed the thrust upgrade to control the additional weight of the larger battery and charging deck.
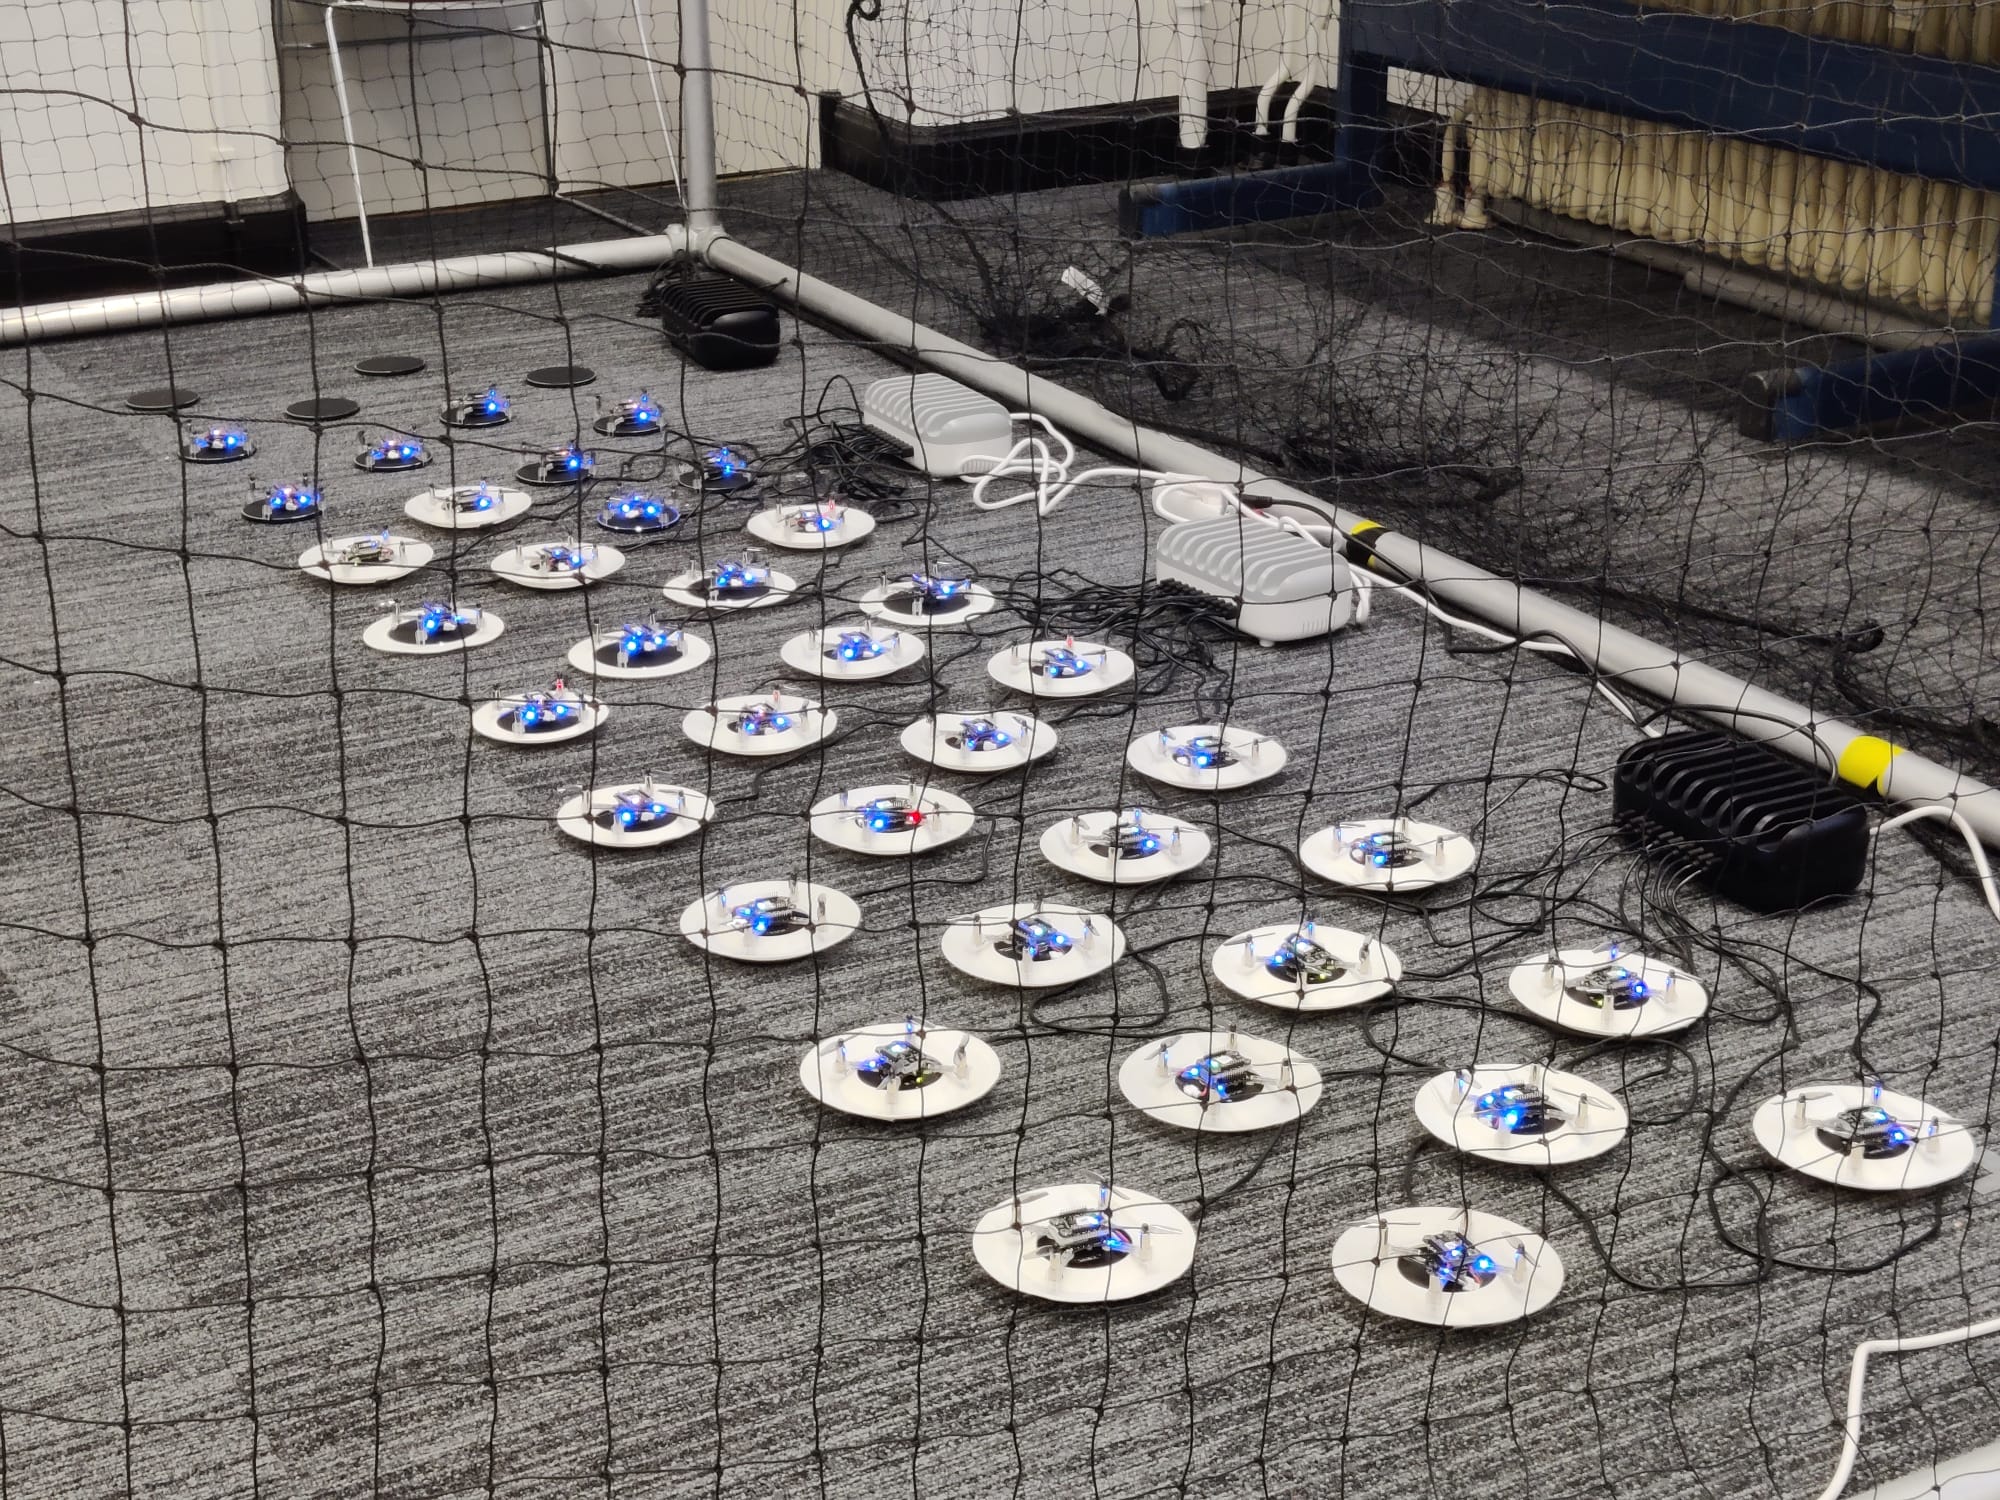
For the charging setup we took inspiration from the Bitcraze IROS 2022 demo; we 3D printed sloped landing pads that we tape onto a wireless charger. After a few iterations we landed on a design that uses minimal printer resources and allows the Crazyflie to land a bit off-center. This last feature turned out to be quite useful considering the large amount of destabilizing airflow that is generated by 40 drones. After receiving the last order of drones we also expanded the charging setup, which at this point takes up quite a bit of floor space. There are some ideas to create a vertical landing pad stack, which would bring the additional challenge of missing the landing pad not being an option.
All 40 drones recharging before their next flight.
After prototyping the charging setup and building confidence with the initial setup, we were confident enough in our system capabilities to expand it to the point where a continuous demo of 5-8 drones is possible. Although the system integration of the previous expansion went without much trouble, we did encounter a few issues when expanding to 40 drones. The first issue of which was radio communication, we noticed that a delay in the radio communication would be present if we increased the update rate above a certain level for a specific number of drones per radio. The second issue we encountered were performance drops related to the violation of certain bounds in the collision avoidance algorithm. These two issues were very difficult to debug since it was not immediately obvious where the source of the issue was.
The third and last major issue was the increase in destabilizing airflow of 40 drones compared to 8. With 40 drones there is a noticeable breeze when you stand next to the drone cage, which is nice for summertime, but not so nice when drones need to land in a tight-packed configuration. To combat this issue there is a limit to the amount of drones that can land at the same time. There is also a minimum separation distance between two active landing pads, which reduced the severity of the induced turbulence. There are still ongoing efforts to increase the landing success rate, which is currently affected by drones running out of power during the landing procedure.
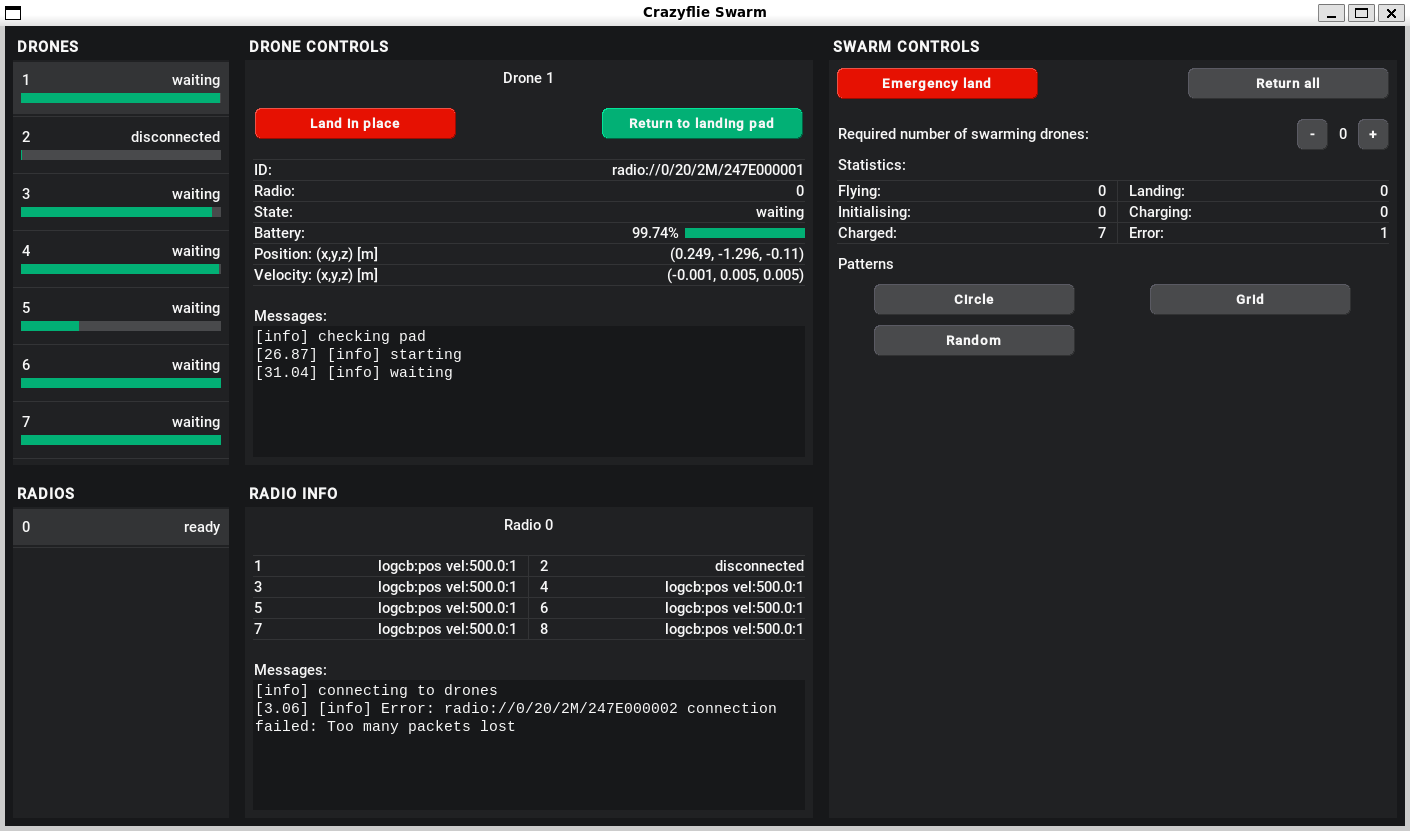
To control and monitor the swarm we designed a custom GUI, an impression of which you can see below. Although some of the buttons are still a work in progress, there are a lot of features that have already proven very useful, especially when testing a new feature.
V1 of the graphical user interface developed for the 24/7 swarm.
The code base that we created for the swarm will be largely open-sourced (only the collision avoidance will not be open-source) to provide researchers all around the world with the possibility to setup their own Crazyflie swarm for research. You can find the repository through this link. Note that the documentation and code base are still under development and might contain bugs/errors.
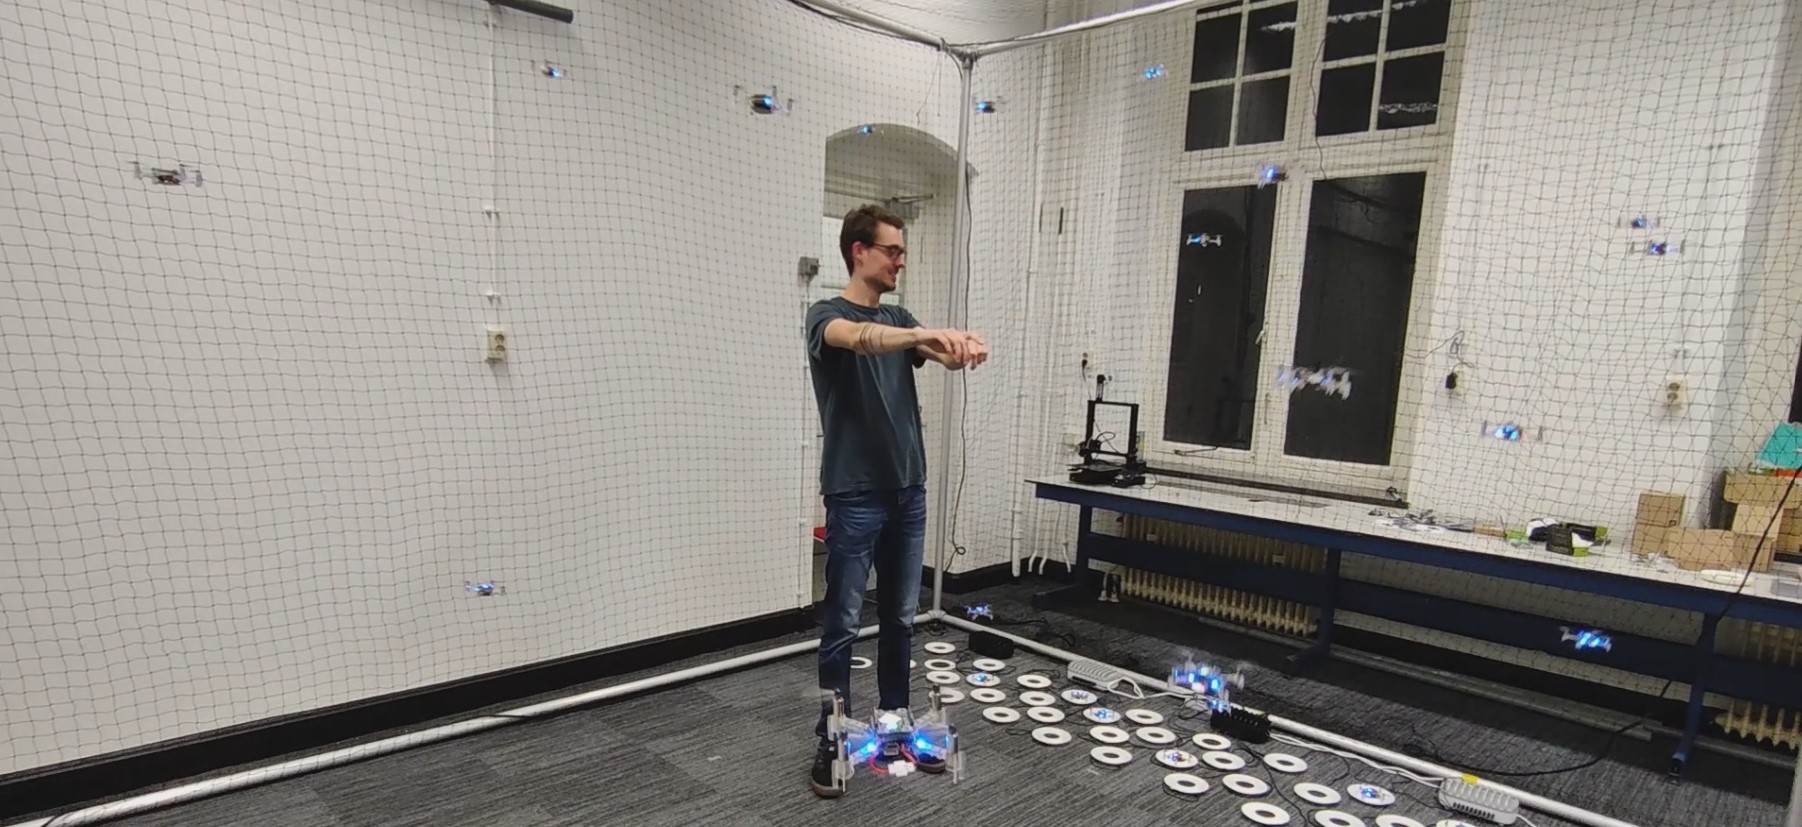
Human interaction
After creating all functionality to provide a continuously operating swarm demo, it was time to work on some of our stretch goals: 1. walking through the swarm whilst it is operating and 2. controlling the swarm using our arms. In the image below you can see an impression of precisely this functionality. The drones are following the operator’s gesture commands whilst performing live collision avoidance with an operator.
Team member Seppe directing the 40 drone swarm, see the full video here.
This demo requires multiple techniques and hardware elements working together to create a relatively low-latency, human-controlled swarm. We used a Kinect-like 3D sensor to perform human pose estimation, we subsequently used this data to create a dynamic obstacle in our collision avoidance software. An important element to consider here is the synchronization of the Lighthouse- and 3D sensor coordinate frames, i.e. without proper calibration the human will not be correctly positioned with respect to the drones and the drones will crash into the human. The interaction between the swarm control software and the human gesture commands also requires careful consideration, proper tuning is required to ensure a responsive system that is reliable and not too aggressive.
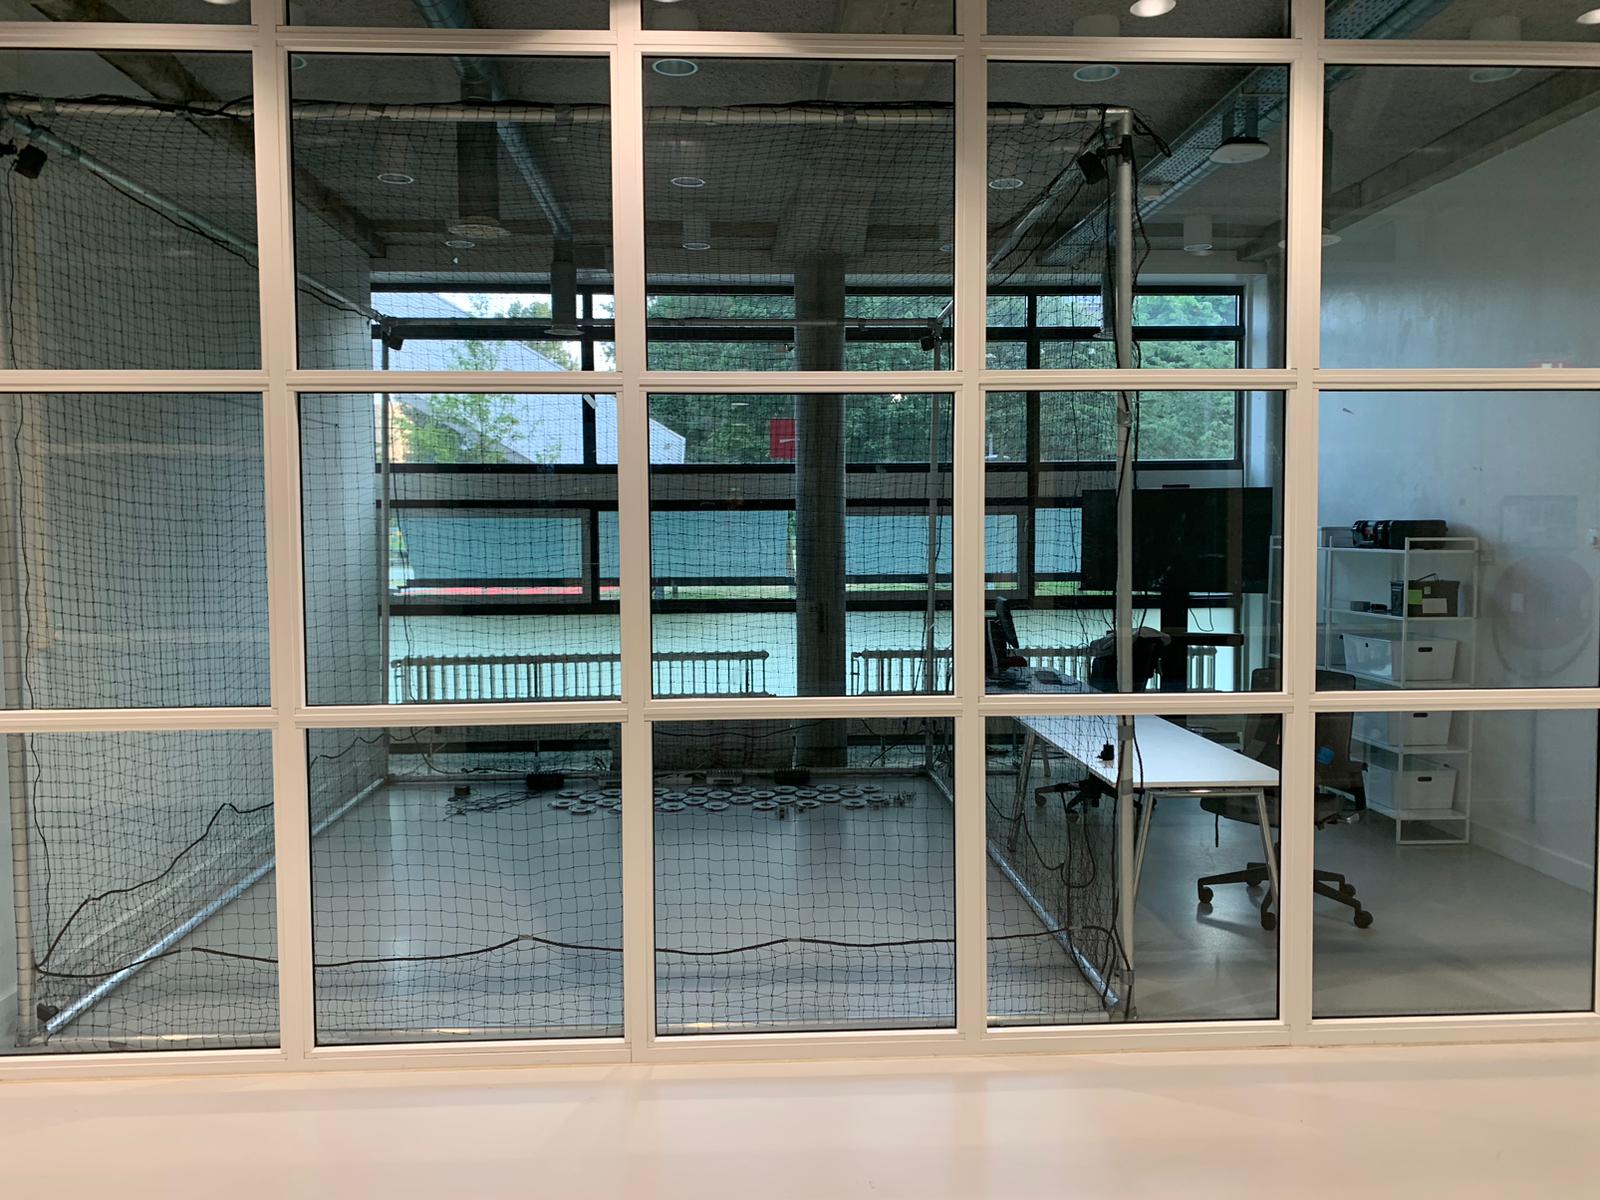
TUD Science Centre Swarming Lab
The next step in this project will be to set up the swarm at its new location, the TU Delft Science Centre. Here, the swarm will first and foremost be visible as a public demo, showcasing the capabilities of TU Delft state-of-the-art swarming research. There will also be a focus on developing the swarm as a research platform. This will allow TU Delft students and researchers to extend swarm functionalities and test their theory on a physical swarming system. Besides demos and academic research, there will also be worked on developing educational applications across the full educational board (primary school, high school and applied education). If you are interested in working on, or collaborating with the swarming lab on any of the above-mentioned tasks, feel free to email the lab management at operations.swarminglab@tudelft.nl.
The TU Delft Swarming Lab setup with 40 drones and charging pads for continuous operations and research.
Applications of Swarming
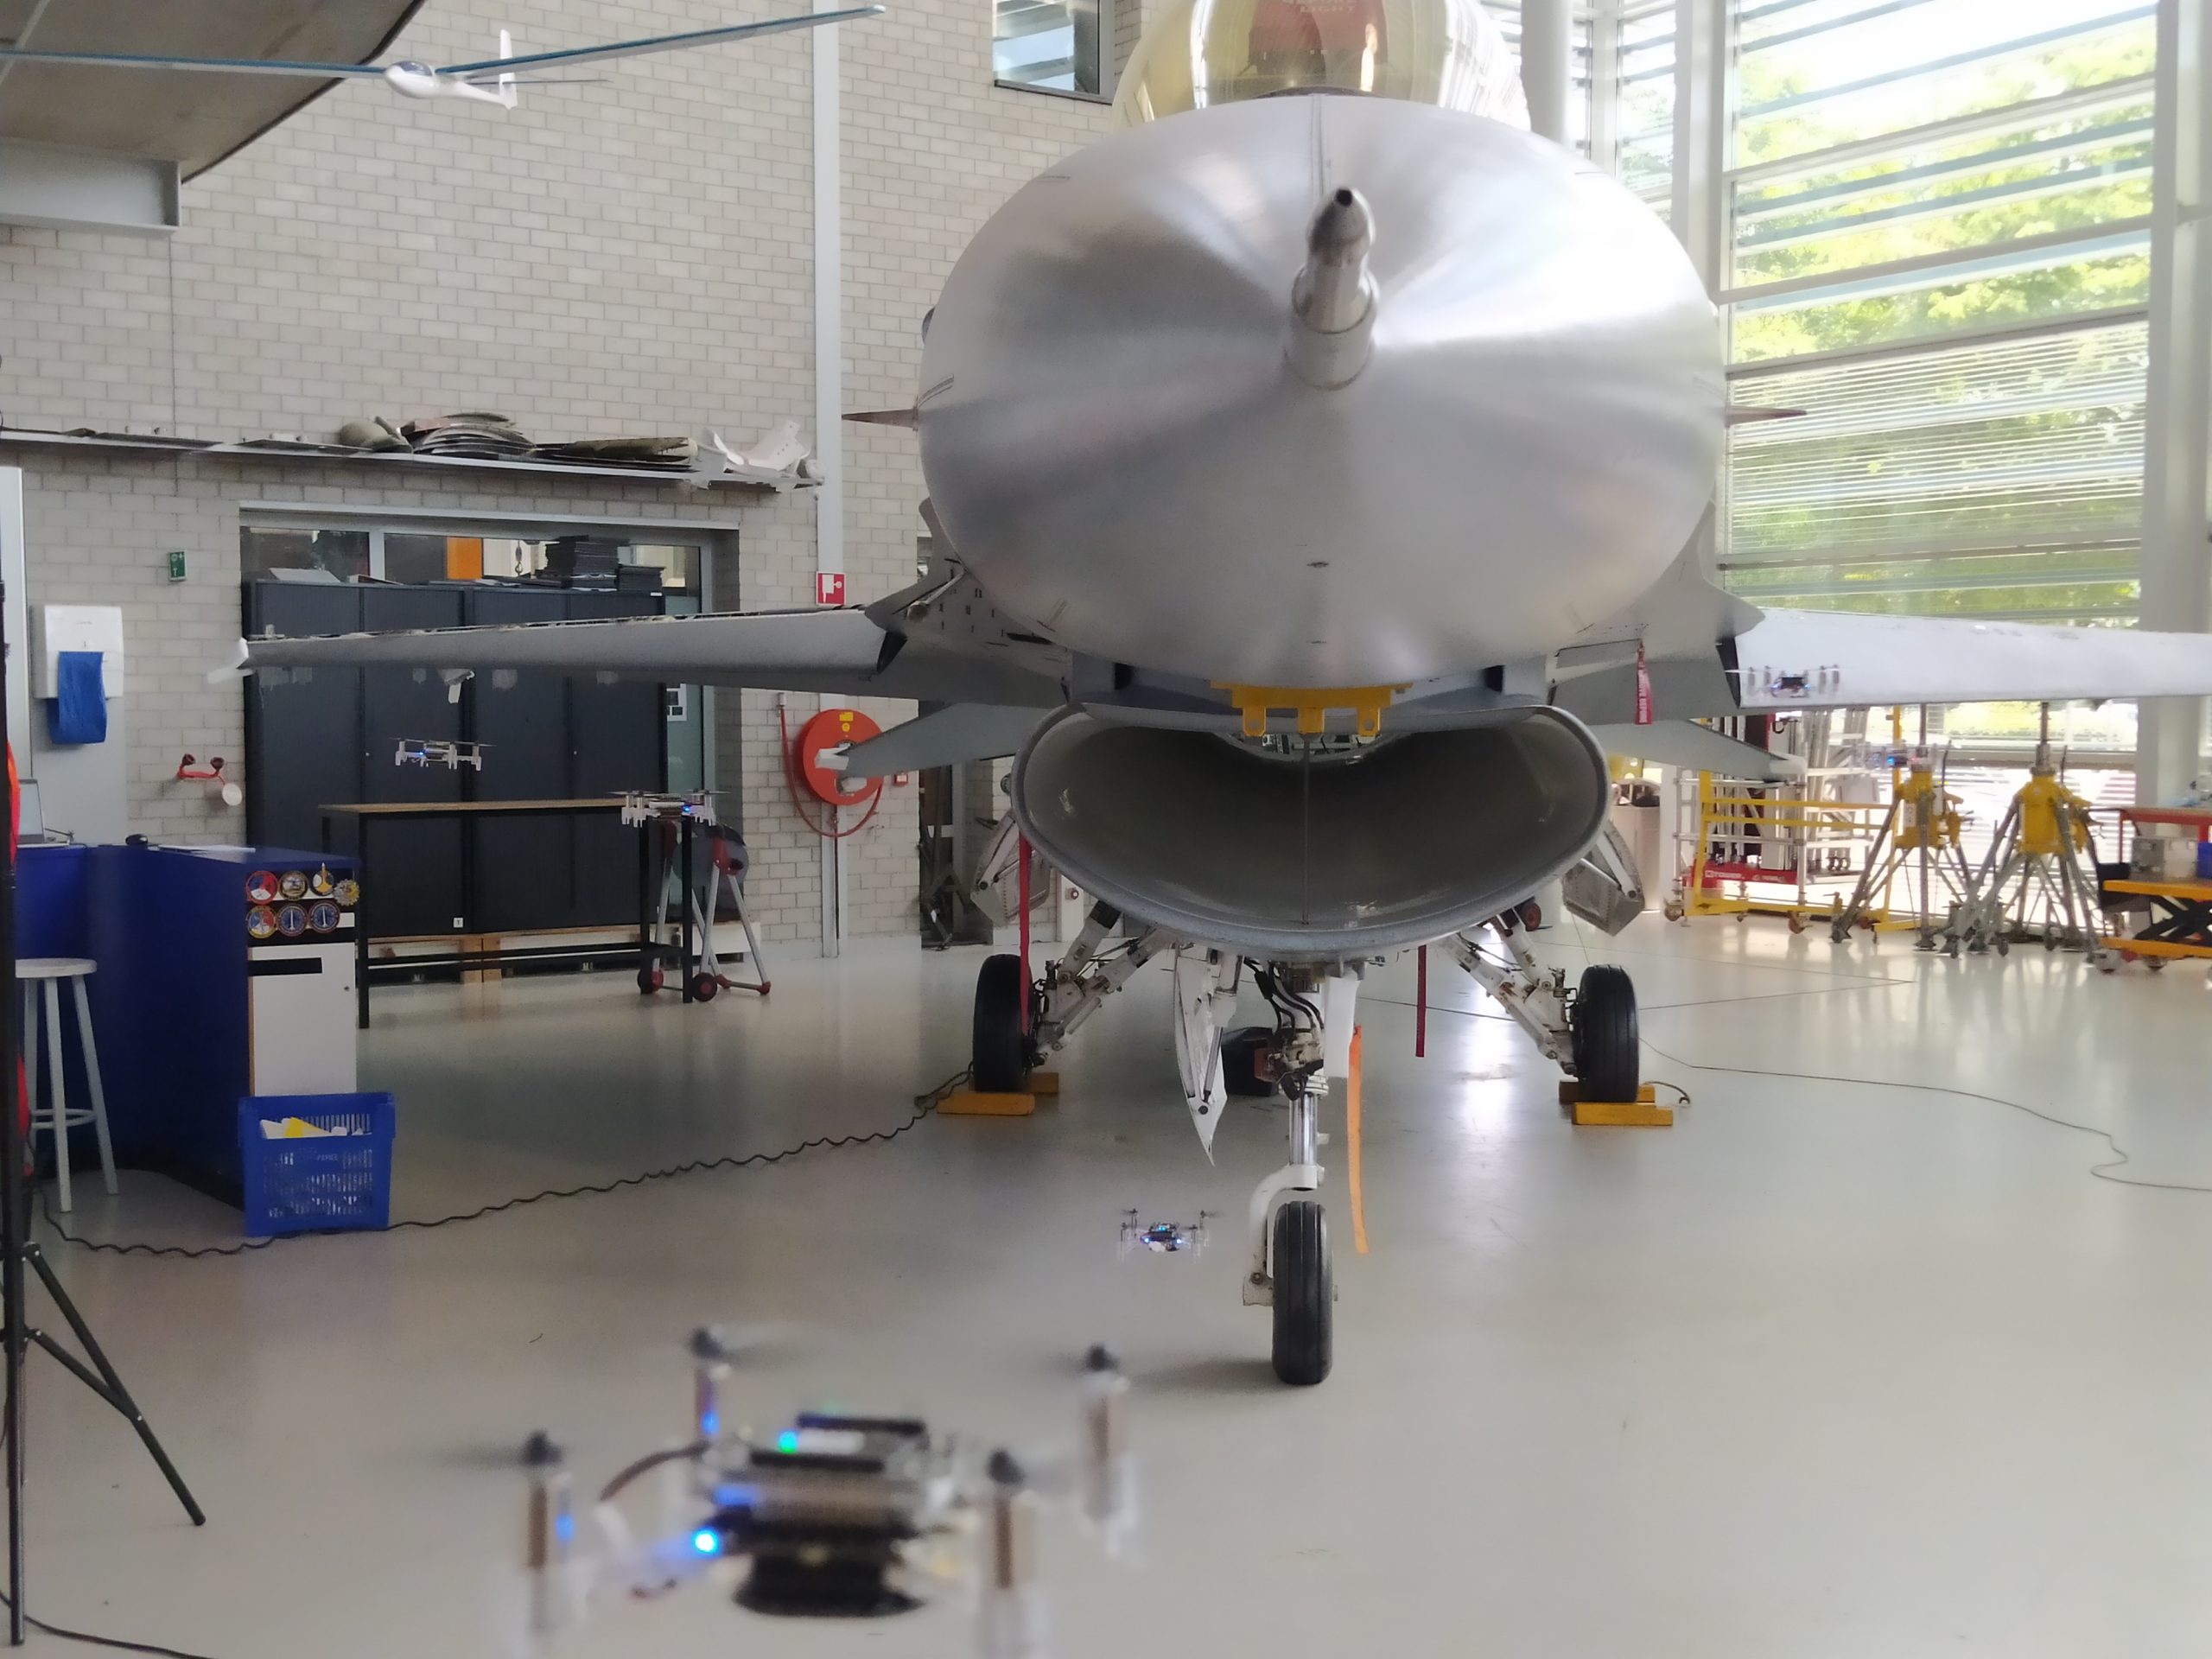
There are a lot of potential use-cases for fully autonomous drone swarms, ranging from indoor applications such as warehouse monitoring and factory inspection to outdoor applications such as search and rescue and surveillance. In our opinion, the true potential of drone swarms lies in applications where there is a significant need for a scalable system with a lot of built-in redundancy. A lot of additional use cases open up when we consider fully onboard autonomous systems, where the full benefits of decentralized swarming can be utilized. Currently, the size of drones needed to achieve such feats is quite large, though maybe in a few years, we could see more and more being done on drone platforms such as the Crazyflie.
A swarm inspection of an F-16 Fighting Falcon at Deltion College in Zwolle, the Netherlands.
An interesting area of application for drone swarms could be in the inspection of aircraft. Drone swarms provide a scalable and flexible means to perform a fast inspection of aircraft across an entire airfield or military base. To showcase that this can be done with any size of drone, we went to Deltion College in Zwolle to perform a mock inspection of an F-16 fighter jet. Above you can see an impression of the inspection. Another area of application is search and rescue, where there is a need for systems that can find people or objects of interest in unknown and cluttered environments. Furthermore, the area that needs to be searched is usually very large and sometimes difficult to travel on foot. A drone swarm could provide fast and reliable coverage of the area of interest, whilst providing full data traceability. Seppe and Lennart will work on creating drone swarms for these use cases with the start-up Emergent Swarms.
This week’s guest blogpost is from Matěj Karásek from Flapper Drones, about flying the Nimble + with a positioning system. Enjoy!
Flapper Drones are bioinspired robots flying by flapping their wings, similar to insects and hummingbirds. If you haven’t heard of Flappers yet, you can read more about their origins at TU Delft and about how they function in an earlier post and on our company website.
In this blogpost, I will write about how to fly the Flappers (namely the Flapper Nimble+) autonomously within a positioning system such as the Lighthouse, and will of course include some nice videos as well.
The Flapper Nimble+ is the first hover-capable flapping-wing drone on the market. It is a development platform powered by the Crazyflie Bolt and so it can enjoy most of the perks of the Crazyflie ecosystem, including the positioning systems as well as other sensors (check this overview). If you would like to get a Flapper yourself, just head to the Bitcraze webstore, where there are some units ready to be shipped! (At the time of writing at least…)
Minimal setup
The minimal setup for flying in a positioning system is nearly identical as with a standard Crazyflie. Next to a Flapper with a recent firmware, a Crazyradio dongle, a positioning system (in this post we will use the Lighthouse), and a compatible positioning deck (Lighthouse deck) you will also need: 1) a mount, such that the deck can be attached on top of the Flapper, and 2) a set of extension cables. You can 3D print the mounts yourself (models here), the extension cable prototypes can either be inquired from Flapper Drones, or can be soldered by yourself (in that case, the battery holder deck, standard Crazyflie pin headers and some wires come handy). Just pay attention to connect the cables in the correct way, as if the deck was mounted right on top of the Bolt. The complete setup with the Lighthouse deck will look like this:
Lighthouse deck installation on a Flapper Nimble+. Make sure the extension cables are well secured (e.g. by using the additional cable mount) such they don’t get caught by the gears.
For the Lighthouse, as with regular Crazyflies, the minimum number of base stations (with some redundancy) is 2, but you will get larger tracking volume with more base stations. 4 base stations mounted at 3 m height will give you about 5 meters time 5 meters coverage, which is recommended especially if you want to fly more than 1 Flapper at a time (they are a bit larger than the Crazyflies, after all…). From now on, it is exactly the same as with standard Crazyflies. After you calibrate the Lighthouse system using the standard wizard procedure via the Cfclient, you can just go to the Flight Control Tab and use the “Command Based Flight Control” buttons to take-off, command steps in xyz directions and land. It is this easy!
Flapper Nimble+ in Lighthouse flown via Command Based Flight Control of cfclient
Assisted flight demo
We used this setup in February for the demos we were giving at the Highlight Delft festival in the Netherlands. This allowed people with no drone piloting skills (from 3-year-olds, to grandmas – true story) fly and control the Flapper in a safe way (safe for the Flapper, as the Flapper itself is a very safe platform thanks to its soft wings and low weight). To make it more fun, and even safer for the Flapper, we used a gamepad instead of on screen buttons, and we modified the cfclient slightly such that the flight space can be geofenced to stay within the tracking volume.
Flight demo at Highlight Delft festival, using the Lighthouse and position hold assistance
If you would like to try it yourself (it works also with standard crazyflies), the source code is here (just keep in mind it is experimental and has some known bugs…). To fly in the position-assisted mode, you need to press (and keep pressing) the Alt 1 button, and use the joysticks to move around (velocity commands, headless mode). Releasing the Alt 1 button will make the Flapper autoland. Autoland will also get triggered when the battery is low. You can still fly the Flapper in a direct way when pressing Alt 2 instead.
Flying more Flappers at a time
Again, this is something that works pretty much out of the box. As with a regular crazyflie, you just need to assign a unique address to each of the Flappers and then use e.g. this example python script to run a preprogrammed sequence.
With a few extra lines of code, we pulled this quick demo at the end of the Highlight Delft festival, when we had 30 minutes left before packing everything (one of the Flappers decided to drop its landing gear, probably too tired after 3 evenings of almost continuous flying…):
Sequence with 3 Flappers within Lighthouse positioning system
Other positioning systems
Using other positioning systems is equally easy. In fact, for the Loco Positioning system, the deck can even be installed directly on the Flapper’s Bolt board (no extension cables or mounts are needed). As for optical motion tracking, we do not have experience with Qualisys and the active marker deck, but flying with retro-reflective markers within OptiTrack system can be setup easily with just a few hacks.
When choosing and setting up the positioning system, just keep in mind that due to its wings, the Flapper needs to tilt much more to fly forward or sideways, compared to a quadcopter. This is not an issue with the Loco Positioning system (but there can be challenges with position estimation, as described further), but it can be a limitation for systems requiring direct line of sight, such as the Lighthouse or optical motion tracking.
Ongoing work
In terms of control and flight dynamics, the Flapper is very different from the Crazyflie. Thus, for autonomous flight, there remains room for improvement on the firmware side. We managed to include the “flapper” platform into the standard Crazyflie firmware (in master branch since November 2022, and in all releases since then), such that RC flying and other basic functionality works out of the box. However, as many things in the firmware were originally written only for a (specific) quadcopter platform, the Crazyflie 2.x, further contributions are needed to unlock the full potential of the Flapper.
With the introduction of “platforms” last year, many things can be defined per platform (e.g. the PID controller gains, sensor alignment, filter settings, etc.), but e.g. the Extended Kalman filter, and specifically the motion model inside, has been derived and tuned for the Crazyflie 2.x, and is thus no representative of the Flapper with very different flight dynamics. This is what directly affects (and currently limits) the autonomous flight within positioning systems – it works well enough at hover and slow flight, but the agility and speed achievable in RC flight cannot be reached yet. We are planning to improve this in the future (hopefully with the help of the community). The recently introduced out of tree controllers and estimators might be the way to go… To be continued :)
Thanks Matej ! And for those of you at home, don’t forget that we have our dev meeting next Wednesday (the 5th), where we’ll discuss about the Loco positioning system, but also will take some time for general discussions. We hope to see you there!
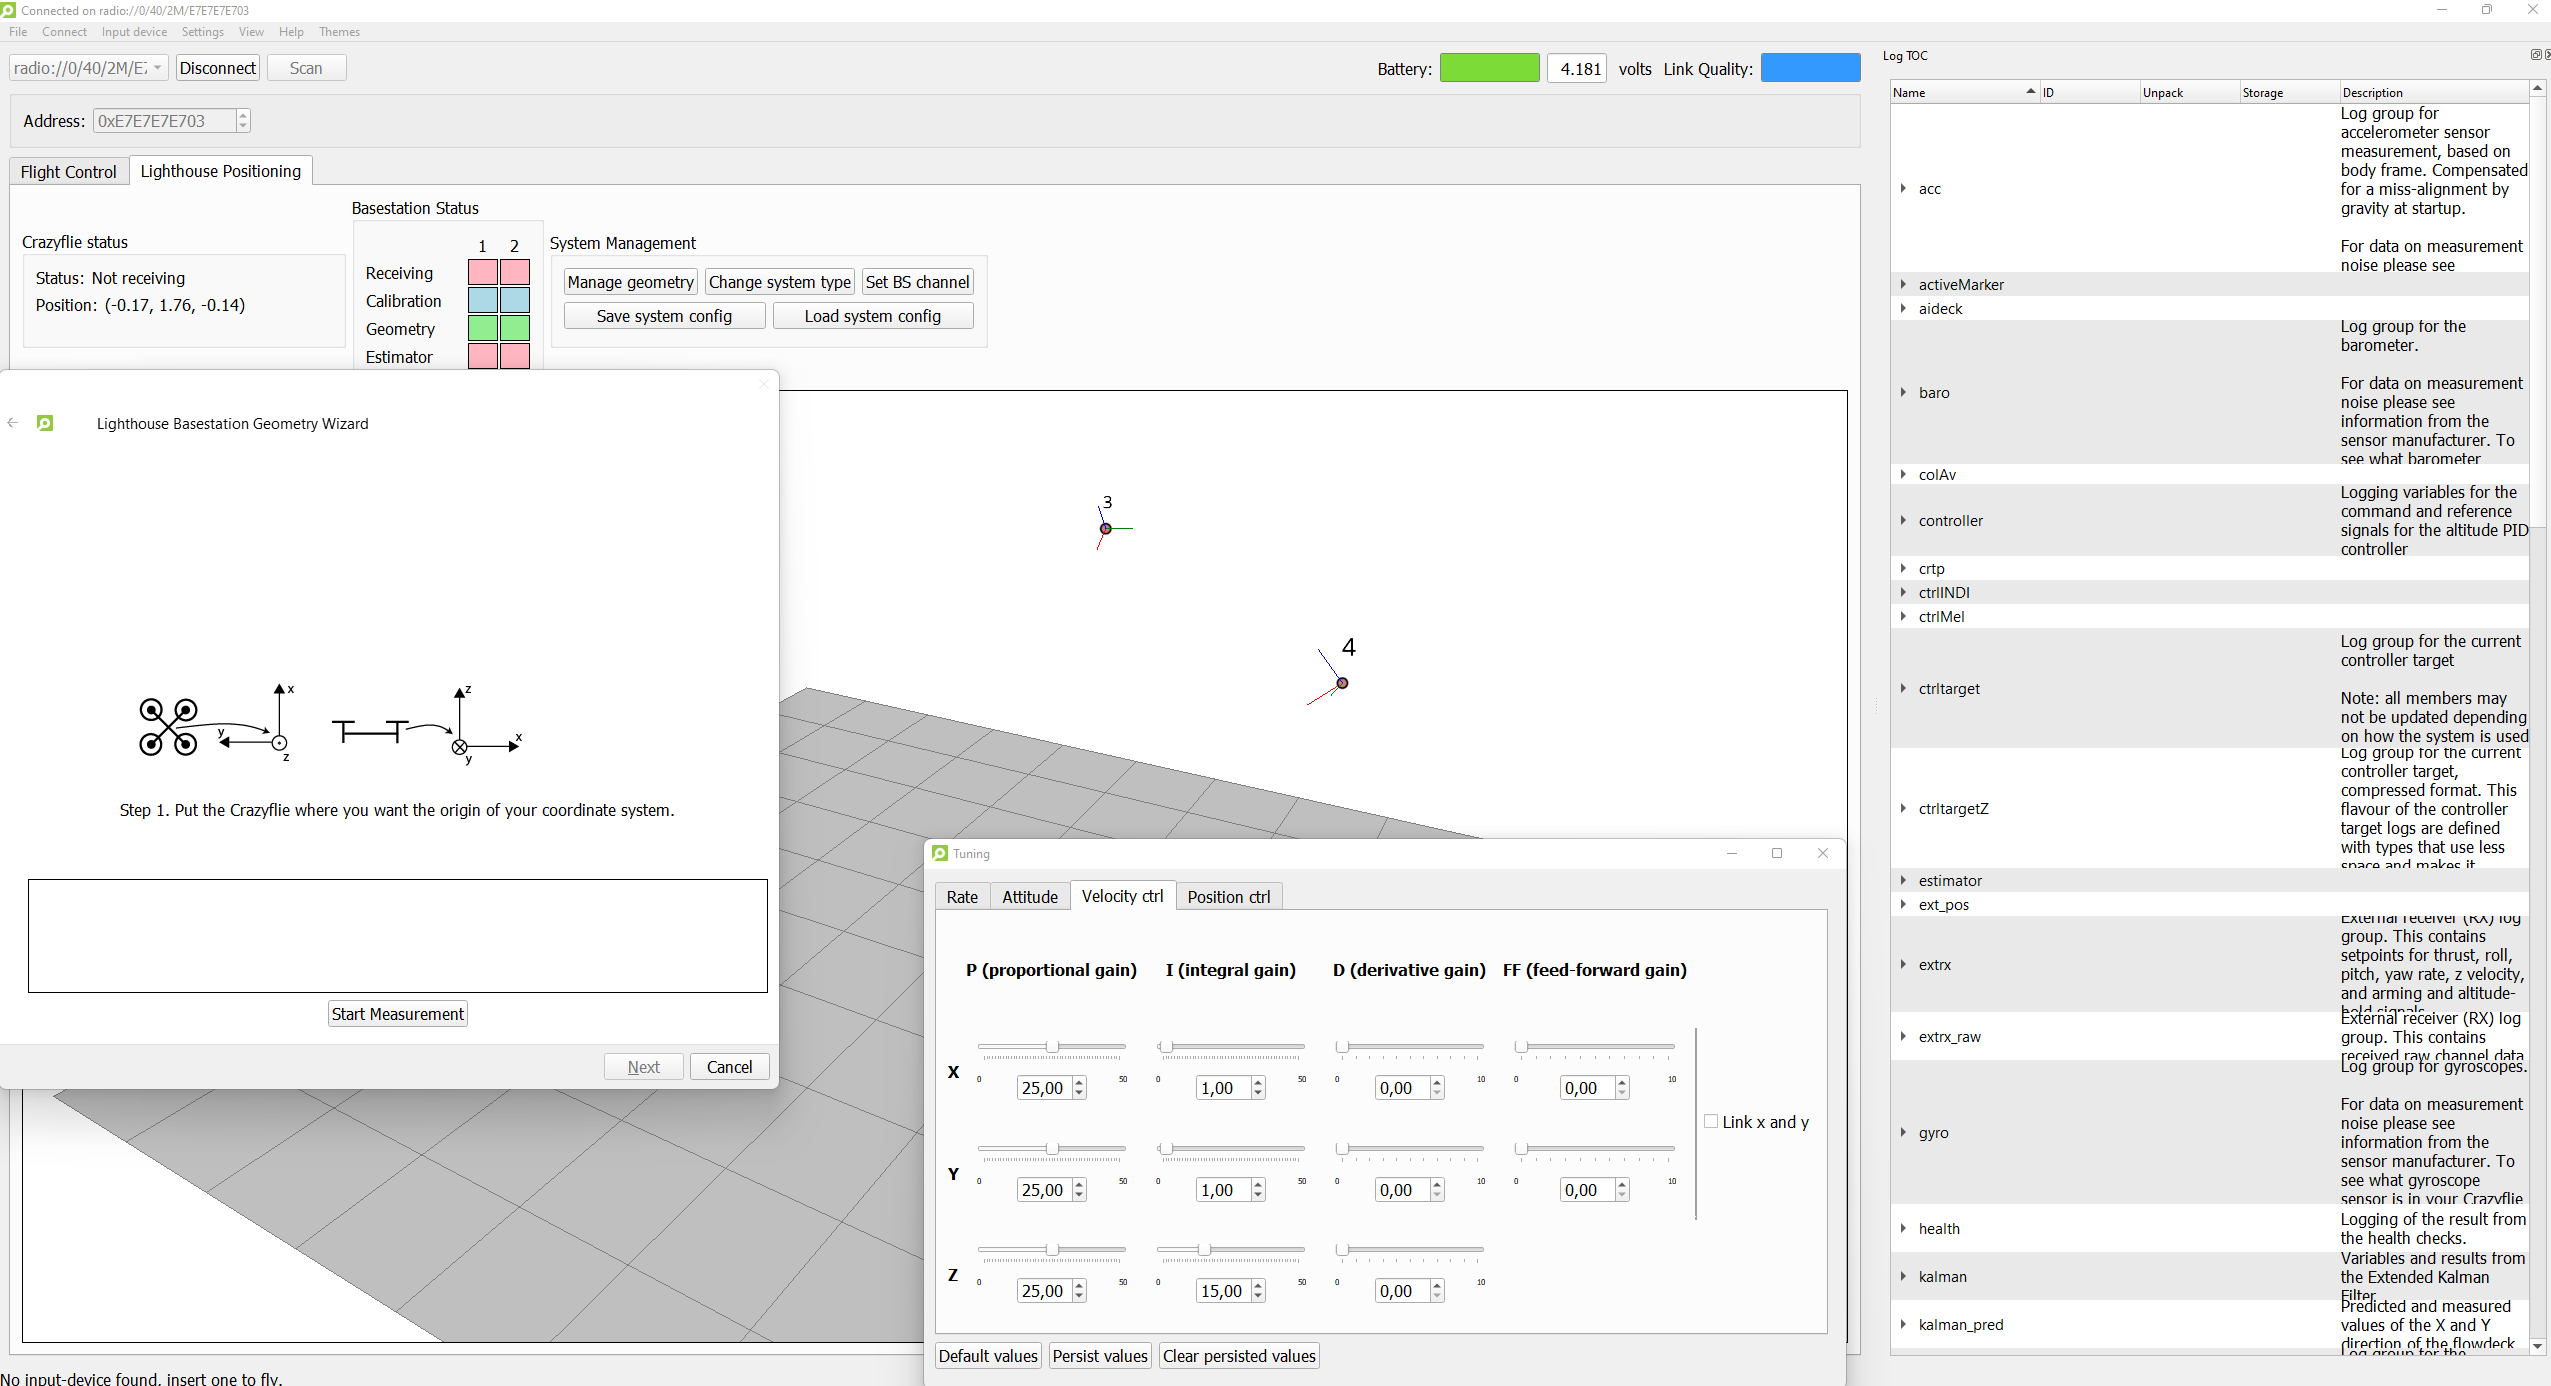
There are some nice and exciting improvement in the CF-client that we worked on during the summer months! First of all we worked on a toolbox structure, where every tab can be reconfigured as a toolbox as well, allowing it to be docked to the sides of the window. Secondly we have added a new geometry estimation wizard for Lighthouse systems to support multi base-station estimation. Finally we have added a new tab for PID controller tuning, mainly intended for the Bolt.
New tabs, toolboxes and wizards for the CFclient
Toolboxes in the CFclient
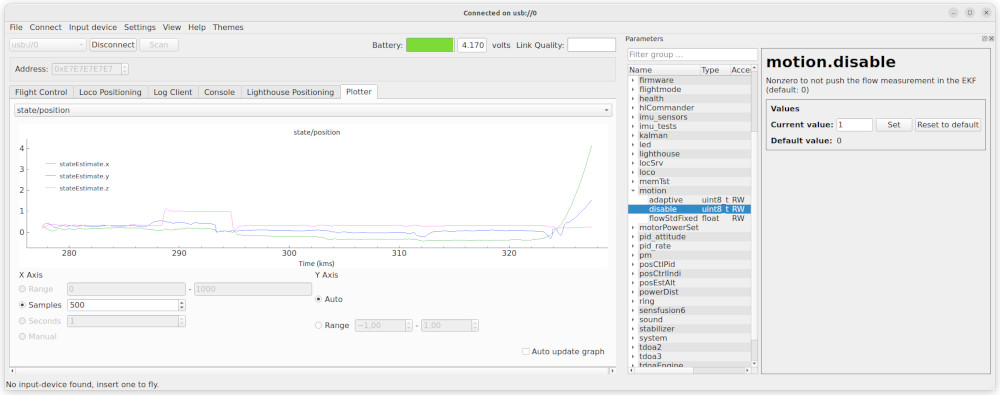
Everyone who used the CFclient has experienced the tabs before. Anytime you want to configure the lighthouse system, setup plotting or look at the parameter states, you switch to the appropriate tab to perform your desired action. This is all fine, but sometimes it can be useful to see the contents of two tabs at the same time, maybe you want to watch the graphing of a log variable at the same time as you change a parameter. This is what the combined tab/toolbox feature adds! Any tab can now be converted into a toolbox that can be docked to the side of the window.
Plotter tab with parameter toolbox
In the example above the plotter is displaying the estimated position of a Crazyflie with a Flow deck, while the parameter window is opened as a toolbox. The “motion.disable” parameter was just set to true and we can see that the kalman estimator gets into trouble when it no longer gets data from the flow deck.
To switch from tab to toolbox mode, go to the View/Toolboxes menu and select the window that you want to show as a toolbox. In a similar way, use the View/Tabs menu to turn it back to a tab.
Even though all tabs can be turned into toolboxes, some of them might still look better as tabs due to their design. We hope to be able to improve the design over time and make them more toolbox friendly, contributions are welcome!
Lighthouse Geometry Estimation Wizard
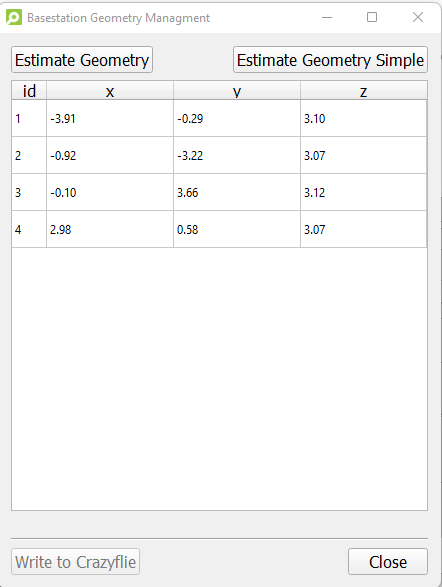
In a blogpost of almost a half year ago, we presented a new multi base station geometry estimation method that enabled the user to include more than 2 base station for flying a Crazyflie. This heavily increases the flight area covered by the base station V2s, as technically it should be able to handle up to 16!
New geometry estimation dialog
However, up until this summer it has been in experimental mode as we weren’t so sure as how stable this new estimation method is, so the only way to use it was via a script in the Crazyflie python library directly, and not from the CFclient. Since we haven’t heard of anybody having problems with this new experimental feature, we decided to go ahead to make a nice multi base station geometry estimation wizard in the CFclient’s Lighthouse tab.
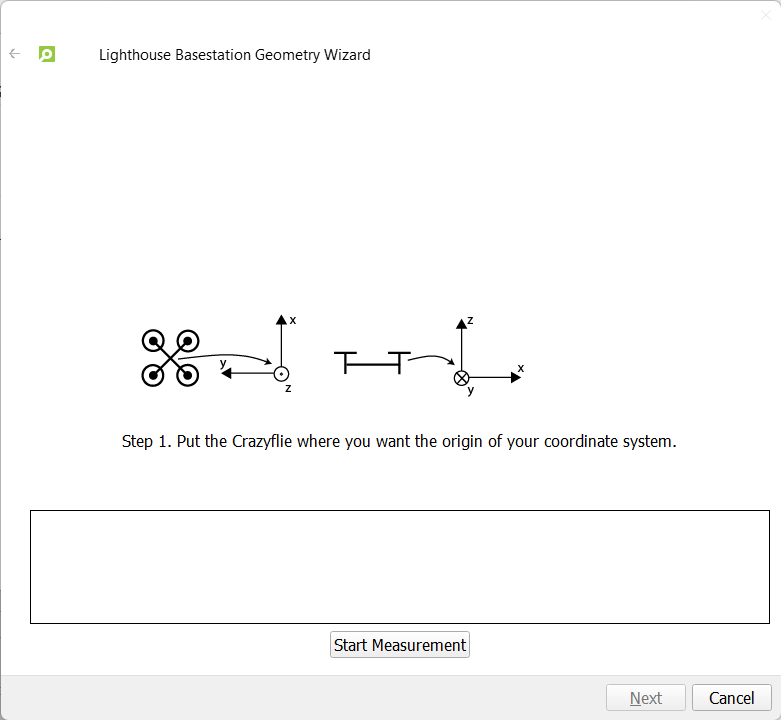
This wizard can be accessed if you go to the lighthouse tab-> ‘manage geometry’ and press ‘Estimate Geometry’. We had to make it a wizard as this new method requires some extra intermediate steps compared to the previous, to ensure proper scaling, ground plane setting and sweep angle recording. If you are only using 2 base stations this seems like extra effort, where you only had to put the Crazyflie on the ground and push a button, but if you compare flight performance of the two methods, you will see an immediate difference in positioning quality, especially around the edges of your flight area. So it is definitely worth it!
First page of the wizard
We will still provide the “simple” option for those that want to use it, or want to geometry estimate only one base-station, as we don’t have support for that for this new estimator (see this issue). In that case, you will have to install the headless version of opencv separately like ‘pip3 install opencv-python-headless’. We will remove this requirement from the cflib itself for the next release as there are conflicts for users who has installed the non-headless opencv on their system, like for the opencv-viewer of the AI-deck’s wifi streamer for instance.
PID tuning tab
The PID controller tuning tab
And last but not least, we introduced an PID tuning tab in a PR in the CFClient! And of course… also available as a toolbox :) This is maybe not super necessary for the Crazyflie itself, but for anyone working with a custom frame with the Bolt or BigQuad deck this is quite useful. Tuning is much handier with a slider than to adjust each parameter numerically with the parameter tab. Also if you are just interested of what would happen if you would increase the proportional gain of the z-position controller of the crazyflie, this would be fun to try as well… but of course at your own risk!
If you are happy with your tuned PID values, there is the “Persist Values” button which will store the parameters in the EEPROM memory of the Crazyflie/Bolt, which means that these values will persist even after restarting the platform. This can be cleared with the ‘Clear persisted values’ button and you can retrieve the original firmware-hardcoded default values with ‘Default Values’ button. Please check out this blogpost to learn more about persistent parameters.
Try it out for yourself!
This client has not been released yet but you can already go ahead and try these new features out for yourself. Make sure to first install the client from source, and then install the CFlib from source, as an update of both is necessary. Also update the crazyflie-firmware to the latest development branch via these instructions, especially if you want to try out the new LH geometry wizard.
And of course, don’t forget to give us feedback on discussions.bitcraze.io or to make an issue on the cfclient, cflib or crazyflie-firmware github repositories if you are hitting a bug on your machine and you know pretty precisely where it comes from.
Ever since we released the Lighthouse deck back in 2019, we’ve wanted to offer a bundle with the deck and the base stations. There’s multiple reasons for this, but the main reason was that we wanted users to be able to buy a full swarm (like the Loco Positioning Swarm) directly from us, without having to find the base stations separately. Initially this seemed easy to do, but it turned out to be a bit tricky. This post is about how we finally managed to get the Lighthouse Swarm Bundle finished and into the E-store.
The Lighthouse swarm bundle
When the Lighthouse deck was initially released it only had support for Lighthouse V1 base stations, but Ligthouse V2 was already out. Since the V1 base stations were already in short supply, we wanted to support V2 since this was what would be available in the future. We had started looking at V2 support, but there was still ongoing efforts from us (and others) to reverse engineer the protocol. After some prototyping we had some initial support, but there was still a lot of infrastructure work to be done before it could be released.
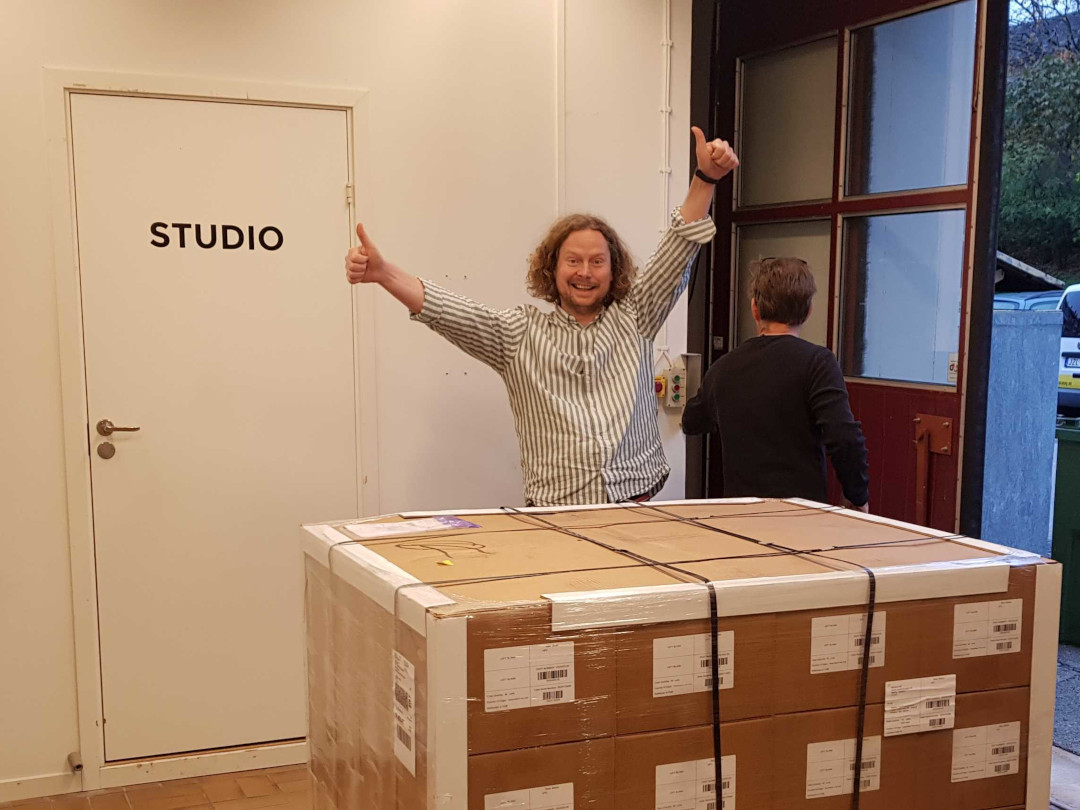
In parallell with this work we started trying to buy the Lighthouse V2 base stations. Normally there’s two options here, either buy from local distributors or buy directly from the manufacturer. Buying from local distributors wasn’t a good option for us since these will only have local power plugs and buying directly from the manufacturer often requires very large orders. So this process quickly stalled. But after a couple of months we got an offer to buy a bulk shipment of Ligthouse V2 base stations (without box or power adapters) which we finally decided to accept. And yeah, that’s me looking really happy next to a bunch of base stations…
Marcus looking happy about the base stations
With a bunch of base stations at the office, work with sourcing a power adapter and creating a box started. Unfortunately the number of COVID-19 cases started rising again shortly after receiving the base stations, so we started working more from home again. And with only 2 persons at the office at a time, it’s hard to work with hardware. Different team-members needs access to different resources, like the electronics labs, flight arena or packing orders. So getting box/adapter samples from manufacturers, doing testing and getting input on physical objects from other team-members quickly went from days to weeks.
Finally, after a couple of months of testing, evaluating and learning lots about adapters and cardboard, we had good candidates. But then, literally as we’re ordering the power adapters, it turns out the certification was not good for all the regions we wanted. Thankfully this time around we already had other options so we quickly decided on the second best option (now the best option) and ordered.
In the meantime work was underway finalizing the implementation of Lighthouse V2, including client support, firmware updates of the Lighthouse deck and documentation/videos. Finally in the beginning of 2021 we got documentation and the full implementation (although only for 2 base stations) in place (blog post).
After a bit more than a month of waiting, the power adapters and boxes finally showed up at our office. With all the supplies in place, we started preparing for the packing. Since you can buy base stations for multiple sources, we wanted to keep track of the base stations that we were sending out to be able to debug issues users might have with these units. Also, even though the base stations had already been factory tested, we wanted to quickly test them before shipping them out. So our flight arena was turned into a makeshift assembly line and we had some outside help come in to do the packing.
Finally, the end result! We’re really excited to be able to offer yet another swarm bundle, the Lighthouse swarm bundle. And we’re pretty happy about how the packaging turned out :-)