Ever since we released the Lighthouse deck back in 2019, we’ve wanted to offer a bundle with the deck and the base stations. There’s multiple reasons for this, but the main reason was that we wanted users to be able to buy a full swarm (like the Loco Positioning Swarm) directly from us, without having to find the base stations separately. Initially this seemed easy to do, but it turned out to be a bit tricky. This post is about how we finally managed to get the Lighthouse Swarm Bundle finished and into the E-store.
The Lighthouse swarm bundle
When the Lighthouse deck was initially released it only had support for Lighthouse V1 base stations, but Ligthouse V2 was already out. Since the V1 base stations were already in short supply, we wanted to support V2 since this was what would be available in the future. We had started looking at V2 support, but there was still ongoing efforts from us (and others) to reverse engineer the protocol. After some prototyping we had some initial support, but there was still a lot of infrastructure work to be done before it could be released.
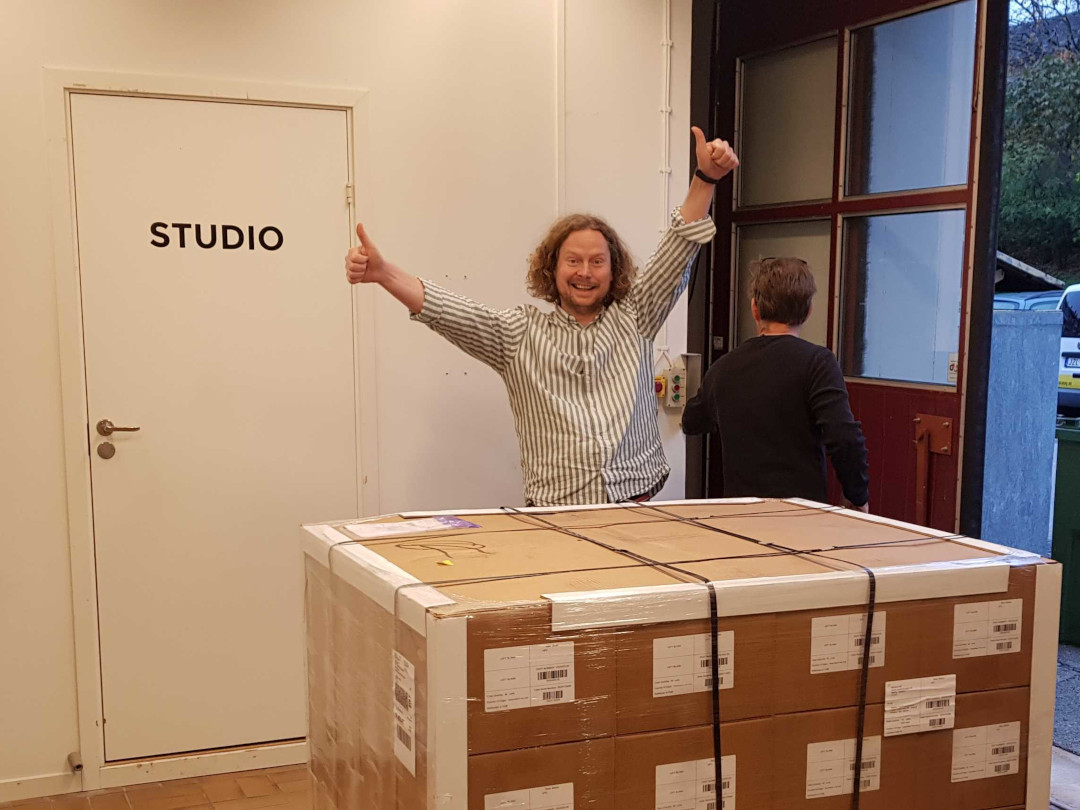
In parallell with this work we started trying to buy the Lighthouse V2 base stations. Normally there’s two options here, either buy from local distributors or buy directly from the manufacturer. Buying from local distributors wasn’t a good option for us since these will only have local power plugs and buying directly from the manufacturer often requires very large orders. So this process quickly stalled. But after a couple of months we got an offer to buy a bulk shipment of Ligthouse V2 base stations (without box or power adapters) which we finally decided to accept. And yeah, that’s me looking really happy next to a bunch of base stations…
Marcus looking happy about the base stations
With a bunch of base stations at the office, work with sourcing a power adapter and creating a box started. Unfortunately the number of COVID-19 cases started rising again shortly after receiving the base stations, so we started working more from home again. And with only 2 persons at the office at a time, it’s hard to work with hardware. Different team-members needs access to different resources, like the electronics labs, flight arena or packing orders. So getting box/adapter samples from manufacturers, doing testing and getting input on physical objects from other team-members quickly went from days to weeks.
Finally, after a couple of months of testing, evaluating and learning lots about adapters and cardboard, we had good candidates. But then, literally as we’re ordering the power adapters, it turns out the certification was not good for all the regions we wanted. Thankfully this time around we already had other options so we quickly decided on the second best option (now the best option) and ordered.
In the meantime work was underway finalizing the implementation of Lighthouse V2, including client support, firmware updates of the Lighthouse deck and documentation/videos. Finally in the beginning of 2021 we got documentation and the full implementation (although only for 2 base stations) in place (blog post).
After a bit more than a month of waiting, the power adapters and boxes finally showed up at our office. With all the supplies in place, we started preparing for the packing. Since you can buy base stations for multiple sources, we wanted to keep track of the base stations that we were sending out to be able to debug issues users might have with these units. Also, even though the base stations had already been factory tested, we wanted to quickly test them before shipping them out. So our flight arena was turned into a makeshift assembly line and we had some outside help come in to do the packing.
Finally, the end result! We’re really excited to be able to offer yet another swarm bundle, the Lighthouse swarm bundle. And we’re pretty happy about how the packaging turned out :-)
This week we have a guest blog post from Bart Duisterhof and Prof. Guido de Croon from the MAVlab, Faculty of Aerospace Engineering from the Delft University of Technology. Enjoy!
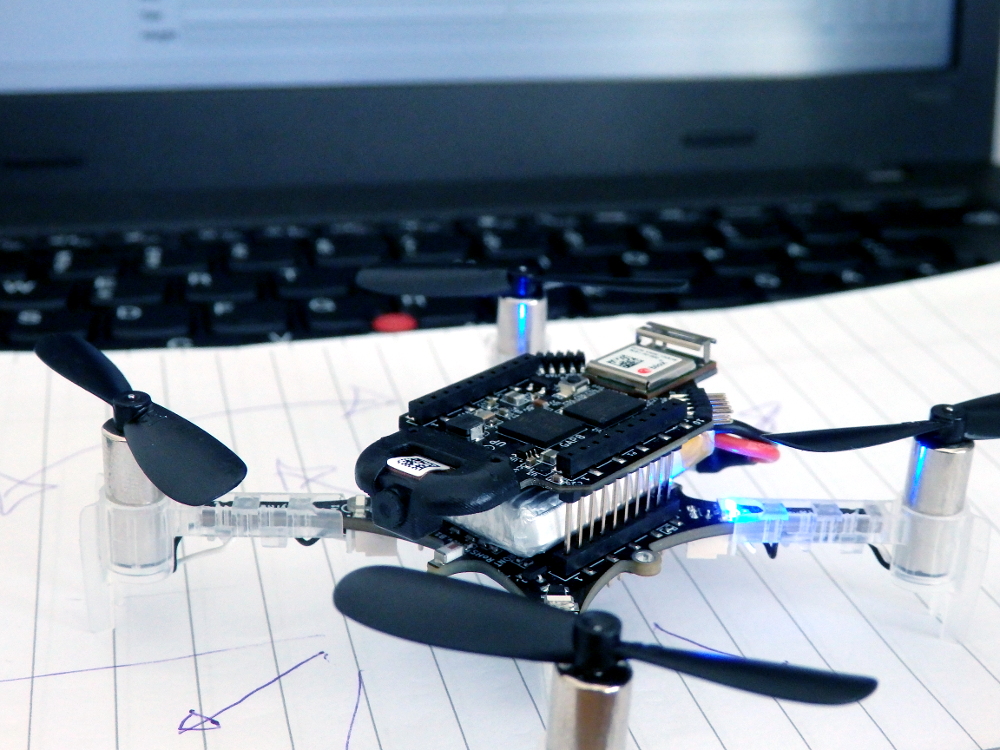
Tiny drones are ideal candidates for fully autonomous jobs that are too dangerous or time-consuming for humans. A commonly shared dream would be to have swarms of such drones help in search-and-rescue scenarios, for instance to localize gas leaks without endangering human lives. Drones like the CrazyFlie are ideal for such tasks, since they are small enough to navigate in narrow spaces, safe, agile, and very inexpensive. However, their small footprint also makes the design of an autonomous swarm extremely challenging, both from a software and hardware perspective.
From a software perspective, it is really challenging to come up with an algorithm capable of autonomous and collaborative navigation within such tight resource constraints. State-of-the-art solutions like SLAM require too much memory and processing power. A promising line of work is to use bug algorithms [1], which can be implemented as computationally efficient finite state machines (FSMs), and can navigate around obstacles without requiring a map.
A downside of using FSMs is that the resulting behavior can be very sensitive to their hyperparameters, and therefore may not generalize outside of the tested environments. This is especially true for the problem of gas source localization (GSL), as wind conditions and obstacle configurations drastically change the problem. In this blog post, we show how we tackled the complex problem of swarm GSL in cluttered environments by using a simple bug algorithm with evolved parameters, and then tested it onboard a fully autonomous swarm of CrazyFlies. We will focus on the problems that were encountered along the way, and the design choices we made as a result. At the end of this post, we will also add a short discussion about the future of nano drones.
Why gas source localization?
Overall we are interested in finding novel ways to enable autonomy on constrained devices, like CrazyFlies. Two years ago, we showed that a swarm of CrazyFlie drones was able to explore unknown, cluttered environments and come back to the base station. Since then, we have been working on an even more complex task: using such a swarm for Gas Source Localization (GSL).
There has been a lot of research focussing on autonomous GSL in robotics, since it is an important but very hard problem. The difficulty of the task comes from the complexity of how odor can spread in an environment. In an empty room without wind, a gas will slowly diffuse from the source. This can allow a robot to find it by moving up gradient, just like small bacteria like E. Coli do. However, if the environment becomes larger with many obstacles and walls, and wind comes into play, the spreading of gas is much less regular. Large parts of the environment may have no gas or wind at all, while at the same time there may be pockets of gas away from the source. Moreover, chemical sensors for robots are much less capable than the smelling organs of animals. Available chemical sensors for robots are typically less sensitive, noisier, and much slower.
Due to these difficulties, most work in the GSL field has focused on a single robot that has to find a gas source in environments that are relatively small and without obstacles. Relatively recently, there have been studies in which groups of robots solve this task in a collaborative fashion, for example with Particle Swarm Optimization (PSO). This allows robots to find the source and escape local maxima when present. Until now this concept has been shown in simulation [2] and on large outdoor drones equipped with LiDAR and GPS [3], but never before on tiny drones in complex, GPS-denied, indoor environments.
Required Infrastructure
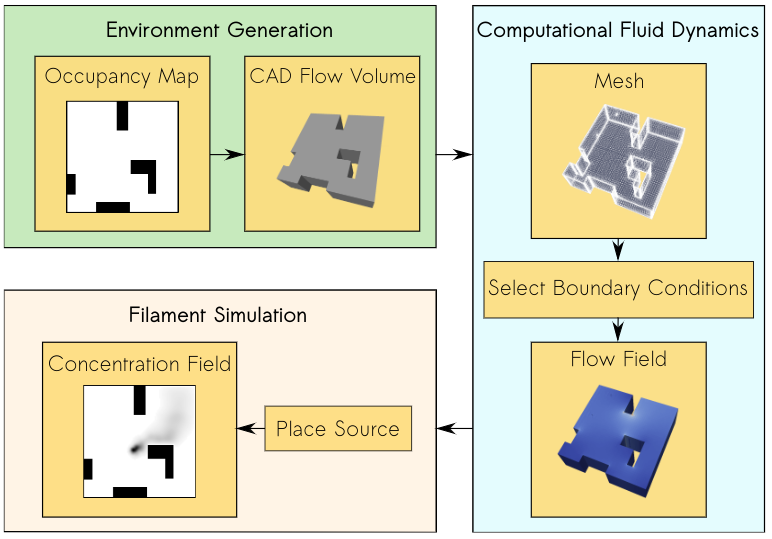
In our project, we introduce a new bug algorithm, Sniffy Bug, which uses PSO for gas source localization. In order to tune the FSM of Sniffy Bug, we used an artificial evolution. For time reasons, evolution typically takes place in simulation. However, early in the project, we realized that this would be a challenge, as no end-to-end gas modeling pipeline existed yet. It is important to have an easy-to-use pipeline that does not require any aerodynamics domain knowledge, such that as many researchers as possible can generate environments to test their algorithms. It would also make it easier to compare contributions and to better understand in which conditions certain algorithms work or don’t work. The GADEN ROS package [4] is a great open-source tool for modeling gas distribution when you have an environment and flow field, but for our objective, we needed a fully automated tool that could generate a great variety of random environments on-demand with just a few parameters. Below is an overview of our simulation pipeline: AutoGDM.
AutoGDM, a fully automated gas dispersion modeling (GDM) simulation pipeline.
First, we use a procedural environment generator proposed in [5] to generate random walls and obstacles inside of the environment. An important next step is to generate a 3D flowfield by means of computational fluid dynamics (CFD). A hard requirement for us was that AutoGDM needed to be free to use, so we chose to use the open-source CFD tool OpenFOAM. It’s used for cutting-edge aerodynamics research, and also the tool suggested by the authors of GADEN. Usually, using OpenFOAM isn’t trivial, as a large number of parameters need to be selected that require field expertise, resulting in a complicated process. Next, we integrate GADEN into our pipeline, to go from environment definition (CAD files) and a flow field to a gas concentration field. Other parts that needed to be automated were the random selection of boundary conditions, which has a large impact on the actual flow field, and source placement, which has an equally large impact on the concentration field.
After we built this pipeline, we started looking for a robot simulator to couple it to. Since we weren’t planning on using a camera, our main requirement was for the simulator to be efficient (preferably in 2D) so that evolutions would take relatively little time. We decided to use Swarmulator [6], a lightweight C++ robot simulator designed for swarming and we plugged in our gas data.
Algorithm Design
Roughly speaking, we considered two categories of algorithms for controlling the drones: 1) a neural network, and 2) an FSM that included PSO, with evolved parameters. Since we used a tiny neural network for light seeking with a CrazyFlie in our previous work, we first evolved neural networks in simulation. One of the first experiments is shown below.
A single agent in simulation seeking a light source using a tiny neural network.
While it worked pretty well in simple environments with few obstacles, it seemed challenging to make this work in real life with complex obstacles and multiple agents that need to collaborate. Given the time constraints of the project, we have opted for evolving the FSM. This also facilitated crossing the reality gap, as the simulated evolution could build on basic behaviors that we developed and validated on the real platform, including obstacle avoidance with four tiny laser rangers, while communicating with and avoiding other drones. An additional advantage of PSO with respect to the reality gap is that it only needs gas concentration and no gradient of the gas concentration or wind direction (which many algorithms in literature use). On a real robot at this scale, estimating the gas concentration gradient or the direction of a light breeze is hard if not impossible.
Hardware
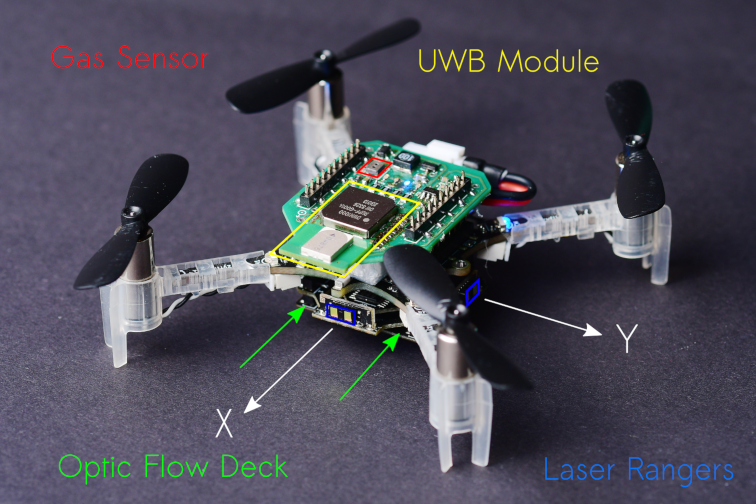
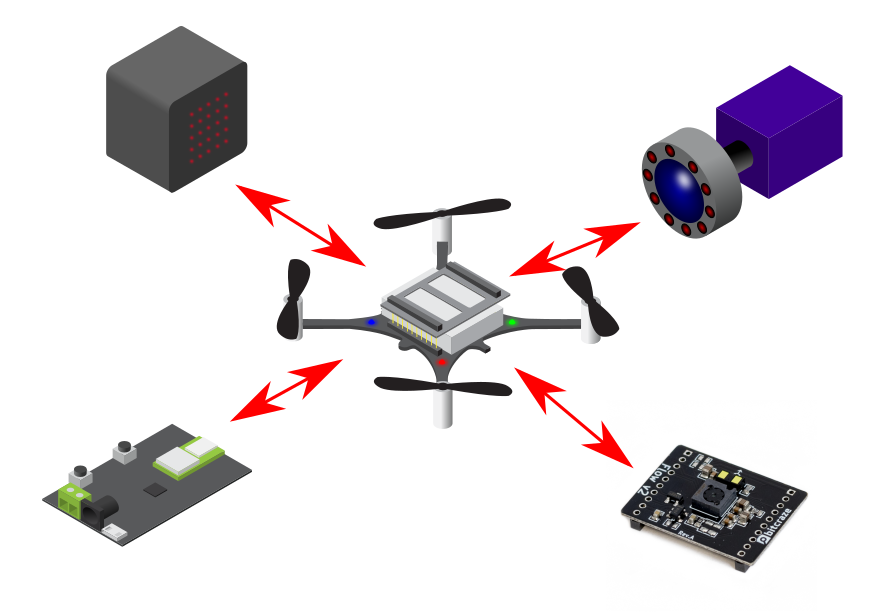
Our CrazyFlie needs to be able to avoid obstacles, execute velocity commands, sense gas, and estimate the other agent’s position in its own frame. For navigation, we added the flow deck and laser rangers, whereas for gas sensing we used a TGS8100 gas sensor that was used on a CrazyFlie before in previous work [7]. The sensor is lightweight and inexpensive, but accurately estimating gas concentrations can be difficult because of its size. It tends to drift and needs time to recover after a spike in concentration is observed. Another thing we noticed is that it is possible to break them, a crash can definitely destroy the sensor.
To estimate the relative position between agents, we use a Decawave Ultra-Wideband (UWB) module and communicate states, as proposed in [8]. We also use the UWB module to communicate gas information between agents and collaboratively seek the source. The complete configuration is visible below.
A 37.5 g nano quadcopter, capable of fully autonomous waypoint tracking, obstacle avoidance, relative localization, communication and gas sensing.
Evaluation in Simulation
After we optimized the parameters of our model using Swarmulator and AutoGDM, and of course trying many different versions of our algorithm, we ended up with the final Sniffy Bug algorithm. Below is a video that shows evolved Sniffy Bug evaluated in six different environments. The red dots are an agent’s personal target waypoint, whereas the yellow dot is the best-known position for the swarm.
Sniffy Bug evaluated in Swarmulator environments.
Simulation showed that Sniffy Bug is effective at locating the gas source in randomly generated environments. The drones successfully collaborate by means of PSO.
Real Flight Testing
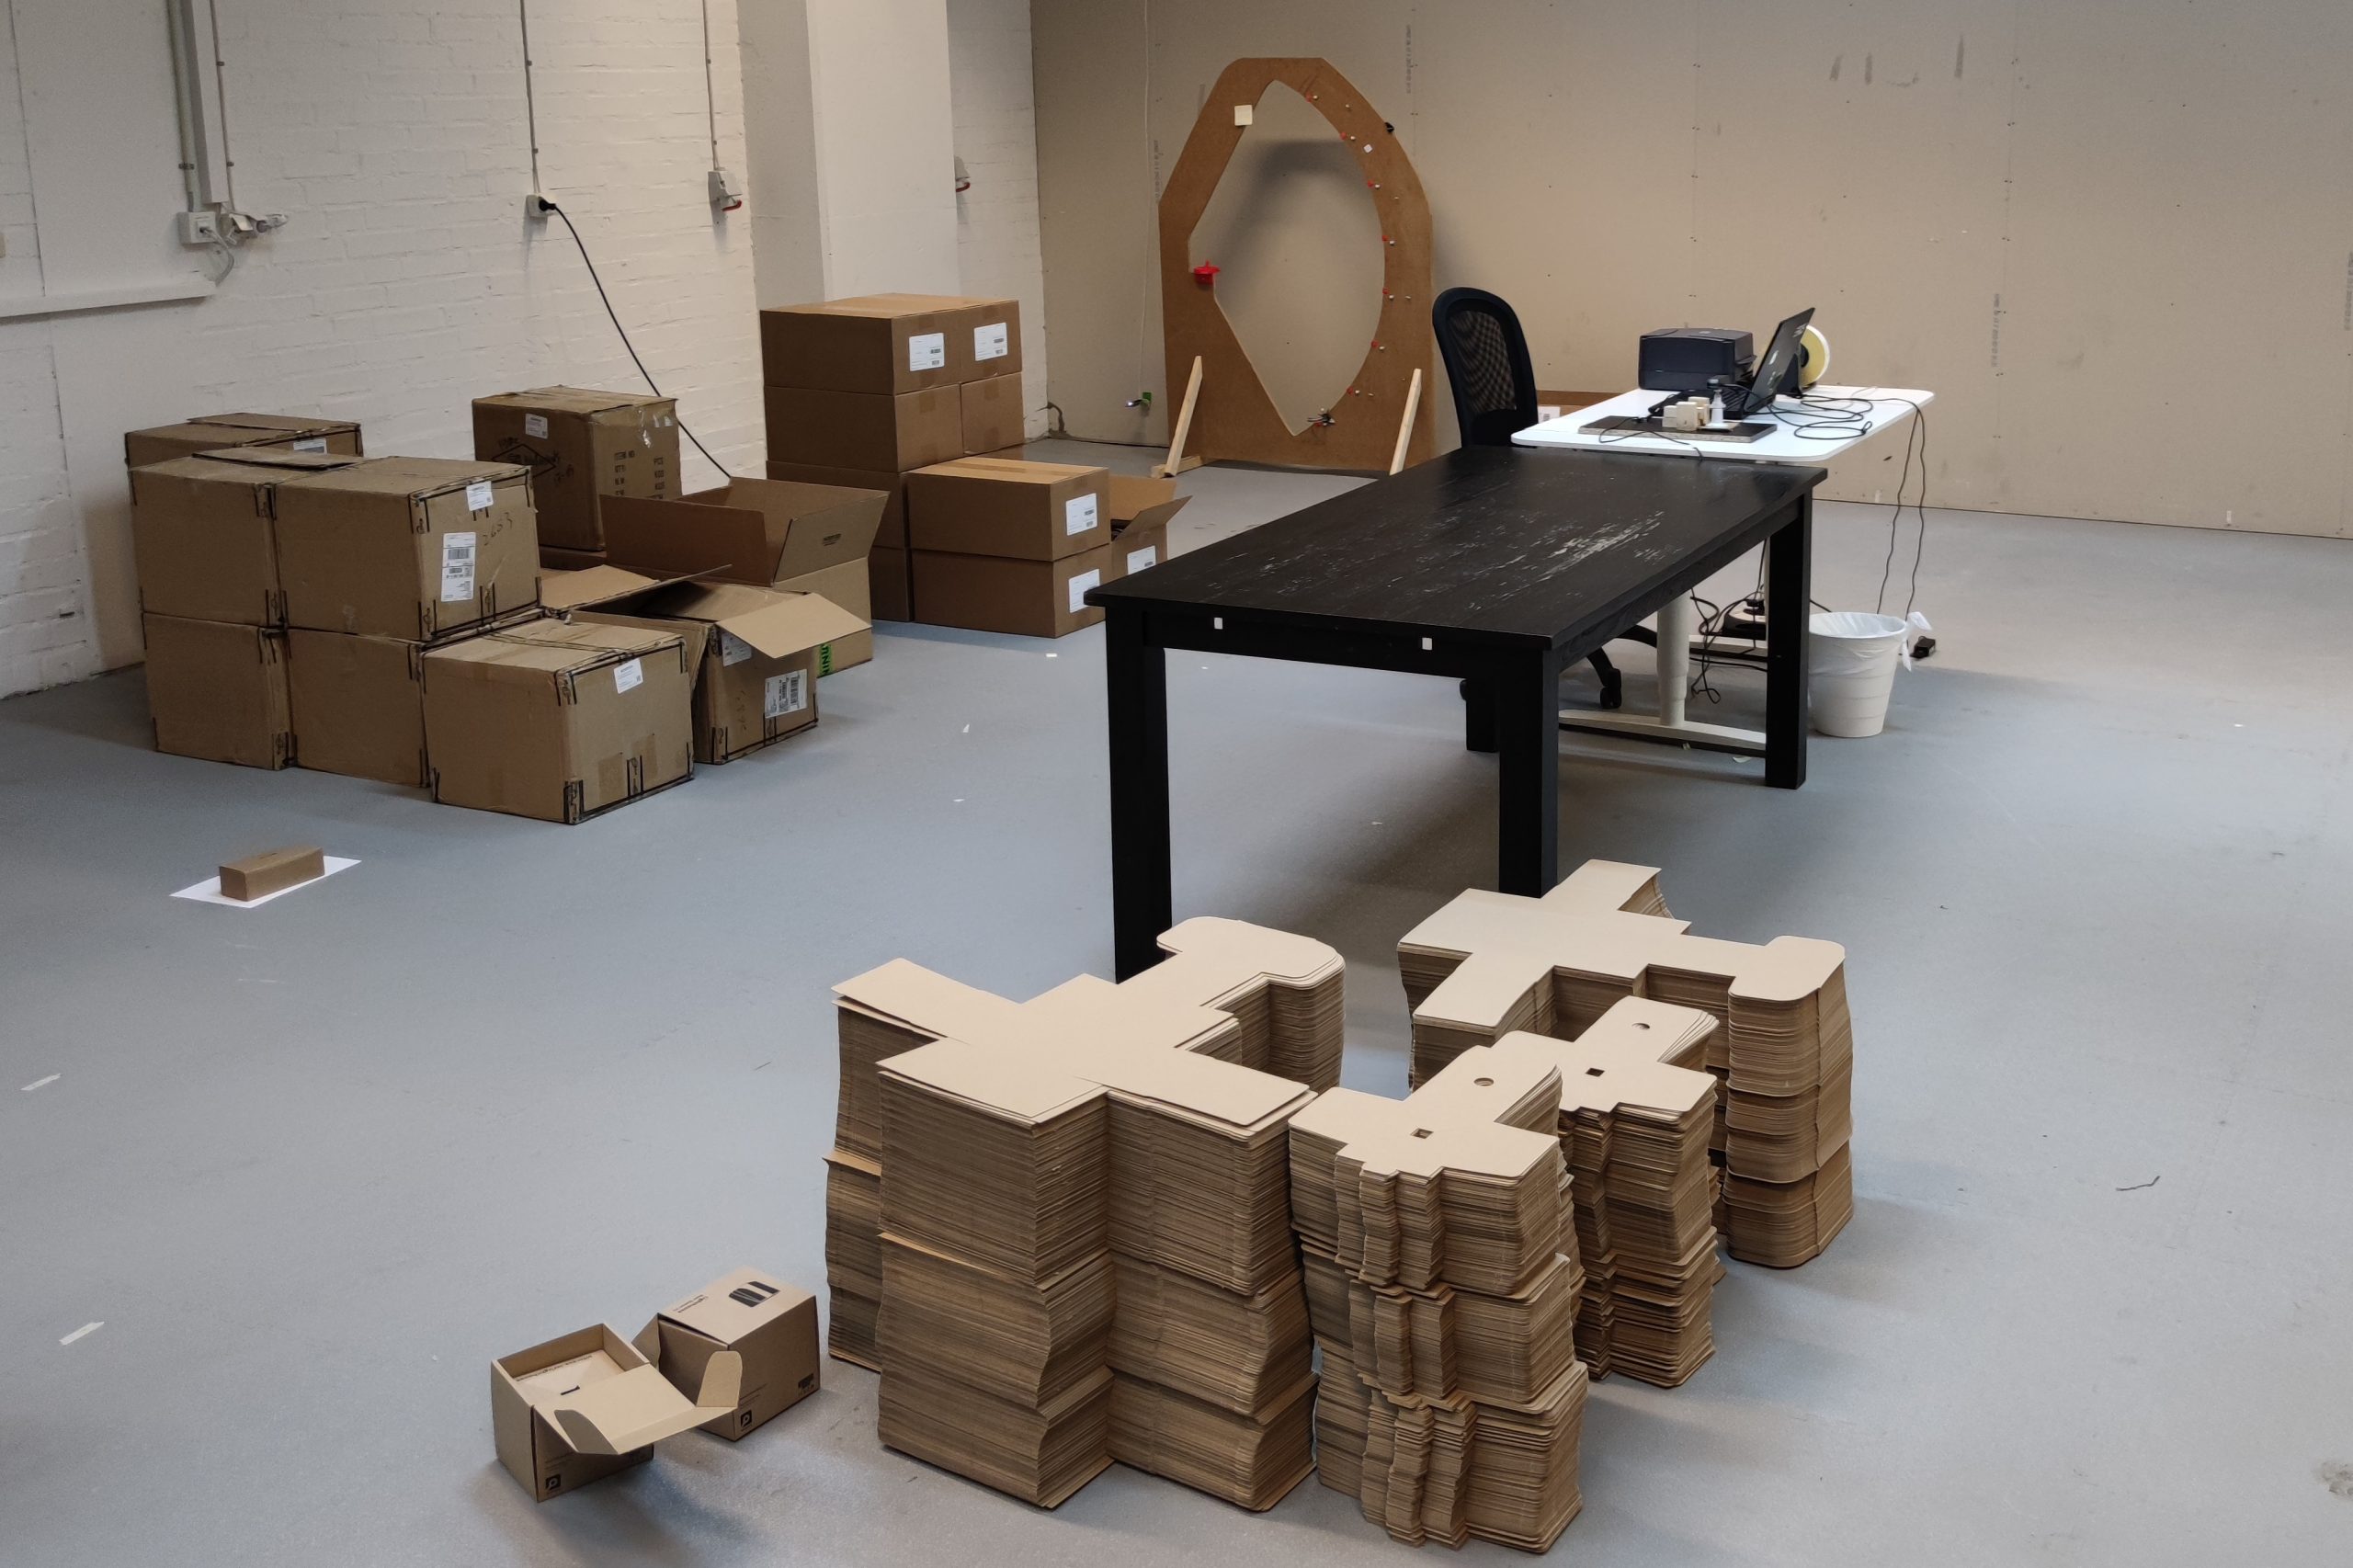
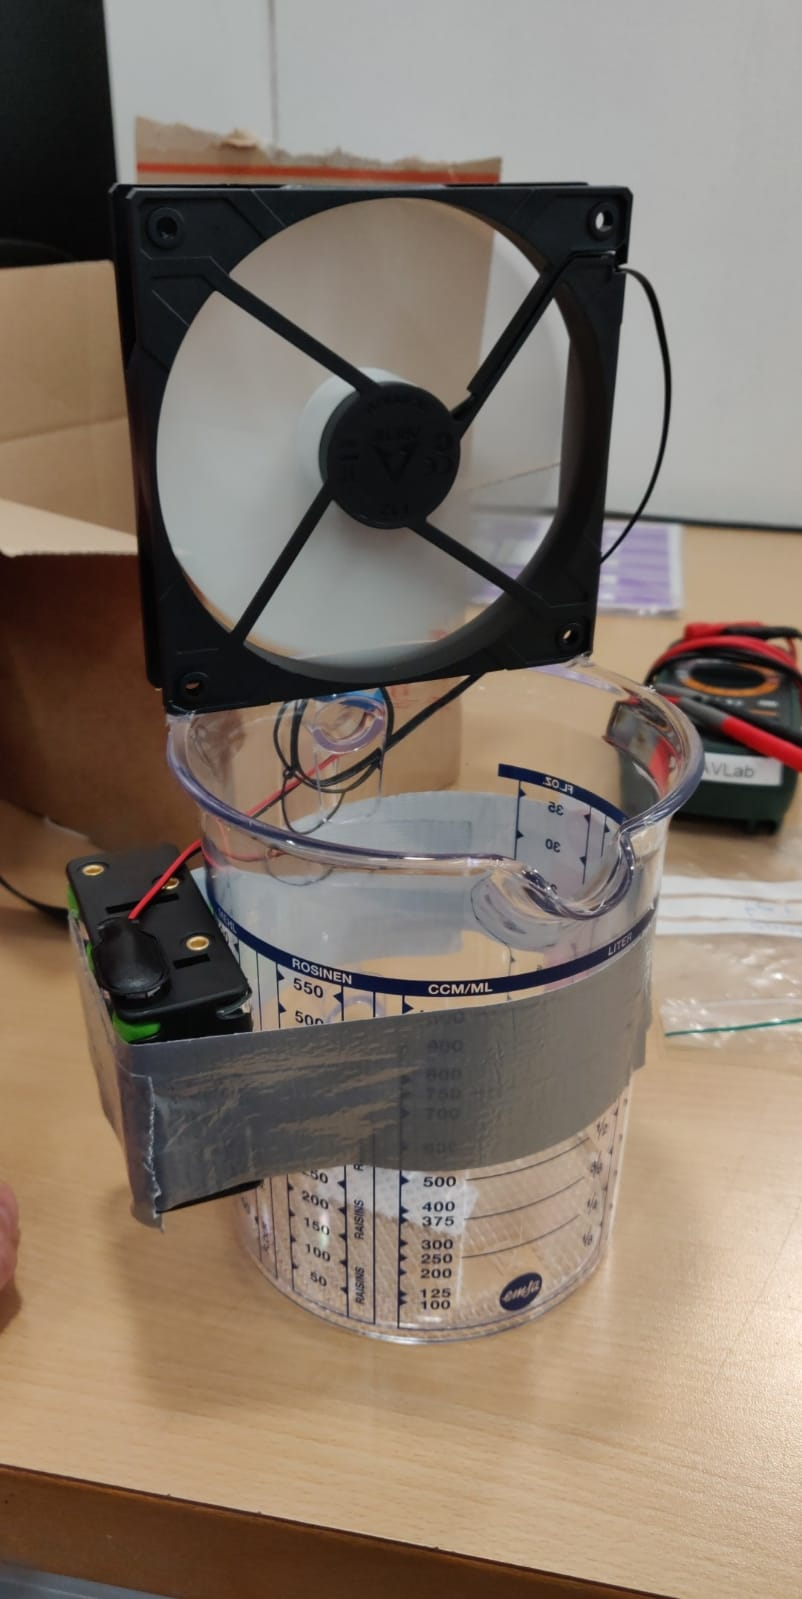
After observing Sniffy Bug in simulation we were optimistic, but unsure about performance in real life. First, inspired by previous works, we disperse alcohol through the air by placing liquid alcohol into a can which is then dispersed using a computer fan.
Dispersion of liquid alcohol in flight tests.
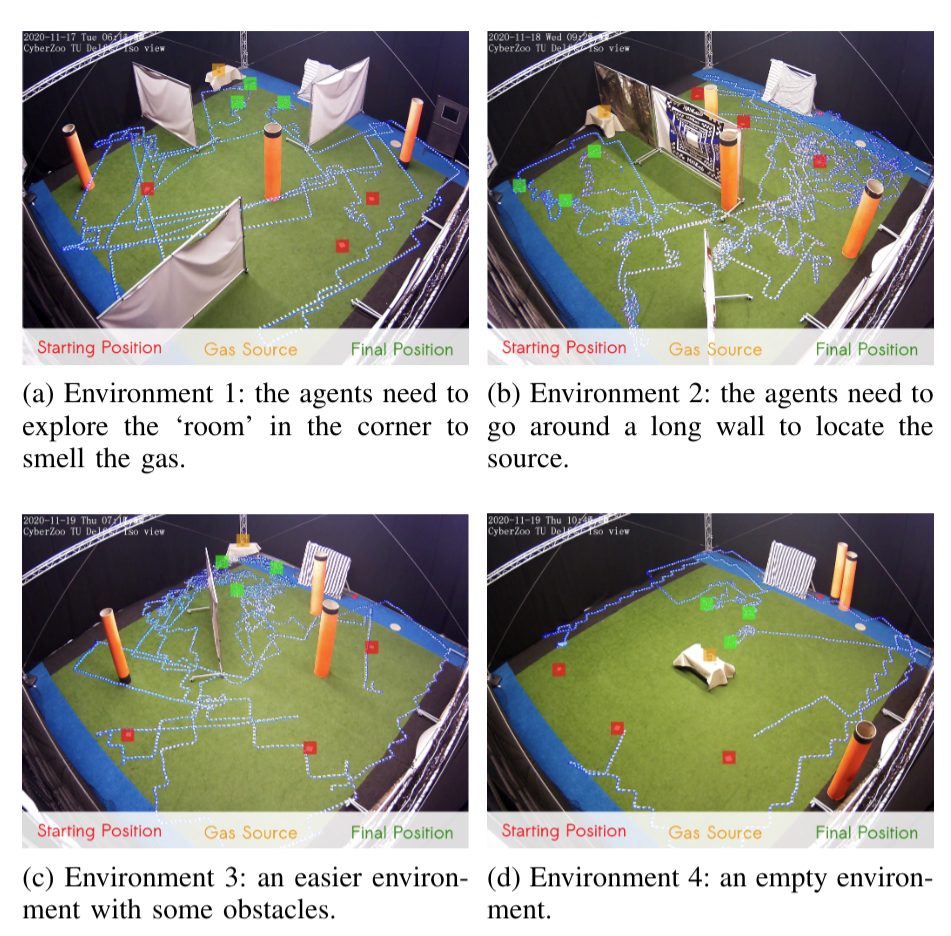
We test Sniffy Bug in our flight arena of size 10 x 10 meters with large obstacles that are shaped like walls and orange poles. The image below shows four flight tests of Sniffy Bug in cluttered environments, flying fully autonomously, i.e., without the help from any external infrastructure.
Time-lapse images of real-world experiments in our flight arena. Sniffy was evaluated on four distinct environments, 10 x 10 meters in size, seeking a real isopropyl alcohol source. The trajectories of the nano quadcopters are clearly visible due to their blue lights.
In the total of 24 runs we executed, we compared Sniffy Bug with manually selected and evolved parameters. The figure below shows that the evolved parameters are more efficient in locating the source as compared to the manual parameters.
Maximum recorded gas reading by the swarm, for each time step for each run.
This does not only show that our system can successfully locate a gas source in challenging environments, but it also demonstrates the usefulness of the simulation pipeline. The parameters that were learned in simulation yield a high-performance model, validating the environment generation, randomization, and gas modeling parts of our pipeline.
Conclusion and Discussion
With this work, we believe we have made an important step towards swarms of gas-seeking drones. The proposed solution is shown to work in real flight tests with obstacles, and without any external systems to help in localization or communication. We believe this methodology can be extended to larger environments or even to 3 dimensions, since PSO is a robust, multi-dimensional heuristic search method. Moreover, we hope that AutoGDM will help the community to better compare gas seeking algorithms, and to more easily learn parameters or models in simulation, and deploy them in the real world.
To improve Sniffy Bug’s performance, adding more laser rangers will definitely help. When working with only four laser rangers you realize how little information it actually provides. If one of the rangers senses a low value it is unclear if a slim pole or a massive wall is detected, adding inefficiency to the algorithm. Adding more laser rangers or using other sensor modalities like vision will help to avoid also more complex obstacles than walls and poles in a reliable manner.
Another interesting discussion can be held on the hardware required for real deployment. When working with 40 grams of maximum take-off weight, the sensors and actuators that can be selected are limited. For example, the low-power and lightweight flow deck works great but fails in low-light scenarios or with smoke. Future work exploring novel sensors for highly constrained nano robots could really help increase the Technological Readiness Level (TRL) of these systems.
Finally, this has been a really fun project to work on for us and we can’t wait to hear your thoughts on Sniffy Bug!
As you have noticed, we talk about the lighthouse positioning a lot these last couple of months ever since we got it out of early release. However, it is good to realize that it is not the only option out there for positioning your Crazyflie! That is why in this blog-post we will lay out possible options and explain how they are different/similar to one another.
The four possible ways to position the crazyflie
Absolute Positioning / Off-board Pose Estimation
Absolute Positioning and External Pose Estimation with the MoCap System
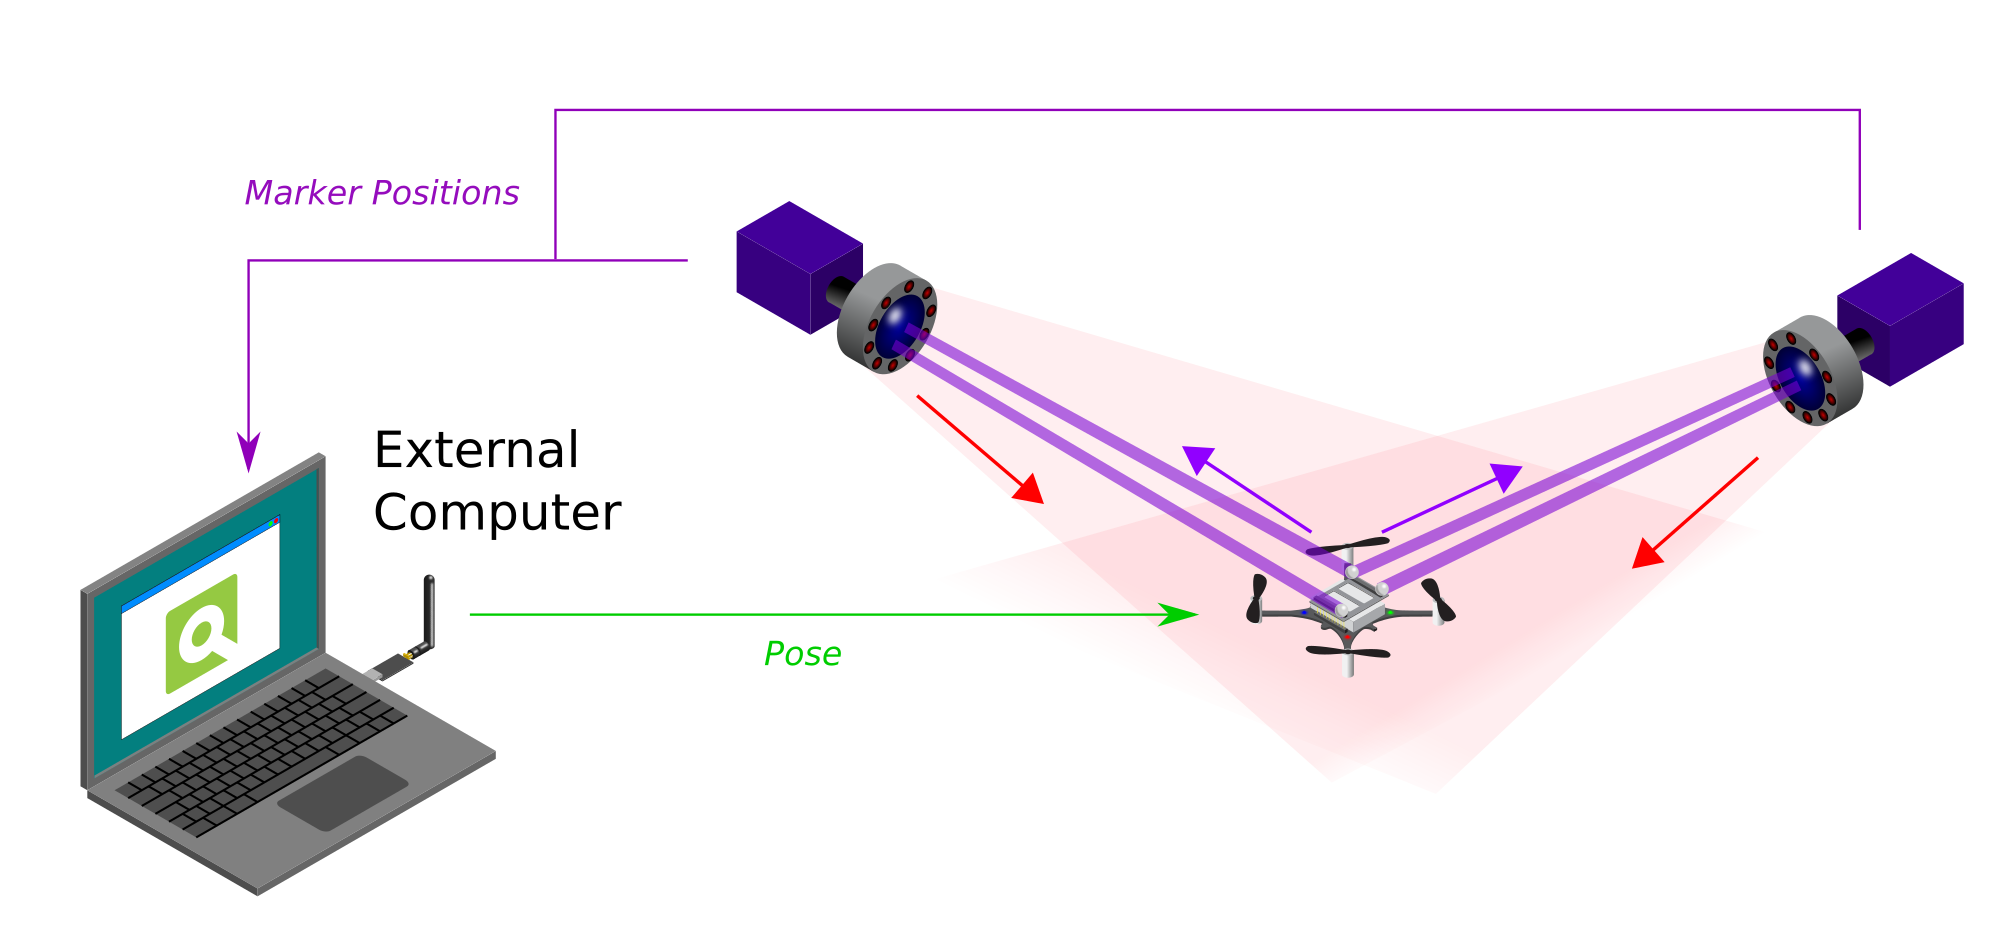
The first we will handle are the use of motion capture systems (MoCap), which resolves around the use of InfraRed cameras and Markers. We use the Qualysis camera ourselves but there are also labs out there that use Vicon or Optitrack. The general idea is that the cameras have an IR-light-emitting LED ring, which are bounced back by reflective markers that are supposed to be on the Crazyflie. These markers can therefore be detected by the same cameras, which pass through the marker positions to an external computer. This computer will have a MoCap program running which will turn these detected markers into a Pose estimate, which will in turn be communicated to the Crazyflie by a Crazyradio PA.
Since that the positioning is estimated by an external computer instead of onboard of the crazyflie, a MoCap positioning system is categorized as an off-board pose estimation using an absolute positioning system. For more information, please check the Motion Capture positioning documentation.
Absolute Positioning / On-board Pose Estimation
Absolute Positioning and Internal Pose Estimation with the Lighthouse and Loco Positioning System
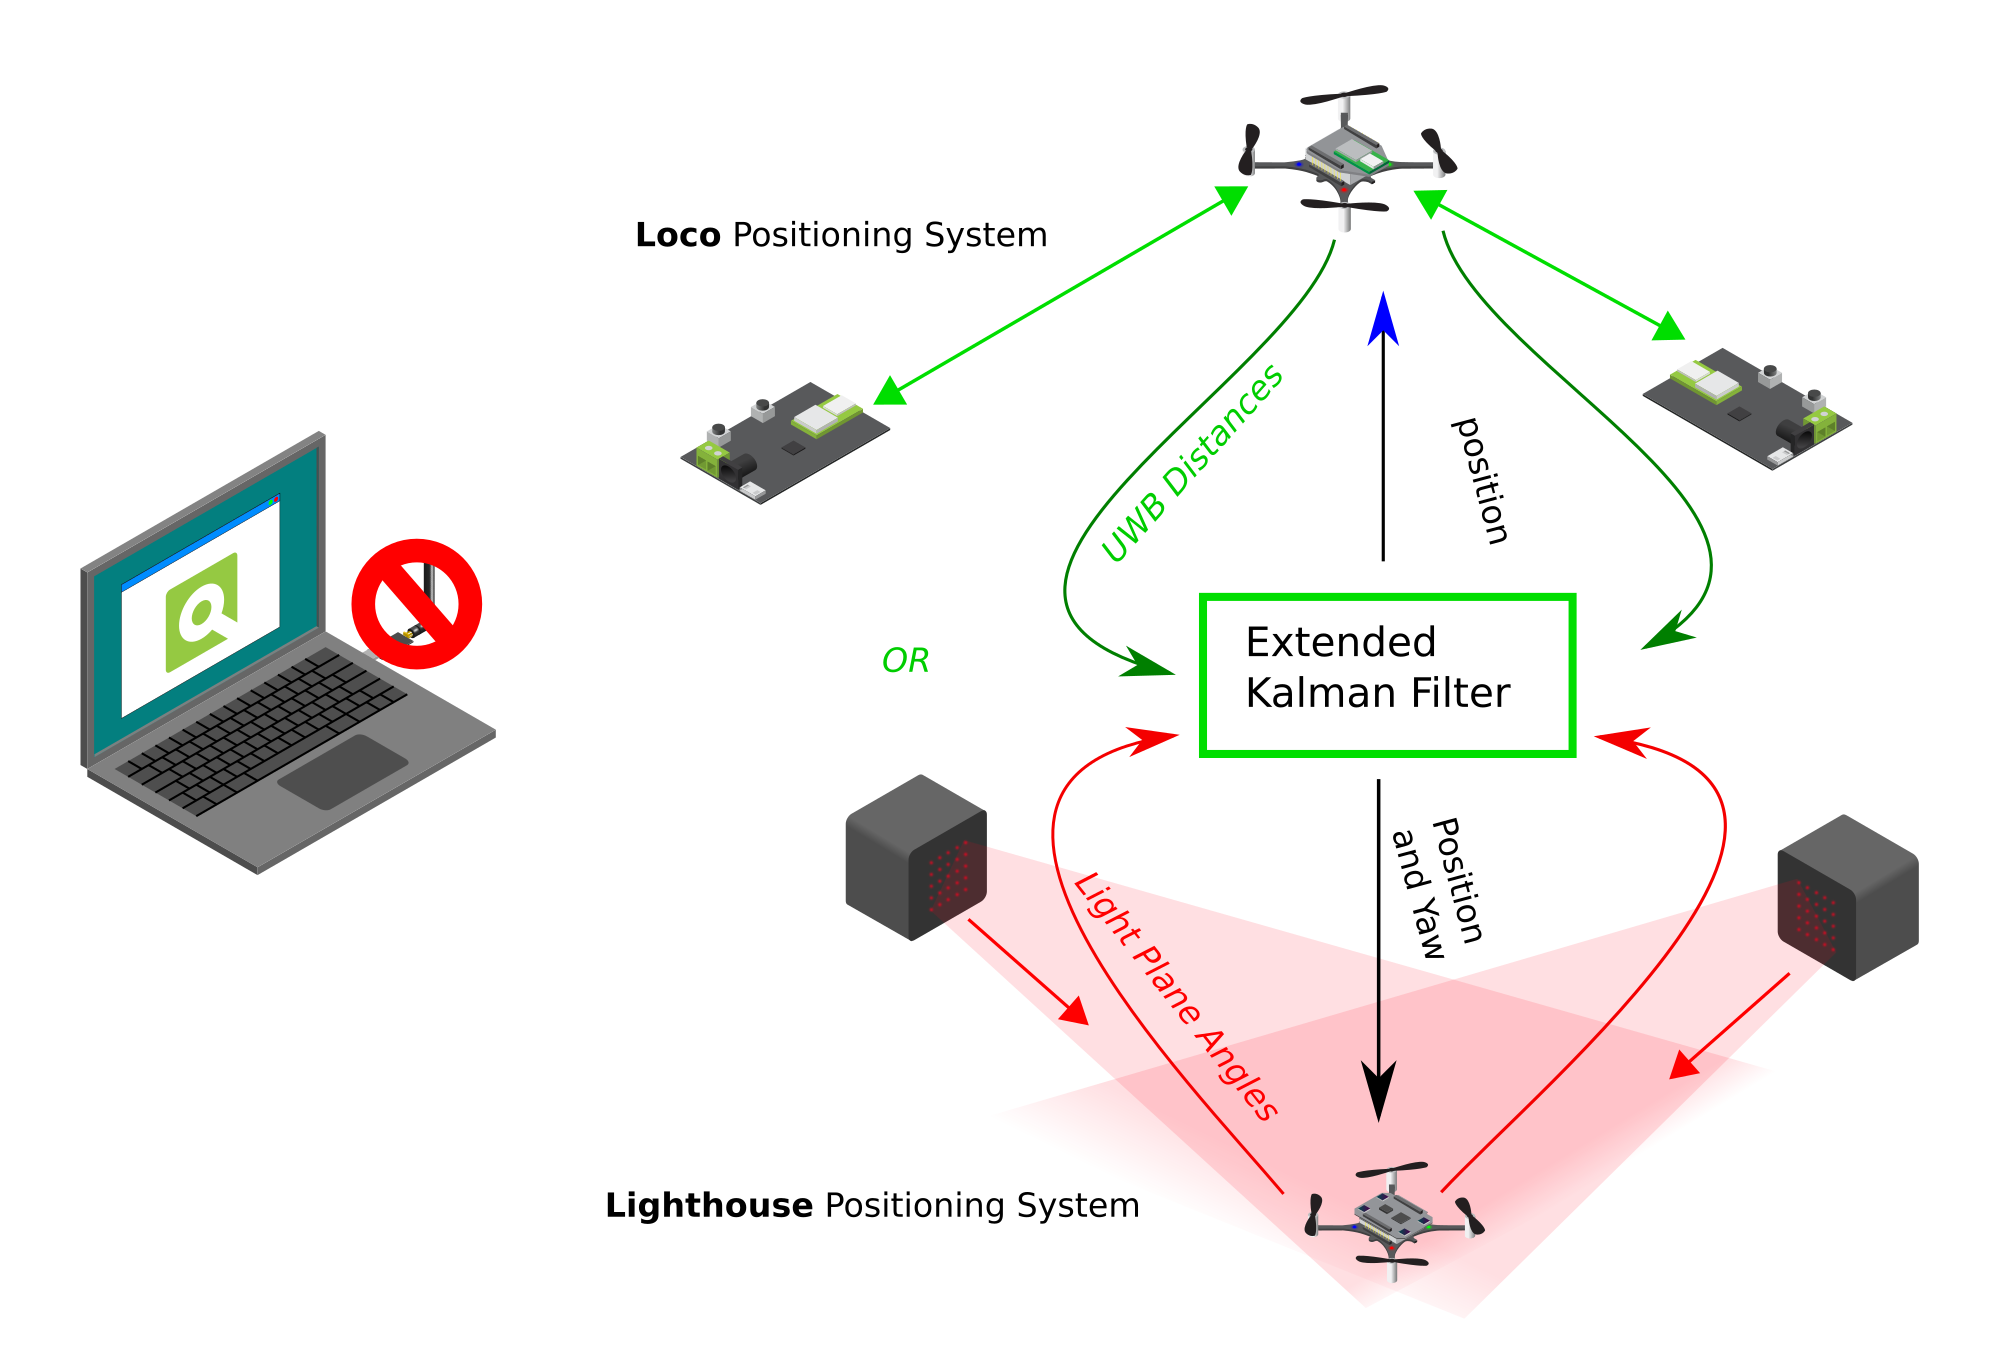
The next category is a bit different and it consists of both the Loco positioning system and the Lighthouse positioning system. Even though these both use beacons/sensors that are placed externally of the Crazyflie, the pose estimation is done all on-board in the firmware of the Crazyflie. So there is no computer that is necessary to communicate the position back to the Crazyflie. Remember that you do need to communicate the reference set-points or high level commands if you are not using the App layer.
Of course there are clear differences in the measurement type. A Crazyflie with the Locodeck attached takes the distance to the externally placed nodes as measured by ultra wide band (UWB) and the Lighthouse deck detects the light plane angles emitted by the Lighthouse Base Stations. However the principle is the same that those raw measurements are used as input to the Extended Kalman filter onboard of the Crazyflie, and outputs the estimated pose after fusing with the IMU measurements.
Therefore these systems can be classified as absolute positioning systems with on-board pose estimation. To learn more please read the Loco and Lighthouse positioning system documentation!
Relative Positioning / On-board Pose Estimation
Relative Positioning and Internal Pose Estimation with the Flowdeck V2.
It is not necessary to have to setup an external positioning system in your room in order to achieve a form of positioning on the Crazyflie. With the Flowdeck attached, the Crazyflie can measure flows per frame with an optical flow sensor and the height in millimetres with a time of flight sensor. These measurements are then fused together with the IMU within the Extended Kalman filter (see the Flow deck measurement model), which results in a on-board pose estimation.
The most important difference here to note is that positioning estimated by only the Flowdeck, will not result in a absolute positioning estimate but a relative one. Instead of using an external placed system (like MoCap, Lighthouse and Loco) which dictate where the zero position is in XYZ, the start-up position the Crazyflie determines where the origin of the coordinate system is. That is why the Flowdeck is classified as a Relative Positioning System with On-board Pose Estimation.
IMU-only On-board Pose Estimation ?
Oh boy… that is a different story. Theoretically it could be possible by using the onboard accelerometers of the crazyflie and fusing those in some short of estimator, however practice has shown that the Crazyflie’s accelerometers are too noisy to result in any good pose estimation… We haven’t seen any work that has been successfully to achieve any stable hover on only the IMU of the Crazyflie, but if you have done/see research that has, please let us know!
And if you would like to give a go yourself and build an estimator that is able to do this, please check out the new out of tree build functionality for estimators. This is still work in progress so it might have some bugs, but it should enable you to plugin in your own estimator separate from the Crazyflie firmware ;)
Documentation
We try to keep keep all the information of all our positioning systems on our website. So check out the positioning system overview page to be referred to more details if you would be interested in a particular system that fits your requirements!
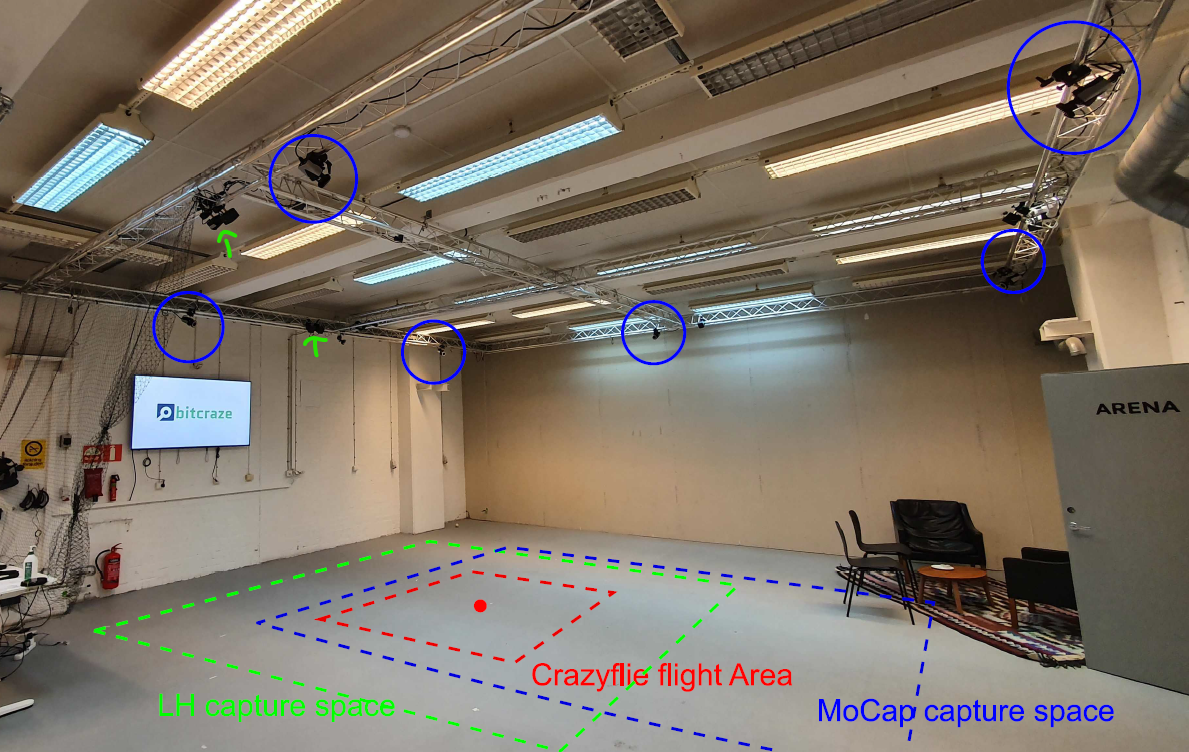
During Wolfgang Hönig‘s time here at Bitcraze, one of the bigger projects we worked together on was to generate a dataset comparing the positioning quality of the Lighthouse system with a Motion Capture (MoCap) system. You could imagine that would be a difficult task, since as the lighthouse basestations transmit infrared light sweeps and MoCap cameras by default also emit IR light which are reflected back by markers. However, with the Active marker deck for the Qualysis system, we were able to use the MoCap and Lighthouse positioning without too much interference.
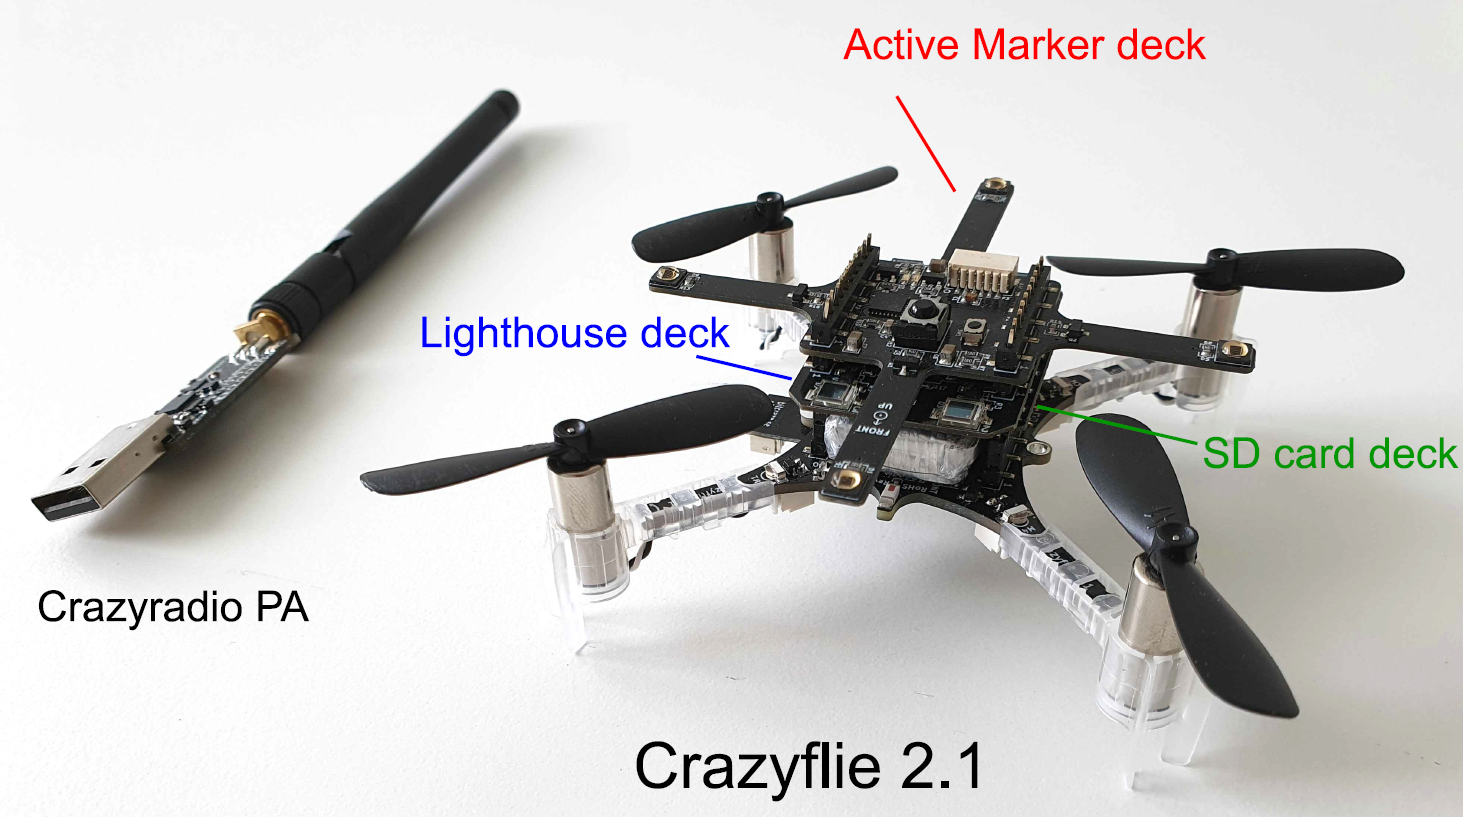
Moreover, Wolfgang also helped out with improving the logging quality on the Micro-SD-card deck which also enabled us to get as much data real-time as possible. He wrote a blogpost about event-based logging a few weeks ago which is a new approach to record data on the Crazyflie at a fast pace. With the Active Marker Deck, the Micro-SD-card deck and of course the Lighthouse deck, … the Crazyflie turn into a full-blown positioning data-collection machine!
The configuration of the Crazyflie with the Micro-SD-card deck, the Lighthouse-deck from the lighthouse dataset paper
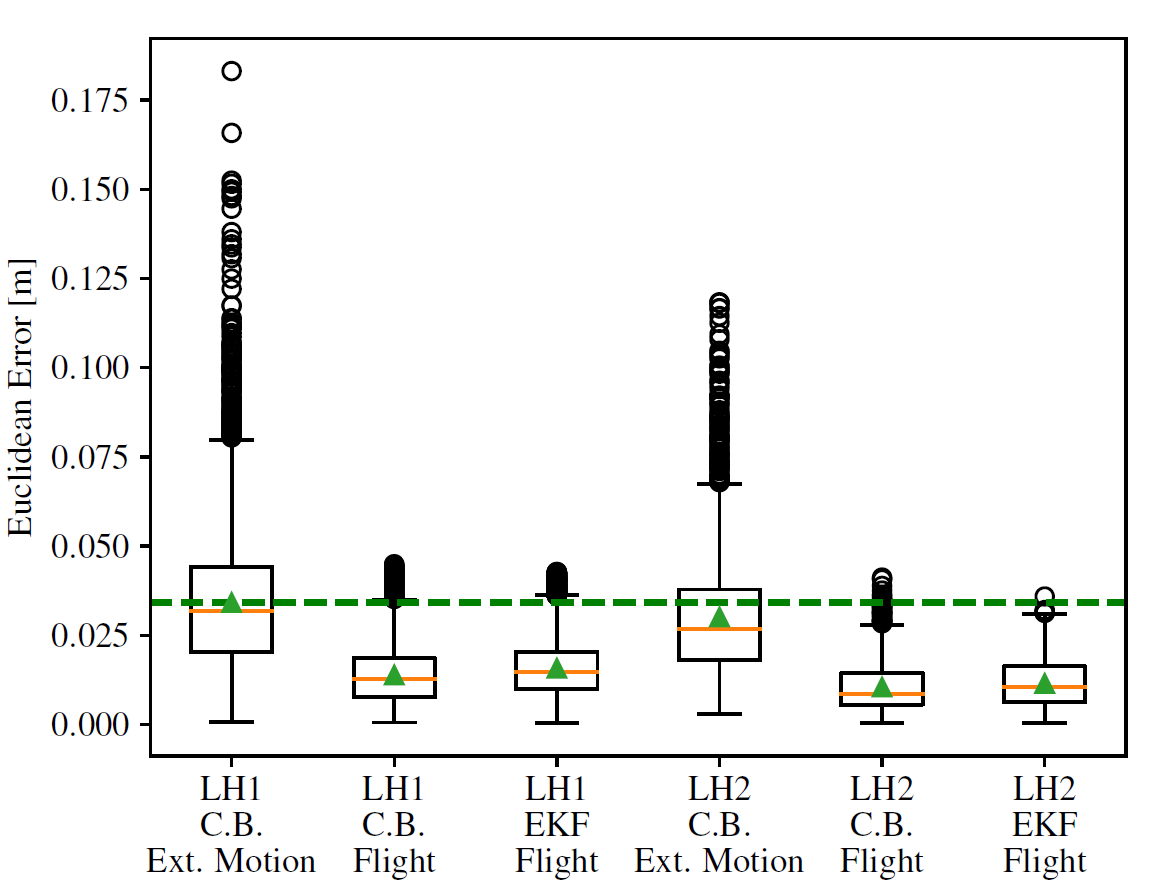
This paper contains an short explanation of the lighthouse system, how we set up the data collection and an analysis of the results, where we compared both Lighthouse V1 and V2 with the Crossing beam (C.B.) method and the extended Kalman filter. In all cases, the mean and median Euclidean error of the Lighthouse positioning system are about 2-4 centimeters compared to our MoCap system as ground truth.
The Euclidean Error of both LH1 and LH2 with Mocap as ground-truth taken from the dataset paper.
ICRA Swarm Workshop
Our paper is selected for a poster presentation at the ICRA 2021 Workshop: Robot Swarms in the Real World. So if you have any questions about the paper, please join and ask us in person! The workshop will be held on the 4th of June.
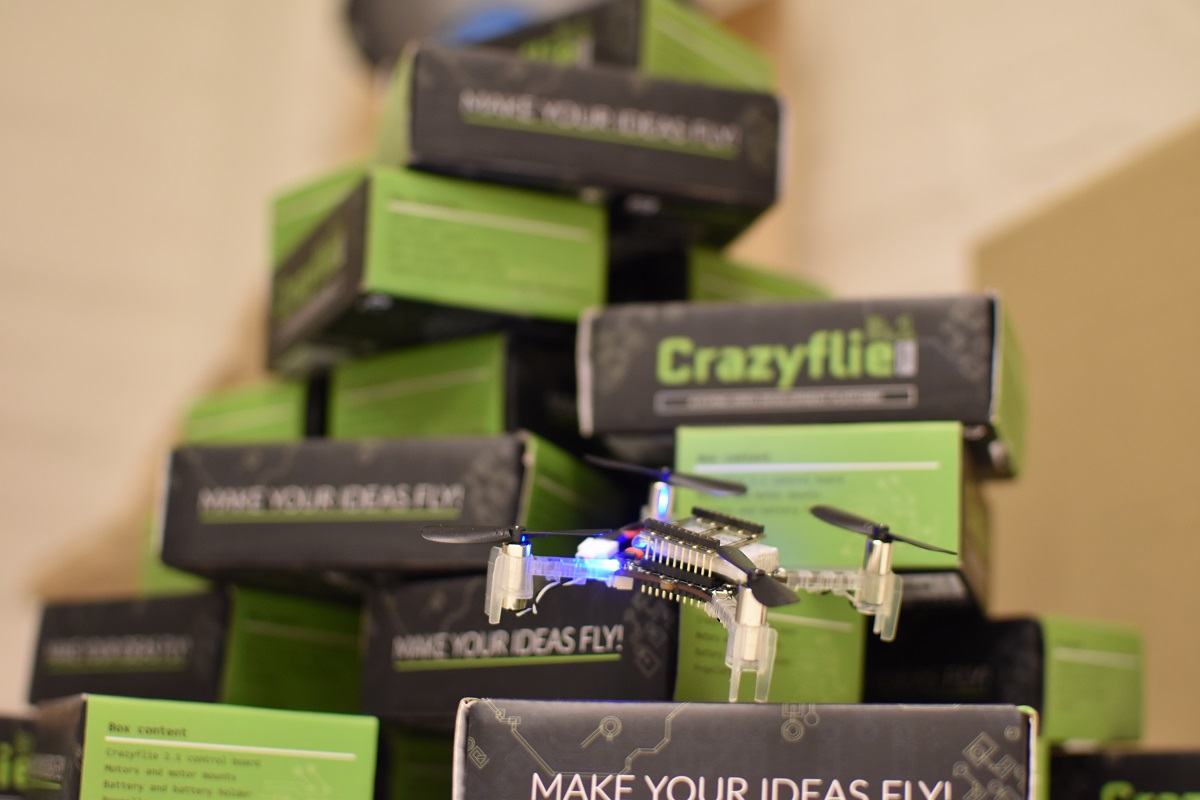
Moreover, we also are sponsoring the event by giving away a Lighthouse Swarm Bundle to whomever wins the best video-demonstration award! So to all the participants, the best of luck! We are super curious to what you’ll have to show us.
The AI-deck consists of the GAP8 chip developed by Greenwaves Technologies. On their website there’s an explanation of development tools where you get a general understanding of what you can use. Also their GAP SDK documentation explains how to install and try out some of their examples as well, on both a GAP8 simulator on the computer or on the GAP8 chip on the AI-deck itself.
Recently we also added the AIdeck documentation to the Bitcraze website, generated from the docuemtnation already available in the Github repository. There’s still improvements to make, so if you find any issues or any additions needed, don’t hesitate to help us improve it. On the bottom there is an ‘improve this page’ link where you can give the suggested change, or notify us by posting on the issue list of the AIdeck repository.
Also note that we have a separate AI-deck category on our forum where you can search for or add any AI-deck related questions. Remember that posting the issues that you are having will also help us to improve the platform and hopefully soon get it out of Early Access.
Workshop by PULP-platform
On the 16th of April we hosted a workshop given by PULP-platform featuring Greenwaves Technologies. In the workshop the an overview of the AI-deck and GAP8 was given as well as going through some basic hands-on exercises. About 70 people joined the workshop and we were happy it was so well received.
The workshop is a great source of information for anybody who is just getting started with the AI-deck, so have a look at the recordings on Youtube and the slides on the event page. Also make sure to check out their PULP training page for more tools that also can be used on the AI-deck. A big thanks to the PULP-platform and Greenwaves Technologies for taking part in the workshop!
Also we would like to ask if anybody who joined the workshop, to fill in this small questionnaire so that we can get some more feedback on how it went and how we can improve for the next one.
During the last year we, like many others, have had to deal with new challenges. Some of them have been personal while some have been work related. Although it’s been a challenge for us to distribute the team, we’ve tried to refocus our work in order to keep making progress with our products.
Our users have of course had challenges of their own. Having a large user-base in academia, we’ve seen users having restricted physical access to hardware and purchasing procedures becoming complex. Some users have solved this by moving the lab to their homes using the Lighthouse positioning or the Loco positioning systems. Others have been able to stay in their labs and classrooms although under different circumstances.
At Bitcraze we have been able to overcome the challenges we’ve faced so far, largely thanks to a strong and motivated team, but now it seems as if one of our biggest challenges might be ahead of us.
Semiconductor sourcing issues
Starting early this year lead-times for some components increased and there were indication that this might become a problem. This has been an issue for other parts like GPUs and CPUs for a while, but not for the semiconductors we use. Unfortunately sourcing of components now has become an issue for us as well. As far as we understand the problems have been caused by an unforeseen demand from the automotive industry combined with a few random events where the production capacity of certain parts has decreased. Together it has created a global semiconductor shortage with large effects on the supply chain.
For us it started with the LPS Node where the components suddenly cost twice as much as normally. The MCU and pressure sensor were mainly to blame, incurring huge price increases. Since these parts were out of stock in all the normal distributor channels, the only way to find them was on the open market. Here price is set by supply and demand, where supply is now low and demand very high. Prices fluctuate day by day, sometimes there’s very large swings and it’s very hard to predict what will happen. To mitigate this for the LPS Node we started looking for an alternative MCU, as the STM32F072 was responsible for most of the increase (600% price increase). Since stock of the LPS Node was getting low we needed a quick solution and found the pin-compatible STM32L422 instead, where supply and price was good through normal channels. The work with porting code started, but after a few weeks we got word that importing this part to China was blocked. So after a dead end we’re back to the original MCU, with a few weeks of lead-time lost and a very high production price.
Unfortunately this problem is not isolated to the LPS Node, the next issue we’re facing is the production of the Crazyflie 2.1 where the STM32F405, BMI088, BMP388 and nRF51822 are all affected with increases between 100 and 400 % in price. These components are central parts of the Crazyflie and they can not easily be switch to other alternatives. Even if they could, a re-design takes a long time and it’s not certain that the new parts are still available for a reasonable price at that time.
Aside from the huge price increases in the open market we’re also seeing price increases in official distributor channels. With all of this weighed together, we expecting this will be an issue for most of our products in the near future.
Planning ahead
An even bigger worry than the price increase is the risk of not being able to source these components at all for upcoming batches. Having no stock to sell would be really bad for Bitcraze as a business and of course also really bad for our customers that rely on our products for doing their research and classroom teaching.
To mitigate the risk of increasing price and not being able to source components in the near future, we’re now forced to stock up on parts. Currently we are securing these key components to cover production until early next year, hoping that this situation will have improved until then.
Updated product prices
Normally we keep a stable price for a product once it has been released. For example the LPS Node is the same price now as it was in 2016 when it was released, even though we’ve improved the functionality of the product a lot. We only adjust prices for hardware updates, like when the Crazyflie 2.0 was upgraded to Crazyflie 2.1. But to mitigate the current situation we will have to side-step this approach.
In order for us to be able to continue developing even better products and to support those of you that already use the Crazyflie ecosystem, we need to keep a reasonable margin. From the 1st of May we will be adjusting prices across our catalog, increasing them with 10-15%. Although this doesn’t reflect the changes we are seeing in production prices at the moment, we believe the most drastic increases are temporary while the more moderate ones will probably stick as we move forward.
Even though times are a bit turbulent now, we hope the situation will settle down soon and we think the actions we are taking now will allow us to focus on evolving our platform for the future.
Approximately two month ago we wrote a blog post presenting our planned master thesis. Time flies and we have now reached a sufficient state where the results are presentable and possible to use. We have used the Renode framework and created a platform for the Crazyflie 2.1. In Bitcraze’s Github repository there now is a Renode fork with a custom Renode-infrastructure submodule. To get Renode up and running on your computer check the README found there.
On the Renode branch crazyflie there are two new REPL (Renode platform) files describing the platform. An example of the syntax is given below.
// I am a comment
peripheralname: Namespace.ClassName @ parent 0x08000000
    numericConstructorField: 0x100000
    stringConstructorField: "template"
    Interrupt -> interrupthandler@3
In the cf2.repl all the external peripherals are connected while the stm32f405.repl contains the STM32F405 peripherals. Note that only the peripherals used by the current Crazyflie 2.1 have been added since they are the only ones that can be tested using the Crazyflie firmware.
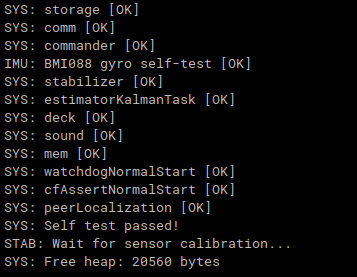
When running Renode a RESC (Renode script) file is loaded. There are currently two RESC files for the Crazyflie, one that only loads the Crazyflie plattform and one that can be used for testing. The one for testing automatically starts the simulation and it also has a hook to exit Renode once the self test has passed.
Successful startup!
As mentioned, Renode is usable both for automatically and interactively testing firmware. The current version of automatic testing is based on the firmware passing the self test. The plan is to incorporate this in the CI pipeline.
When used interactively it is possible to pause the emulation whenever the user wants to, either manually via a Renode command or by connecting to GDB. This allows reading (as well as writing to) memory addresses. Want to read the DMA status at a specific line of code or mess with the system by randomly flipping bits? Doable in the emulator without risking your Crazyflie crashing.
In the platform there also are our customized sensors to which data can be loaded. The data can be loaded either manually or via a file and then sent to the STM32. The scope of this master thesis however has been on firmware testing, not getting a simulated Crazyflie to fly in a virtual environment.
Emulation of hardware is not a trivial task, there are still improvements to be made and the everlasting question whether the emulation actually represents the real system.
One of the Crazyflie features that had to be simplified was the syslink and connection to the nRF microcontroller, which in the emulation simply sends messages back to the STM32. The most exciting part about it currently is how the STM32 receives a signal that no expansion decks are connected via the 1-wire when a scan is executed. Further improvements would be to emulate the radio, power management and support expansion decks, either via an external program or through Renode.
Of course there are other things to improve as well, there will always be someone who thinks of better ways to implement features and only time will tell how this emulator is going to evolve.
One crucial aspect of any research and development is to record and analyze data, which then can be used for quantifying performance, debugging strange behavior, or guide us in our decision making. We have been trying to improve the way that this is done to help all of you researcher out there with their work, so this blog post will explain an alternative, better, method to record whatever is happening on the Crazyflie in real-time.
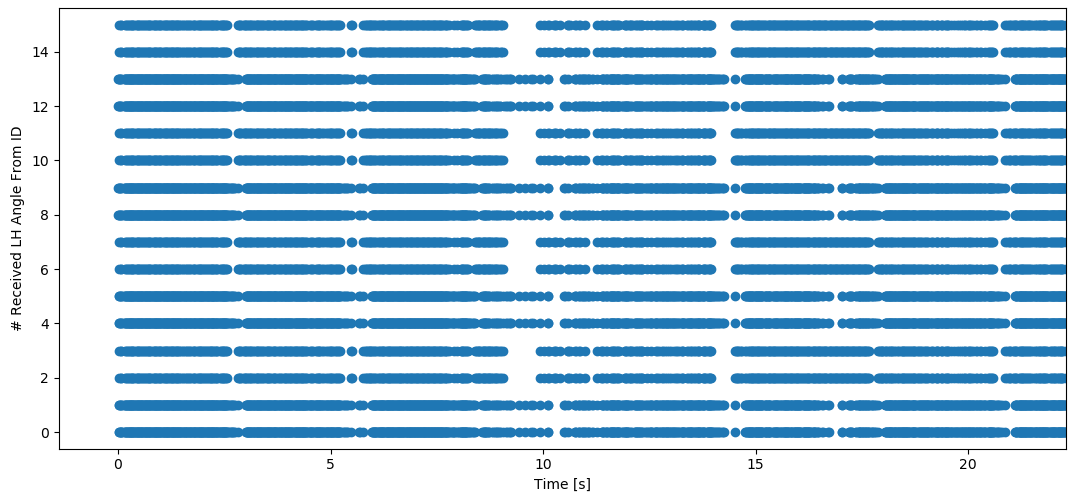
Example data collection of received Lighthouse angles over time. The y-axis contains a unique measurement ID (16 in total for 4 sensors * 2 basestations * 2 sweeps/basestation). Thus, each dot represents the time when a certain kind of measurement was received. We do not receive all angles in fixed intervals, because of the interference between basestations.
Existing Logging Approaches
So far there have been two principle ways of recording data with the Crazyflie:
Logging: In the firmware, one can define global variables that can be streamed out at a fixed frequency, using logging configurations. Variables have a name and data type, and the list of all available variables can be queried from the firmware.
Debug Prints: It is possible to add DEBUG_PRINT(…) in any place that contains a string and possibly some variables. These are asynchronous, but not timestamped, so they are mostly useful to notify the user of some status change.
Both approaches have multiple backends. The logging variables can be streamed over USB, via the Crazyradio, or on a Micro-SD-card using a specialized deck. When using the radio or USB, the frequency is limited to 100 Hz and only a few variables can be streamed at this speed due to bandwidth limitations. The Micro-SD-card deck, on the other hand, allows to log a lot more logging variables at speeds up to 1 kHz, making it possible to access high-speed sensor information, e.g., the IMU data. The Debug Prints can be used over the radio or USB, or with a SEGGER J-Link and a Debug Adapter, over J-Link Real-Time Transfer (RTT). The former is very bandwidth limited, while the latter requires a physical wire connection, making it impossible to use while flying.
New Approach: Event-Based Logging
Event-based logging combines the advantages of the existing approaches and offers a third alternative to record data. Similar to debug prints, a user can trigger an event anywhere in the code and include some mandatory variables that describe this event (so-called payload). Similar to logging, these events are timestamped and have fewer bandwidth limitations. Currently, there is just one backend for the Micro-SD-card deck, but it would be possible to add support for radio and USB as well.
One of our first test cases of the event-based logging is to analyze the data we get from the Lighthouse deck. Here, we trigger an event whenever we received a raw sweep. This allows us to visually see the interference that happens between two LH2 basestations. We also use the event-based logging for time synchronization of the Crazyflie and a motion capture system: when we enable the IR LEDs on the active marker deck, we record an event that contains the Crazyflie timestamp. On the PC side, we record a PC timestamp when the motion capture system first detects the IR LEDs. Clock drifts can be computed by using the same logging mechanism when the IR LEDs are turned off.
Adding event-based logging had some other good side effects as well: the logging is now generally much faster, there is more user feedback about the correct buffer size usage, and the binary files are smaller. More details are in the documentation.
Future Work
We are working on adding event triggers to the state estimator. This will enable us to record all the sensor information during real flights with different positioning systems, so that we can tune and improve the Kalman state estimator. It will also be interesting to add support for events in CRTP, so that it can be used over USB and radio.
Since the middle of January, Bitcraze has had two additional guests: us! We, Josefine & Max, are currently doing our master thesis at Bitcraze during our final semester at LTH.
Unfortunately, the pandemic means remote working which could have caused some difficulties with hardware and equipment accessibility. Fortunately, for us, our goal with the thesis is to emulate the Crazyflie 2.1 hardware in the open source software Renode. We can therefore do the work at home.
Since this is the first time either of us have tried to emulate hardware it is exciting to see if it will even be possible, especially as we do not know what limitations Renode might have. Thus far, four weeks in, there have been some hiccups and crashes but also progress and success. One example was when we got the USART up and running and it became possible to start printing debug messages and another was when the LED lights were connected and it was possible to see when they were turned on and off.
Example of output from partially implemented hardware.
If all goes well, the emulated hardware could be used as a part of the CI pipeline to automatically hunt for bugs. Academically, it would be used to further study testing methods of control firmware.
Getting a glimpse into the workings at Bitcraze and the lovely people working here has been most interesting and we are looking forward to the time ahead. Until next time, hopefully with a working emulation, Josefine & Max.
The lithium polymer battery we use, as with basically all rechargeable batteries, suffers from degradation. That means that when using it, and as time goes by, its energy capacity as well as performance will degrade. The performance, which is very related to the batteries internal resistance, will result in that the Crazyflie will not be able to produce the same maximum thrust and it will not be able to carry as much payload. The loss of capacity is due to ageing and charge cycles, results in that the flight time will decrease. A common solution to monitor the degradation is to have a BMS, or Battery Management System, that constantly monitors the battery health. For the small type of battery that is used in the Crazyflie, this is not yet viable, but maybe there is something we can do to test part of the battery health anyway?
Theory
Since the internal resistance will result in a larger voltage drop during load we can exploit this property and measure it. We will however not only measure the batteries internal resistance but the resistance of the complete power path as a result of the components we have at hand on the Crazyflie.
Power path block diagram
So what we do is to activate the switch (mosfet) so the load (motor) will pull power from the battery. The power drawn will result in a voltage drop compared to a no-load situation, which we can measure and compare to a healthy setup. Since the measurement point is at the PCB traces, any of the components before that point can be causing the voltage drop, however the battery and connector are most likely of doing so as they are most prone to ageing.
Implementation
The load is achieved by, for a very short time, activate the motors at full thrust. We don’t want the Crazyflie to fly away as that would be a bit unhandy. Before activating the motors we measure the idle voltage and during load we measure the minimum voltage so we can calculate the voltage drop. This is pretty easy to do, the problem is to find a good level where we can distinguish a good battery from bad battery. Therefore this feature is pretty experimental. We tested many batteries and good batteries tend to yield a voltage drop between 0.60V – 0.85V while bad batteries go above 1.0V. Therefore the current threshold is set to 0.95V but it would be good to have more data so if you use this feature please give us feedback if the level is wrong. The testing was run on a “stock” setup with the standard battery, propeller and motors, and it is for these the level is set. A different setup will probably not work well and needs a different threshold. Also keep in mind that the connector can also be a “bad” guy as oxide can build up and result in a higher resistance. Often this can be solved with some e.g. WD-40 solvent or un-connecting/connecting the connector several times.
Usage
This is not in the 2021.01 release so one would have to run the latest on the master branch on both the crazyflie-firmware and the Crazyfie-clients-python. The simplest way to test this feature is to launch the cflient, connect to the Crazyflie, open the console tab and press the battery test button.
cfclient console tab after running battery test
When pressing the button the propellers will shortly spin and there will be an output in the console as highlighted in red. If the sag value is below 0.95V it will yield [OK] and if it is above it will say [FAIL].
A probably more useful use case is to test this automatically before taking of with e.g. a swarm. This can be done by setting the parameter health.startBatTest to 1 and after around 0.5s readout the result in the log variable health.batteryPass to check that it is set to 1. The health.batterySag log variable will contain the latest sag (voltage drop) measurement. Hopefully this experimental feature will be a good way of increasing reliability of flights.