As some of you might know, we are working full ahead on developing a local positioning system for the Crazyflie 2.0 ecosystem. There are many things to be done and we just took two major step by improving the stabilizer code architecture and moving the position control code into the firmware. Getting the position from an external system is fine and dandy, but we also have to control the pitch, roll and yaw of the Crazyflie to keep its desired position. Up til now we have been running this control algorithm outside the Crazyflie in an external computer, but now we have moved it into the Crazyflie itself. The controller is a simple PID controller and can definitely be improved, but the main purpose of the work has been to improve the architecture in this area. We know there are people in the community working on position related features and we hope the new architecture will make it easier for us all to implement the bits and pieces needed to get an autonomous Crazyflie. The estimation of the position has not been implemented in the firmware yet but the architecture now has support for it.
The general layout of the new architecture is as follow:
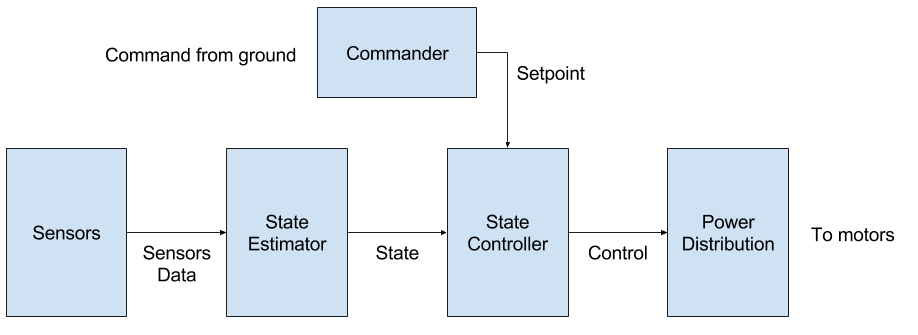
- The sensors are gyroscope, accelerometer and pressure sensor. More could and will be added in the future like position and altitude measurement.
- The state estimator calculate an as good as possible estimate of the Crazyflie state using the sensor values. The state contains the Crazyflie orientation (roll, pitch, yaw), its position and speed. Currently the state estimator has complementary filters for the orientation and the altitude. In the near future the full position will be estimated as well.
- The commander generate a setpoint to be followed by the Crazyflie. Currently this is only done by receiving commander packet from the ground using Crazyradio or bluetooth low energy.
- The state controller generates control output to achieve the requested setpoint from the current state.
- Finally the power distribution is translating controls from the controller into driving the actual motors.
This is implemented in stabilizer.c and each block is implemented in there own file. Stabilizer.c used to be very verbose and complex to read and modify, it has now been greatly simplified and the above architecture is implemented in one short loop (see the full code in GitHub):
while(1) {
  vTaskDelayUntil(&lastWakeTime, F2T(RATE_MAIN_LOOP)); // 1KHz

  sensorsAcquire(&sensorData, tick);
  stateEstimator(&state, &sensorData, tick);
  commanderGetSetpoint(&setpoint, &state);
  stateController(&control, &sensorData, &state, &setpoint, tick);
  powerDistribution(&control);
  tick++;
}
Our philosophy with this new architecture is to keep the code as simple as possible and to allow customisation at compile time. The high-level functions have as simple as possible interface and so can be exchanged easily. So if tomorrow, we have a shiny new controller we just have to compile it instead of the current PID controller. We think that this fits the way the Crazyflie is used, as a development tool.
This is just the beginning: there is still some more to clean-up in the functions and we will most certainly enhance the code from feedback. Please tell us if this is useful and how it can be enhanced even more.


