As some of you may know, I’ve worked at Bitcraze for two summers (2019, 2020), and I did my Bachelor’s thesis here during the spring this year. While we mentioned shortly that I started working on my thesis (here), I never presented the results of it, so I thought that I’d do that now! Better late than never, right?
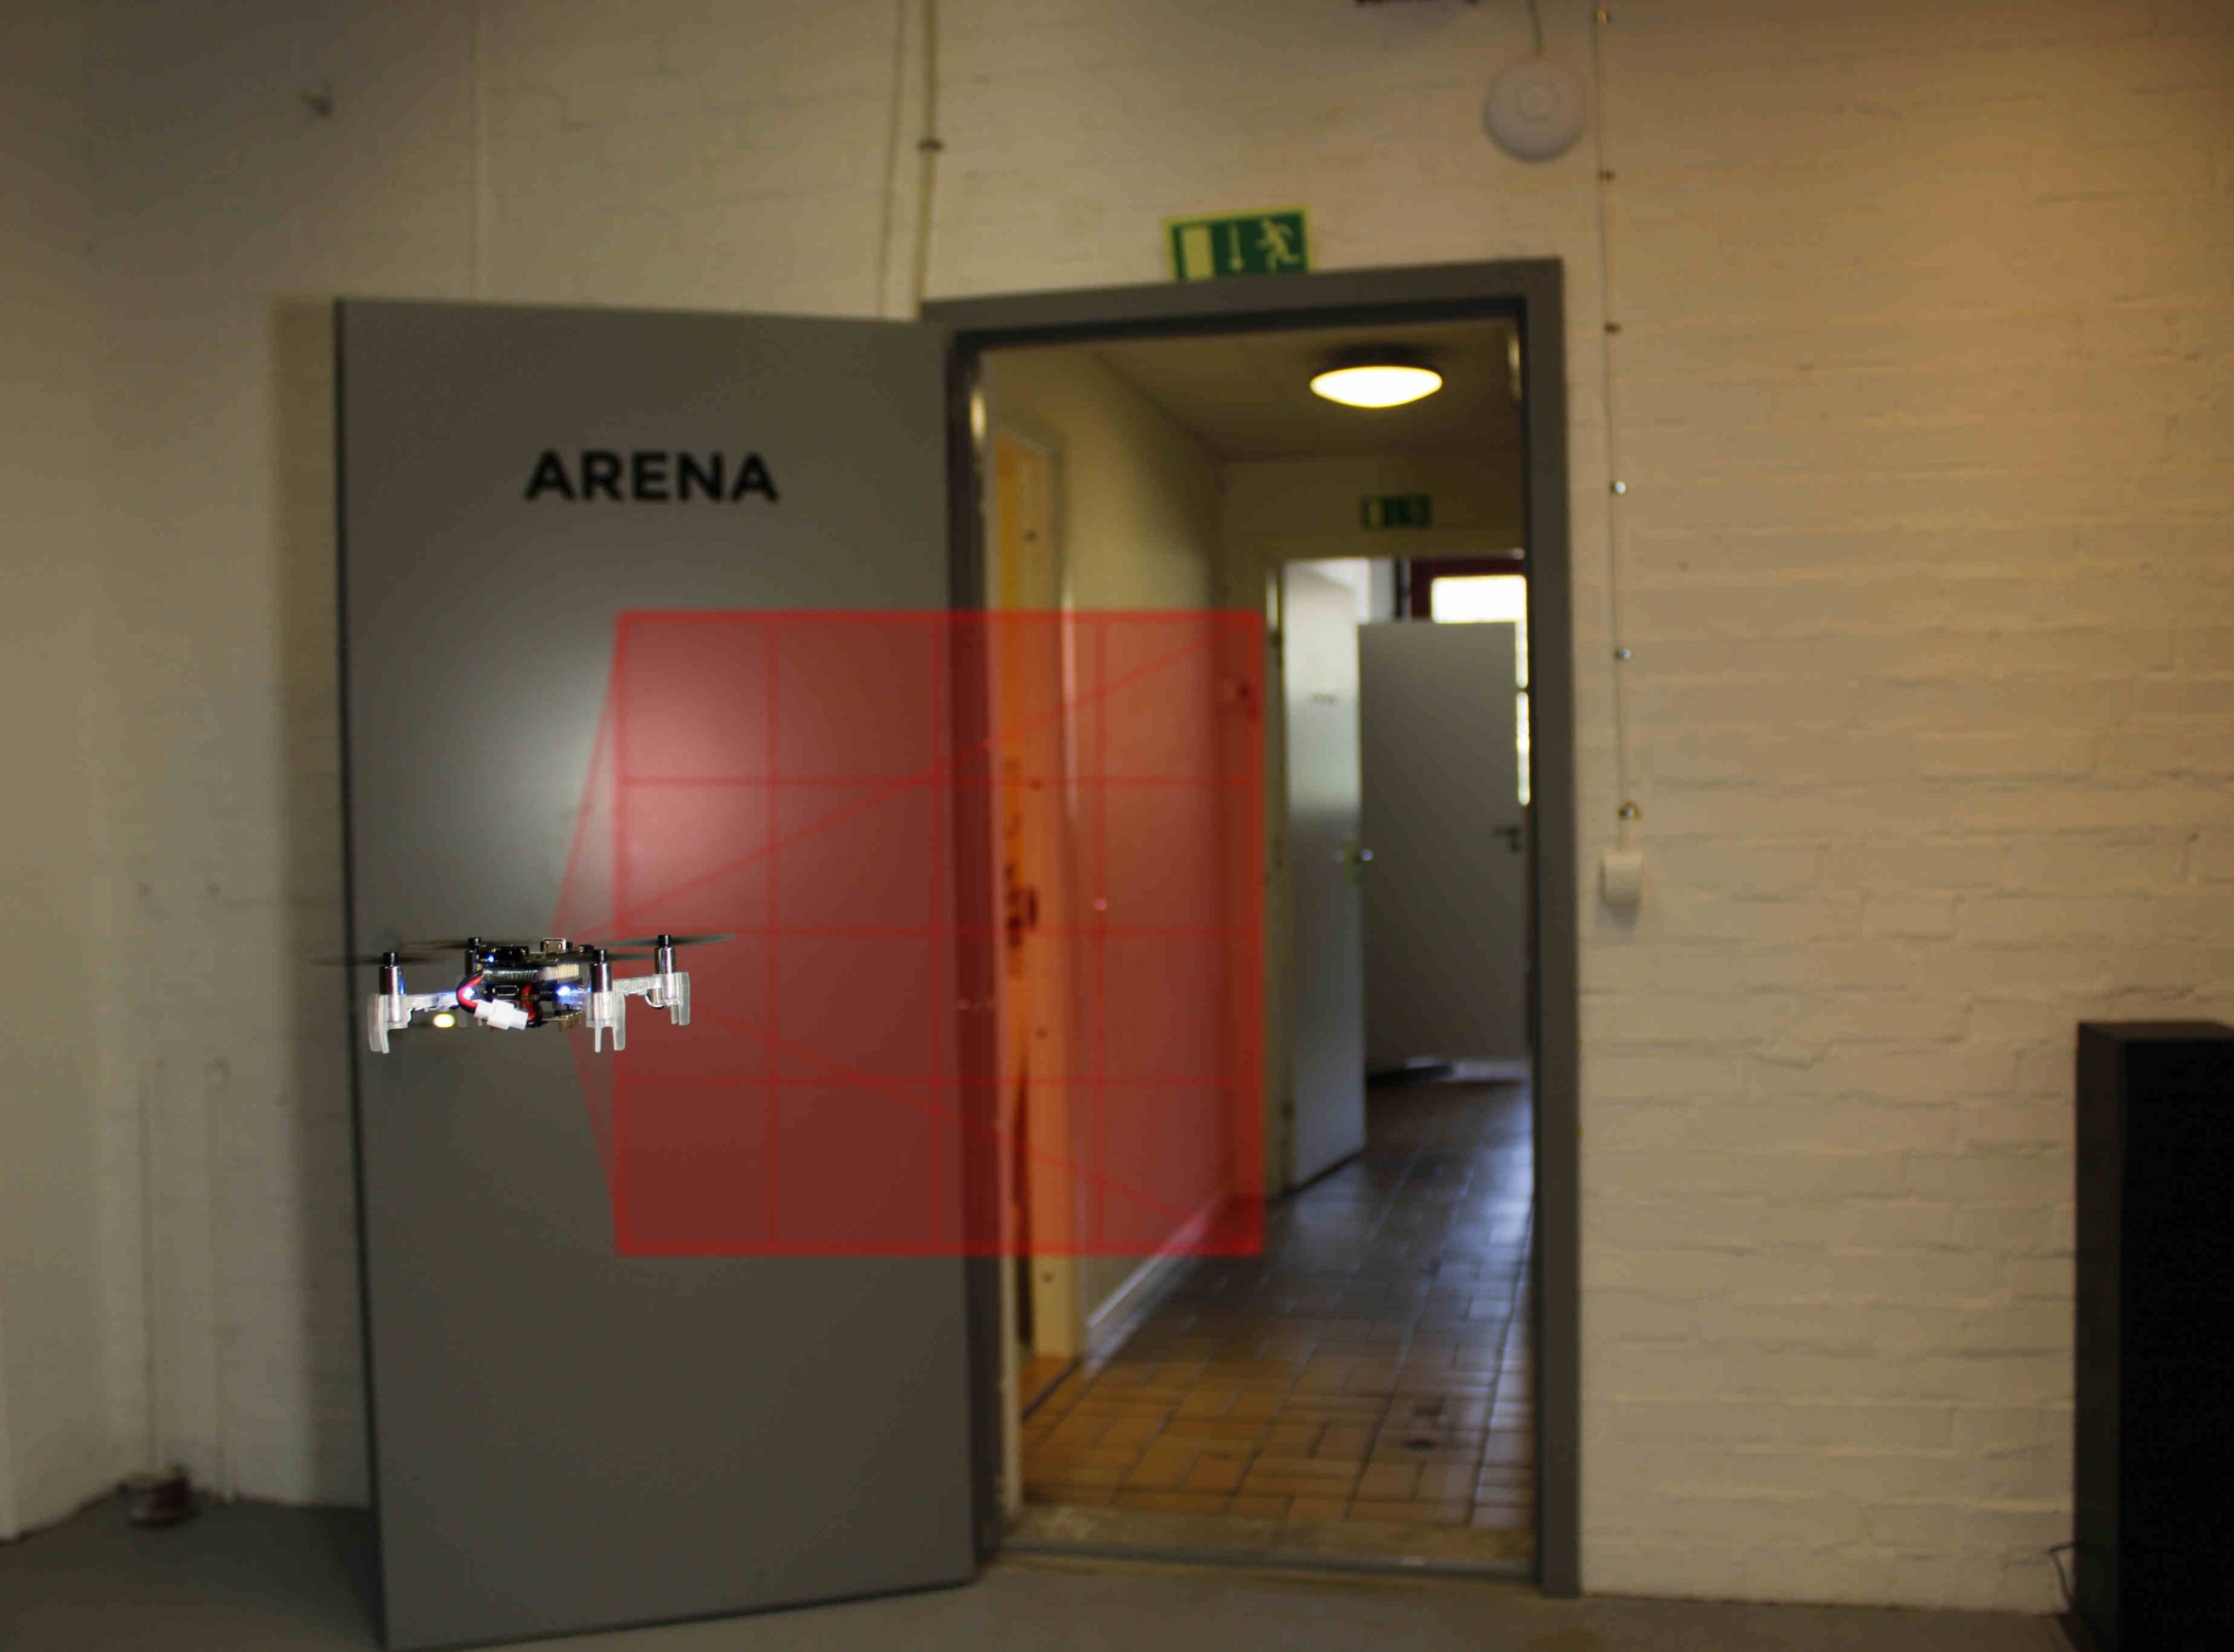
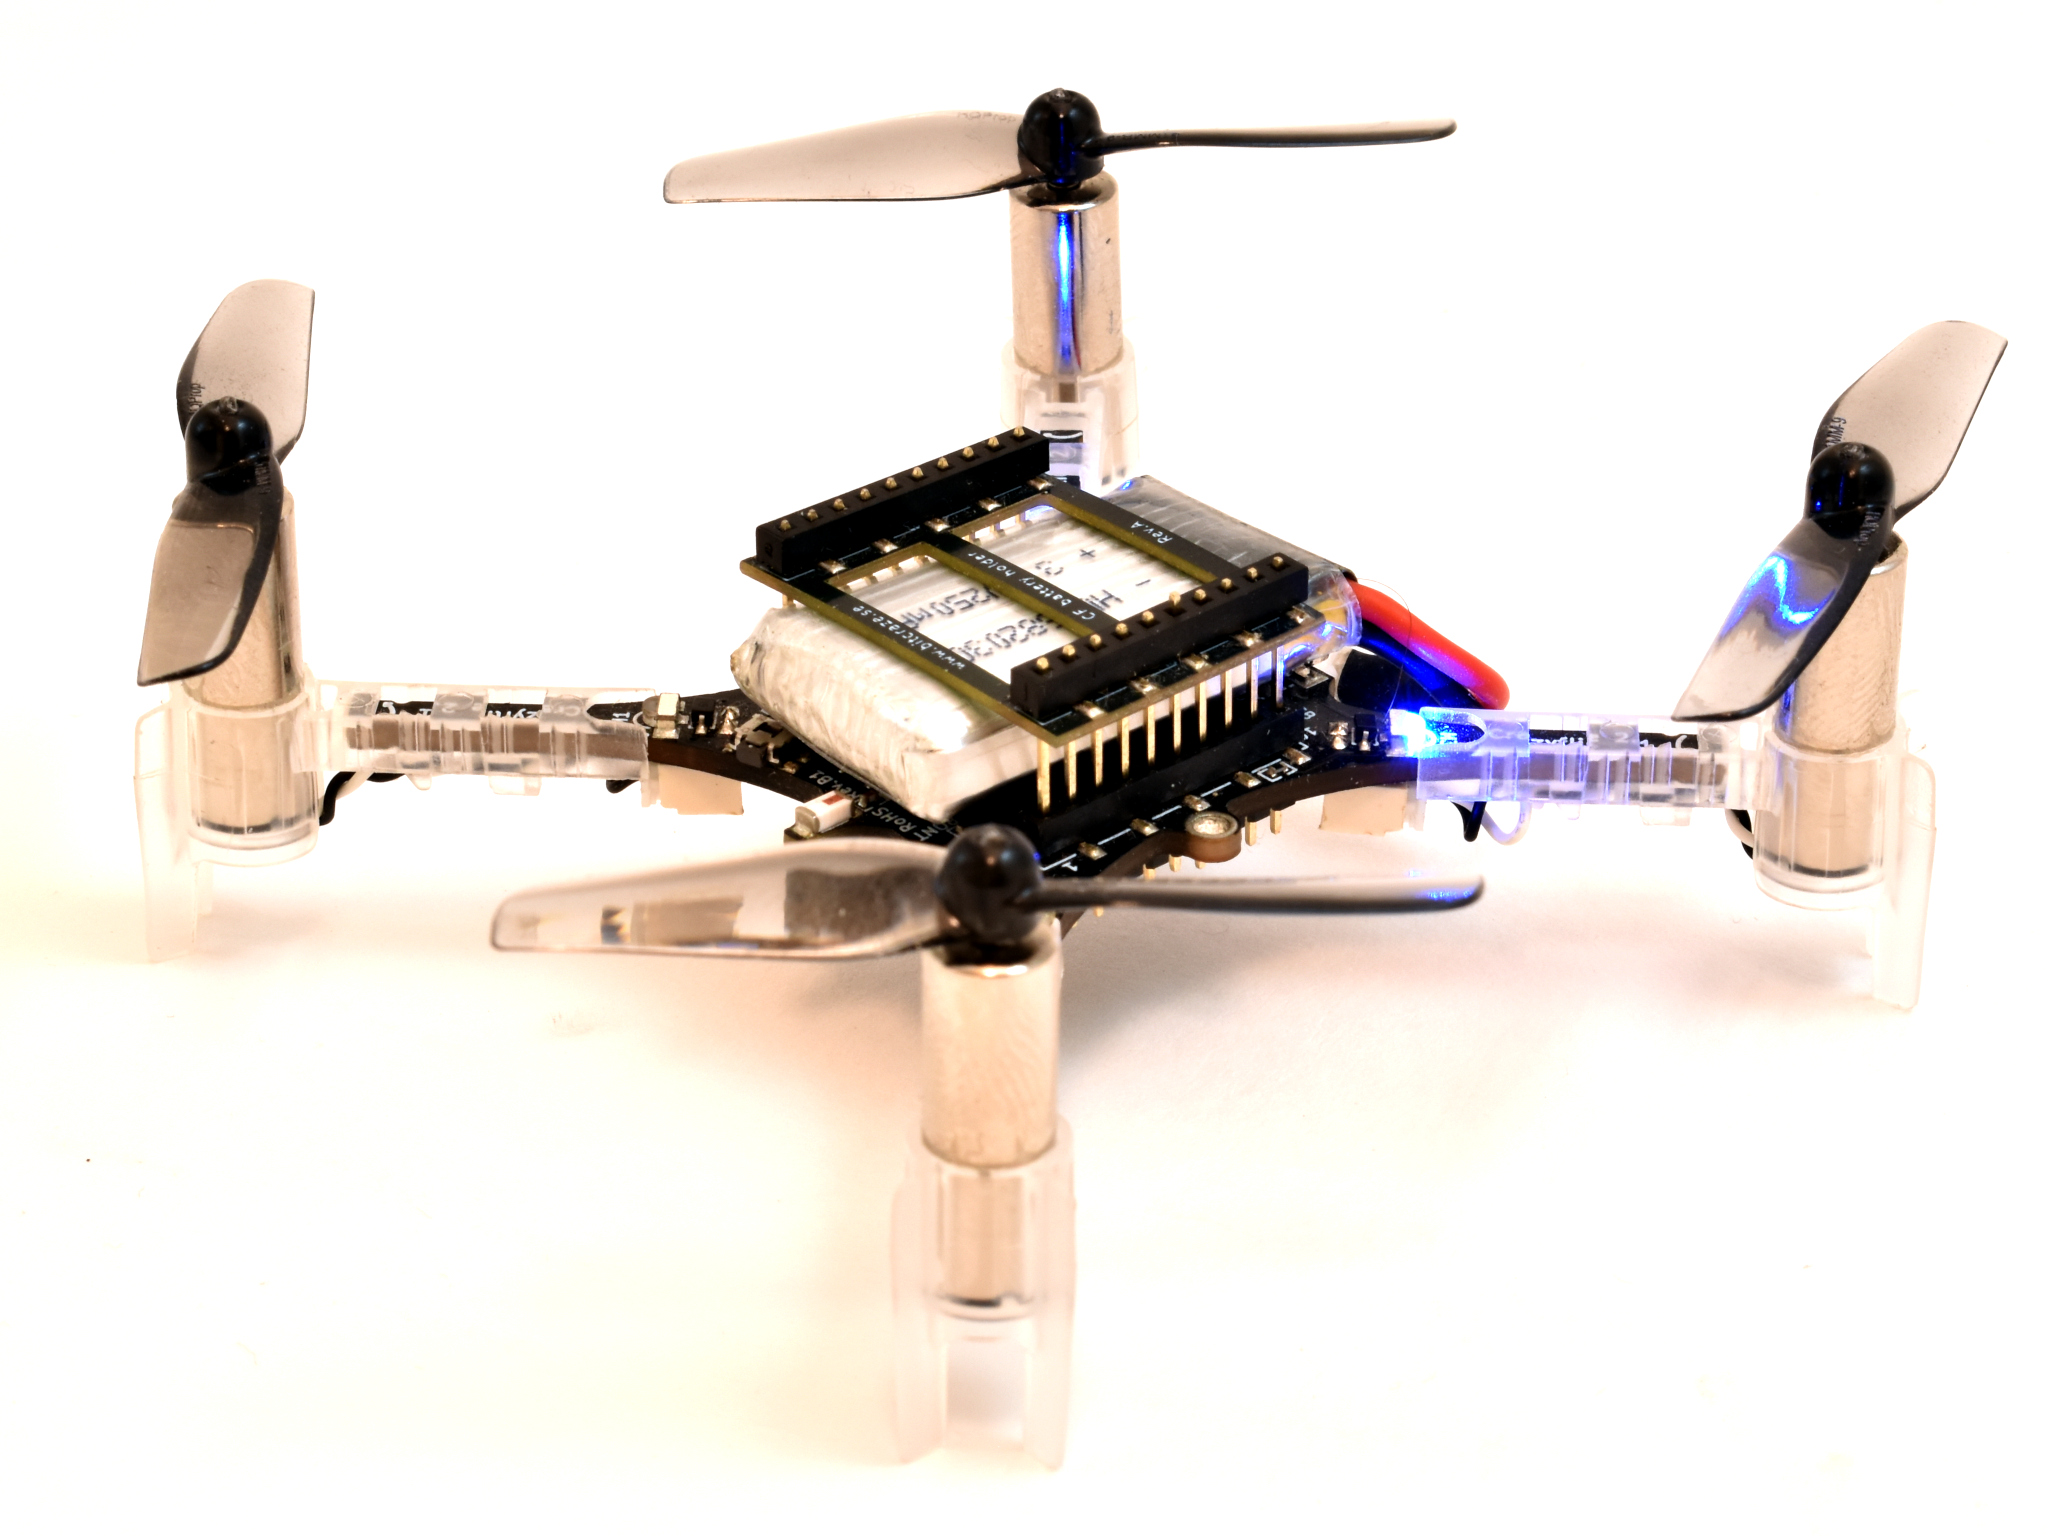
So, during my thesis I built a prototype deck for the Crazyflie which contained five multizone lidar sensors (VL53L5CX) and an ESP32-S3. The VL53L5CX sensors can output distances to a 8×8 grid, with a 45 degrees FoV at a rate of 15 hz. The purpose of the ESP32-S3 was to collect the data from the sensors and send it to a ground control station, either with WiFi, or, with the nRF radio on the Crazyflie. While the ESP32-S3 is quite overkill for only collecting data and send it, we weren’t sure of how much data that would be gathered from the sensors, so to be on the safe side we rolled with the ESP32-S3. Both the sensors and the microcontroller was very new at the time so it seemed like a good oportunity to try them out.
I designed the schematic in KiCad and got a lot of help from everyone here at Bitcraze while doing so, especially Tobias. Once the schematic was done I designed the PCB, ordered the components and then waited eagerly for the stuff to arrive. Once everything had arrived, I soldered all components and assembled the deck. I then wrote some firmware for the ESP32-S3, and the STM32 on the Crazyflie, and at last I wrote a simple GUI in PyQt to help visualize the data, both in 2D and 3D.
The deck was quite successful and while the GUI was very far from perfect, I think it did show that the deck has some nice potential and it was very cool to see the 3D point cloud in realtime while flying the Crazyflie! I tried sending the data over WiFi which worked perfectly well, and I also tried sending it through the nRF on the Crazyflie with the help of CPX, which also worked pretty well.
If you’re more curious about the thesis, feel free to check it out here, and the github repository can be found here.
I finished the thesis in the beginning of the summer, and I have been working part time here at Bitcraze since September and I’ve truly been loving! I think it’s been really cool to become a part of the team and work more on the regular stuff that the rest of the team does. It has been very interesting to see how the team works and cooperates on a daily basis. Something that striked me was just how many products and different features and services we handle here, with only six people!
Fortunately and unfortunately, I will be moving to Gothenburg next week which means that my time at Bitcraze is over, for this time. I have learned a lot from everyone here and truly appreciate all the love and support, which actually started before I even started my Bachelor’s degree.
Announcement: We will have a townhall meeting this Wednesday (7th of December) about Crazyradio 2.0 and the ideas about the new com-stack at 15:00 (3 pm) CET. Please follow the discussion here for more info.
As you have been very much aware of already if you have been reading the blog occasionally is that we went to Japan with the entire company to be at the International Conference on Intelligent Robots and Systems (IROS) in Kyoto, Japan. Besides eating great food, singing karaoke, and herding our fully onboard autonomous swarm at our stand, we also had some time to check out what kind of work was done with the Crazyflie in the proceeding papers and talks!
So just some generic statistics first:
IROS had 1716 papers accepted
We found 14 Crazyflie papers/posters and 2 workshop papers
The three biggest topics we found the papers in were: SLAM, Multi-robot systems and Navigation & Motion planning, SLAM
At ICRA this year, we noticed that the Crazyflie/bolt were used to make unconventional platforms, like a mono-copter or transforming the Crazyflie to a Pogo stick. It was interesting to see that now at IROS, the focus seemed to be more on navigation, localization and even SLAM… also with unconventional sensors!
Navigation and SLAM with the Crazyflie
In the summer I (Kim) worked on a summer project with using ROS2 to try SLAM with the standard packages with the Flow deck and Multi-ranger. This was also to present the work at ROScon before that with the Crazyswarm2 project, the Crazyflie can be used as an actual robotic platform too! I’m glad that some researchers already figured this one out already, as there were quite some papers on SLAM! [6] and [12] made use of the flow & multi-ranger but made their own custom algorithms to do SLAM and mapping that was more tailored to the task than the standard SLAM packages out there meant for 360 degree lidars.
Very interestingly, there were several papers that uses unconventional sensors for this as well. [5] used a gas sensor to do both gas source localization and distributing mapping and [10] made their own echolocation deck with buzzer + microphones. Let’s see what other sensors will be explored in the future!
Safe Robot Learning Competition
A special mention goes to the Safe Robot Learning competition, organized by the joined TU Munich and Utoronto’s the Learning system & robotics lab (formally known as the Dynamic Systems lab). In this competition, teams could participate with an online competition where they had to finish an obstacle course in simulation. From those that were successful, the finals were done with a real Crazyflie at a remote testbed in the University of Toronto, where the algorithms were put to the ultimate test! The simulation was done in the safe-control-gym framework [12], and the communication with the real Crazyflie was done with the ROS1 based Crazyswarm. We sponsored the first three places with a couple of Crazyflie bundles, so congrats to the winners!
List of IROS 2022 Papers featuring the Crazyflie
Using Simulation Optimization to Improve Zero-shot Policy Transfer of Quadrotors Sven Gronauer, Matthias Kissel, Luca Sacchetto, Mathias Korte and Klaus Diepold
Polynomial Time Near-Time-Optimal Multi-Robot Path Planning in Three Dimensions with Applications to Large-Scale UAV Coordination Teng Guo, Siwei Feng and Jingjin Yu
Avoiding Dynamic Obstacles with Real-time Motion Planning using Quadratic Programming for Varied Locomotion Modes Jason White, David Jay, Tianze Wang, and Christian Hubicki
Safe Reinforcement Learning for Robot Control using Control Lyapunov Barrier Functions Desong Du, Shaohang Han, Naiming Qi and Wei Pan
Harbin Institute of Technology + TU Delft + University of Manchester
Late breaking result poster
Parsing Indoor Manhattan Scenes Using Four-Point LiDAR on a Micro UAV Eunju Jeong, Suyoung Kang, Daekyeong Lee, and Pyojin Kim
Sookmyung Women’s University,
Late breaking result poster
Interactive Multi-Robot Aerial Cinematography Through Hemispherical Manifold Coverage Xiaotian Xu , Guangyao Shi , Pratap Tokekar , and Yancy Diaz-Mercado
University of Maryland
Note: Only mention of Crazyflie experiments in presentation
Safe-control-gym: a Unified Benchmark Suite for Safe Learning-based Control and Reinforcement Learning in Robotics Zhaocong Yuan, Adam W. Hall, Siqi Zhou, Lukas Brunke, Melissa Greeff, Jacopo Panerati, Angela P. Schoellig
Customizable-ModQuad: a Versatile Hardware-Software Platform to Develop Lightweight and Low-cost Aerial Vehicles Diego S. D’Antonio, Jiawei Xu, Gustavo A. Cardona, and David Saldaña
Let us know if we are missing any papers or information per papers! Once the IEEE xplore IROS 2022 proceedings have been published, we will update these too and put them on our research page.
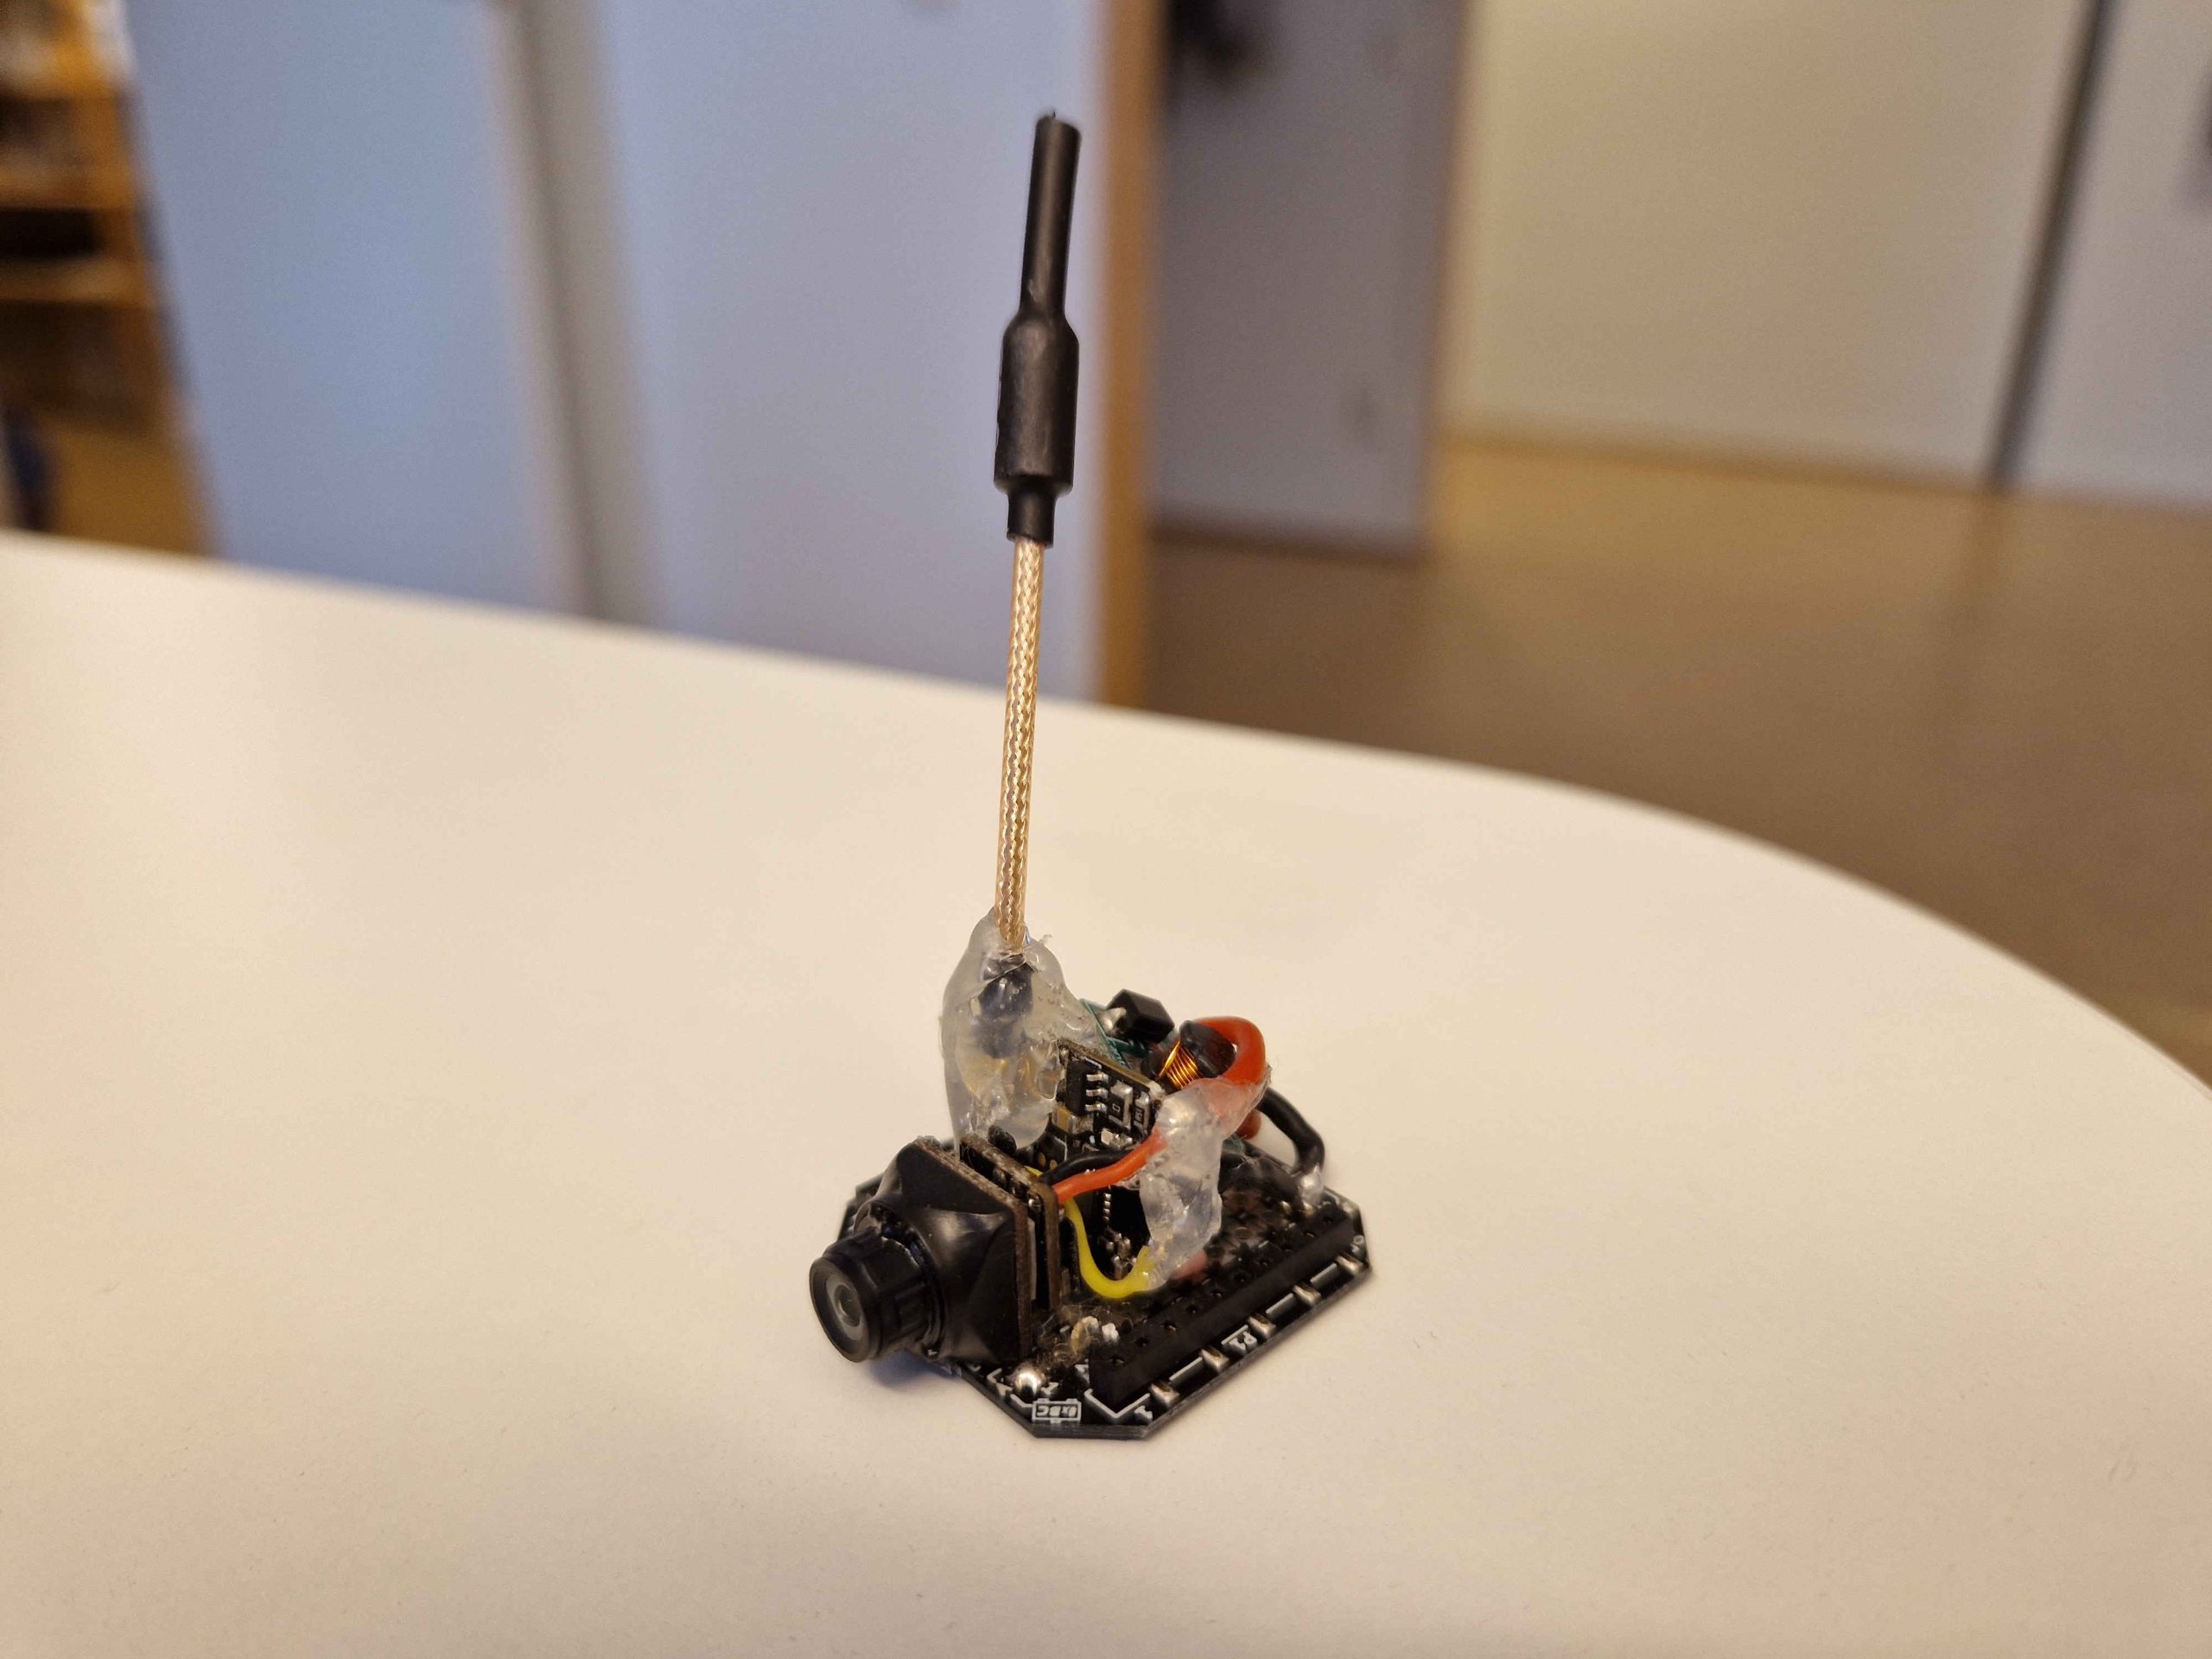
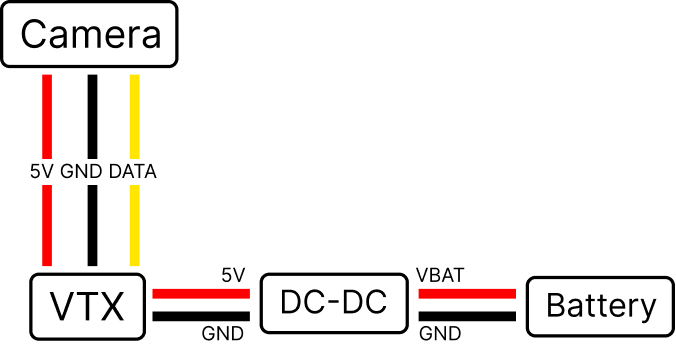
I’ve been flying FPV drones for some time and while I usually fly bigger drones (3-5 inch props) I have always wanted to put an analog camera on the Crazyflie to fly it in FPV. So, a few weeks ago I put together a simple FPV deck using off-the shelf components! The deck simply consists of a camera, VTX and a DC-DC converter, soldered onto a prototype deck.
The deck is very simple and consists of only four components and the price (as of writing) is approximately 50$ in total.
I soldered the components onto the prototype deck and used some hot glue to attach the camera, as well as on and around the antenna to prevent it from breaking off when crashing. The deck weighs a total of 8.5 grams including connection pins.
I used the newly released upgrade kit on the Crazyflie which made it easier to fly since the motors and propellers makes the drone a lot faster and easier to control flying manually. The upgrade kit also increases the lift capacity of the drone, which is nice so that the extra weight of the camera deck doesn’t become a problem.
Radio Controller
When flying FPV race drones you typically want a nice radio controller and there are many options to choose from. I recently got myself a RadioMaster Zorro Radio Controller – 4-in-1 Multi-Protocol which supports a whole variety of different RC protocols, including the popular ones such as frsky, flysky and many more. You can run the popular OpenTX or EdgeTX firmware on it and the controller is equipped with multiple RF chips, whereas one of the chips is the nRF24L01. This means that we can control the Crazyflie with the controller! While I expected several hacks to make this work, thanks to the awesome Bitcraze community someone had already written support for the Crazyflie for the controller.
Below are the steps that I took to control the Crazyflie using a RadioMaster Zorro 4-in-1 controller. In short, we want two different firmwares: 1) Firmware for the remote controller (like the controller OS). 2) Firmware for the internal RF module. Please note that the details of the steps might change in the future, but hopefully it can still be helpful.
Locate the file Multiprotocol/CFlie_nrf24l01.ino in the repository and set the address of the Crazyflie that you want to connect to in the method CFLIE_initialize_rx_tx_addr().
Ensure that the #define CFLIE_NRF24L01_INO is uncommented in the file Multiprotocol/_Config.h
Download Arduino IDE in order to build the code for the internal RF module.
Open Arduino IDE from the Multiprotocol directory and build the code by Sketch -> Export Compiled Binary. This might take some time since the firmware is quite big. The binary can then be found in Multiprotocol/build/XXX.bin.
Plug in the SD card of the remote controller or connect it to the computer using USB-C and start the controller as a storage device.
Transfer the two firmware binaries to the firmware directory of the radio controller. Unplug the radio controller and install the EdgeTX/OpenTX binary as the radio firmware, and the Multiprotocol binary for the internal RF module.
Create a new model and select the CFLIE protocol.
You should now be ready to fly! So turn on your Crazyflie and ensure that it’s on the address that you assigned in the CFLIE_initialize_rx_tx_addr() method in step 3. The radio should automatically find the correct channel so you shouldn’t have to worry about selecting the right channel.
Conclusions
I think the deck turned out really nice and it’s super cool to fly the Crazyflie in FPV! :) Some notes to consider:
It’s possible to fly with the FPV deck with the normal motors and propellers of the Crazyflie but with the thrust upgrade kit the flying is easier and significantly more enjoyable since you can go a lot faster.
Ensure that the battery is well and fully charged before flying.
There’s no support for On-Screen Display (OSD) on this deck, but it would be a cool thing to test in the future. I believe that most flight controllers that supports onboard OSD has the MAX7456 or AT7456E chip, but there’s probably more ways to do it.
The hot glue loosens up slightly from the heat dissipation of the VTX. I added some extra glue and it seems to hold quite well, even after multiple crashes.
There are modules that contains the camera and the VTX in the same package, which might be a good/better option for the Crazyflie buying them separately and soldering them together.
Please let me know if you’ve found any mistakes in the text above or if you have any other cool ideas or hacks about FPV for the Crazyflie! :)
The communication protocols between a PC, a Crazyradio and a Crazyflie are critical parts of the Crazyflie ecosystem, they allow to communicate with and control the Crazyflies in real time. These protocols have been documented in a couple of blog posts already. They exist since the origin of the Crazyflie, in 2011, and where originally designed with one use-case in mind: controlling one Crazyflie manually from a game-pad connected to a PC. The Crazyflie can of course do much more nowadays, like flying in big autonomous swarm, but the underlying communication protocols are still an evolution of these simple manual-flights single Crazyflie origin.
Over time we have felt the limitations of the communications protocols and of the Crazyradio (PA). For this reason, lately, we have been starting to work at making a new, more modern, Crazyradio dongle and at revamping the communication protocol used to communicate with the Crazyflie. The aim is to start with the current Crazyflie use-cases including flying in centralized and decentralized swarms with varying levels of autonomy of the drone itself.
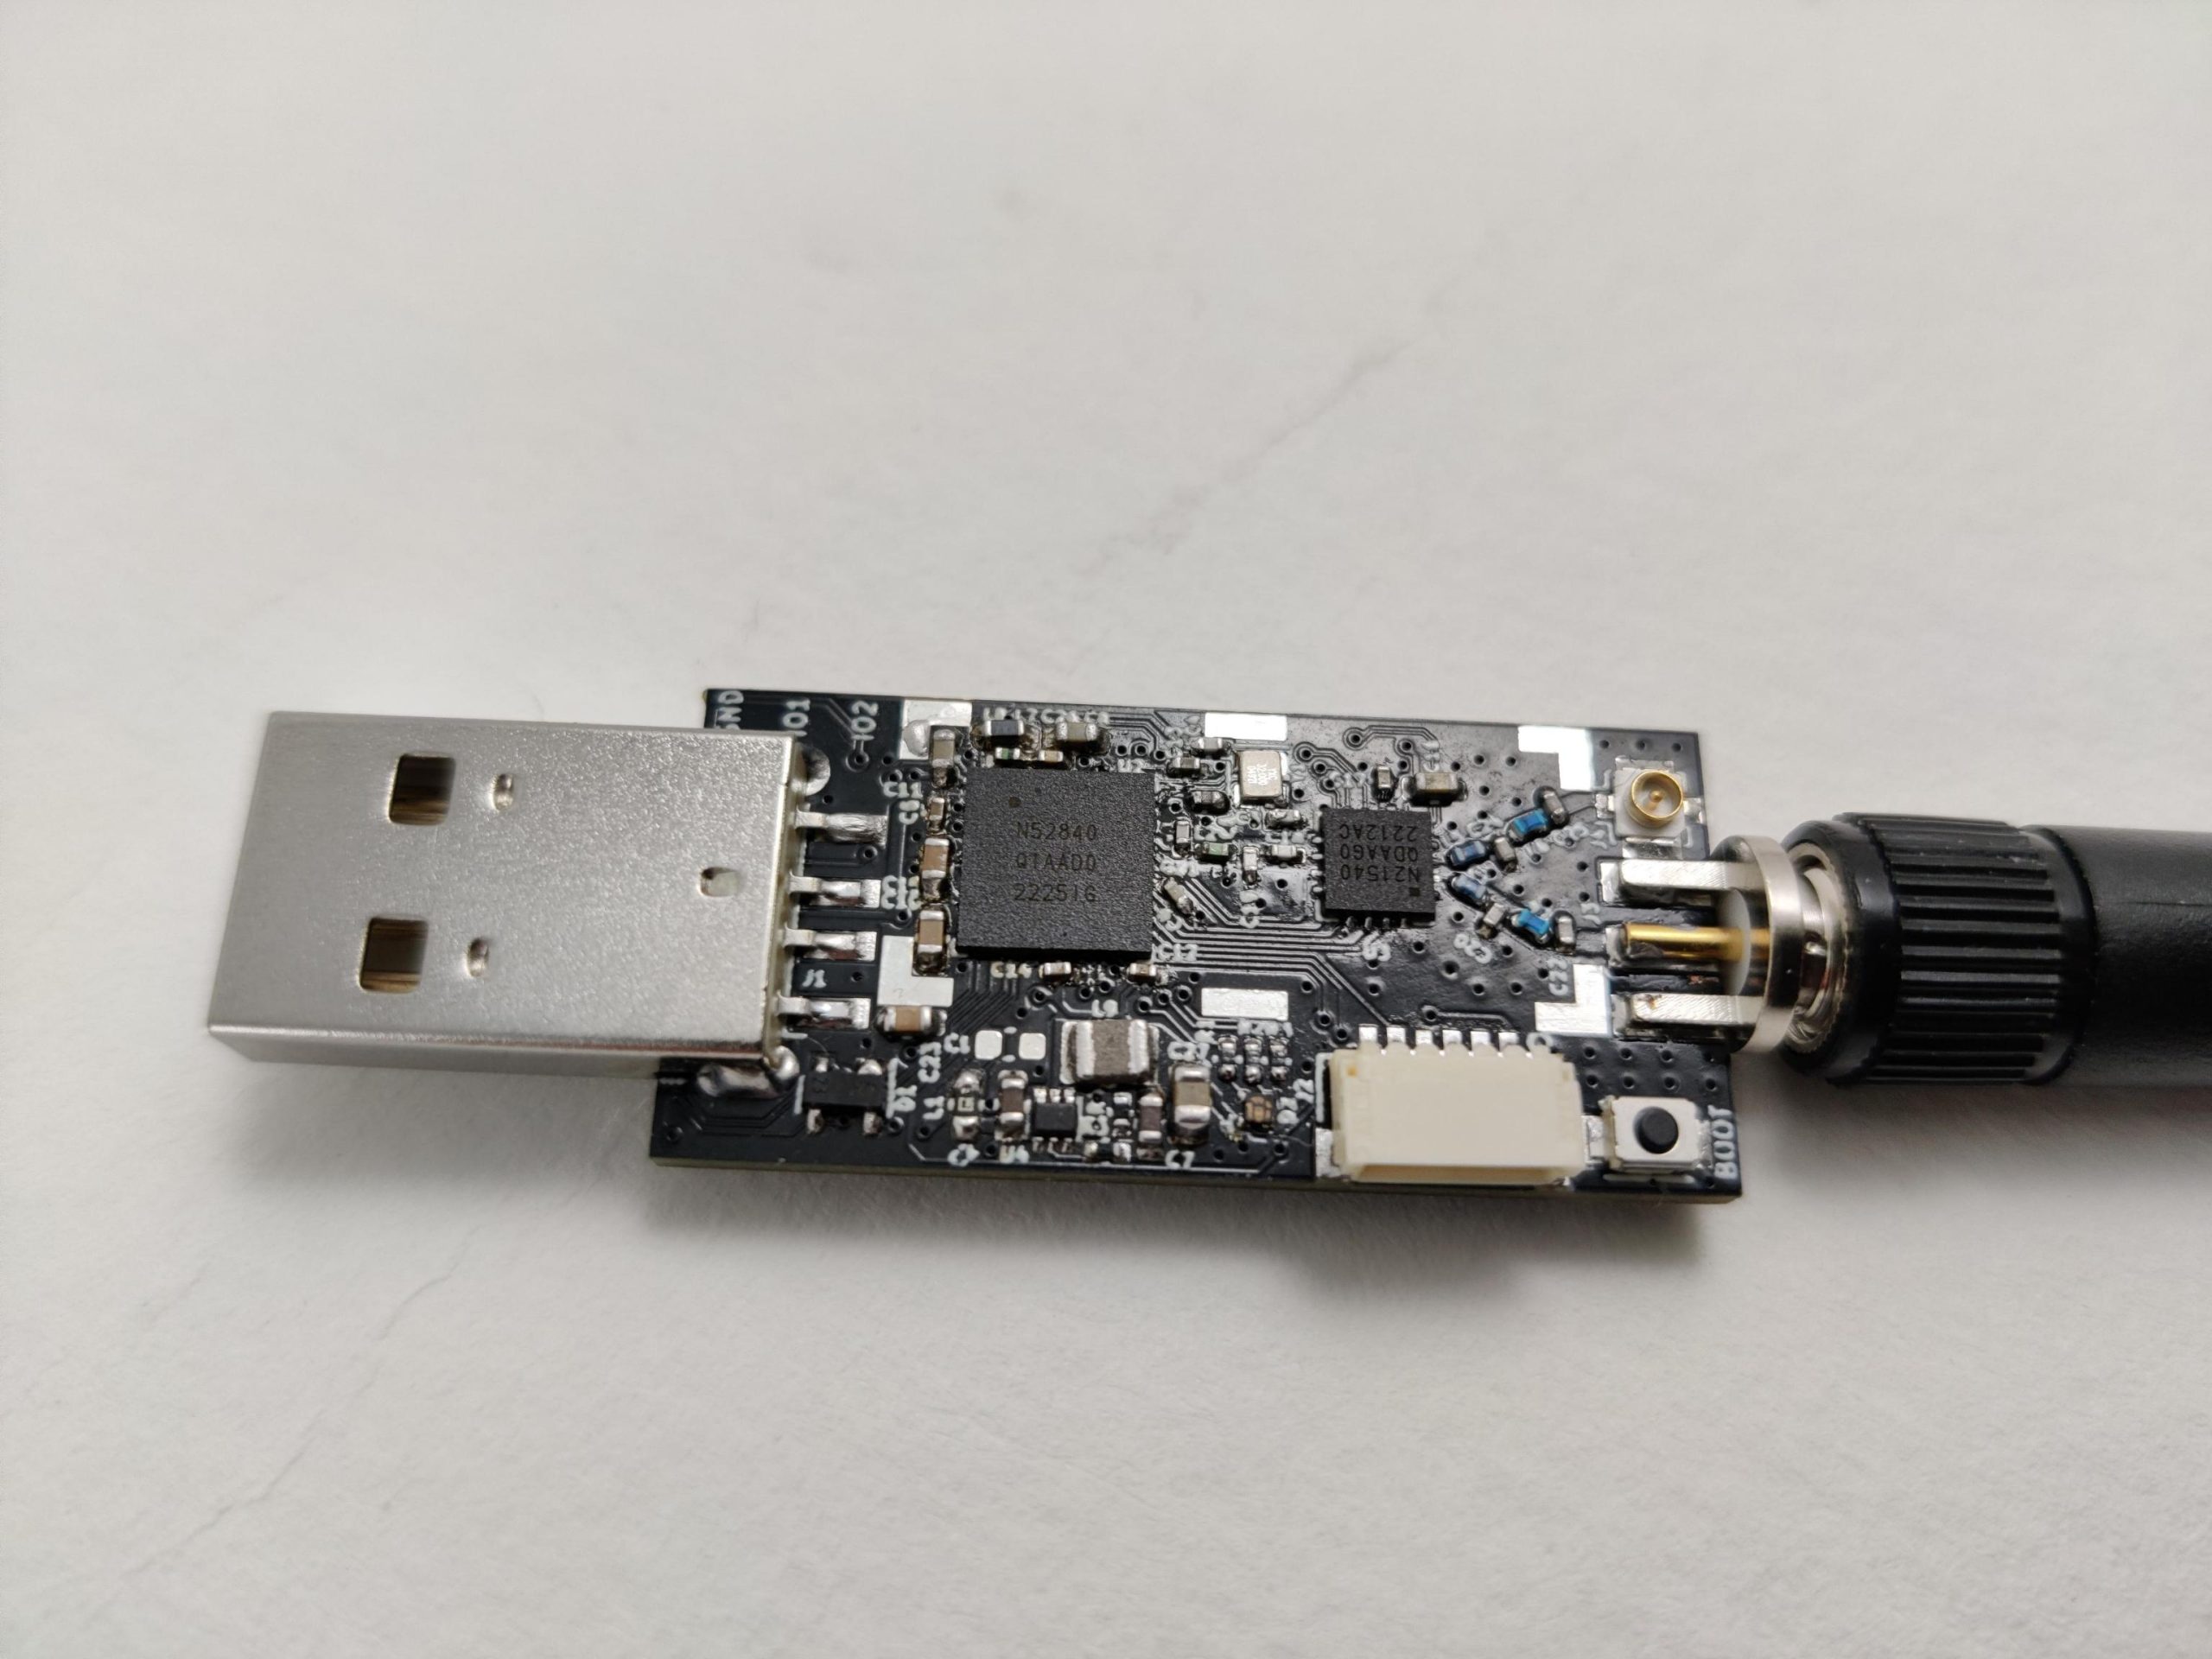
The first project is to make a new Crazyradio dongle: the current Crazyradio PA is based on an old nRF24 chip from Nordic semi. It runs on a 8051 microcontroller and has a mostly hardware-driven radio. This means that the processing power is quite limited and the radio has no flexibility with the on-air protocol and packet size limited to 32 Bytes. We are working on a new Crazyradio dongle based on an nRF52840 microcontroller and a RF power amplifier. We expect the new radio to be available sometimes before the summer 2023:
The main advantage of using the new nRF52 microcontroller is that it is an ARM Cortex-M4 chip with quite a lot of flash and ram. This will make development much easier and faster. It is also a much more capable chip which will improve communication performance. The output power will be similar to the Crazyradio PA so the range should be similar. The radio being more flexible, it will allow development of new protocols including the capability to send packets bigger than 32 bytes.
On the USB protocol side, we will take this opportunity to improve the USB protocol. We are making it more flexible so that it can be expanded more easily in the future and it will also be much more efficient when controlling swarm of Crazyflies.
The first version of the new Crazyradio will implement the same air-protocol as the current one, so there will not be a need to change the Crazyflie firmware right away.
However we are already thinking of a couple of new radio protocol that we want to develop for the new Crazyradio and the Crazyflie 2:
A low latency channel hopping protocol: This protocol would allow to connect one or a swarm of Crazyflie using channel hopping. This means that the user does not have to setup a channel for communication anymore, the protocol will automatically hop form channel to channel randomly. This will make it much easier to connect to Crazyflies and make the link more reliable
A P2P protocol that will allow Crazyflies and Crazyradios to talk to each other: the main idea is to make the P2P protocol a proper supported protocol and to make the Crazyradio able to be a node in the P2P network. This should simplify a lot the development of autonomous swarm.
On the higher level protocol, CRTP, we are stating to think of ways to make new protocols as well. On that side, there has been no work started yet but a lot of ideas and general direction based on our experience and on feedback in iROS 2022 and other conferences. The basic lose ideas currently are:
Integrating the concept of connection in the protocol: currently there is no such concept so for example if a logging is setup and the link is lost, the logging subsystem will continue to try to send packets forever. A more logical implementation would tell the logging subsystem that the connection is lost and so that the logging can be canceled.
Basing the protocol on Remote Procedure Call: A lot of that we currently do in CRTP is to emulate procedure call with packets and parameters. Making procedure call the base unit of the protocol would make it much easier to use and extend
Versioning! One of the problem currently is that without clear versioning, it is very hard to make the protocol evolve in a documented way. We will find a way to version so that we can improve, add and remove functionality when needed.
Finally. We are not planning on running (micro) ROS in the Crazyflie 2, however the goal is to make a protocol that would make the interface to (micro) ROS and Crazyswarm as thin and boring as possible. Today the Crazyswarm ROS Crazyflie server is a full fledged client, the hope is to make the Crazyflie protocol in such a way that it would look more like a proxy to the Crazyflie RPC API.
If you have made a client that communicates directly with the Crazyradio PA, the change in the new Crazyradio will affect you. We will soon make the new Crazyradio 2 repos public with documentation of the new protocol to give the possibility to have discussions before release.
Those are still very lose ideas and the main goal of this blog post is to bring awareness to the future work: if you have any ideas, opinion or wishes when it comes to the communication protocol please come in contact with us and let’s discuss. The best forum is our github discussion page. Also we are planning to have an online townhall meeting so that we can handle any questions about implementation or discuss the proposed protocol, so keep an eye on this discussion thread: Townhall meeting (7 Dec 2022) · Discussion #426 · bitcraze (github.com).
Tiny quadcopters like the Crazyflie can be operated in narrow, cluttered environments and in proximity to humans, making them the perfect candidate for search-and-rescue operations, monitoring of crop in a greenhouse, or performing inspections where other flying robots cannot reach. All these applications benefit from autonomy, allowing deployment without proximity to a base station or human operator and permitting swarming behavior.
Achieving autonomous navigation on nano quadcopters is challenging given the highly constrained payload and computational power of the platform. Most attention has been given to monocular solutions; the camera is a lightweight and energy-efficient passive sensor that captures rich information of the environment. One of the most important monocular visual cues is optical flow, which has been exploited on MAVs with higher payload for obstacle avoidance [1], depth estimation [2] and several bio-inspired methods for autonomous navigation [3–7].
Optical flow describes the apparent visual variations caused by relative motion between an observer and their surroundings. This rich visual cue contains tangled information of velocity and depth. However, calculating optical flow is expensive. The field of optical flow estimation is and has been for a couple of years dominated by convolutional neutral networks (CNNs). Despite efforts to find architectures of reduced size and latency [8-10], these methods are still highly computationally expensive, running at several to tens of FPS on modern desktop GPUs and requiring millions of parameters to run, rendering them incompatible with edge hardware.
To this end, we present “NanoFlowNet: Real-Time Dense Optical Flow on a Nano Quadcopter”, submitted to an international robotics conference, which introduces NanoFlowNet, a CNN architecture designed for real-time, fully on-board, dense optical flow estimation on the AI-deck.
CNN architecture
We adopt semantic segmentation CNN STDC-Seg [11] and modify it for optical flow estimation. The resulting CNN architecture may be considered “real-time” on desktop hardware, for deployment on edge devices such as a nano quadcopter the net must be significantly shrunk. We improve the latency of the architecture in three ways.
First, we redesign the key convolutional modules of the architecture, the Short-Term Dense Concatenate (STDC) module. By reordering the operations within the strided variant of the module, we save, depending on the location of the module within the architecture, from over 10% to over 50% of the MAC operations per module, while increasing the number of output filters with large receptive field size. A large receptive field size is desirable for optical flow estimation.
Second, inspired by MobileNets [12], we globally replace ‘regular’ convolutions with depthwise separable convolutions. Depthwise separable convolutions factorize a convolution into a depthwise and pointwise convolution, effectively reducing the calculational expense at a cost in representational capacity.
Third, we reduce the input dimensionality. We train and infer network on grayscale input images, reducing the required on-board memory for storing images by a factor 2/3. Any memory saved on the AI-deck’s L2 memory can be handed to AutoTiler for storing the CNN architecture, speeding up the on-board execution. Requiring more of a speed-up, we run the CNN on-board at a reduced input resolution of 160×112 pixels. Besides the speed-up through saved L2, reducing the input resolution makes all operations throughout the network cheaper. We downscale training data to closely match the target resolution. Both these changes come at a loss of input information. We will miss out on small objects and small displacements that are not captured by the resolution.
To give some intuition of the available memory: Estimating optical flow requires two input images. Storing two color input images at full resolution requires (2 x 324x324x3=) 630 kB. The AI-deck has 512 kB of L2 memory available.
Motion boundary detail guidance
Inspired by STDC-Seg, we guide the training of optical flow with a train-time-only auxiliary task to promote the encoding of spatial information in the early layers. Specifically, we introduce a motion boundary prediction task to the net. The motion boundary ground truth can be found in the optical flow datasets. This improves performance by 0.5 EPE on the MPI Sintel clean (train) benchmark, at zero cost to inference latency.
Performance on MPI Sintel
Given the scaling and conversion to grayscale of input data, our network is not directly comparable with results reported by other works. For comparison, we retrain one of the fastest networks in literature, Flownet2-s [13], on the same data. Given the reduction in resolution, we drop the deepest two layers to maintain a reasonable feature size. We name the model Flownet2-xs.
We benchmark the performance of the architecture on the optical flow dataset MPI Sintel. NanoFlowNet performs better than FlowNet2-xs, despite using less than 10% of the parameters. NanoFlowNet achieves 5.57 FPS on the AI-deck. FlowNet2-xs does not fit on the AI-deck due to the network size. To put the achieved latency of NanoFlowNet in perspective, we execute FlowNet2-xs’ first two convolutions and the final prediction layer on the GAP8. The three-layer architecture achieves 4.96 FPS, which is slower than running the entire NanoFlowNet. On a laptop GPU, the two architectures accomplish similar latency.
Method
MPI Sintel (train) [EPE]
Frame rate [FPS]
Parameters
Clean
Final
GPU
GAP8
FlowNet2-xs
9.054
9.458
150
–
1,978,250
NanoFlowNet
7.122
7.979
141
5.57
170,881
Performance on MPI Sintel (train subset). (Average) end-to-end Point Error (EPE) describes how far off the estimated flow vectors are on average, lower is better.
Input frame IGround truth optical flowNanoFlowNet (ours)FlowNet2-xsInput frame IGround truth optical flowNanoFlowNet (ours)FlowNet2-xsQualitative comparison of optical flow estimates by NanoFlowNet(-s) and FlowNet2-xs on MPI Sintel (train) clean pass. NanoFlowNet and NanoFlowNet-s pick up on smaller moving objects, such as the person in the bottom row.
Obstacle avoidance implementation
We demonstrate the effectiveness of NanoFlowNet by implementing it in a simple, proof-of-concept obstacle avoidance application on an AI-deck equipped Crazyflie. We let the quadcopter fly forward at constant velocity and implement the horizontal balance strategy [14], [15], where the quadcopter balances the optical flow in the left and right half plane by yawing.
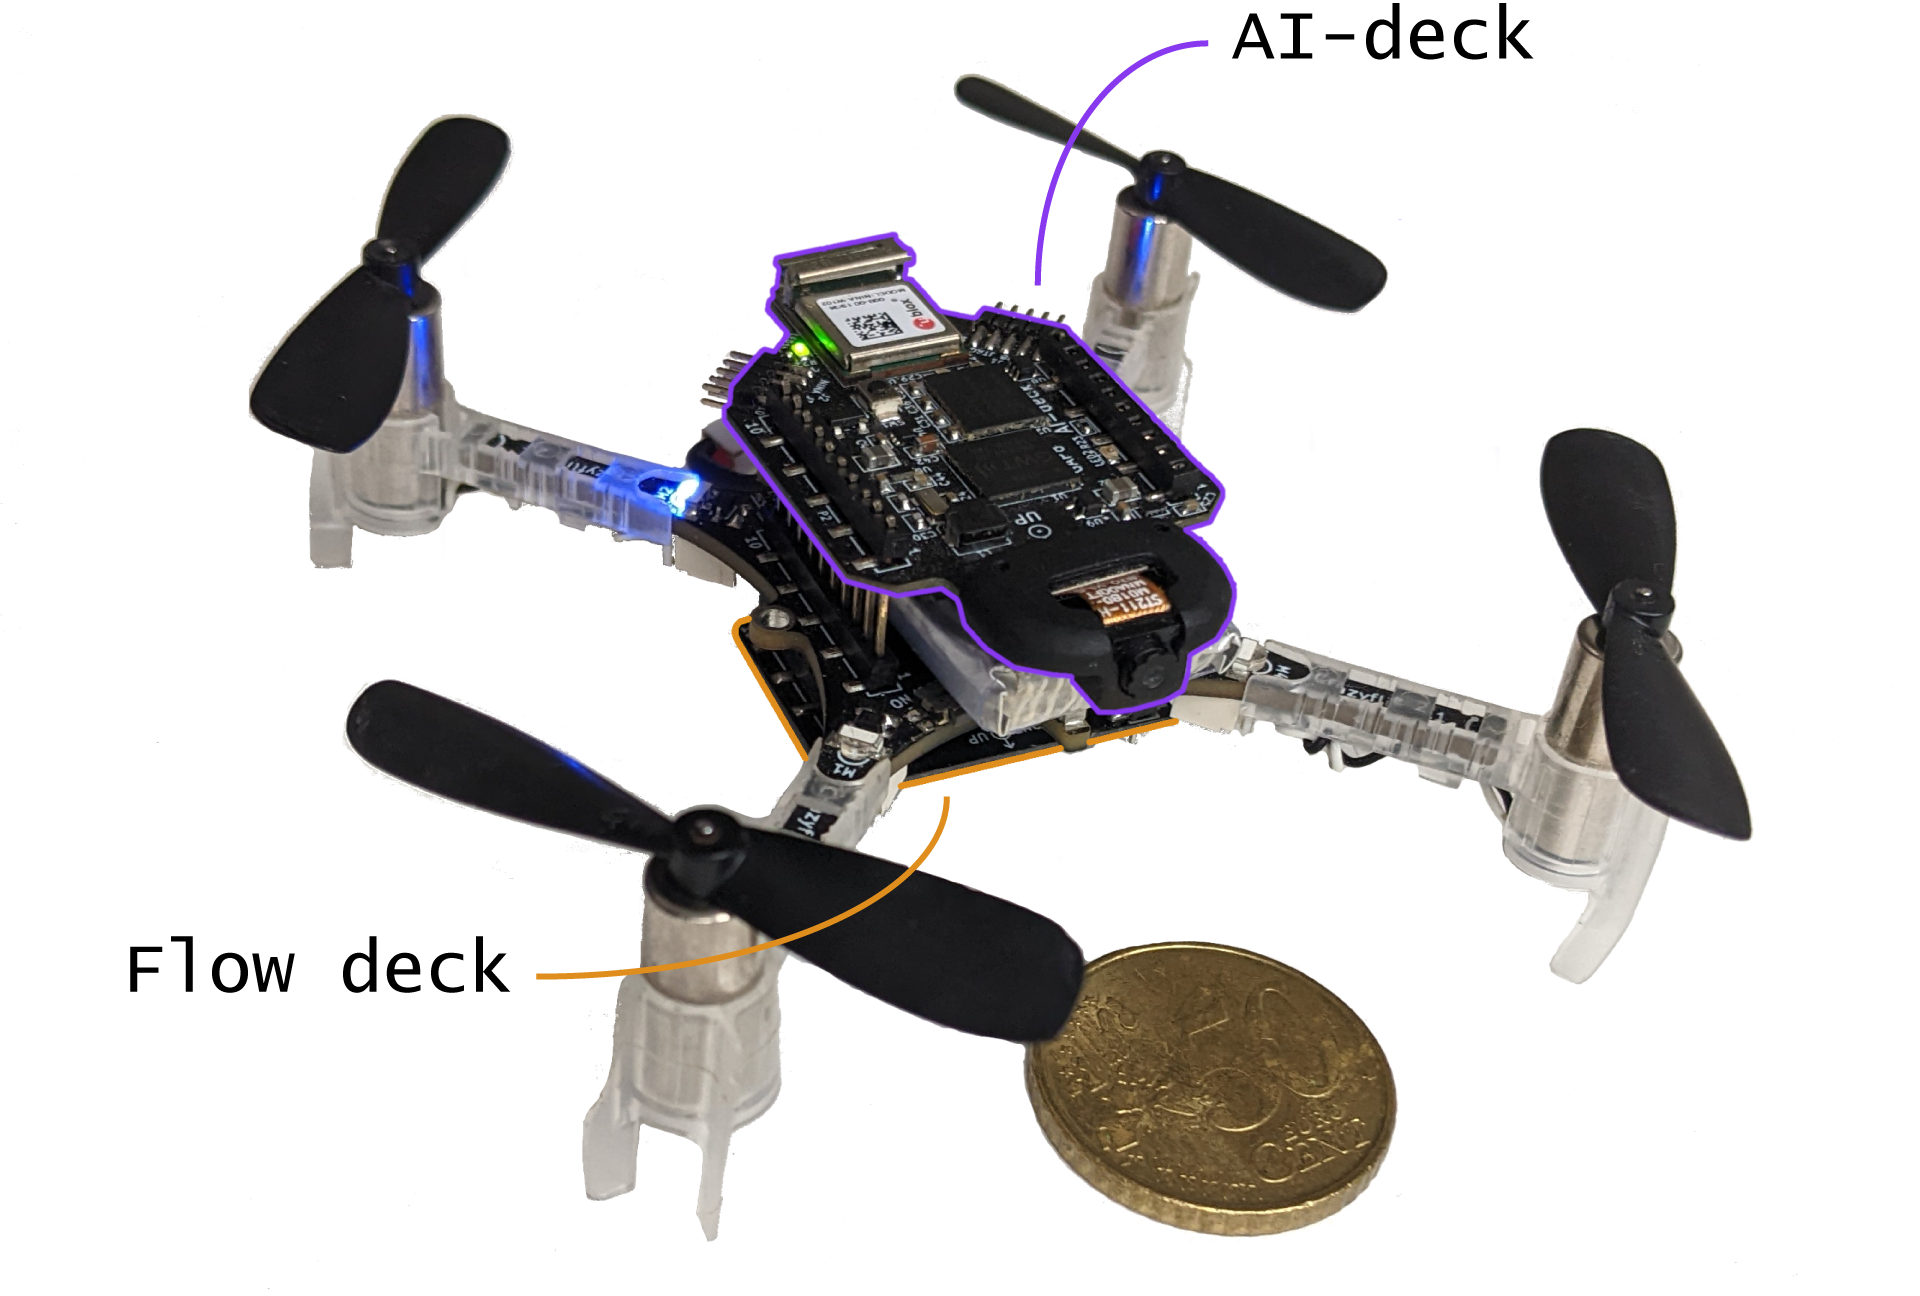
We equip a Crazyflie with the Flow deck for positioning only. The total flight platform weighs 34 grams.
We augment the balance strategy by implementing active oscillations (a cyclic up-down movement), resulting in additional optical flow generated across the field of view. This is particularly helpful for avoiding obstacles in the direction of horizontal travel, since no optical flow is generated at the focus of expansion.
The obstacle avoidance implementation is demonstrated in an open and a cluttered environment in ‘the Cyber Zoo’, an indoor flight arena at the faculty of Aerospace Engineering at the Delft University of Technology. The control algorithm is most robust in the open environment, with the quadcopter managing to drain a full battery without crashing. In the cluttered environment, performance is more variable. Especially on occasions where obstacles are close to one another, the quadcopter tends to avoid the first obstacle successfully, only to turn straight into the second and crash into it. Adding a head-on collision detection based on FOE detection and divergence estimation (e.g., [7]) should help avoid obstacles in these cases.
Successful run in a cluttered environment in the Cyber Zoo. The Crazyflie manages to avoid collision until the battery is drained.
All in all, we consider the result a successful demonstration of the optical flow CNN. In future work, we expect to see applications that take more advantage of the resolution of the flow information.
Citation
Bouwmeester, R. J., Paredes-Vallés, F., De Croon, G. C. H. E. (2022). NanoFlowNet: Real-time Dense Optical Flow on a Nano Quadcopter. arXiv. https://doi.org/10.48550/arXiv.2209.06918
References
[1] Gao, P., Zhang, D., Fang, Q., & Jin, S. (2017). Obstacle avoidance for micro quadrotor based on optical flow. Proceedings of the 29th Chinese Control and Decision Conference, CCDC 2017, 4033–4037. https://doi.org/10.1109/CCDC.2017.7979206
[2] Sanket, N. J., Singh, C. D., Ganguly, K., Fermuller, C., & Aloimonos, Y. (2018). GapFlyt: Active vision based minimalist structure-less gap detection for quadrotor flight. IEEE Robotics and Automation Letters, 3(4), 2799–2806. https://doi.org/10.1109/LRA.2018.2843445
[3] Conroy, J., Gremillion, G., Ranganathan, B., & Humbert, J. S. (2009). Implementation of wide-field integration of optic flow for autonomous quadrotor navigation. Autonomous Robots, 27(3), 189–198. https://doi.org/10.1007/s10514-009-9140-0
[4] Zingg, S., Scaramuzza, D., Weiss, S., & Siegwart, R. (2010). MAV navigation through indoor corridors using optical flow. Proceedings – IEEE International Conference on Robotics and Automation, 3361–3368. https://doi.org/10.1109/ROBOT.2010.5509777
[5] De Croon, G. C. H. E. (2016). Monocular distance estimation with optical flow maneuvers and efference copies: A stability-based strategy. Bioinspiration and Biomimetics, 11(1). https://doi.org/10.1088/1748-3190/11/1/016004
[6] Serres, J. R., & Ruffier, F. (2017). Optic flow-based collision-free strategies: From insects to robots. Arthropod Structure and Development, 46(5), 703–717. https://doi.org/10.1016/j.asd.2017.06.003
[7] De Croon, G. C. H. E., De Wagter, C., & Seidl, T. (2021). Enhancing optical-flow-based control by learning visual appearance cues for flying robots. Nature Machine Intelligence, 3(1), 33–41. https://doi.org/10.1038/s42256-020-00279-7
[8] Ranjan, A., & Black, M. J. (2017). Optical flow estimation using a spatial pyramid network. Proceedings – 30th IEEE Conference on Computer Vision and Pattern Recognition, 2720–2729. https://doi.org/10.1109/CVPR.2017.291
[9] Hui, T. W., Tang, X., & Loy, C. C. (2018). LiteFlowNet: A Lightweight Convolutional Neural Network for Optical Flow Estimation. Proceedings of the IEEE Computer Society Conference on Computer Vision and Pattern Recognition, 8981–8989. https://doi.org/10.1109/CVPR.2018.00936
[10] Sun, D., Yang, X., Liu, M. Y., & Kautz, J. (2017). PWC-Net: CNNs for Optical Flow Using Pyramid, Warping, and Cost Volume. Proceedings of the IEEE Computer Society Conference on Computer Vision and Pattern Recognition, 8934–8943. https://doi.org/10.1109/CVPR.2018.00931
[11] Fan, M., Lai, S., Huang, J., Wei, X., Chai, Z., Luo, J., & Wei, X. (2021). Rethinking BiSeNet For Real-time Semantic Segmentation. Proceedings of the IEEE Computer Society Conference on Computer Vision and Pattern Recognition, 9711–9720. https://doi.org/10.1109/CVPR46437.2021.00959
[12] Howard, A. G., Zhu, M., Chen, B., Kalenichenko, D., Wang, W., Weyand, T., Andreetto, M., & Adam, H. (2017). MobileNets: Efficient Convolutional Neural Networks for Mobile Vision Applications. In arXiv. arXiv. http://arxiv.org/abs/1704.04861
[13] Ilg, E., Mayer, N., Saikia, T., Keuper, M., Dosovitskiy, A., & Brox, T. (2017). FlowNet 2.0: Evolution of optical flow estimation with deep networks.Proceedings – 30th IEEE Conference on Computer Vision and Pattern Recognition, 1647–1655. https://doi.org/10.1109/CVPR.2017.179
[14] Souhila, K., & Karim, A. (2007). Optical flow based robot obstacle avoidance. International Journal of Advanced Robotic Systems, 4(1), 2. https://doi.org/10.5772/5715
[15] Cho, G., Kim, J., & Oh, H. (2019). Vision-based obstacle avoidance strategies for MAVs using optical flows in 3-D textured environments. Sensors, 19(11), 2523. https://doi.org/10.3390/s19112523
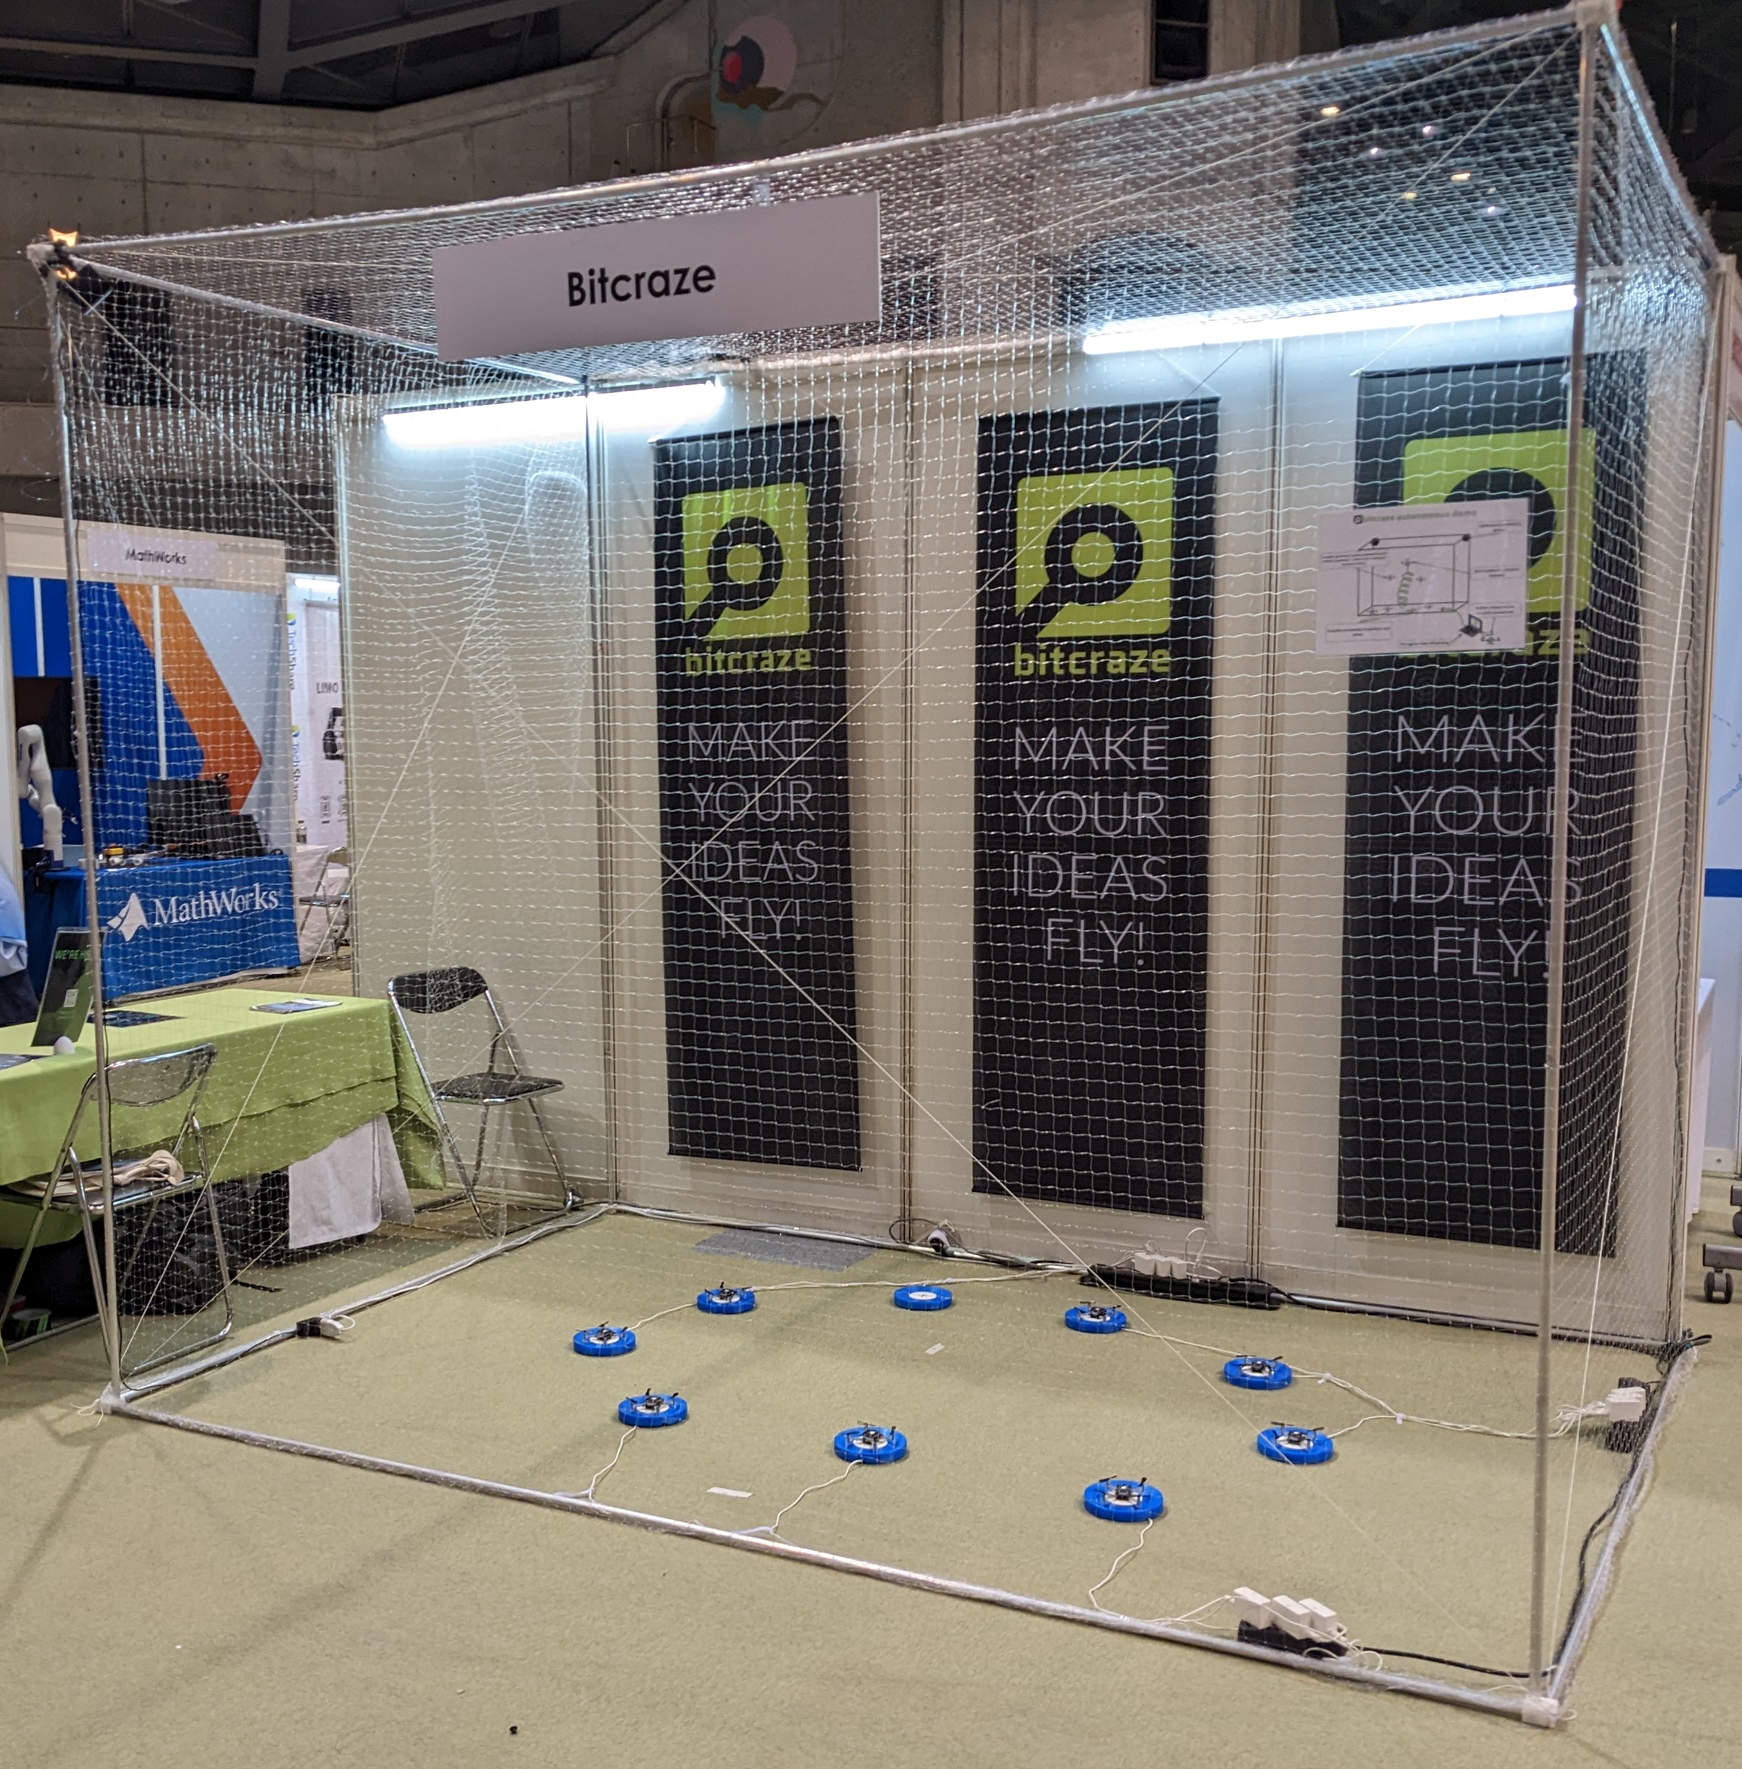
IROS in Kyoto is over and all Bitcrazers are finally back in Sweden again. We had a really good time in Japan and enjoyed all the interesting discussions we had with all of you, thanks!
The demo has similarities with our previous demo (see IROS 2019) but has been upgraded to be a fully autonomous and decentralized swarm with 9 Crazyflies buzzing around in a cage, going back to charging pads for wireless charging when the battery is running out. The demo supports multiple Crazyflies flying at the same time, avoiding collisions without a central authority, all decision making is done in each Crazyflie, that is fully decentralized.
The hardware is off-the-shelf products available in our store (links here). The software is obviously written specifically for the demo, but we wanted to use the building blocks already available in the system so the demo code is mainly “glue” to connect them together.
The cage/flying space
The flying space was box shaped, 3×2 meters in foot print and 2.5 meters high. We enclosed it in our lightweight travel cage made from aluminium pipes and a light net. It is a pretty small space to fly multiple Crazyflies in at the same time but it worked! The main problem with such a small space is down-wash from other Crazyflies and having enough room to avoid collisions. 3 Crazyflies worked pretty well, but had the space been larger it would have been possible to fly all nine.
Localization
Localization was handled by the Lighthouse positioning system. We used two base stations and the lighthouse deck on each Crazyflie which provides the Crazyflies with their current position with high accuracy.
Since the position is computed in the Crazyflie, using only data from on-board sensors, no external communication is needed in relation to the localization system. The only exception was that we uploaded the physical geometry of the system when setting up the cage.
Path planing
When a Crazyflie is flying in the demo, the standard mode of operation is to fly a randomized pattern of straight lines. From time to time (randomized) the Crazyflie can also chose to fly the spiral that we have used in earlier demos (see the IROS 2019 demo for instance).
When the battery is running out, the Crazyflie goes back to the charging pad for charging. The position is sampled before taking off and this coordinate is used as the landing point to find the charging pad. When landed the Crazyflie verifies that the battery is being charged. If the battery is not charging the Crazyflie assumes it missed the charging pad and it takes off again to adjust the position.
Charging
The Crazyflies were equiped with the Qi-charging deck for wireless charging. The charging pads are 3D-printed pads with a slope to make the Crazyflie slide into position also if the landing is not perfect. In the center of the pads there are standard Qi-chargers from IKEA mounted to provide power.
To fly continuously, the system charging rate must be higher than what is consumed by the flying Crazyflies. With a system of nine Crazyflies that are charging through Qi-chargers it is possible to keep one Crazyflie flying, just. To get some margin we increased the charging speed a bit, the down side being that the Crazyflies get warm and the batteries ware out faster.
Collision avoidance
We use the built in collision avoidance system contributed by James Alan Preiss at University of Southern California. Thanks James, it works like a charm!
There is no planing ahead, but each Crazyflie must know where the other Crazyflies are located. Based on this information they avoid each other and chose a new path to reach their target position. For this to work each Crazyflie is continuously broadcasting its position to the other Crazyflies using the peer-to-peer framework.
Swarm control and collaboration
As mentioned earlier there is no central authority that decides which Crazyflie that should take off or go to a specific position, instead this functionality is handled in each Crazyflie. To make it possible for each Crazyflie to have a rough idea of the system state, each Crazyflie is broadcasting its position and state (landed, flying etc) to the other Crazyflies. If a Crazyflie realizes that too few drones are flying, it will simply take off to fix the problem, if it sees that too many are flying it will go back to the charging pad. To avoid that all Crazyflies takes off or lands at the same time, a randomized hold-back time is used before the actions is executed. This does not fully prevent two individuals from taking off at the same time, but makes it less likely, and eventually the correct number of drones will fly.
The number of drones that should fly at the same time is a system wide parameter that can be set from one of the peers in the system. To make sure they all agree on the value, a simple mechanism is used based on the age of the data. The value and the age of the value is included in the broadcast data. When another Crazyflie receives the data it compares the age of the received data with the age of the data it already has and replaces it only if it is younger.
Sniffer
A tenth Crazyflie is used in the demo as a sniffer. It is essentially a non-flying member of the swarm that listens to the broadcast traffic and it is used to feed data to a GUI that displays the state of the system. It can also be used to inject a new value for the desired number of flying Crazyflies.
Implementation and how to run it
The code is mainly implemented as an app in the Crazyflie firmware, using the app layer. The main part is a state machine that keeps track of what to do next with some other modules handling communication and trajectories.
The examples/demos/decentralized_swarm/src/common_files/choose_app.h file controls if the code is compiled for a swarm member or the sniffer.
All Crazyflies should have the same radio channel and the same address, except the last byte. Swarm members must use addresses ending in 01 to 09 while the sniffer must use the address ending in 00.
Since last March, some members of the Bitcraze team went away. Jonas left, and Arnaud took his parental leave. We welcomed an intern, and eventually Arnaud came back but our 6 person team feels a little short.
At Bitcraze, it always seems that there are not enough hours in a day to do everything we want to do. It’s even truer now, when the day-to-day maintenance is longer and it feels like we don’t have the time to dive into our new projects – even though we still manage a lot of new things, like the motor upgrade kit or a conference in Japan.
But if there is not enough man-hour per hour, one solution is simple: hire a new person ! Since this summer, a job post has been up in our webpage. We are officially actively looking for a new teammate !
So, who are we looking for exactly ?
Well, we’re looking for someone that is open, honest, and passionate about technology. That last part is easiest to determine: you must be interested in everything technological, and more specifically embedded systems. At the moment, we’re mostly looking for someone that is interested in the manufacture part of the process, but also in embedded software. However, if you’re a developer with some Python knowledge, and a passion about hardware, you’re might be a right fit as well! Generally speaking, someone with a lots of different interests that would fill the holes we have right now.
And that’s why, frankly, writing a job post is not an easy feat here. In Bitcraze, no one is the manager or “boss”, and we all decide together on what to work on. No one has a definite part, and we talk more easily of passions than fixed role . So, we don’t know exactly now what profile would be the best for us, as it’s more about what you’re willing to do than what you can accomplish. Right now, we’re in need of someone with hardware passion; but maybe we also need someone with a totally different interest that we don’t know about – because we ourselves are not interested in it and didn’t think about it.
The way we work is something that asks for a specific mindset, and we want to make sure that every prospect has the same mentality. Being open-minded, and ready to take on a lot of different tasks and roles, is a very important part of the daily life at Bitcraze, and something we’re searching for in every candidate we meet. And that covers the open and honest part !
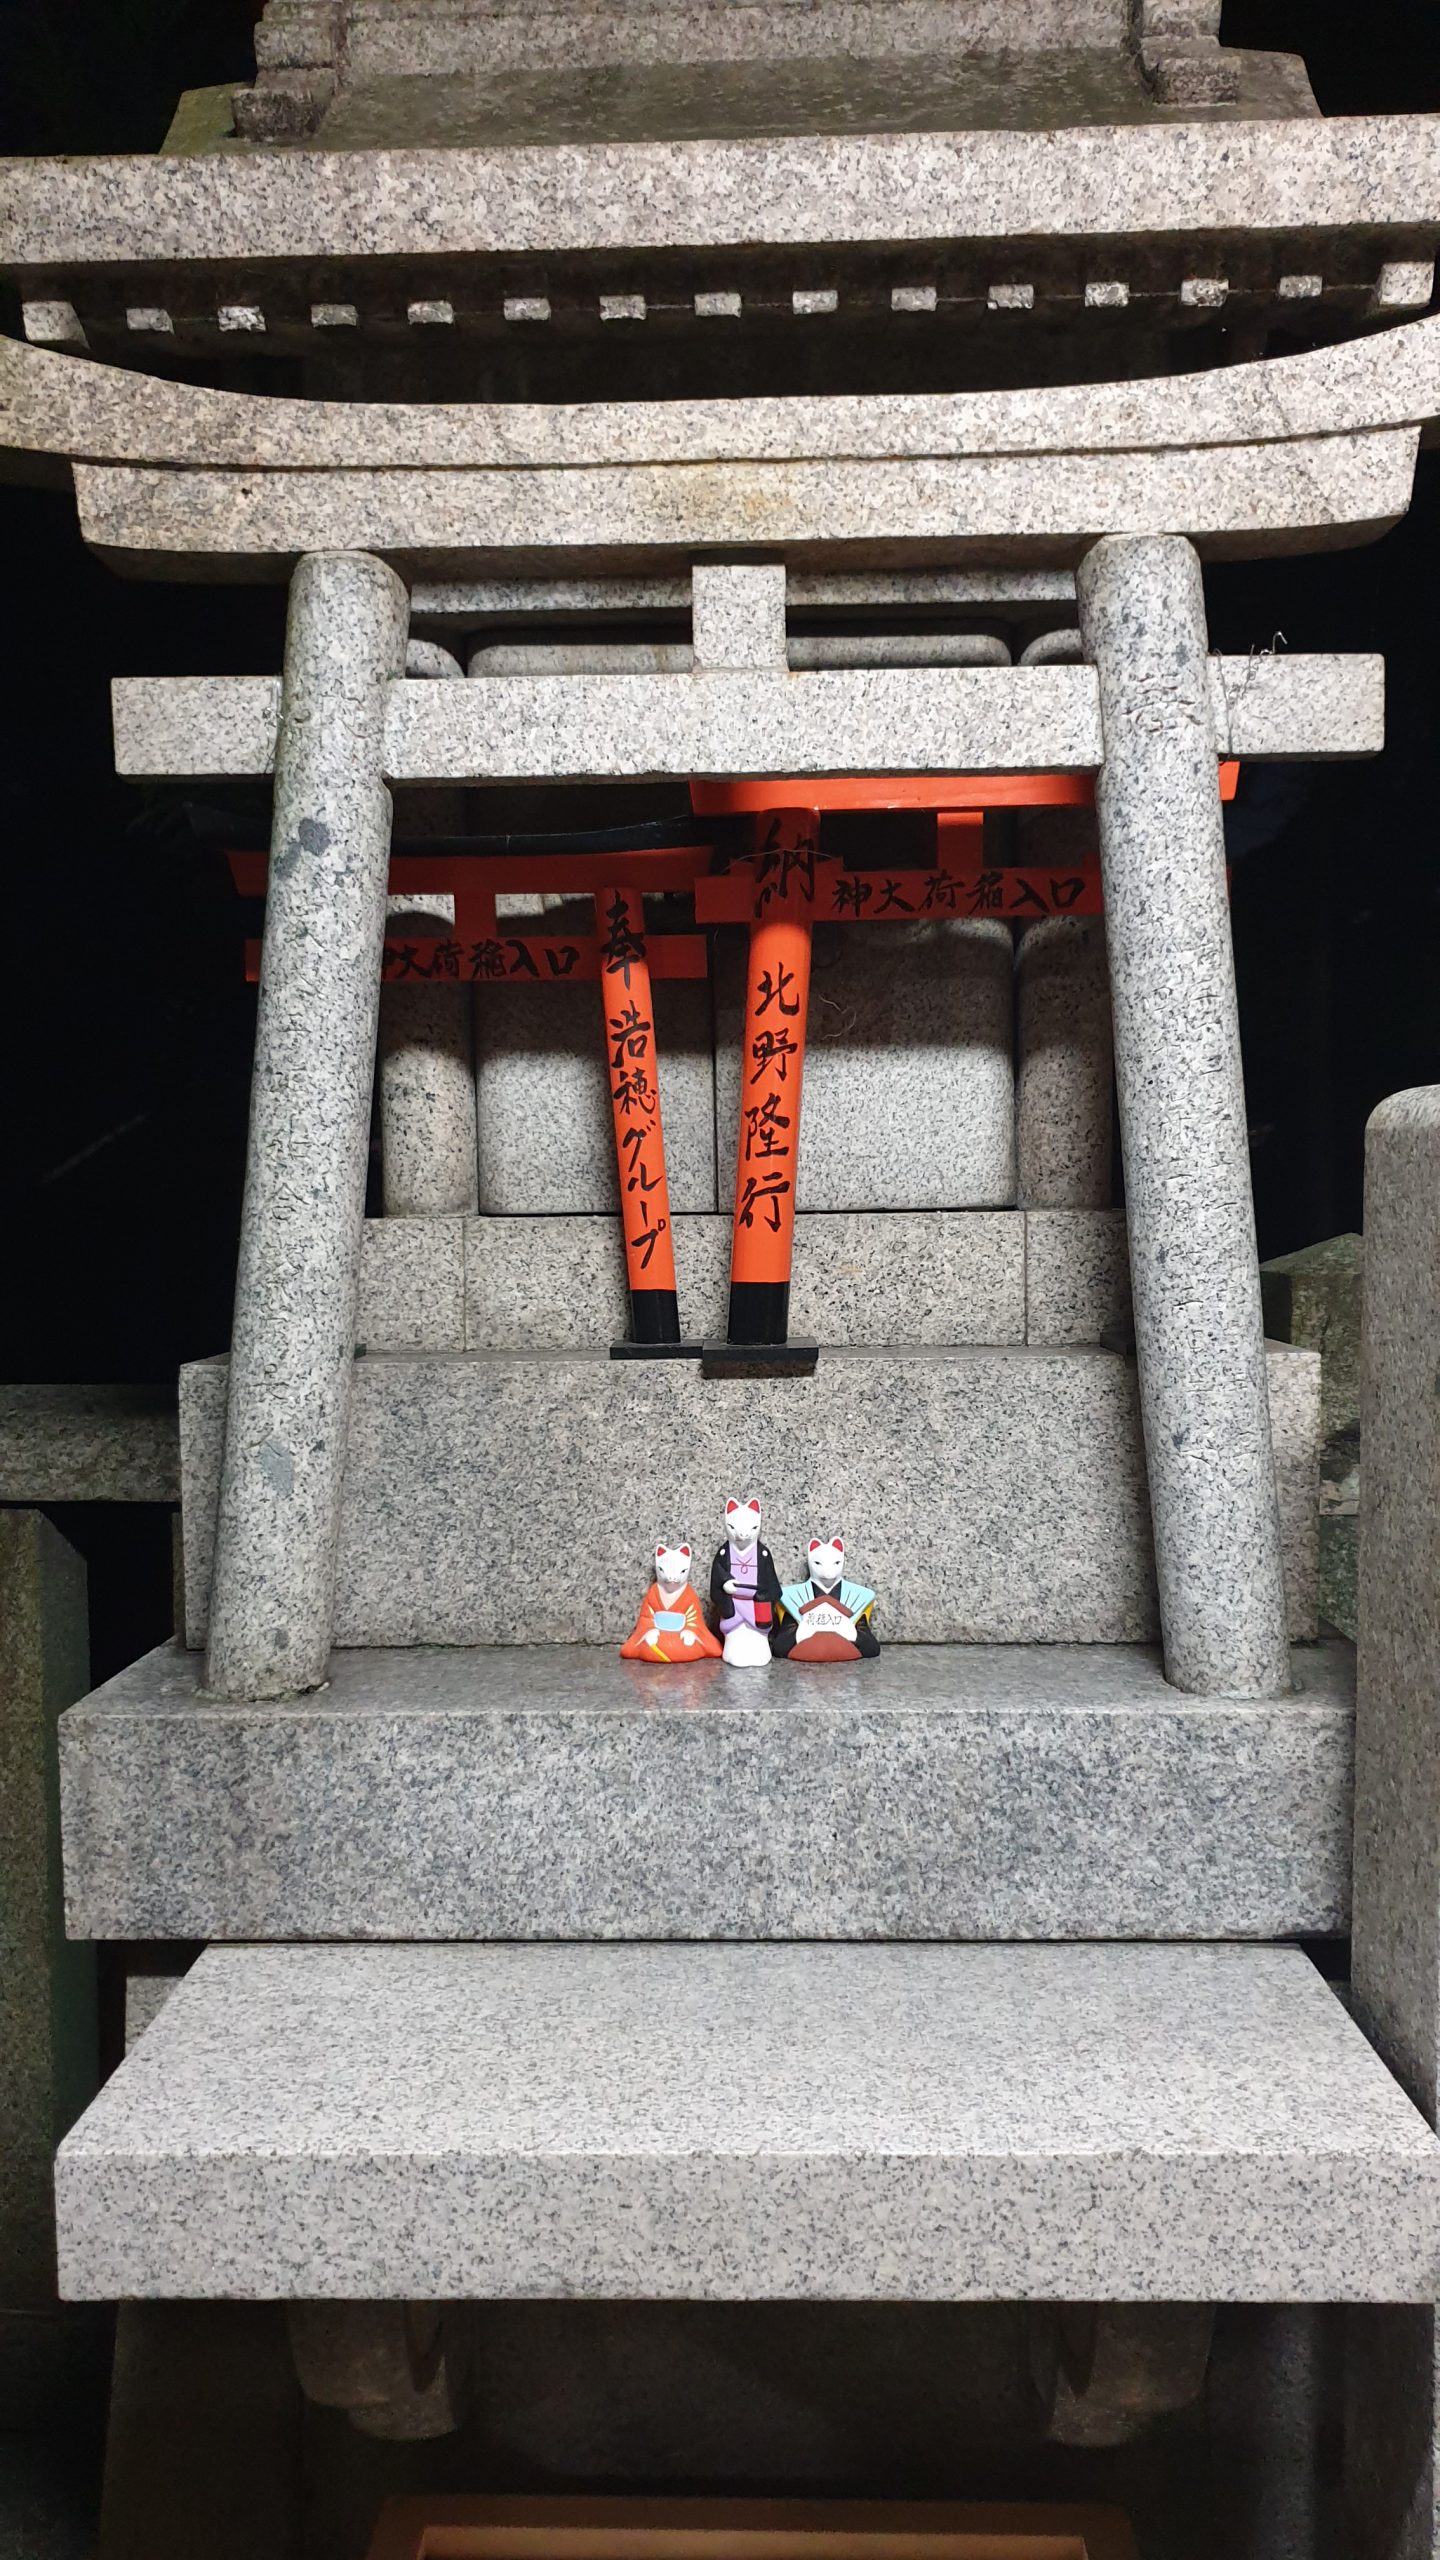
In Japan, we came across a shrine dedicated to matchmaking. It is said that the goddess Kuchiire Inari Okami ties together people – whether for marriage or job hires. We made a small offering to her – you never know what can help.
The Kuchiire Inari Okami in Fushimi Inari
Of course, a more effective way to help us would be to send us your CV at jobs@bitcraze.io and tell us who you are !
By the way, some of us are still in Japan (while the others are recovering from jetlag) so the company might still be running a little slowly this week.
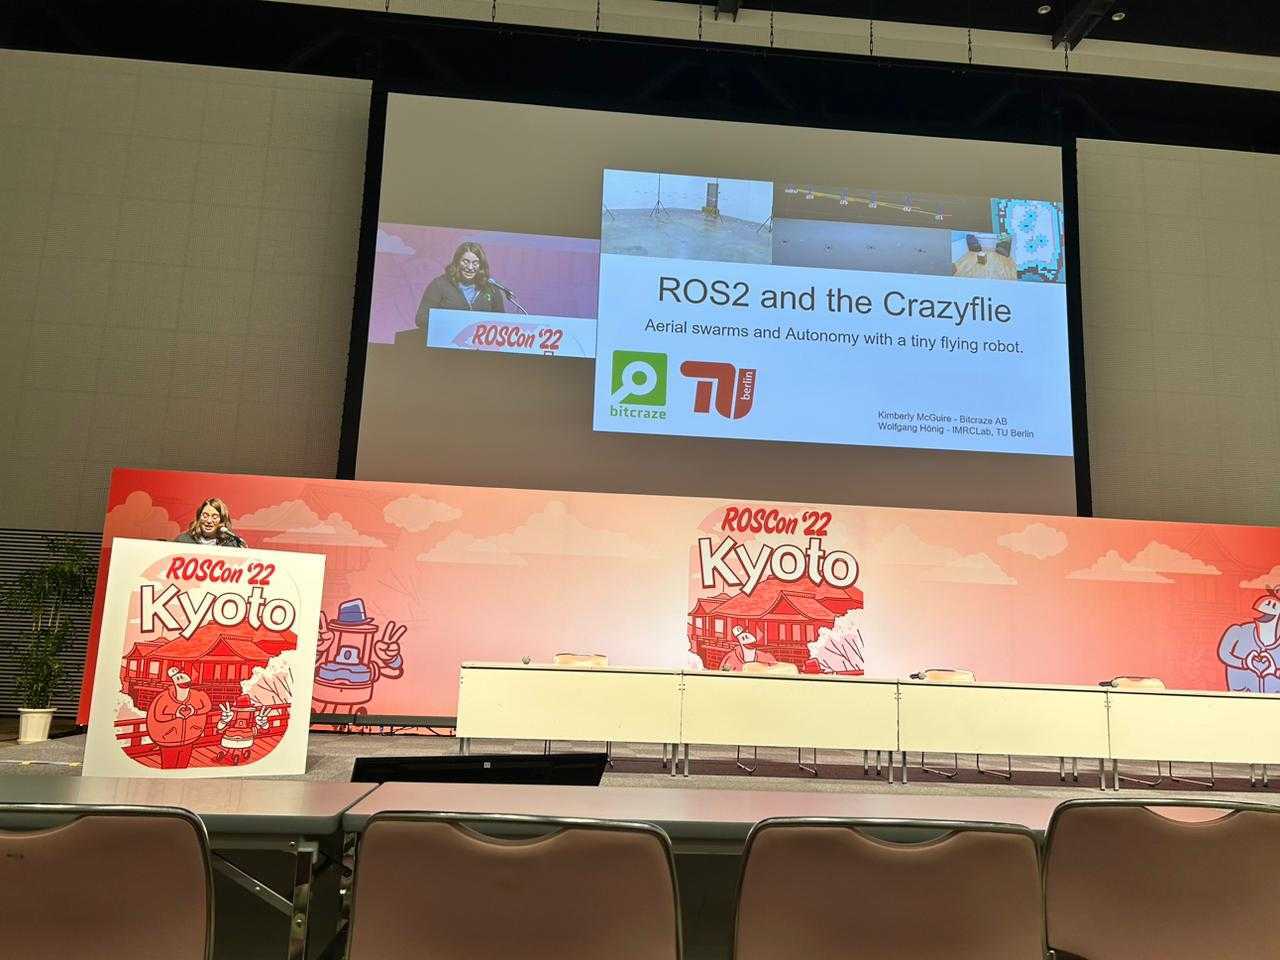
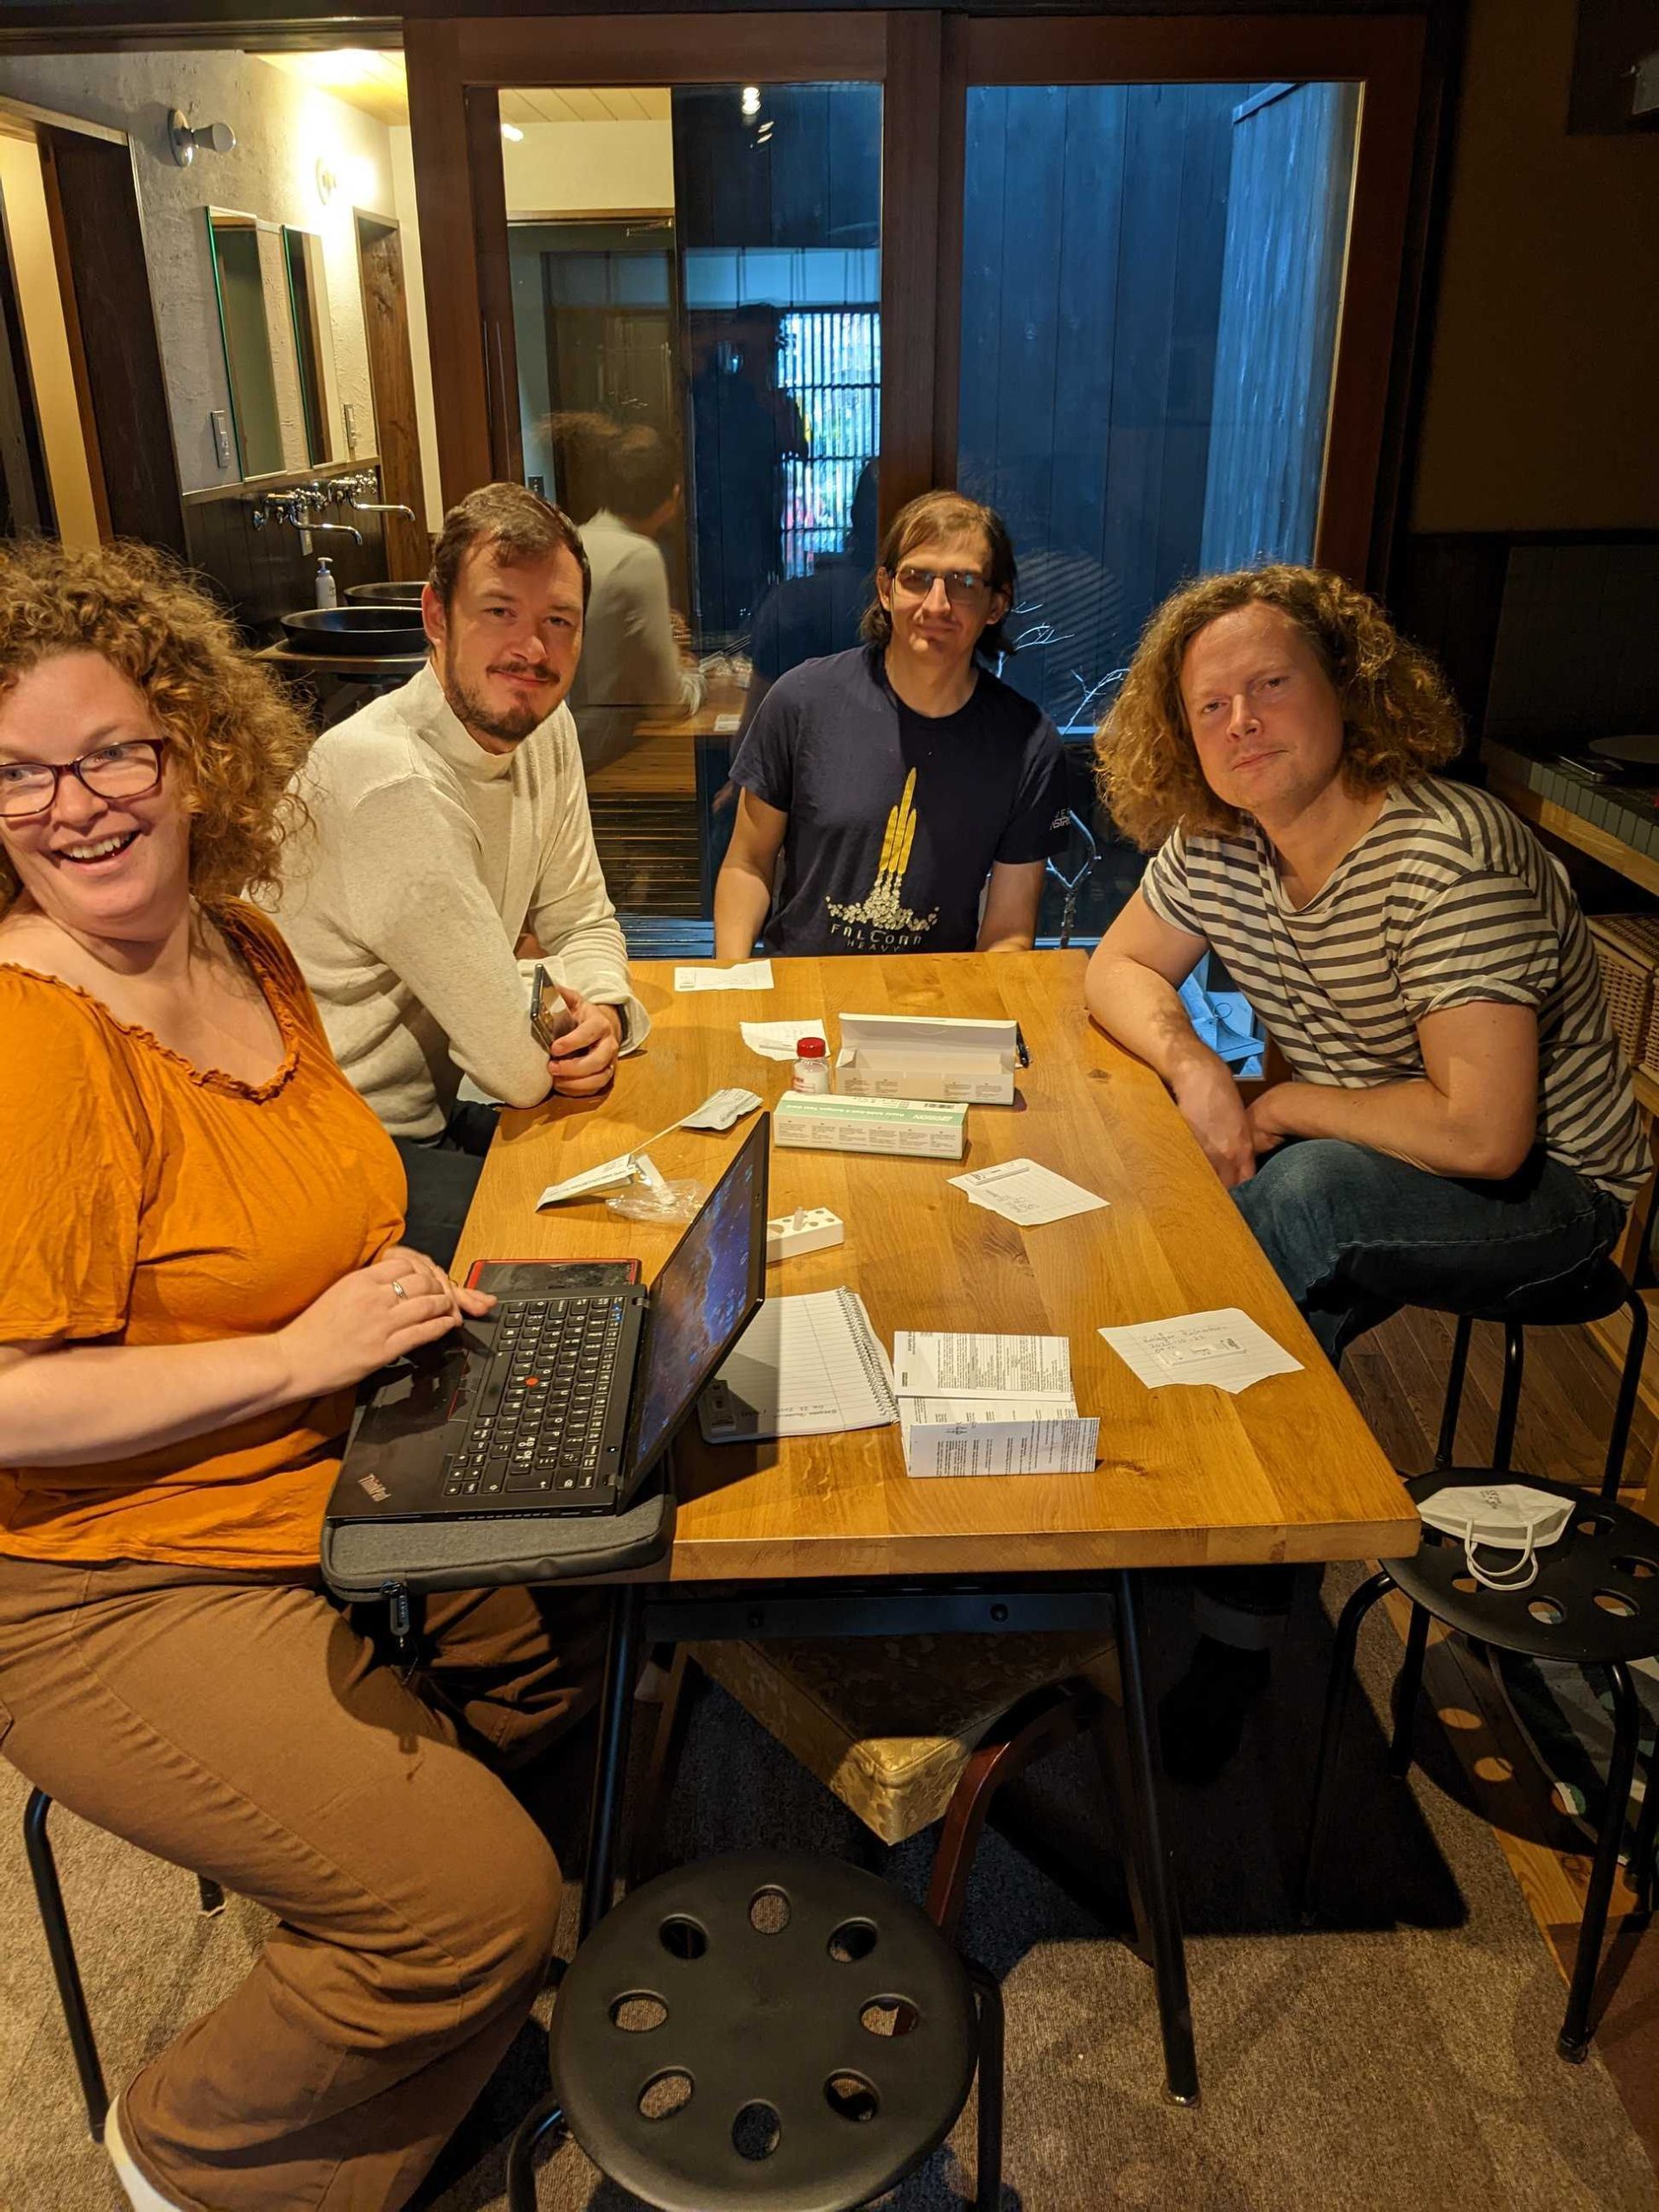
I already talked about it here and there, but this day finally came: the whole company is in Japan ! Kimberly travelled first, to account for jetlag, meet with some people, and attend ROScon.
It was last week, and she got the opportunity to learn a lot, meet people from the ROS community, and give an exciting talk.
Kimberly’s talk at RosCon (made by Ramón Roche)
Happy to be in Japan (Made by Ramón Roche)
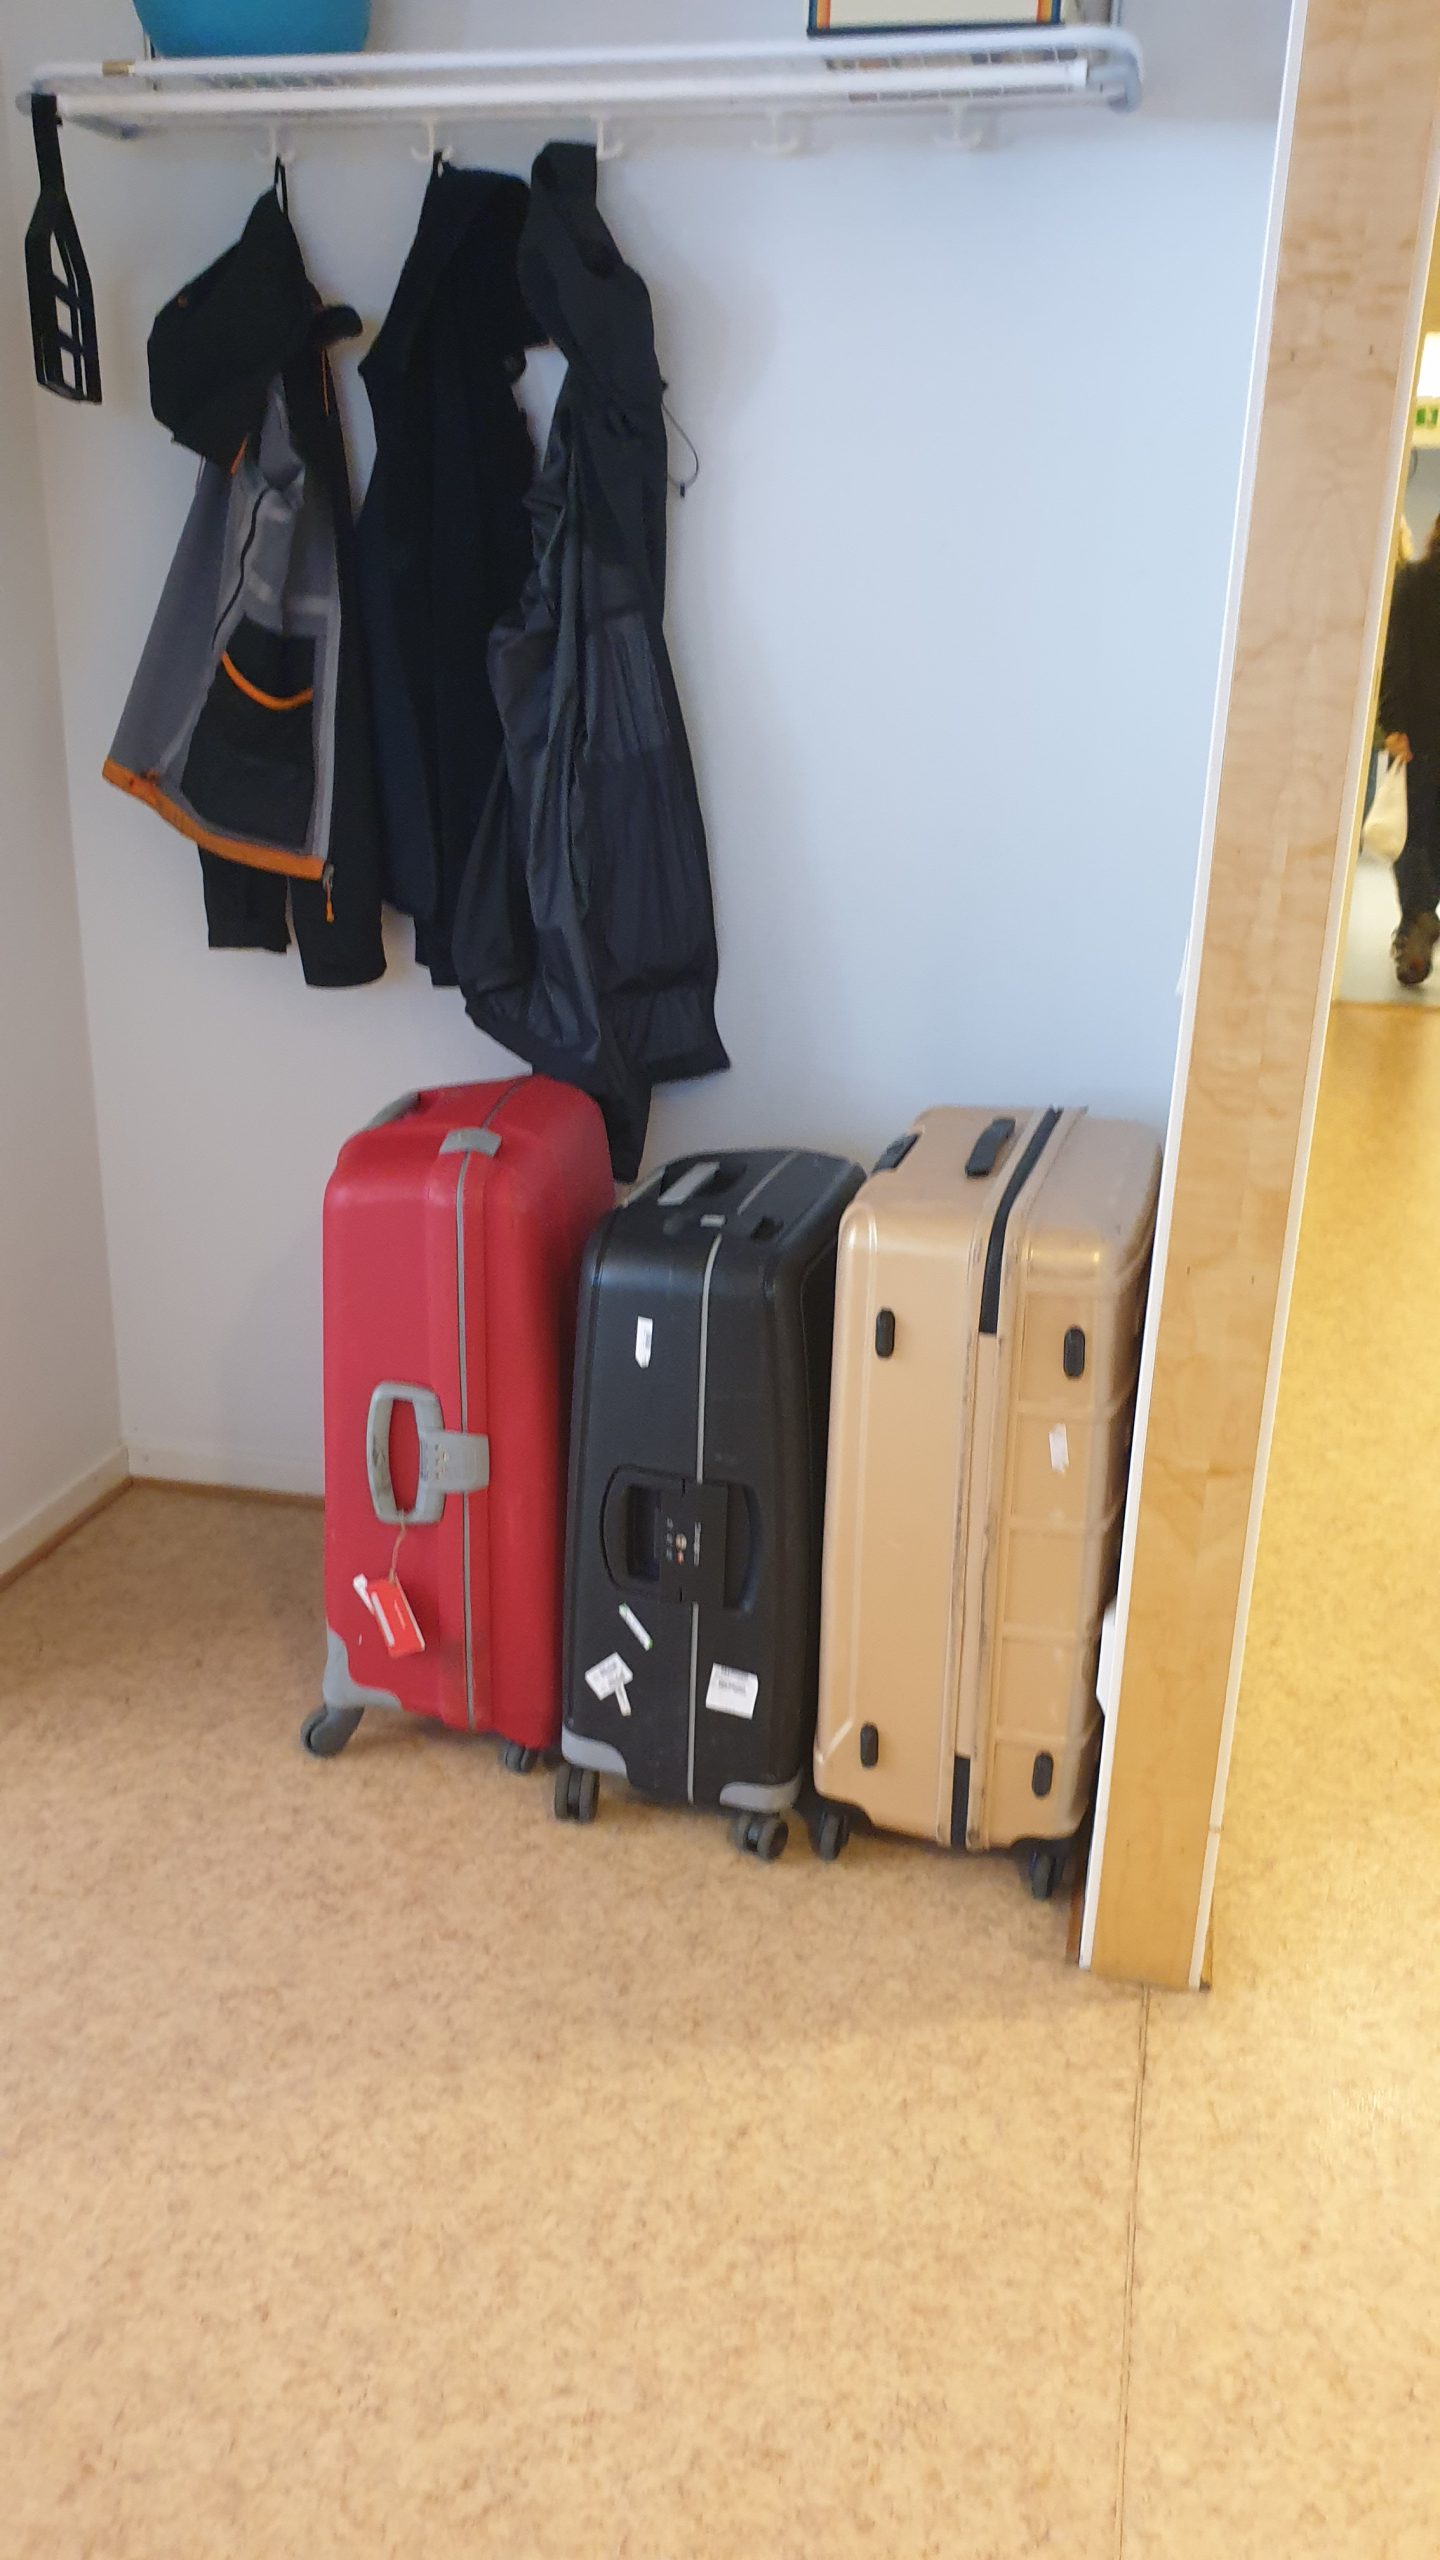
The rest of the company travelled last week with all the equipment needed divided into our suitcases.
Our suitcases at the office, to gather the materials before going
We chose to rent a traditional machiya while there, where we can all stay together and enjoy the life in the center of Kyoto.
Us chilling out in the Bitcraze mansion
Our first day here was to account for jetlag, but we managed to sightsee the amazing sites of Kyoto – and enjoy the most praised Japanese food, much appreciated after a long walk among the Tori gates of the Fushimi Inari shrine.
Us after climbing on top of Mt Inari – with the beautiful path of Tori gates
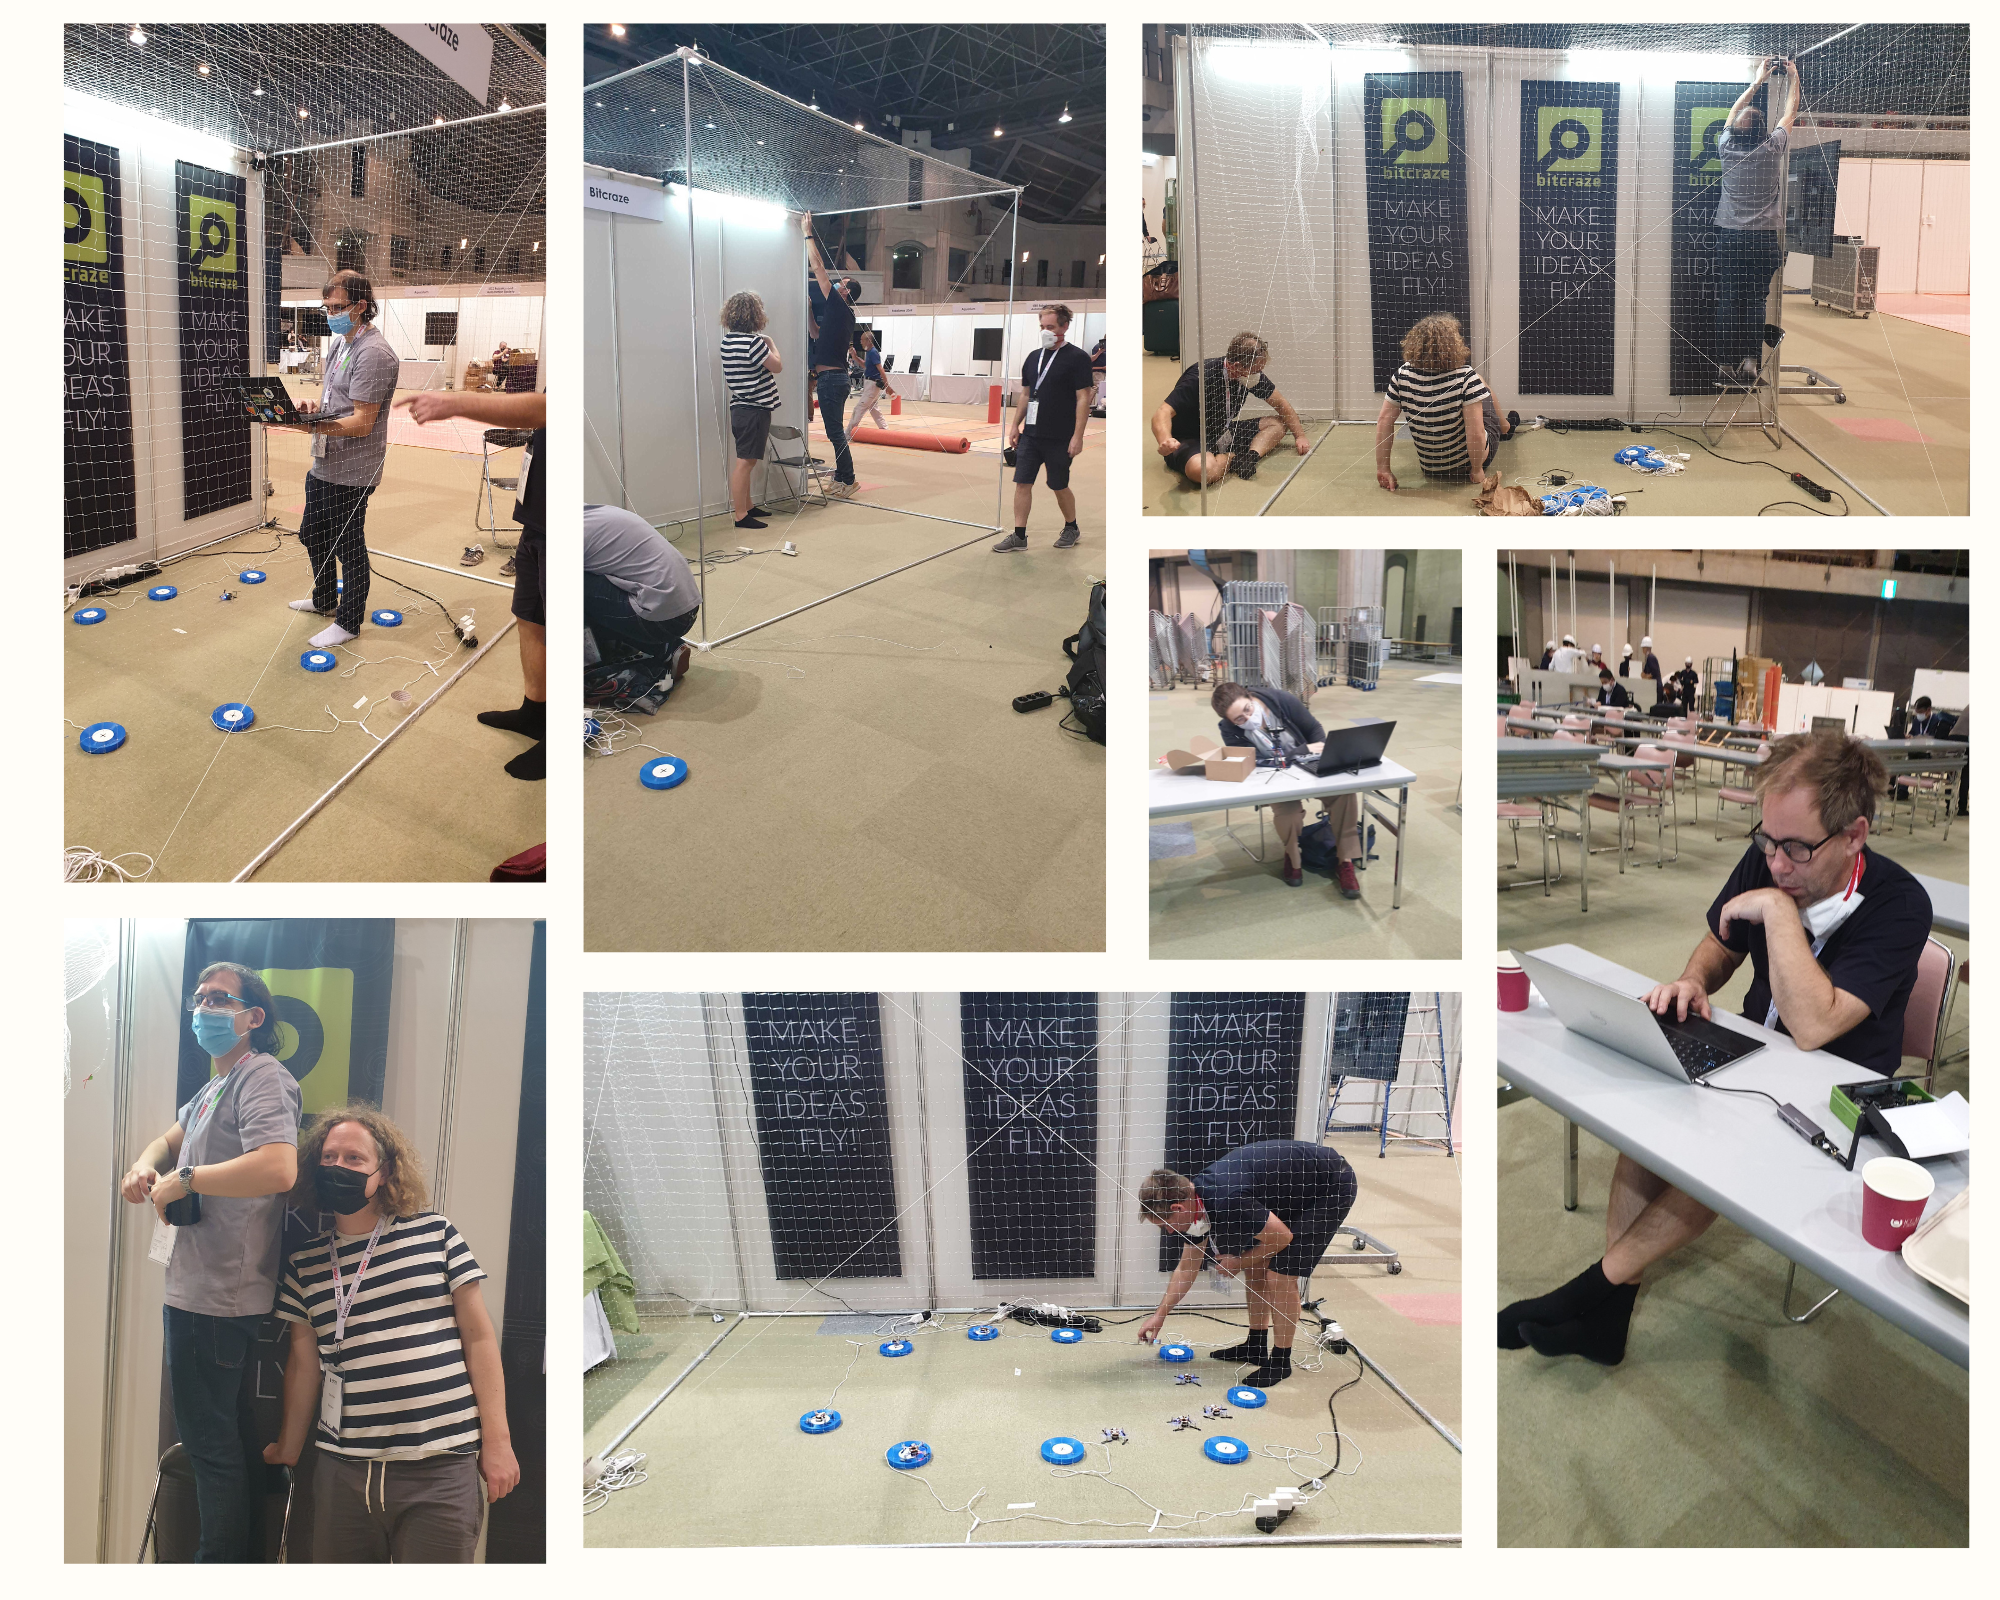
But it was soon time to start working, and yesterday we worked really hard on setting up everything to have a nice demo at IROS.
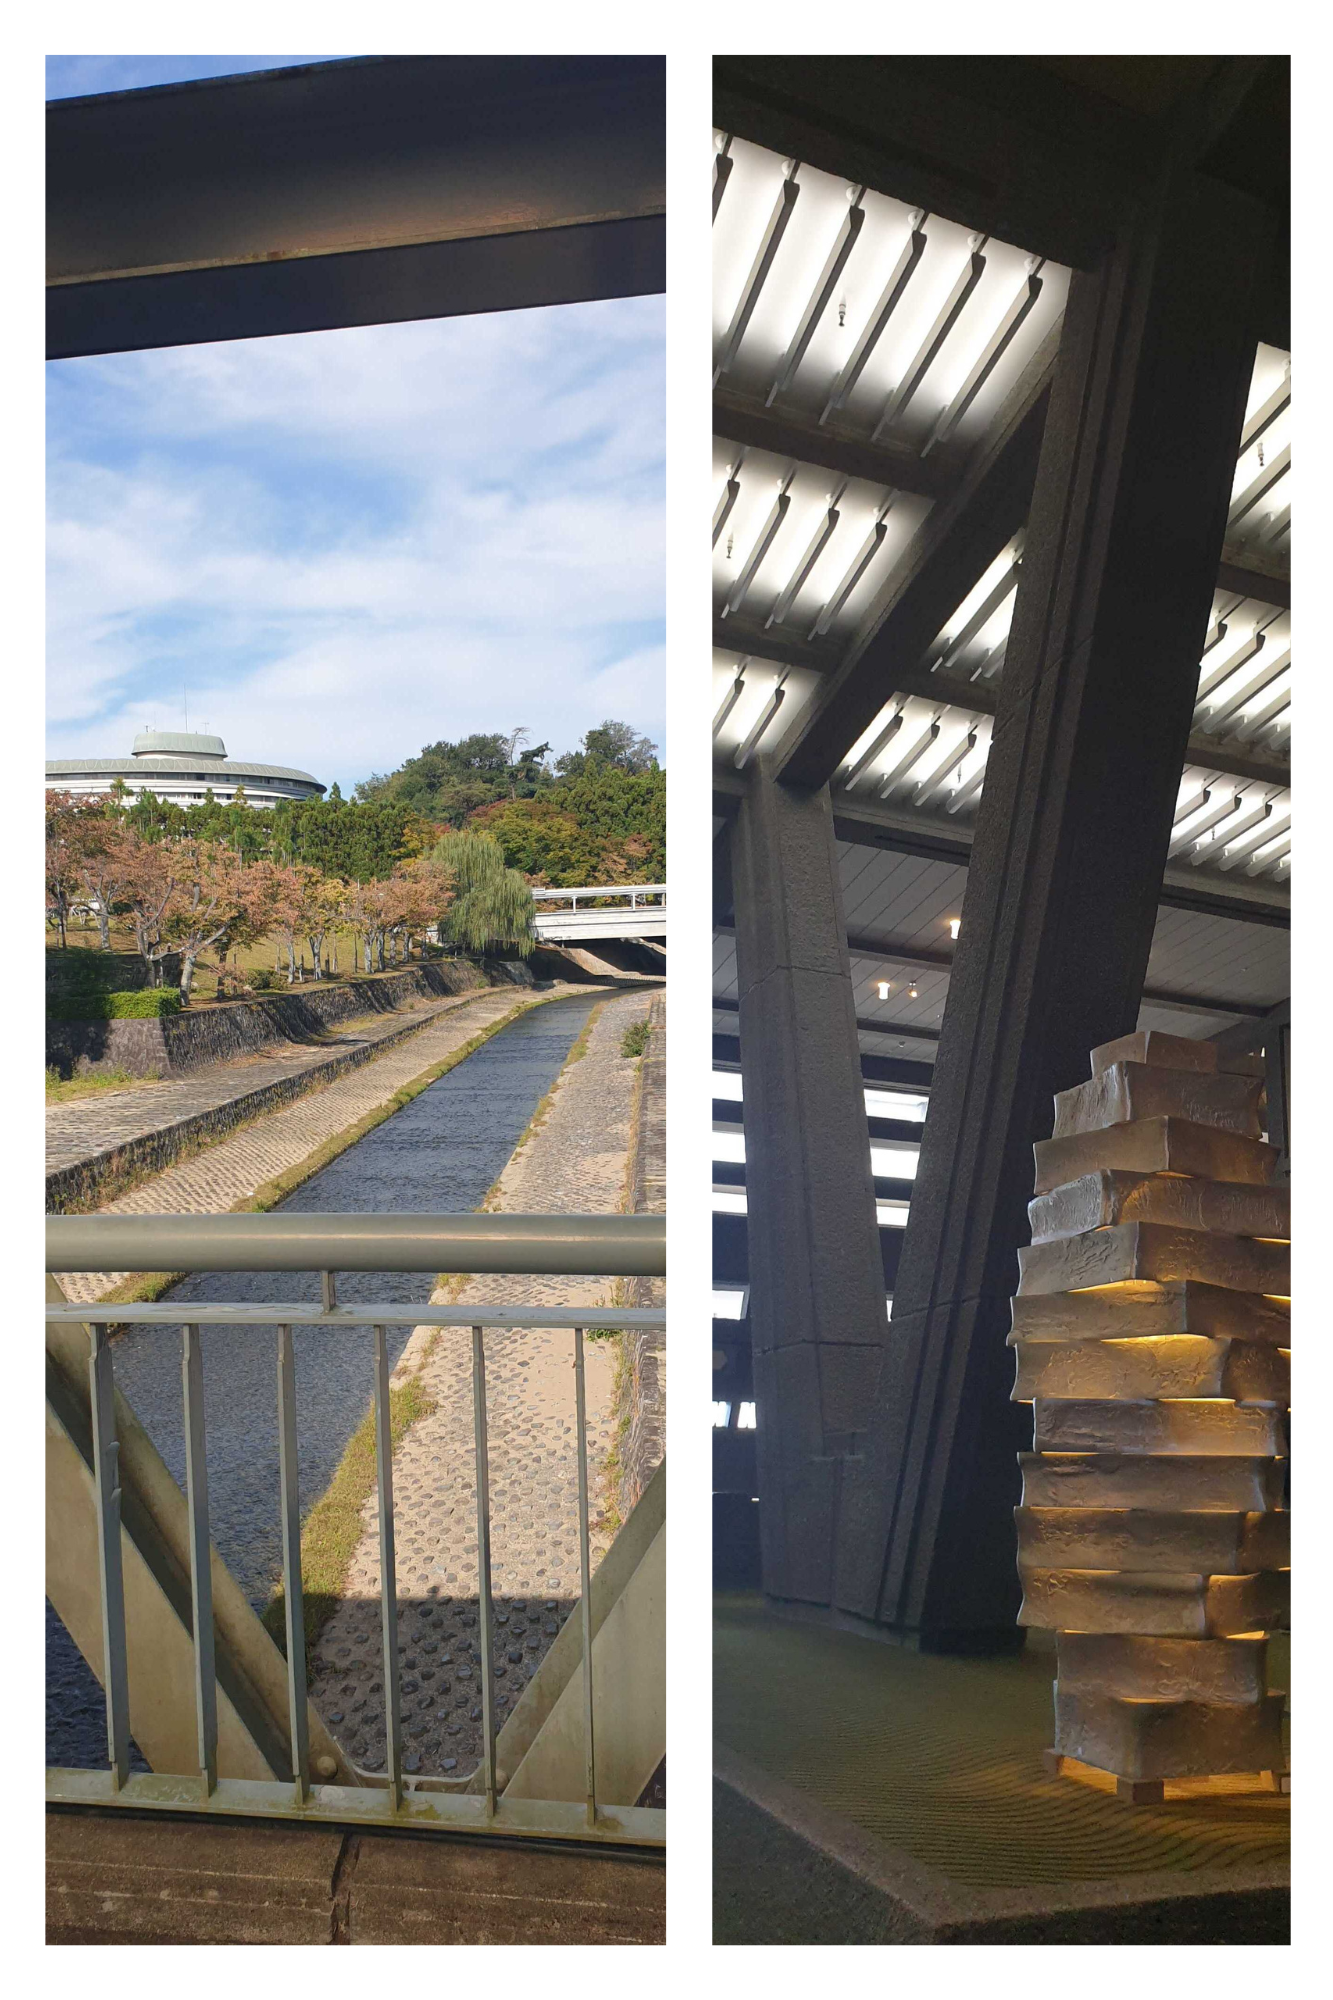
After some head scratching, emergency taping and hacking we managed to get the autonomous demo that Marios implemented last summer flying – just before the event hall We got time to explore the Kyoto International Conference Center, a beautiful venue with a Japanese garden and a futuristic look – as imagined in the 70′.
Some views from the Kyoto Conference Center
We invited those of you that are attending IROS to come and see us for a tech meet-up. It’s today and it would be a real nice opportunity for us to finally chat in person with our users ! Since there are a lot of aerial systems talks, we realize it may be difficult to come during the sessions, so the tech meet-up can begin during the break, at 15.40
Next up this week is the safe nanocopter competition. Kimberly will actually deliver the prize for that, we can’t wait to see what this competition will show – and how fun it is to remote-control the Crazyflies that are in the University of Toronto Institute for Aerospace Studies!
Of course, we will share some news on social media – and we will have a blogpost in a few weeks to debrief on the whole trip.
As you’ll understand, maintaining the day-to-day of the company is a little trickier this week, but we still monitor email, github discussions, and are shipping orders. You should just expect a longer time to process those, as we’re too busy – either at the booth or… at karaoke ! (no, there will be no videos of us singing).
Propellers of high quality and good balance has not been easy to find for drones in the Crazyflie size. Not that long ago HQ-prop released a propeller, 51MMX2GR-1MM-PC, with 51mm in diameter (2 inch) that could work well for the Crazyflie 2.1. HQ-prop is famous for making good propellers for FPV-drones and them releasing a 51mm propeller was quite exciting as this could be used on the Crazyflie. After getting some samples we tested them with a couple of different 7x20mm coreless bushed motors with different rpm/v (KV) values until we found a good match, a 13400 KV motor. With this motor the maximum thrust of a Crazyflie using a new charged battery reaches ~80 grams. This is ~40% more thrust then the stock Crazyflie 2.1 with a 60 grams of total maximum thrust. It does come at an expense of efficiency though and the hover time is reduced from ~7:00 to ~6:00 minutes.
Crazyflie 2.1 with 51mm propellers and 7×20 mm coreless brushed motors
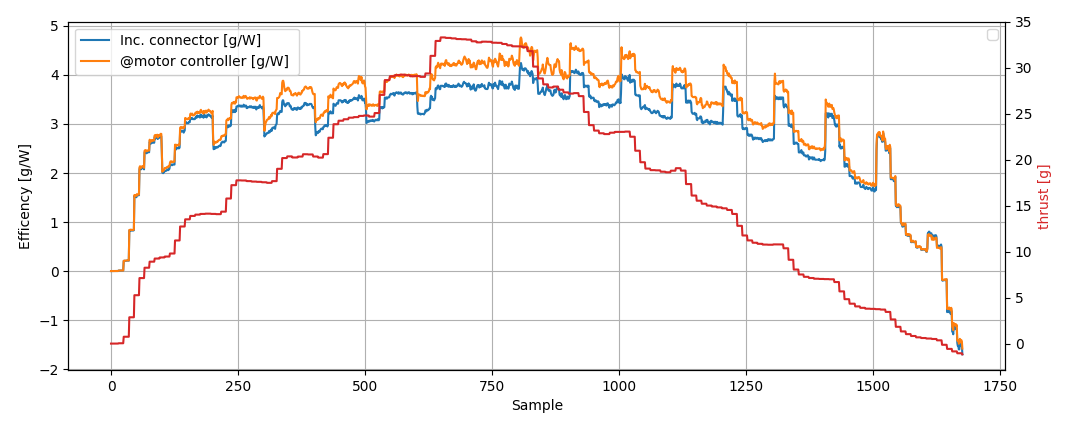
Using the thrust stand we wrote about and built earlier we can get an estimated value of the efficiency which is interesting in many aspects.
Instead of ramping up/down the PWM in very small steps as was done in the thrust stand post, the same test has been changed to do it in larger steps to make it easier to separate the changed efficiency effect when doing acceleration/deceleration. Another thing to note is that in this test the PWM was only ramped up to 50% as the RPM measurement sensor had trouble tracking the transparent-grey propeller at higher speeds. There are two lines graphing the efficiency where the blue line is the one including the losses in the connector which should be closest to the real overall efficiency. Following the blue line we can see that at ~33 grams of thrust we get ~3.8 g/W. Very similar to the stock Crazyflie 2.1 setup with 45mm propeller and 7×16 mm motor.
So if you are in a need for some more thrust because you are using many decks, or maybe just because you want more agility, be sure to watch out for the thrust upgrade kit that will be released during the fall!
IROS
The two coming weeks are going to be a little special for us: as written before, we’re going to Japan ! Kimberly is already there for ROSCon, but we will have a booth at IROS. If you’re there, don’t forget our tech meetup on Monday 24th of October at 16.00 at our booth 59.
The whole company is going there, so there may be some delays in handling emails and shipping from the end of this week.
As you probably noticed already, this summer I experimented with ROS2 and connecting the Crazyflie with multi-ranger to several mapping and navigation nodes (see this and this blogpost). First I started with an experimental repo on my personal Github account called crazyflie_ros2_experimental, where I managed to do some mapping and navigation already. In August we started porting most of this functionality to the crazyswarm2 project, so that is what this blogpost is mostly about.
Crazyswarm goes ROS2
Most of you are already familiar with Crazyswarm for ROS1, which is a project that Wolfgang Hönig and James Preiss have maintained since its creation in 2017 at the University of Southern California. Since then, many have used and referred to this work, since the paper has been cited more than 260 times. From all the Crazyflie papers of the latest ICRA and IROS conferences, 50 % of the papers have used Crazyswarm as their communication middleware. If you haven’t heard about Crazyswarm yet, please check-out the nice BAMdays talk Wolfgang gave last year.
Unfortunately, ROS1 will not be there forever and will be phased out anno 2025 and will not be supported for Ubuntu 22.04 and up. Therefore, Wolfgang, now at the Intelligent Multi-robot Coordination Lab at TU Berlin, has already started with the ROS2 port of Crazyswarm, namely Crazyswarm2. Here the same principle of the C++ based Crazyflie server and the python wrapper were been implemented, along with the simple position based simulation and Teleop nodes. Mind that the name Crazyswarm2 is just the project name out of historic reasons, but the package itself can also be used for individual Crazyflies as well. That is why the package names will be called crazyflie_*
Porting the Summer Hack project to Crazyswarm2
The crazyflie_ros2_experimental was fun to hack around, as it was (as the name suggests) experimental and I didn’t need to worry about releases, bugfixes etc. However, the problem of developing only here, is that the further you go the more work it becomes to make it more official. That is when Wolfgang and I sat down and started talking about porting what I’ve done in the summer into Crazyswarm2. This is also a good opportunity to get more involved with the project, especially with so many Crazyfliers using the ROS as well.
The first step was to write a second crazyflie_server node that relied on the python CFlib. This means that many of the variables I used to hardcode in the experimental node, needed to be defined within the parameter structure of ROS2. The crazyflies.yaml is where anything relevant for the server (like the URIs and parameters) needs to be defined. Both the C++ backend server and the CFlib backend server are using the same parameters. Also the functionality of the both servers are pretty similar, except for that logging is only possible on the CFlib version and uploading/follow trajectories is only possible on the C++ version. An overview will be provided soon on the Crazyswarm2 documentation website.
The second step was to make the crazyflie_server (cflib) node suitable to be connected to external packages that I’ve worked with during the hack project. Therefore, there are some special logging modes, that enables the server to not only output topics based on logging, but Pose/Odometry/LaserScan messages along with Transforms. This allowed the SLAM_toolbox to use the data from the Crazyflie itself to create a map, which you can see an example of in this tutorial.
Moreover, for the navigation it was important that incoming Twist messages either from keyboard or from a navigation toolkit were handled properly. Most of these packages assume a 2D non-holonomic robot, but a quadcopter like the Crazyflie needs to first take off, stay in the air and land. Therefore in the examples, a separate node (vel_mux.py) was written to receive incoming Twist messages, first have the Crazyflie take off in high level commander, and keep sending hover commands to keep it in the air until a land service is called.
What’s next?
As you probably noticed, the project is still under development, but at least it is now at a good state that we feel comfortable to presented at the upcoming ROScon :) We also want to include an more official simulation package, especially now that the Crazyflie has recently became part of the official release of Webots 2022b, but we are currently waiting on the webots_ros2 to be released in the ubuntu packages. Moreover, the idea is to provide multiple simulation backends that based on the requirement of the topic (swarms, vision-based etc), the user can select the simulation most useful for their situation. Also, we would like to even out the missing items (trajectory handling, logging) in both the cflib and cpp backend of the crazyflie_server so that they can be used interchangeably. Also, I saw that the experimental simple mapper node has been featured on social media, so perhaps we should be converting that to Crazyswarm2 as well :)
So once we got the most of the above mentioned issues out the way, that will be the time that we can start discussing the official release of a ROS2 Crazyflie package with its source code residing in the Crazyswarm2 repository. In the meantime, it would be awesome that anybody that is interested in ROS2, or want to soon upgrade their Crazyswarm(1) packages to ROS2 to give the package a whirl. The more people that are trying it out and report bugs/proposing fixes, the more stable it becomes and closer it will come to an official release! Please join us and start any discussions on the Crazyswarm2 project github repository.