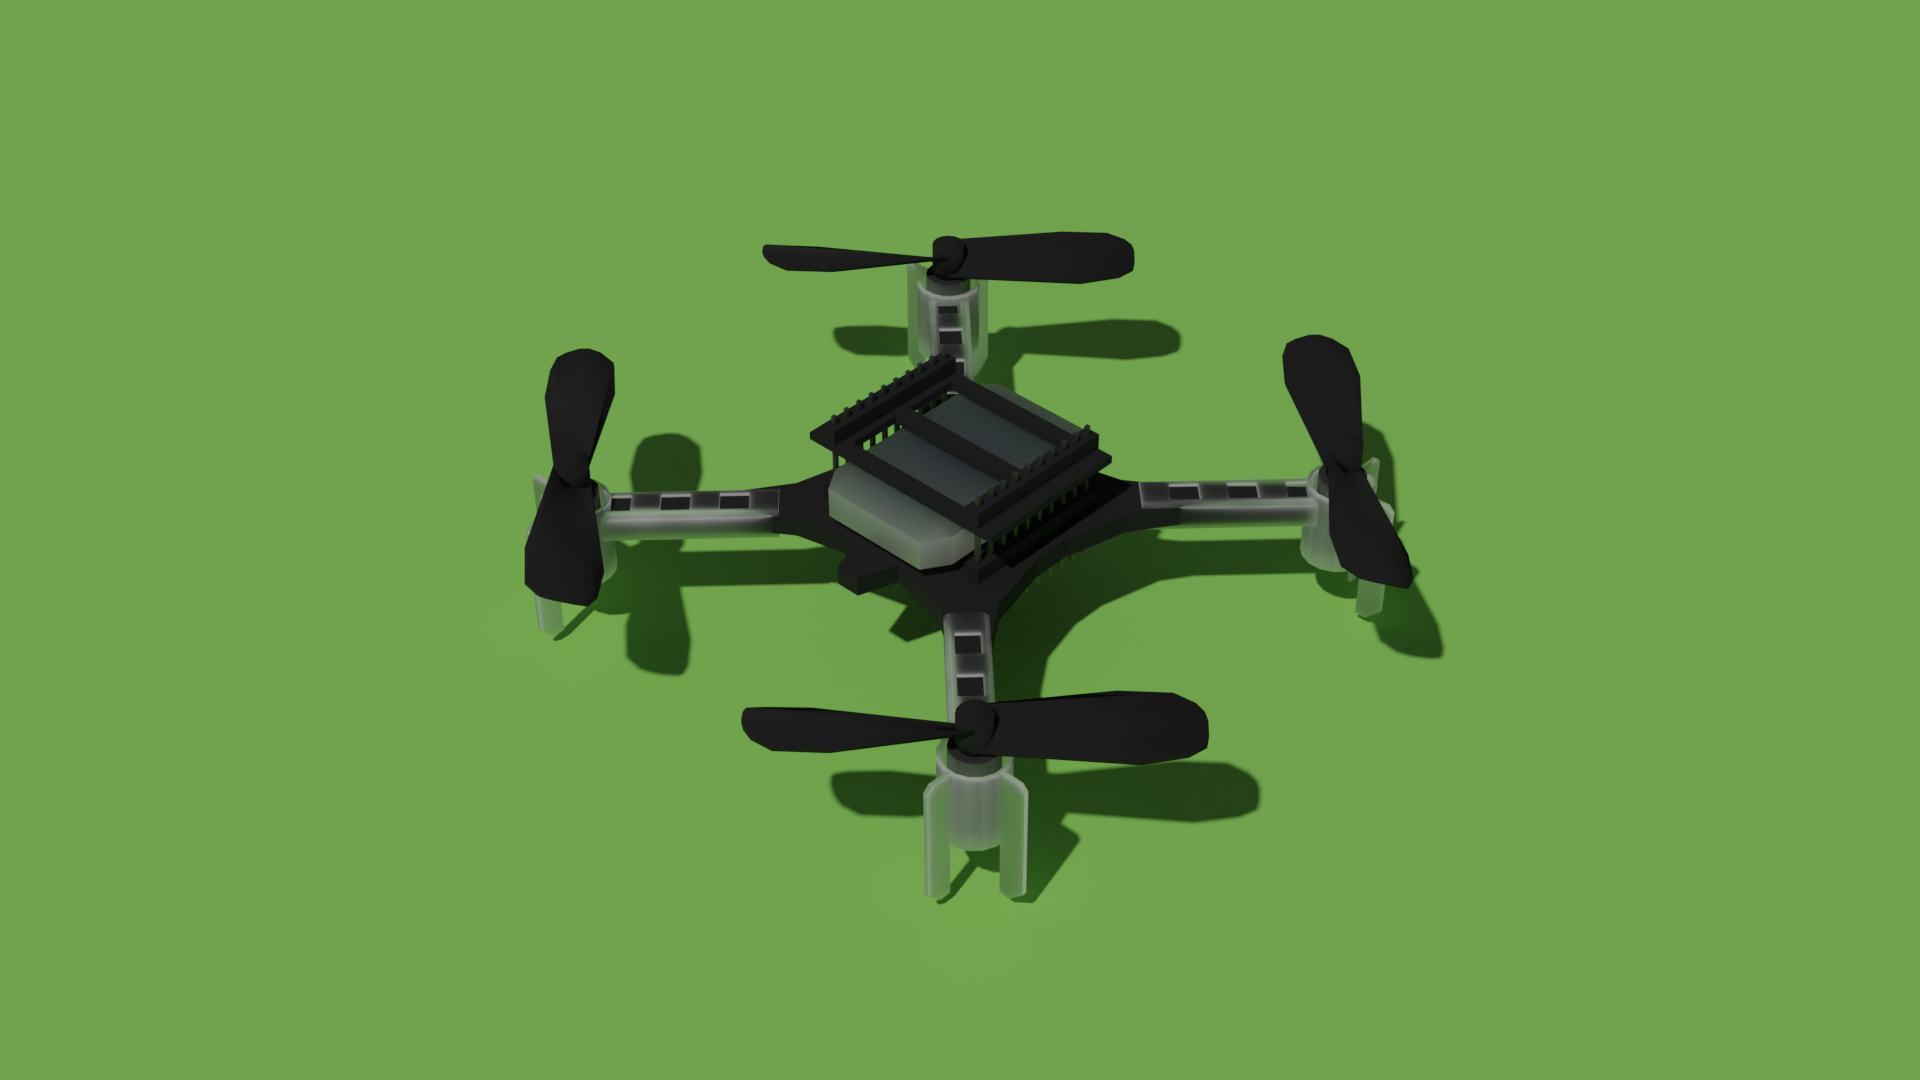
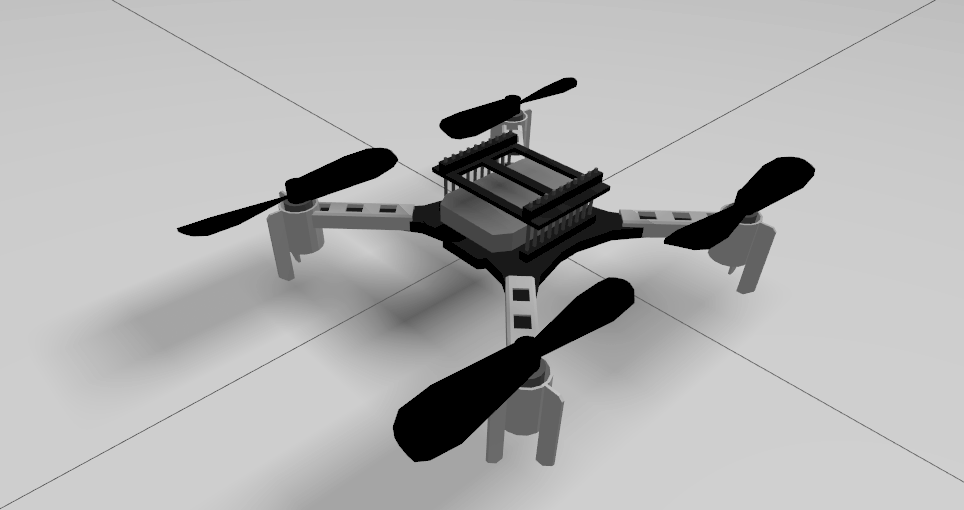
We have worked hard last week to get a new fresh release out before the summer months are on our doorstep. Not only that we would like to make sure that important bugs are fixed before some of us go on our holiday, but also to be able to display our new AI deck features! Here is an overview of what has been changed
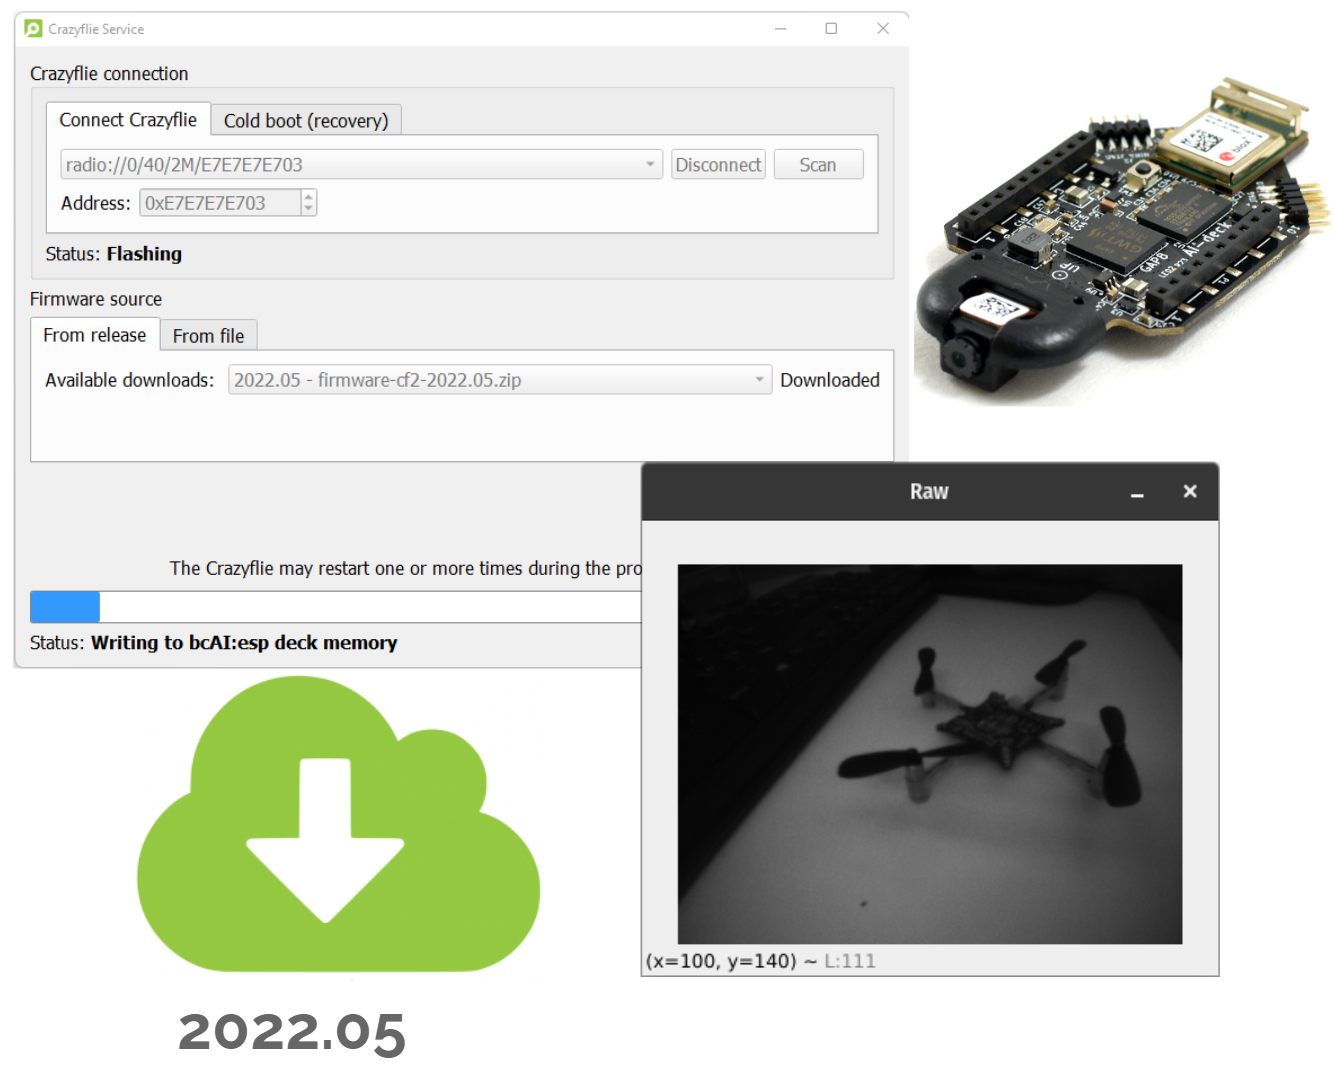
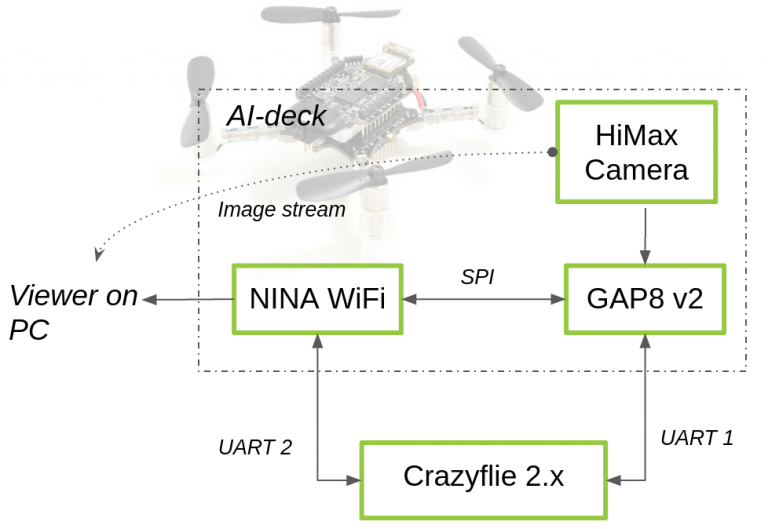
AI deck over air flashing
As you can probably see in the release notes of both the python libraries and the firmware, most of our changes are focused on making it possible to develop for the AI deck without using a programmer all the time. If the STM and NRF firmware of the Crazyflie is fully updated, and the ESP firmware on the AI deck, it should now be possible to flash an AI deck example binary with a Crazyradio! For older versions of the AI deck 1.X (Rev A to C) it is unfortunately still necessary to use the JTAG programmer one last time to flash a bootloader on the GAP8, but after that it should not be needed anymore.
In the light of the work we have done for the AI deck, we also have started to implement a new, inter MCU protocol called the Crazyflie Packet Exchange. Since with the AI deck, we are adding 2 additional microprocessors to the Crazyflie architecture, it was crucial to handle the communication between all platforms and communication channels properly. Currently the functionality is mostly enabled to tailor Wifi streaming and console printouts for the AI deck, but it is meant to be a generic protocol which in the future, should be able to handle more combinations like for instance, command messages through wifi?
For the last part of the Grand tour trip, we had a hackathon with the IMRC lab of TU Berlin and our close collaborator Wolfgang Hönig, in which we managed to convert the PID controller, Mellinger controller and the motor mixing into python bindings, which can be used in the experimental simulator of the Crazyflie.
There is no Pypi release of these, you will need to pull the latest crazyflie-firmware repo and build the bindings with ‘make bindings_python’
Additional fixes
We have some additional fixes to both the python libraries and firmware. For the STM we have updated the STD peripheral library and solved several build issues. For the cfclient, we fixed a lot of issues that were caused by either the latest version of python, as it was more stricter with type definitions, and some issues QT. Moreover, the LED ring headlight functionality has been restored, and the cfbridge.py script, used for the PX4 crazyflie 2.1 tutorial, is re-added, since it suddenly disappeared a few releases ago.
Update and Feedback
Make sure to update your cfclient with ‘pip install cfclient –upgrade’ and to reflash the new stable firmware. For AI deck users, try out our our new tutorial to try out both CPX, the over air flashing and the wifi example. The new AI deck functionalities has been subjected to some limited testing so if there is anything wrong or unclear, please let us know in the forum! The feedback will help the AI deck to become a more stable product for development, so we would be very grateful if you would be able to help out with that.
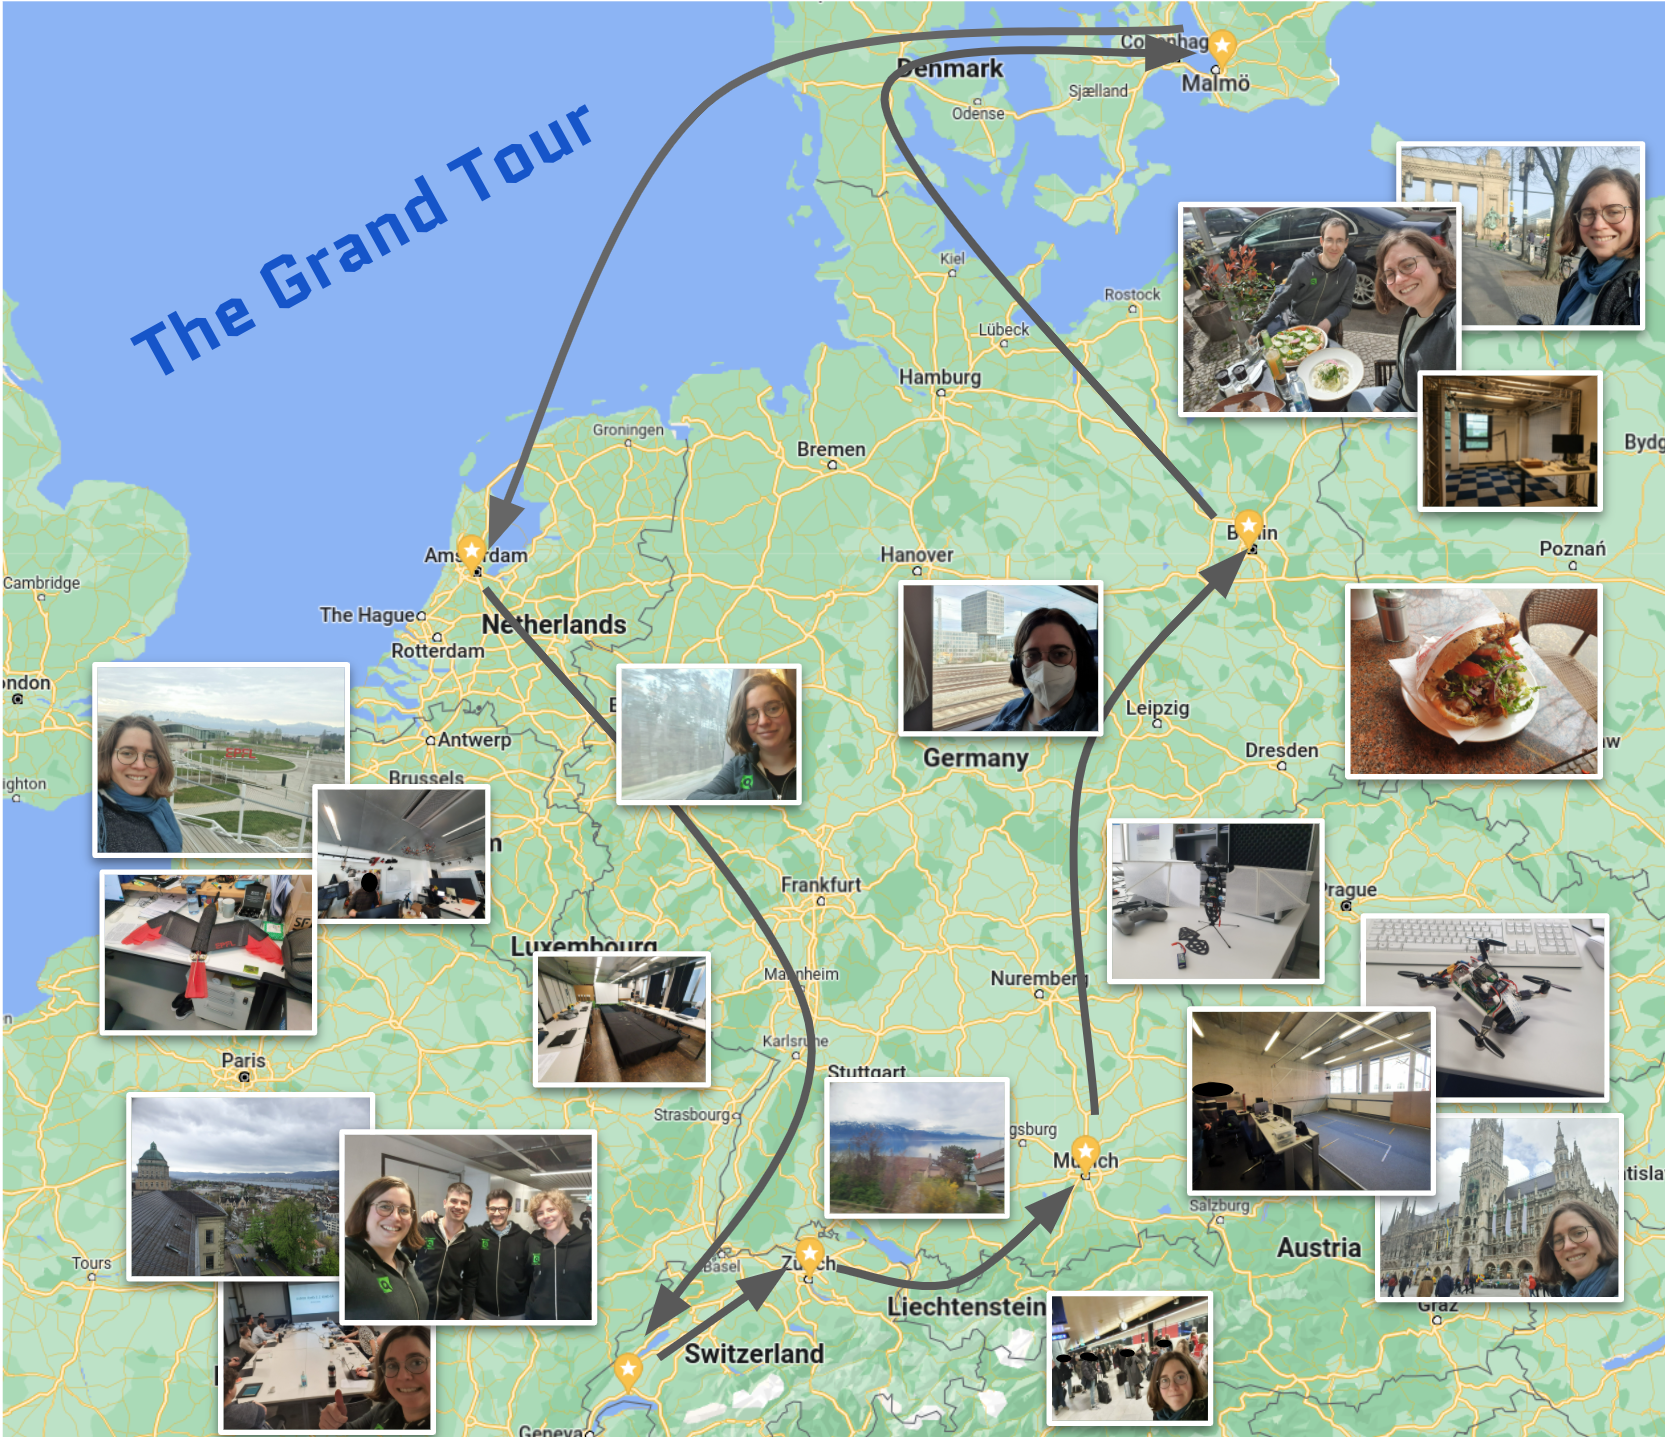
If anybody noticed a delay of my response on emails, forum or Github, that might be due to the fact that I was on the road for Bitcraze for the last few weeks! I was invited to give a guest lecture for a course at EPFL, and of recent they have a CO2 reducing policy regarding travel. At Bitcraze we also aim for reducing our environmental impact, so hence the idea came forth to travel to Switzerland and visit our close collaborators that are nearby(ish)… all by train! Internally we dubbed this to be The Grand Tour.
The Itinerary
We kept the itinerary mostly within Switzerland and Germany, although I did pass the Netherlands a few days just to visit family. The full itinerary by train was:
Utrecht (NL) -> Lausanne (SW) -> Zürich (SW) -> Munich (GE) -> Berlin (GE) -> Malmö (SE)
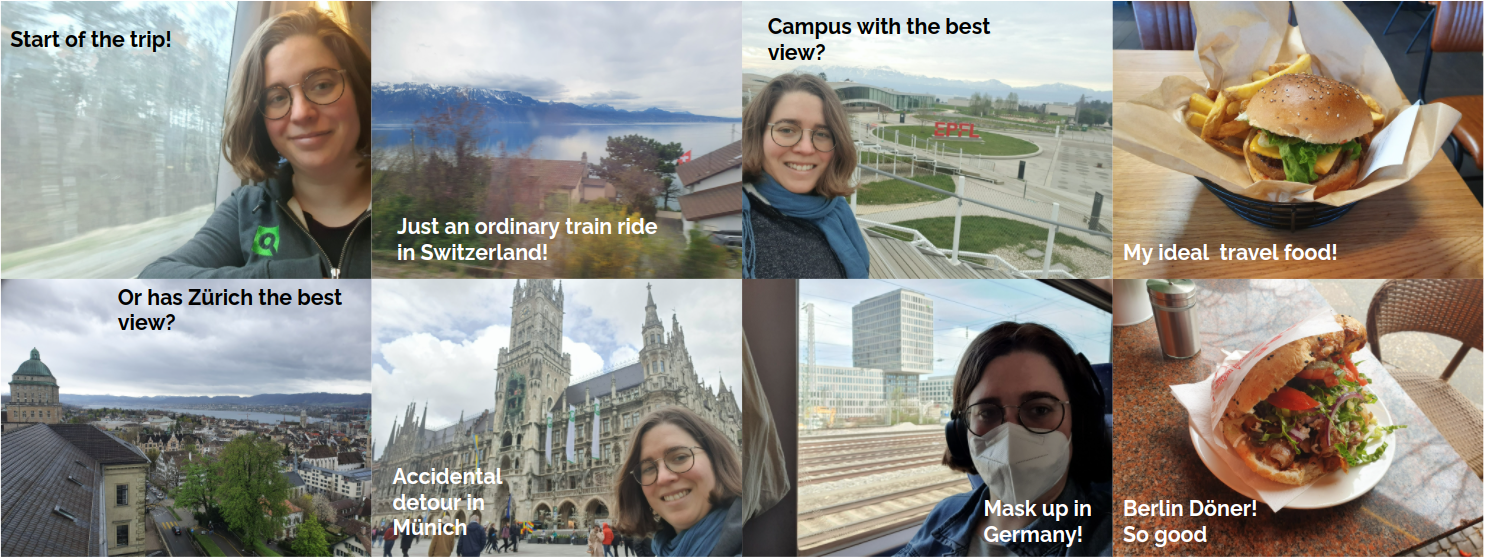
The longest train ride was from Utrecht to Lausanne (9 hours), but all the others were well under 4 hours which was pretty comfortable. The nice thing about being in the train is that it quite easy to work on your laptop (although the wireless network + onboard WiFi was still patchy). Luckily I was able to actually phone in for Bitcraze’s morning meetings so that I wouldn’t miss a thing.
Here are some pictures of the in-between travels, with the views, trains and food. It was all awesome, but if I do have to make a confession… the train rides through Switzerland was the most beautiful of all!
Travelling through Switzerland and Germany
The People
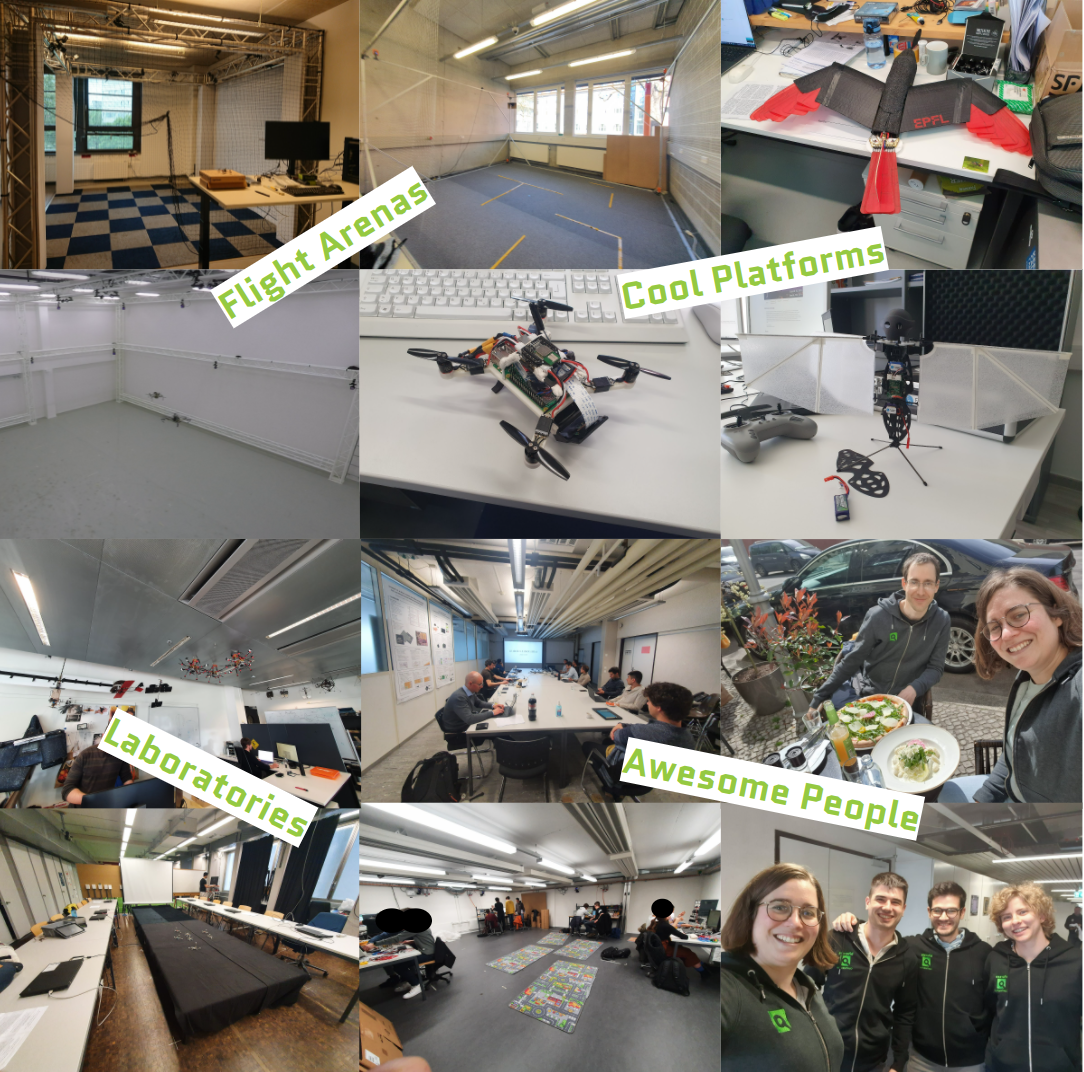
The first two days in Lausanne went quite smoothly. Dario Floreano of the Laboratory of Intelligent Systems (LIS) invited us to give a Crazyflie 101 lecture to the students of the Aerial Robotics course, for which we are very grateful for the opportunity. It was great to do the talk in person this time and visit the EPFL campus, since the last two years I’ve given the same lecture from my own kitchen. I was able to see the students trying to start up the course themselves, and actually got to experience how they would install the Crazyflie framework. Next to my lecture, I was given a very nice tour through the offices, laboratories and work-spaces, where I had the possibility see all the nature inspired drone designs of the LIS-lab. In the meantime I also squeezed in a quick but fun visit with Cyberbotics, the creator of Webots, to discuss our latest efforts for a crazyflie simulator.
After a beautiful train ride towards Zurich, I first met up with the people of the Automatic Control lab (ACL), who made a video about how they handled education with the Crazyflie during the harsher COVID times. Now I got a chance to see the flight room where students are able control their Crazyflie down to the rate attitude controller. Moreover, I was treated to a full workshop, hosted by ETH Zürich’s Integrated Systems Lab (IIS) and Center of Project Based learning (PBL), joined by researchers from ETHZ, University of Bologna and IDSIA (Lugano) working on the PULP platform and/or nano-drones. The workshop consisted of them and us showcasing our current work, future plans and they showed me very impressive demos with both the AIdeck and their own prototypes decks! Complete that with a lunch with one of the best views any campus has to offer, coffee break talks, and you have a very inspiring day.
The third part of the trip took place in Germany! My first stop was near Munich, namely Hochschule Augsburg, where I visited the Cooperative Control Lab lead by Klaus Kefferpütz where we had great discussions about collaborative swarms and state estimators. They showed their lab with demos, and we spoke about positioning systems and how to improve their development experience. They are currently integrating the Bolt with a Raspberry Pi with the latest functionalities we implemented into our firmware, which we can imagine is a very wanted feature by the community! I also had a brief visit at TU Munich as well to visit my friend Sophie Armanini from the eAviation and Sustainable Flight Group, and to my surprise I got to fly with a Crazyflie Bolt fueled Flapper drone!
As my final stop, I visited Wolfgang Hönig from the Intelligent Multi-Robot Coordination Lab (IMRC) at TU Berlin. Here we discussed all about Crazyswarm, simulations and firmware python bindings among many things. Also, we had a successful hackathon where we managed to generate python bindings of the Mellinger & PID controller and the motor mixing. On top of that, we managed to fly with the PID binding in the Webots simulator, which has been on the wish list for a little while now. It was great working together again in person after 1.5 years!
Collection of the tours, the platforms and the people I’ve met!
The Insights
It was great to see all the different ways that our products are used and what matters to the community members were dealing with. I’ve visited labs that tweak the attitude rate controllers, trying to improve the quality of the state estimators, or experiment with the actual mechanics. However, it was clear to see that quite some were controlling the Crazyflies on a higher level of autonomy, either off-board or onboard. This is all spread out over education and research alike, so there is a very wide range of people that are working with the Crazyflie.
There is of course also a huge variety in their approach. Some used our internally development framework with the Cflib and cfclient, and I’ve generated quite some new Github tickets in those respective repositories based on the discussions I had. However, it was interesting to see that many have made their own clients to tailor more to their research and education objectives. Moreover, about half of the users I met used ROS to interact with the Crazyflies. Is it perhaps a sign that we should start to rethink the communication infrastructure and how it all fits together?
There was also quite the difference on how close these users were on our latest changes. It ranged from working on a branch forked 4 years ago to being on the very edge of the commits, which each have their pros and cons. Working on a stable branch that has been proven worthy might be beneficial with education classes, but also makes people miss out on new features like the new lighthouse integration. However, it is not all fine and dandy on the edge of development either, as I have heard of many having issues with the new kbuild intergration, installing the cfclient or our latest efforts of getting the AIdeck out of early access. That is something that these pioneers has to deal every time they merge the new master, so we need to find better ways to make it easier for them as well.
And last but not least, it seems that the simulation we have been working on has generated quite the buzz, as most of whom I spoke to were quite interested in it, or has used a different simulation for their purpose. It was clear that there is not yet a standard simulator for aerial robotics that can fulfill everybody’s requirements in terms of swarming, (vision-based) autonomy or control. Perhaps that is a good reason to promote the simulation work from Fun-Fridays to a regular day project and have some interesting future discussions with the community how to shape this to most of our needs.
The Conclusion
All and all, those were very inspiring 2 weeks of travel for me. Even though physically I was a bit exhausted afterwards, mentally it was very motivating and inspiring! After two of the worst years of the pandemic it was great to talk to people in person and I really feel stronger connections with those I visited than the remote video calls we have done before. It is so important to stay in touch with the community in person, after so long time of absence, as we get a better sense of what the needs are and how people are using the Crazyflie and its ecosystem. The Grand Tour was according to us a great success, and who knows…. perhaps we will do an 2023 edition as well :)
There is a new fresh release of both the firmware and the python library and client! The last release (2022.01) was from 2 months ago but we already added quite some extra functionality so we wanted to make a snapshot of this before continuing on other priorities.
Kbuild on CF firmware
One of the biggest changes that you will notice, is that there is now a new way to configure your Crazyflie firmware before building it. The old config.mk is gone and you will now need to either automatically generate a config file or generate one with the menuconfig, of which kbuild is most known for. For more information, please read the blogpost about this latest change, for the exception that we do prefer the users to use ‘make cf2_config’ as instructed in the 2022.03 version of the repo documentation.
Platform support for Bolt
We now defined the Bolt as a different platform. That means that for each release, there should now also be a bolt flavor zip file, next to the cf2 and tag zips, as you can see in the release page. Moreover, if you want to build the firmware to be Bolt compatible, you would first need to do ‘make bolt_defconfig’ to generate the needed configs with kbuild. For more information of how to add your own custom platform, please check out these instructions.
2+ Lighthouse base stations (experimental)
For those that feel constrained by the max 2 lighthouse base station support in the firmware and client, this functionality is now part of the release. This blogpost will explain more about this, and it is still experimental in nature, as you would need to reconfigure the firmware with… you guessed it: Kbuild! Also the geometry estimation needs to be done as a separate python script as well all from the Crazyflie python library. No worries, if you still prefer using the cfclient, it still uses the old way of estimating if you click the button, but just remember that you would need to do something extra in order to get 2+ base station support.
New VM release
We were also made aware of a pretty big error in the bitcraze VM, namely that we still used the old git:// type url for github repositories. IN the new release of the bitcraze VM this should be fixed, so please download the new one, or fix it yourself in your current VM by changing the remote URLs of the github repos you are working on to https://.
In December we had a blogpost where we gave an overview of existing simulation models that were out there. In the mean time, I have done some work during my Fun Fridays to get this to work even further. Currently I moved the efforts from my personal Github repo to the Bitcraze organization github called crazyflie-simulation. It is all still very much work in progress but in this blogpost I will explain the content of the repository and what these elements can already do.
Low Poly CAD model
The first thing that you will need to have for any simulation, is a 3D model of the Crazyflie. There is of course already great models available from the CrazyS project, the sim_cf project and the multi_uav_simulator, which are completely fine to use as well. But since we have direct access to the exact geometries of the real crazyflie itself, I wanted to see if I could abstract the shapes myself. And also I would like to improve my Blender skills, so this seemed to be a nice project to work with! Moreover, it might be handy to have a central place if anybody is looking for a 3D simulation model of the Crazyflie.
For simulations with only one or a few Crazyflie, the higher resolution models from the other repository are absolutely sufficient, especially if you are not using a very complicated physics geometry model (because that is where most of the computation is). But if you would like to simulate very big swarms, then the polygon count will have more influences on the speed of the simulation. So I managed to make it to 1970 vertices with the below Crazyflie model, which is not too bad! I am sure that we can make it even with lesser polygons but this is perhaps a good place to start out with for now.
In the crazyflie-simulation, you can find the Blender, stl files and collada files under the folder ‘meshes’.
Webots model
We implemented the above model in a Webots simulator, which was much easier to implement than I thought! The tutorials they provide are great so I was able to get the model flying within a day or two. By combining the propeller node and rotational motor, and adjusting the thrust and drag coefficient to be a bit more ‘Crazyflie like’, it was able to take off. It would be nice to perhaps base these coefficients on the system identification of the Crazyflie, like what was done for this bachelor thesis, but for now our goal is just to make it fly!
It would then be possible to control the pitch and roll with the arrow keys of your keyboard while it is maintaining a current height of 1 meter. This is current state of the code as of commit 79640a.
Ignition Gazebo model
Ignition will be the replacement for Gazebo Classic, which is already a well known simulator for many of you. Writing controllers and plugins is slightly more challenging as it is only in C++ but it is such a landmark in the world of simulation, it only makes sense that we will try to make a Gazebo model of the Crazyflie as well! In the previous blogpost I mentioned that I already experimented a bit with Ignition Gazebo, as it has the nice multicopter motor model plugin standard within the framework now. Then I tried to make it controllable with the intergrated multicopter velocity control plugin but I wasn’t super successful, probably because I didn’t have the right coefficients and gains! I will rekindle these efforts another time, but if anybody would like to try that out, please do so!
First I made my own controller plugin for the gazebo model, which can be found in the repository in a different branch under /gazebo-ignition/. This controller plugin needs to be built first and it’s bin file added to the path IGN_GAZEBO_SYSTEM_PLUGIN_PATH, and the Crazyflie model in IGN_GAZEBO_RESOURCE_PATH , but then if you try to fly the model with the following:
It will take off and hover nicely. Unfortunately, if you try out the key publisher widget with the arrow keys, you see that the Crazyflie immediately crashes. So there is still something fishy there! Please check out the issue list of the repo to check the state on that.
Controllers
So the reason why I made my own controller plugins for the above mentioned simulation models, is that I want to experiment with a way that we can separate the crazyflie firmware controllers, make a code wrapper for them, and use those controllers directly in the simulator. So this way it will become a hybrid software in the loop without having to compile the entire firmware that contains all kinds of extra things that the simulation probably does not need. We can’t do this hybrid SITL yet, but at least it would be nice to have the elements in place to make it possible.
Currently I’m only experimenting with a simple fixed height and attitude PID controller written in C, and some extra files to make it possible to make a python wrapper for those. The C-controller itself you can try out in Webots as of this commit 79640a, but hopefully we will have the python version of it working too.
What is next?
As you probably noticed, the simulation work are still very much work in process and there is still a lot enhancements to add or fix. Currently this is only done on available Fridays so the progress is not super fast unfortunately, but at least there is one model flying.
Some other elements that we would like to work on:
Velocity controller, so that the models are able to react on twist messages.
Crazyflie firmware bindings of controllers
Better system variables (at least so that the ign gazebo model and the webots model are more similar)
I might turn a couple of these into topics that would be good for contribution, so that any community members can help out with. Please keep an eye on the issue list, and we are communicating on the Crazyswarm2 Discussion page about simulations if you want to share your thoughts on this as well.
I have returned from my family visit in California, who I’ve haven’t seen them in 3 years due to Covid. To spend the most possible time with them, the plan was that I would still work full time for Bitcraze from my father’s home. The problem became however, that it wouldn’t fit so well in our current way of work as I would miss all the morning stand up meetings due to the large time difference between Sweden and California (-9 hours). That is why we settled that I would work on separate projects/investigations during my time away. So I thought it would be a great opportunity to dig into ROS and 3D simulations again and see what the latest state of that is! So about the simulations is what I’ll be mostly talking about right in this blog post, in terms of what simulators are out there and what simulation development is currently ongoing.
Need for simulation?
Why would it be actually be necessary to have a simulation in our current frame work? Just to give an example, my new colleague Jonas recently tried out his hand on the CFlib swarm class for the first time for the BAMdays tutorials, and simulator would have been great during that initial porcess. Namely, most of the crashes were not necessary due to low batteries or bad communication, but mostly due to the fact that he was not able to double check his script beforehand. If one is able to check if all the programmed positions of the Crazyflies are implemented as they should before an actual flight, this would prevented a lot of broken propellers!
Just to note here that there are a lot of types of simulations that you can think of. Earlier this year had our ex-interns Max and Josephine finish an Renode simulation of the Crazyflie’s microcontrollers. We’ve also seen the word Simulink pop-up multiple times on the forum which indicates that quite some control classes are investigating the dynamic model of the Crazyflie. However, the type of simulation that I’m currently referring to are the 3D simulators in which a robot or quadcopter can move and interact with a virtual environment, with usually an physics engine in effect.
Crazyflie in Gazebo (+ROS)
During some initial investigation there were already some simulations that pop out. First of all I went and looked into what is available for Gazebo at the moment, which is:
CrazyS is based on the RotorS simulation with some additional off-board crazyflie controllers for position control. I wasn’t able to build it for my Ubuntu 20.04 just yet myself, but that there is ongoing work to port CrazyS to ROS Noetic. For now on a virtual machine with ROS melodic it build just fine! Note my laptop did had to work quite hard when I wanted to simulate more than 1 Crazyflie, but the physics and plugins that were made for Gazebo is enabling many to do a lot for their research. Please check out the core papers about CrazyS!
Sim_cf is perhaps a little lesser known, but the project does stand out as it has some interesting features to it. It is for instance, possible to use the actual c-based firmware in software-in-the-loop (SITL) mode, which controls the simulated Crazyflie. It is even possible to use an actual crazyflie with an hardware-in-the-loop (HITL) simulation. Eventhough the project is not actively maintained anymore, I did manage to build it from source for ROS Noetic and Gazebo 11, although I was not able to fly more than 4 do to errors.
Other Simulators
Ofcourse Gazebo is not the only possibility out there. I also had a quick go at another simulator called Webots, which is quite an interesting option indeed as well. Currently there is only one quadcopter model available, so it only makes sense for it to also contain an Crazyflie! They do use their own robotic format, so probably the easiest process would be, is to convert an existing model for Gazebo/ROS into an format that Webots can understand.
So in the future, the current Gazebo in its form will disappear and will be only be part of Ignition. So that is why it made sense for me to start playing with an separate Crazyflie model and plugins for the Ignition frame work instead. Moreover, it seems that quite some elements and plugins based on the RotorS simulation for the original gazebo, are now fully integrated within the Ignition gazebo framework, which should make it more easier to make quadcopter models fly. Currently it’s still work in progress, so right now is only to be found on my personal github repository, but as soon as it becomes more fleshed out and stable, this will probably transferred to Bitcraze’s github repos and we will write a more elaborate blogpost about it. For now, I’ll try to work on it further as my Fun Friday project!
In the mean time, we have started a simulation discussion thread in the Crazyswarm2 repository, which is an ongoing port of Crazyswarm to ROS2. It would be the ideal situation if we would be able to use this simulator for both Crazyswarm and our native CFlib! But I’ve mostly have used Gazebo in the past, so if there are any other simulators that we should try out too, please join the discussion and let us know!
Last week it was time for the International Conference on Intelligent Robots and Systems (IROS), which is one of the biggest yearly robotics conferences! In previous editions (see 2018 blog post, 2019 event page), we joined IROS’ exhibition and showed an autonomous demos for everybody to enjoy during the coffee breaks. Then… as everybody knows… the Covid-19 pandamic hit and we had to cancel our plans to go to the 2020’s Las Vegas edition. This year’s IROS was supposed to be held in Prague, but was very early announced that this was going to be an online edition.
Eventhough we considered joining IROS’s online exhibition, after our decision to organize the Bitcraze Awesome Meetup (BAM) days as a celebration to our 10 year anniversary (see this blo gpost), we wouldn’t have enough time to prepare for both. However, we still signed up for the conference itself, so we could see how and where the Crazyflie is used in the robotics community! So this blog post will give a list and small overview of the Crazyflie-fueled research with some highlights.
Crazyflie as a Demonstration Tool in Research
A common use-case that we saw is to use the Crazyflie as a research demonstration tool. In the case of designing algorithms for quadcopters, many of the researchers we heard from or talked to told us that there is significant added value to demonstrate their ideas on a real platform. Then it can be truly evaluated with real environmental issues and platform dynamics. For this, the majority of the papers have used the ROS package developed for the CrazySwarm project but some researchers has gone as far as implementing it fully on the Crazyflie’s MCU [6, 8]!
We also noticed the large spread of the Crazyflie-featured papers throughout the sessions of the conference. A bunch of the papers could obviously be found in Aerial System sub-sessions as in ‘Perception and Autonomy’ [1], ‘Applications’ [3], ‘Mechanics and Control’ [4 , 5], but many were spread out in areas like Reinforcement Learning [2], Localization [6] and Collision avoidance [7]. There were also some papers to be found in the Swarm Robotics session [8, 9], as well as in Distributed Robot Systems [10].
Note that there is usually quite some overlap between the different sessions, but it is still very exciting to see that the Crazyflie being used in so many fields!
Highlights and the Community
We saw lots of awesome applications but there are a few that we really like to highlight! There was a presentation of an actual solar-powered Crazyflie [2] which can literally fly forever. This research was done by the same group at the University of Washington that also was featured in a blog post last year, and who is responsible for the Smellicopter. Also, our jaw literally dropped at the sight of the 4 Crazyflie-fueled mega-copter by the University of California, Los Angeles [4, 5]. Last but not least, the fully onboard autonomous gas-seeking swarm, Sniffybug [8], from the MAVLab (TU Delft), never stops to amaze us. They wrote a blog post about their work on our website this summer!
We are hoping for more interesting blog posts related to the papers in the list below in the future. We also would like to invite all the researchers, who have been working with the Crazyflie, to join us for discussions at the Community Q&A at the BAMdays. Most of the amazing aspects of the Crazyflie in terms of autonomy, localization and swarming have all been contributions of the research community in the past. So join the discussion to continue that path in order to bring the Crazyflie to a new level!
List of IROS 2021 Papers featuring the Crazyflie
Here is a list of all the Crazyflie-related papers we could find, but please let us know if we are missing any!
[1] Target-Visible Polynomial Trajectory Generation within an MAV Team Yunwoo Lee, Jungwon Park, Boseong Jeon and H. Jin Kim
Lab for Autonomous Robotic Research (LARR), Seoul National University
[3] Toward battery-free flight: Duty cycled recharging of small drones Nishant Elkunchwar, Suvesha Chandrasekaran, Vikram Iyer and Sawyer B. Fuller
Department of Mechanical Engineering, University of Washington
[4] An Over-Actuated Multi-Rotor Aerial Vehicle with Unconstrained Attitude Angles and High Thrust Efficiencies Pengkang Yu, Yao Su , Matthew J. Gerber, Lecheng Ruan and Tsu-Chin Tsao
[6] A Computationally Efficient Moving Horizon Estimator for Ultra-Wideband Localization on Small Quadrotors Sven Pfeiffer, Christophe de Wagter and Guido C.H.E. de Croon
[9] micROS.BT: An Event-Driven Behavior Tree Framework for Swarm Robots Yunlong Wu, Jinghua Li, Huadong Dai, Xiaodong Yi, Yanzhen Wang and Xuejun Yang
Artificial Intelligence Research Center, National Innovation Institute of Defense Technology, Beijing
[10] Neural Tree Expansion for Multi-Robot Planning in Non-Cooperative Environments Benjamin Riviere, Wolfgang Honig, Matthew Anderson and Soon-Jo Chung
[11] Trust your supervisor: quadrotor obstacle avoidance using controlled invariant sets Luigi Pannocchi, Tzanis Anevlavis, Paulo Tabuada
University of California, Los Angeles
[12] Continuous-time Gaussian Process Trajectory Generation for Multi-robot Formation via Probabilistic Inference Shuang Guo , Bo Liu , Shen Zhan , Jifeng Guo and Changhong Wang
Harbin institute of Technology
[13] Non-Prehensile Manipulation of Cuboid Objects Using a Catenary Robot Gustavo A. Cardona , Diego S. D’Antonio , Cristian-Ioan Vasile and David Saldana
The AI-decks are back in stock! Also, last week we had our quarterly meeting, where we plan our focus for the next quarter. As it is also the start of the fiscal year, we also take this opportunity to update our 1 year and 3 year plans as well. We have a big plans coming up, but one of the important focuses that we will have this year, is to get the AI-deck out of early-access!
But what would be necessary for such a task? The AI-deck is one of the most complicated boards we have worked with, so do we have to evaluate its ‘out-of-readiness’ along the same standards than any of our other products.
Mega AIdeck Tutorial
So one of our idea is to be able to achieve a state of the AIdeck in order to write a mega AIdeck tutorial series. This implies that we are able to show how somebody could go from a datasets all the way to a flying aideck-crazyflie combo. Such a series could consist of the following topics:
How to go from a dataset of images to a (Deep) Neural Network
Testing the DNN on the computer with the Image WiFi examples
Converting the neural network to Tensorflow Light (with basics on Edge AI and quantizing neural networks)
AIdeck basics (How to access the camera, how to add the network to the cluster, how to send commands)
Build and flashing the AIdeck and testing it out in the hand
Attach the AIdeck to the crazyflie, make an app-layer application to fly and react on the image input.
From the first look of it, this sounds like it should be easy to do right? Actually, there are still much to be done in order to make this tutorial possible.
Replumbing the Communication
One of the more challenging aspects of the AIdeck as it now is, is that users need to buy a JTAG-enabled programmer in order to flash the GAP8 and the NINA module of the AI-deck. That is the reason why currently the AIdeck has these 2 x 10 pin jtag connectors attached, but ideally we would want to get rid of it completely. This means is that we need to have over air flashing of the GAP8’s binary and that the intercommunication of the NINA and AIdeck will become even more important.
Moreover, the communication protocol from the GAP8 to the STM32 of the Crazyflie is currently very basic, as of right now, it is only possible to send single characters. It might work in some situations, but what if you would like to send an array of values back to the Crazyflie, like the collision probability & steering angle like in PULP platform’s implementation of Dronet? And, would we like to keep on using two UART serial ports or perhaps just relay both NINA and GAP8 communication all through one? The later will make it easier for us to maintain the crazyflie-aideck communication but can perhaps introduce communication delays.
These are just a slice of the type of re-plumbing work for the AIdeck before we can even start our dream tutorial series, but at least it will give you an idea of what we are dealing with :)
Rik the Intern
From this week we have the honor of hosting Rik Bouwmeester for a couple of months. He is currently doing his Master Thesis at the MAVlab from the faculty of Aerospace Engineering of the TU Delft. Since he has experience of working the AIdeck before, he will be able to provide us with some user perspective and help us with the above mentioned issues. You can expect a blogpost from him soon!
How to handle our documentation has been always a bit of struggle. For almost 2 years (see this blogpost and this one) we have working on improving the documentation structure, with by transferring information from the wiki, putting information closer to the code and setting up automating documentation. A few months ago, we managed to have automated logging and parameter documentation (see this blogpost).
Even though we think there is some improvement already, it can always be better! We have noticed that some of our users are a bit confused of how to go through our documentation. So in this blogpost we are discussing some navigational strategies of how you can maneuver yourself through the documentation as it is presented on bitcraze.io, which can also be found here.
Ecosystem-based navigation
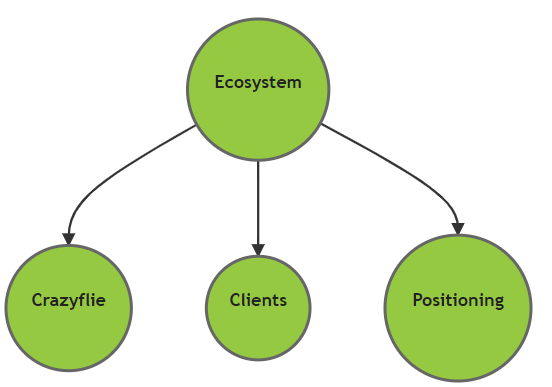
So more than a year ago, we also started with a Ecosystem overview page, which are meant to take first-timers by the hand through the Crazyflie ecosystem.. This type of overview pages are starting from the three main pillars: the Crazyflie Platform, the Clients and Positioning Technology. This is a type of navigation that we mostly advise to take if you are a beginner Crazyflie user who do not know the structure of the eco system fully.
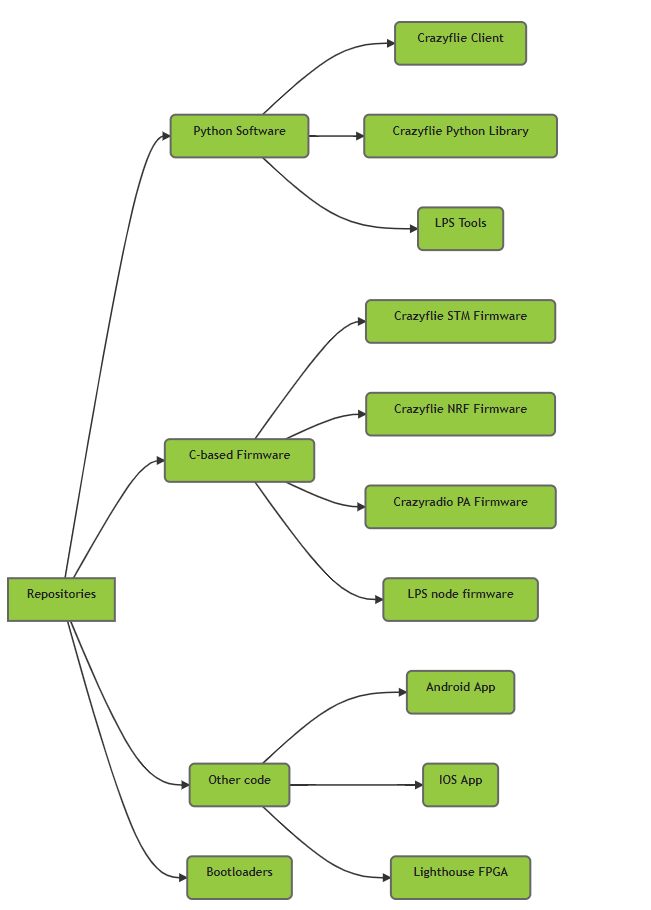
For those that already have experience with the Crazyflie and its Ecosystem, the previous way of navigating through the docs might be a bit convoluted. With the Ecosystem-based navigation, it takes about 3 scrolls and clicks to reach the STM development documentation, which is a bit to much of a round way if you already know what you are looking for. We have made the repository overview page not for this purpose but we actually started using ourselves a lot within the company, as a direct pathway to the development repository per element. So this is a page that would be useful to other advanced developers as well!
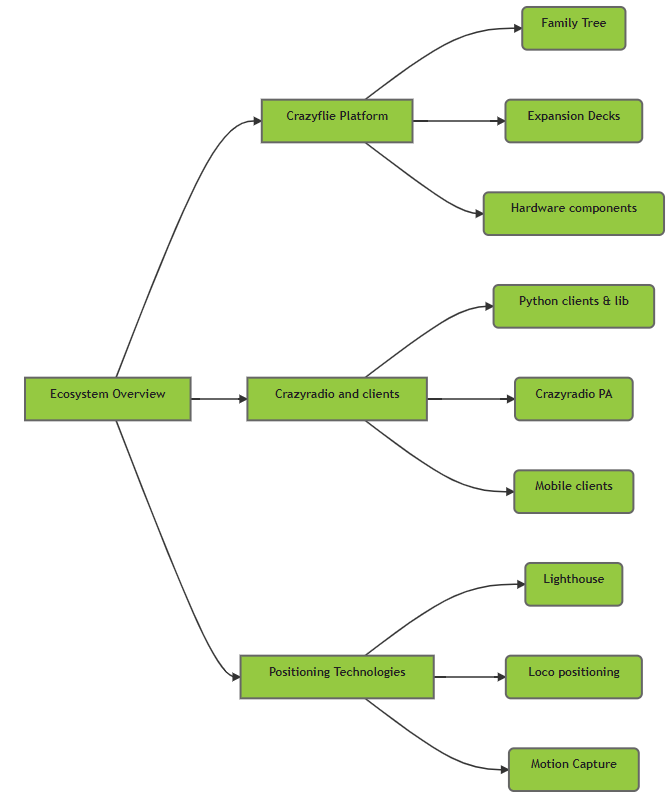
So the repository overview page is split up in 4 main categories: Python-based software, C-based firmware, Other languages and bootloaders. See the navigation tree which of those repositories approximately point too. By the way, have you noticed that repository documentation has a gray header (like this one) and all the overview pages on the web have a green header (like this one)? This are meant to make you aware if you are still on a fluffy overview website page or going in the nitty gritty details of the development documentation.
Repository-based navigation tree
Feature-based navigation ?
Still a remaining problem is that the repository documentation might not be enough to get a good overview. Where do you need to look if you are interested in ‘controllers’ or ‘state estimators’, or how to make an app-layer application? Currently all of this is within the stm32 firmware documentation, as that is the exact location of where all of this is implemented. But how to document spanning features like the CRTP, where not only the STM chip but also the NRF, Crazyradio PA and the Crazyflie python library are also involved? Or how about the loco positioning system, where the Crazyflie communicates through the LPS deck with a separate LPS node?
So perhaps a good way how to present all this information, is to do it feature-based, like ‘controllers’, ‘positioning’, ‘high level commander’, where we present a structure that points to parts of the detailed documentation within the repo-docs. With ecosystem-based, or even repository-based, navigation documentation strategy, it will take for instance 4-7 clicks to come to the specific controller page, as you can verify by looking at the bread-crumb of the header. Perhaps splitting it up based on feature instead of Ecosystem elements or programming language might be a more logical structure of the current state of the Crazyflie documentation.
Feedback
One reason why it is so difficult to do this properly, is that we have a lot of repositories based on each microprocessor of all of our products, which makes our opensource projects quite unique. It is therefore difficult to find another opensource project of which we can take inspiration from. So, let us know what you would prefer for navigating through our documentation in this poll, but we are always open to other suggestions! If you know of any example of a similar opensource software project that is doing it the right way, or have any other tips, send us an email (contact_at_bitcraze.io), contact us on social media platforms or post a comment on this blogpost!
Update 2021-12-21:
The poll is closed and this is the result! Thanks all for responding!
It feels like the day of yesterday, when Arnaud, Tobias and Marcus came together in a backyard shed and decided to go fully in developing the Crazyflie 1.0 and start a business. The result that came from that was Bitcraze, and after 10 years we are still here! Also in the course of the next months, we will be releasing more information about the history of Bitcraze on the blog or social media.
But more important we would like you to leave the 19th-21th of October open in your agenda for the grand party, because we will be organizing our own multi day convention: BAM days a.k.a. Bitcraze Awesome Meetup days.
Of-course we did everything we could to come to abbreviation BAM as you can see :)
This event will be fully online and will be filled with (guest) talks, workshops but most importantly: Fika time, which is coffee breaks in Swedish. We really want to put the emphasize on networking and the coffee breaks as we considered the most important part of any conference, seminar or convention. So in between the talks, which will be in a video chat format like Zoom or Google Meet, there will be equally long coffee breaks in spatial chat format as like Gathertown, Mozilla Hubs or MiBo. We are currently browsing to several online event portal alternatives to accommodate all of this to make sure that everything goes smoothly!
We are currently still building up the program and inviting speakers to give talks and workshops. Moreover, we probably will prepare workshops and demos ourselves as well! So please fill in this interest form if you want to receive more information the event, and give us some pointers of the content. Also check out the event page for any current information.
And in the mean time, make sure to keep the 19th to the 21th of October free in your agenda so that you can come and celebrate our 10 year anniversary with us!
As you have noticed, we talk about the lighthouse positioning a lot these last couple of months ever since we got it out of early release. However, it is good to realize that it is not the only option out there for positioning your Crazyflie! That is why in this blog-post we will lay out possible options and explain how they are different/similar to one another.
The four possible ways to position the crazyflie
Absolute Positioning / Off-board Pose Estimation
Absolute Positioning and External Pose Estimation with the MoCap System
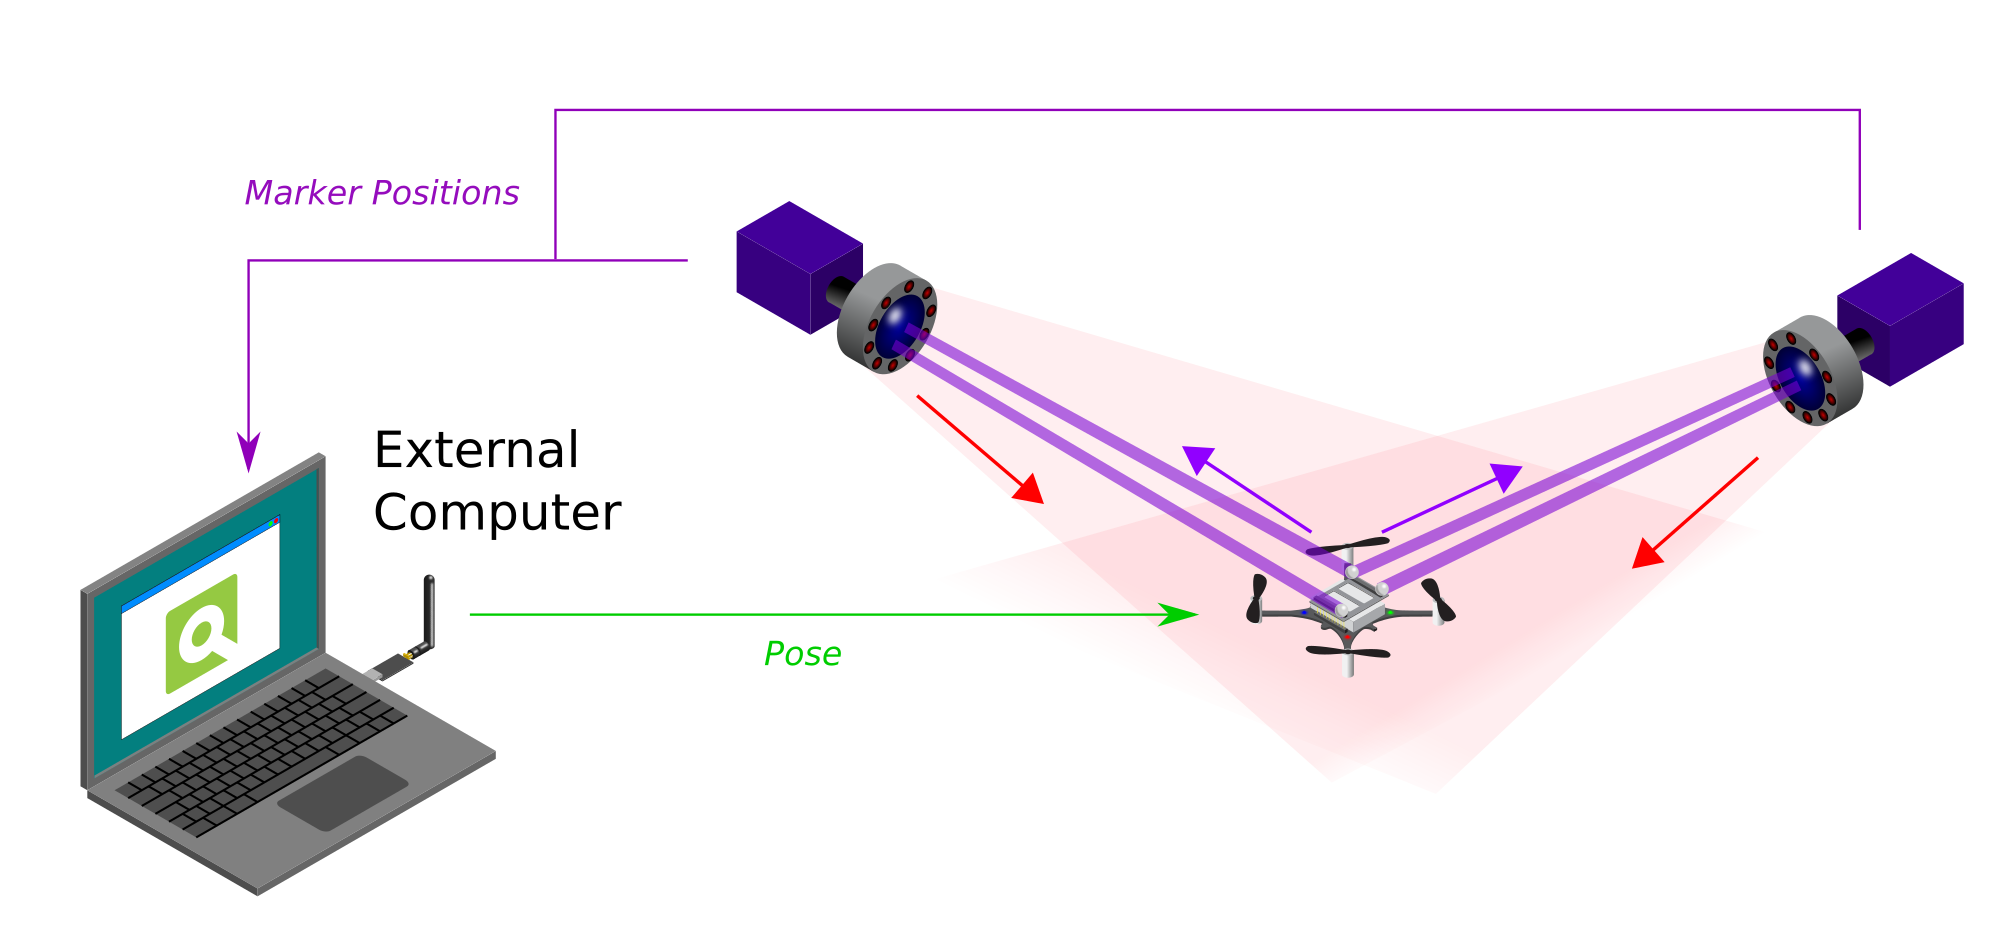
The first we will handle are the use of motion capture systems (MoCap), which resolves around the use of InfraRed cameras and Markers. We use the Qualysis camera ourselves but there are also labs out there that use Vicon or Optitrack. The general idea is that the cameras have an IR-light-emitting LED ring, which are bounced back by reflective markers that are supposed to be on the Crazyflie. These markers can therefore be detected by the same cameras, which pass through the marker positions to an external computer. This computer will have a MoCap program running which will turn these detected markers into a Pose estimate, which will in turn be communicated to the Crazyflie by a Crazyradio PA.
Since that the positioning is estimated by an external computer instead of onboard of the crazyflie, a MoCap positioning system is categorized as an off-board pose estimation using an absolute positioning system. For more information, please check the Motion Capture positioning documentation.
Absolute Positioning / On-board Pose Estimation
Absolute Positioning and Internal Pose Estimation with the Lighthouse and Loco Positioning System
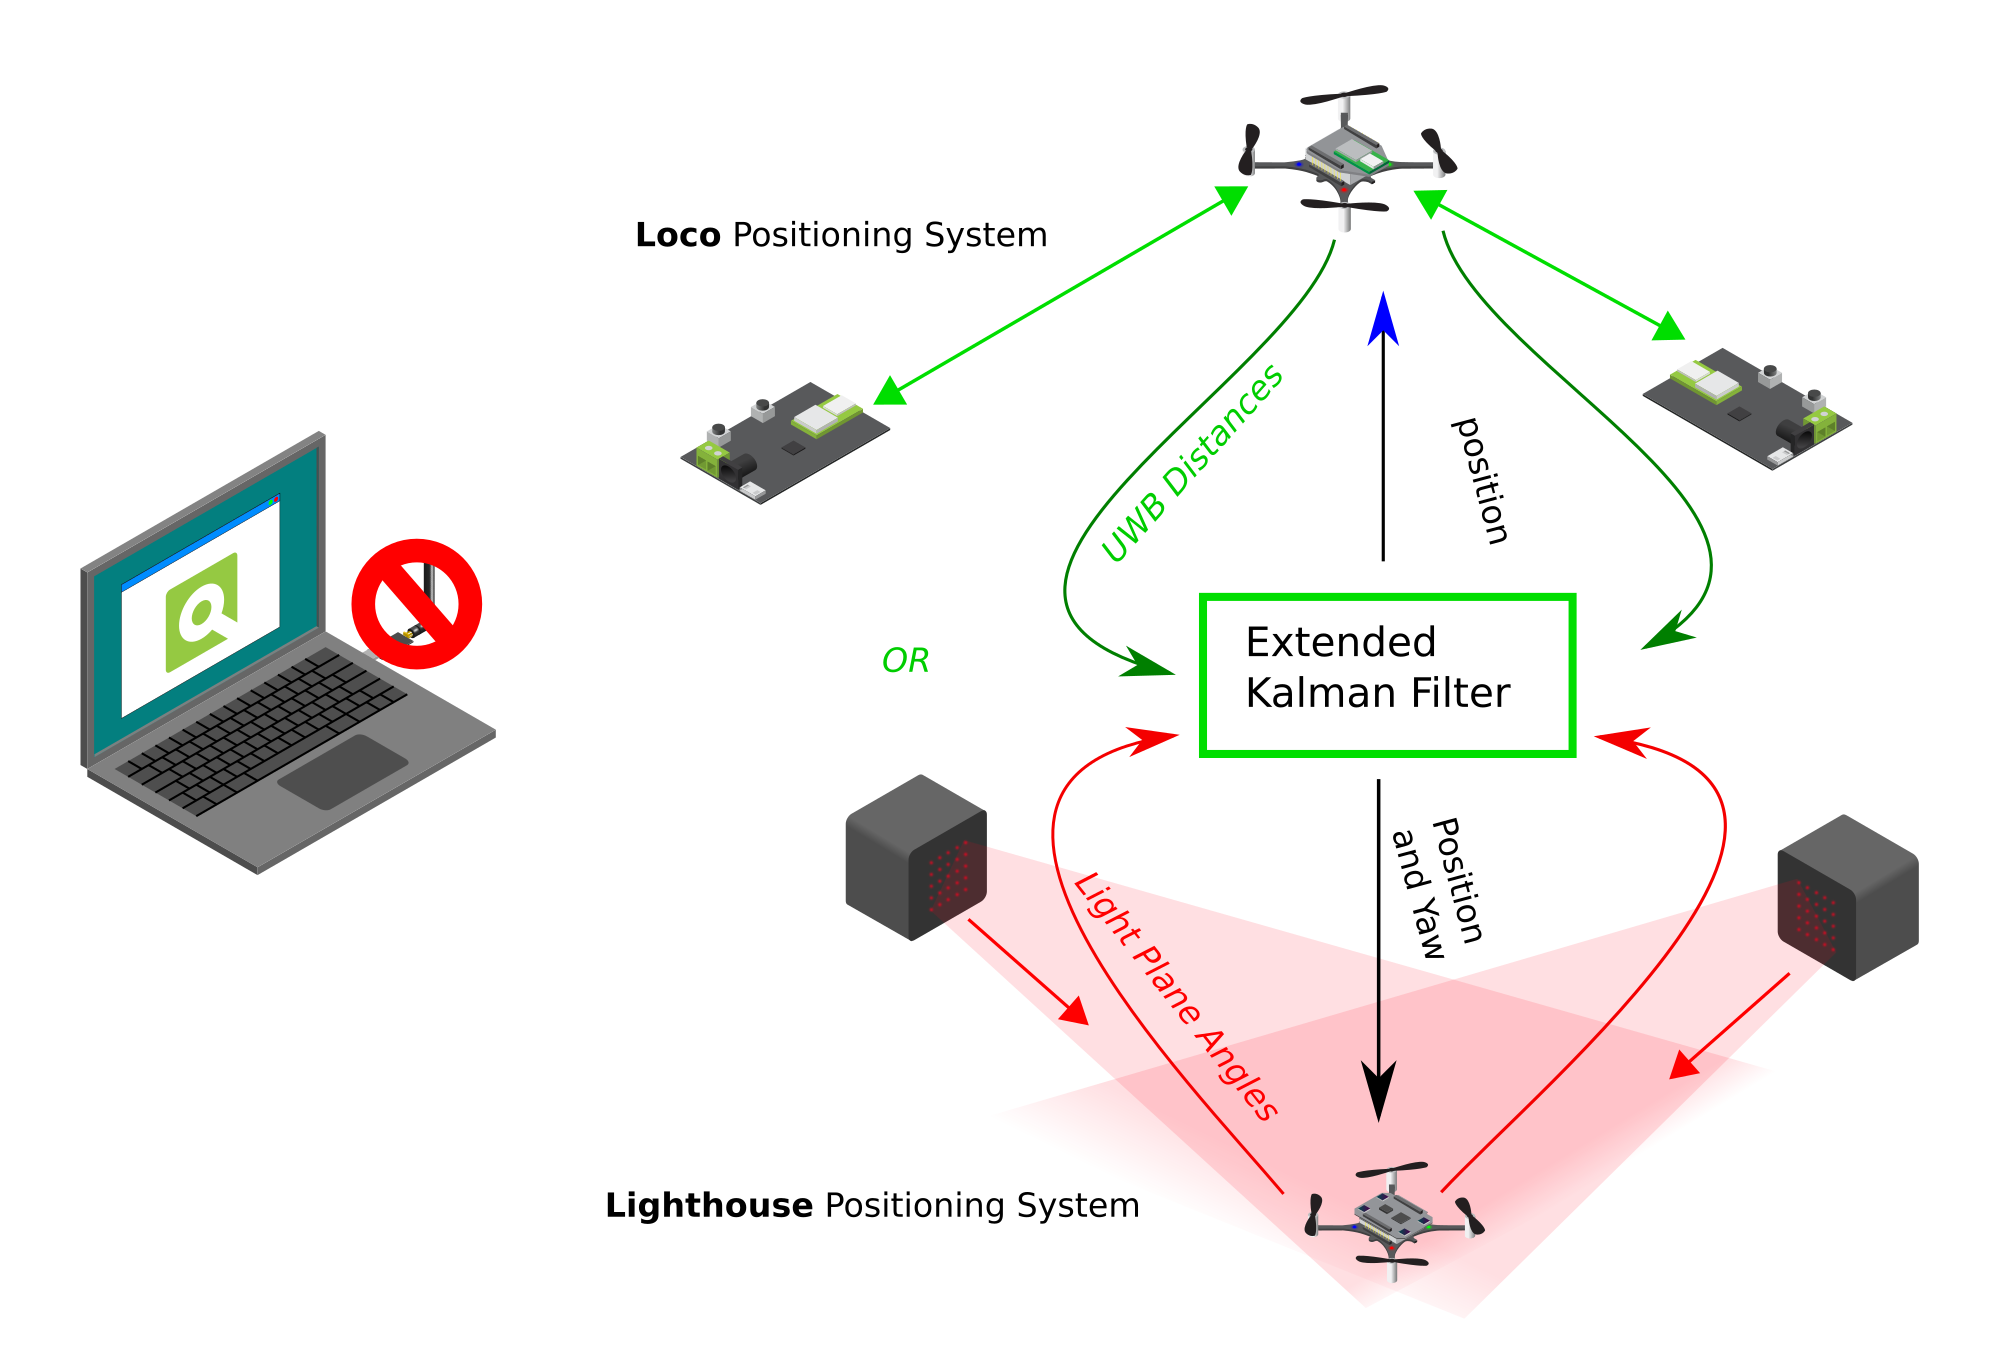
The next category is a bit different and it consists of both the Loco positioning system and the Lighthouse positioning system. Even though these both use beacons/sensors that are placed externally of the Crazyflie, the pose estimation is done all on-board in the firmware of the Crazyflie. So there is no computer that is necessary to communicate the position back to the Crazyflie. Remember that you do need to communicate the reference set-points or high level commands if you are not using the App layer.
Of course there are clear differences in the measurement type. A Crazyflie with the Locodeck attached takes the distance to the externally placed nodes as measured by ultra wide band (UWB) and the Lighthouse deck detects the light plane angles emitted by the Lighthouse Base Stations. However the principle is the same that those raw measurements are used as input to the Extended Kalman filter onboard of the Crazyflie, and outputs the estimated pose after fusing with the IMU measurements.
Therefore these systems can be classified as absolute positioning systems with on-board pose estimation. To learn more please read the Loco and Lighthouse positioning system documentation!
Relative Positioning / On-board Pose Estimation
Relative Positioning and Internal Pose Estimation with the Flowdeck V2.
It is not necessary to have to setup an external positioning system in your room in order to achieve a form of positioning on the Crazyflie. With the Flowdeck attached, the Crazyflie can measure flows per frame with an optical flow sensor and the height in millimetres with a time of flight sensor. These measurements are then fused together with the IMU within the Extended Kalman filter (see the Flow deck measurement model), which results in a on-board pose estimation.
The most important difference here to note is that positioning estimated by only the Flowdeck, will not result in a absolute positioning estimate but a relative one. Instead of using an external placed system (like MoCap, Lighthouse and Loco) which dictate where the zero position is in XYZ, the start-up position the Crazyflie determines where the origin of the coordinate system is. That is why the Flowdeck is classified as a Relative Positioning System with On-board Pose Estimation.
IMU-only On-board Pose Estimation ?
Oh boy… that is a different story. Theoretically it could be possible by using the onboard accelerometers of the crazyflie and fusing those in some short of estimator, however practice has shown that the Crazyflie’s accelerometers are too noisy to result in any good pose estimation… We haven’t seen any work that has been successfully to achieve any stable hover on only the IMU of the Crazyflie, but if you have done/see research that has, please let us know!
And if you would like to give a go yourself and build an estimator that is able to do this, please check out the new out of tree build functionality for estimators. This is still work in progress so it might have some bugs, but it should enable you to plugin in your own estimator separate from the Crazyflie firmware ;)
Documentation
We try to keep keep all the information of all our positioning systems on our website. So check out the positioning system overview page to be referred to more details if you would be interested in a particular system that fits your requirements!