Starting today, I, Björn, have started my master thesis here at Bitcraze. My thesis topic will revolve around fault detection of erroneous states as well as appropiate system responses whenever a fault has been detected. So far, since it’s my first day, I’ve only familiarized myself with the Crazyflie system and gotten to know the lovely people at Bitcraze.
Starting off with fault detection, my initial approach will be to design several observers, each dedicated to a specific sensor, from this, a faulty sensor reading can hopefully be detected by comparing the expected value with the measured one (i.e residual) when combined with an appropriate filter and/or statistical test.
If the result are promising, the suggested strategy could improve the safety of crazyflie, protecting both its surrounding environment, aswell as itself.
Looking forward, I’m excited to get this thesis going and hope to find some interesting results to share with you all.
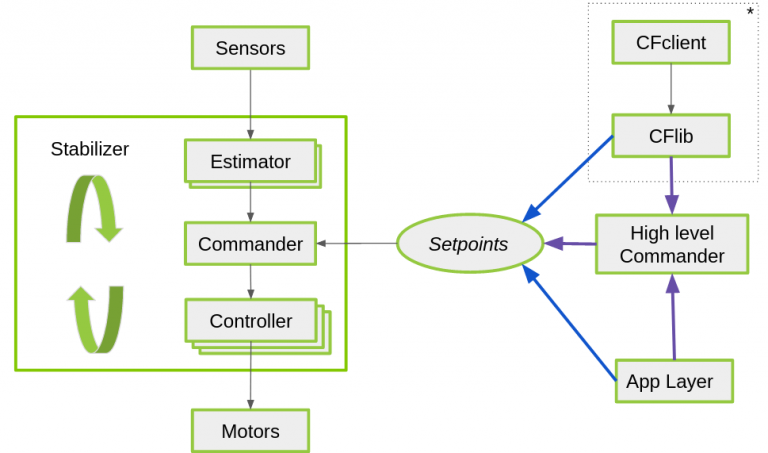
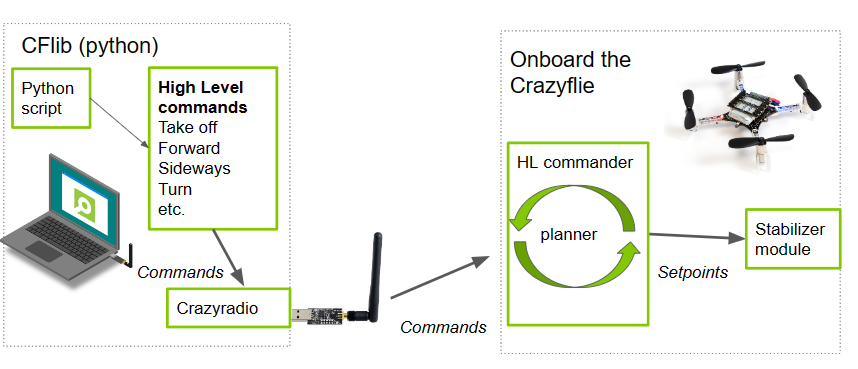
A few years ago, we wrote a blogpost about the Commander framework, where we explained how the setpoint structure worked, which drives the controller of the Crazyflie, which is an essential part of the stabilization module. Basically, without these, there would not be any autonomy on the Crazyflie, let alone manual flight.
General framework of the stabilization structure of the crazyflie with setpoint handling. * This part is takes place on the computer through the CFlib for python, so there is also communication protocol in between. It is left out of this schematics for easier understanding.
However, we notice that there is sometimes confusion regarding these different functionalities and what exactly sends which setpoints and how. These details might not be crucial when using just one Crazyflie, but become more significant when managing multiple drones. Understanding how often your computer needs to send setpoints or not becomes crucial in such scenarios. Therefore, this blog post aims to provide a clearer explanation of this aspect.
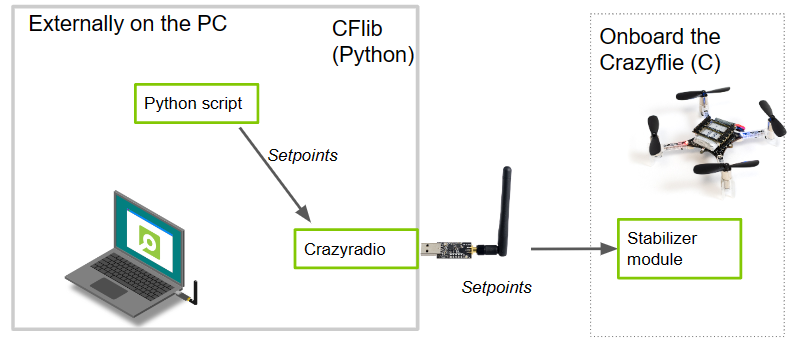
Sending set-points directly from the CFlib
Let’s start at the lower level from the computer. It is possible to send various types of setpoints directly from a Python script using the Crazyflie Python library (cflib for short). This capability extends to tasks such as manual control:
If you use these functions in a script, the principle is quite basic: the Crazyradio sends exactly 1 packet with this setpoint over the air to the Crazyflie, and it will act upon that. There are no secret threads opening in the background, and nothing magical happens on the Crazyflie either. However, the challenge here is that if your script doesn’t send an updated setpoint within a certain amount of time (default of 2 seconds), a timeout will occur, and the Crazyflie will drop out of the sky. Therefore, you need to send a setpoint at regular intervals, like in a for loop, to keep the Crazyflie flying. This is something you need to take care of in the script.
Example scripts in the CFlib that are sending setpoints directly:
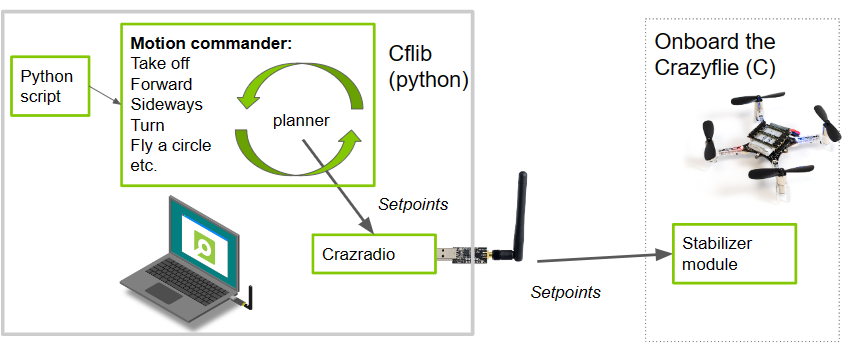
Another way to handle the regular sending of setpoints automatically in the CFLib is through the Motion Commander class. By initializing a Motion Commander object (usually using a context manager), a thread is started with takeoff that will continuously send (velocity) setpoints at a fixed rate. These setpoints can then be updated by the following functions, for instance, moving forward with blocking:
forward(distance)
or a giving body fixed velocity setpoint updates (that returns immediately):
start_linear_motion(vx, vy, vz, rate_yaw)
You can check the Motion Commander’s API-generated documentation for more functions that can be utilized. As there is a background thread consistently sending setpoints to the Crazyflie, no timeout will occur, and you only need to use one of these functions for the ‘behavior update’. This thread will be closed as soon as the Crazyflie lands again.
Here are example scripts in the CFlib that use the motion commander class:
Setpoint handling through the high level commander
Prior to this, all logical and setpoint handling occurred on the PC side. Whether sending setpoints directly or using the Motion Commander class, there was a continuous stream of setpoint packets sent through the air for every movement the Crazyflie made. However, what if the Crazyflie misses one of these packets? Or how does this stream handle communication with many Crazyflies, especially in swarms where bandwidth becomes a critical factor?
This challenge led the developers at the Crazyswarm project (now Crazyswarm2) to implement more planning autonomy directly on the Crazyflie itself, in the form of the high-level commander. With the High-Level Commander, you can simply send one higher-level command to the Crazyflie, and the intermediate substeps (setpoints) are generated on the Crazyflie itself. This can be achieved with a regular takeoff:
take_off(height)
or go to a certain position in space:
go_to(x, y)
This can be accomplished using either the PositionHLCommander, which can be used as a context manager similar to the Motion Commander (without the Python threading), or by directly employing the functions of the High-Level Commander. You can refer to the automated API documentation for the available functions of the PositionHLCommander class or the High-Level Commander class.
Here are examples in the CFlib using either of these classes:
Considering the various options available in the Crazyflie Python library, it’s essential to realize that these setpoint-setting choices, whether direct or through the High-Level Commander, can also be configured through the app layer onboard the Crazyflie itself. You can find examples of these app layer configurations in the Crazyflie firmware repository.
It’s important to note some discrepancies regarding the Motion Commander class, which was designed with the Flow Deck (relative positioning) in mind. Consequently, it lacks a ‘go to this position’ equivalent. For such tasks, you may need to use the lower-level send_position_setpoint() function of the regular Commander class (see this ticket.) The same applies to the High-Level Commander, which was primarily designed for absolute positioning systems and lacks a ‘go forward with x m/s‘ equivalent. Currently, there isn’t a possibility to achieve these functionalities at a lower level from the Crazyflie Python library as this functionality needs to be implemented in the Crazyflie firmware first (see this ticket). It would be beneficial to align these functionalities on both the CFlib and High-Level Commander sides at some point in the future.
Hope this helps a bit to explain the commander frame work in more detail and where the real autonomy lies of the Crazyflie when you use different commander classes. If you have any questions on what the Crazyflie can do with these, we advise you to ask your questions on discussions.bitcraze.io and we will try to point you in the right direction and give examples!
It’s the first day of the year, and it’s become traditional now at the beginning of a new year to (fore)see what we have in store for 2024.
Here is how we think it will go:
Products:
The Christmas video was filled with promising prototypes (it’s here if you missed it!) that we hope to get to your lab in 2024. The Lighthouse deck 2.0 (which allows for positioning from 16 base stations) and the Crazyflie 2.1 Brushless will continue to be in our focus. We plan also to change a little bit what’s in your Crazyflie 2.1 box. The 47-17 propellers and the longer pin headers will come as standard in the kit, which will be renamed Crazyflie 2.1+ for the occasion. We have as usual a lot of prototypes that we’re hoping to be able to present to you someday, so keep reading our blogposts to keep you updated!
Community
We are interested in some conferences in 2024. Even though our schedule is not clear, we’re hoping to join at least ICRA in Yokohama and ROScon in Odense.
We will continue the developer meetings – the first in January is actually next Wednesday and should be only a support meeting. You’re welcome to join if you have any questions!
Also we are planning to continue helping to host the Aerial ROS community working group meetings. Moreover, ROScon will be very near us this year as well, so that would be nice to join too.
We’re continuing our collaboration with Flapper Drones, and are also excited to dive into the school education together with Droneblocks!
Bitcraze
Even if we’re sad to see Kristoffer pursue new adventures, we’re hoping his gap can be filled soon. We have spent a lot of time in the last months trying to find the next Bitcrazer(s), and hope 2024 will be filled with new faces!
Of course, those are the things we can see coming for us in 2024 – we hope most of them come true!
We wish you a great year, filled with hacking, developping, and flying ideas!
We have also been working on some new products that are not ready for the store yet, these include the Crazyflie 2.1 brushless, an improved lighthouse deck and some other things we will write about in coming blog posts – stay tuned for exciting news!
The big picture when it comes to the software is that there has been some work done on estimators and controllers, including “out-of-tree support” to make it easy to add to your own. We have worked on support for brushless motors, including safety features like the supervisor and arming functionality. The client has been upgraded to use PyQt6 instead of PyQt5.
There has been a bit of a focus on stability, partly by us in the infinite flight project, but also at TU Delft in their 24/7 swarm.
As always when writing the yearly looking back blog post, we are amazed at all the things that have been going on during the year. Thanks for joining us on our journey!
I joined Bitcraze back in 2015 and I have had a fantastic time during my 8 years in the company, but I have decided to move on to new adventures and I will leave Bitcraze after Christmas.
This summer I visited Karlskrona, an old naval city in Sweden, and happened to pass by a school that teaches traditional wooden boat building. I have done various types of wood work in my spare time before and the idea of learning more about boat building full time got stuck in my head and refused to go away. In January I will start to learn about how to build boats in the Nordic clinker tradition that dates back to before the viking age, this style of boat building is also on the UNESCO intangible heritage list!
Building boats might seem very different from developing small quads, but there is a similarity in learning, evolving skills and explore new areas, even though in a different field. Exploration and learning is very much what I like and have been doing at Bitcraze, in so many fields ranging from the obvious ones related to robotics such as control theory, positioning systems, embedded programming and so on, but also in the many areas related to running a company. After all we are only 6 persons and I have had the opportunity to be involved in everything from sales, marketing, IT, organization, the office, flight lab, production and much more. One field that I have a strong interest in is how to organize a company and I’m especially happy that I have had the possibility to try all sorts of ideas related to self organization at Bitcraze.
I’d like to thank everyone at Bitcraze for an awesome time, we’re almost always moving close to the speed of light, in a relaxed way! I would also like to thank all the interesting people I have met through the years, it is very inspiring to see what you are doing with the Crazyflie and other products, I hope you all continue to do funky stuff!
Before we start settling down and preparing for Christmas, it’s time for another release! The last one was before the summer in July, and we’ve had quite a few changes on the development master branch that we’d like to share. You can now download the latest Cfclient through pip and install the newest firmware on the Crazyflie to 2023.11 via the CFclient.
Latest changes in CFclient and Cflib
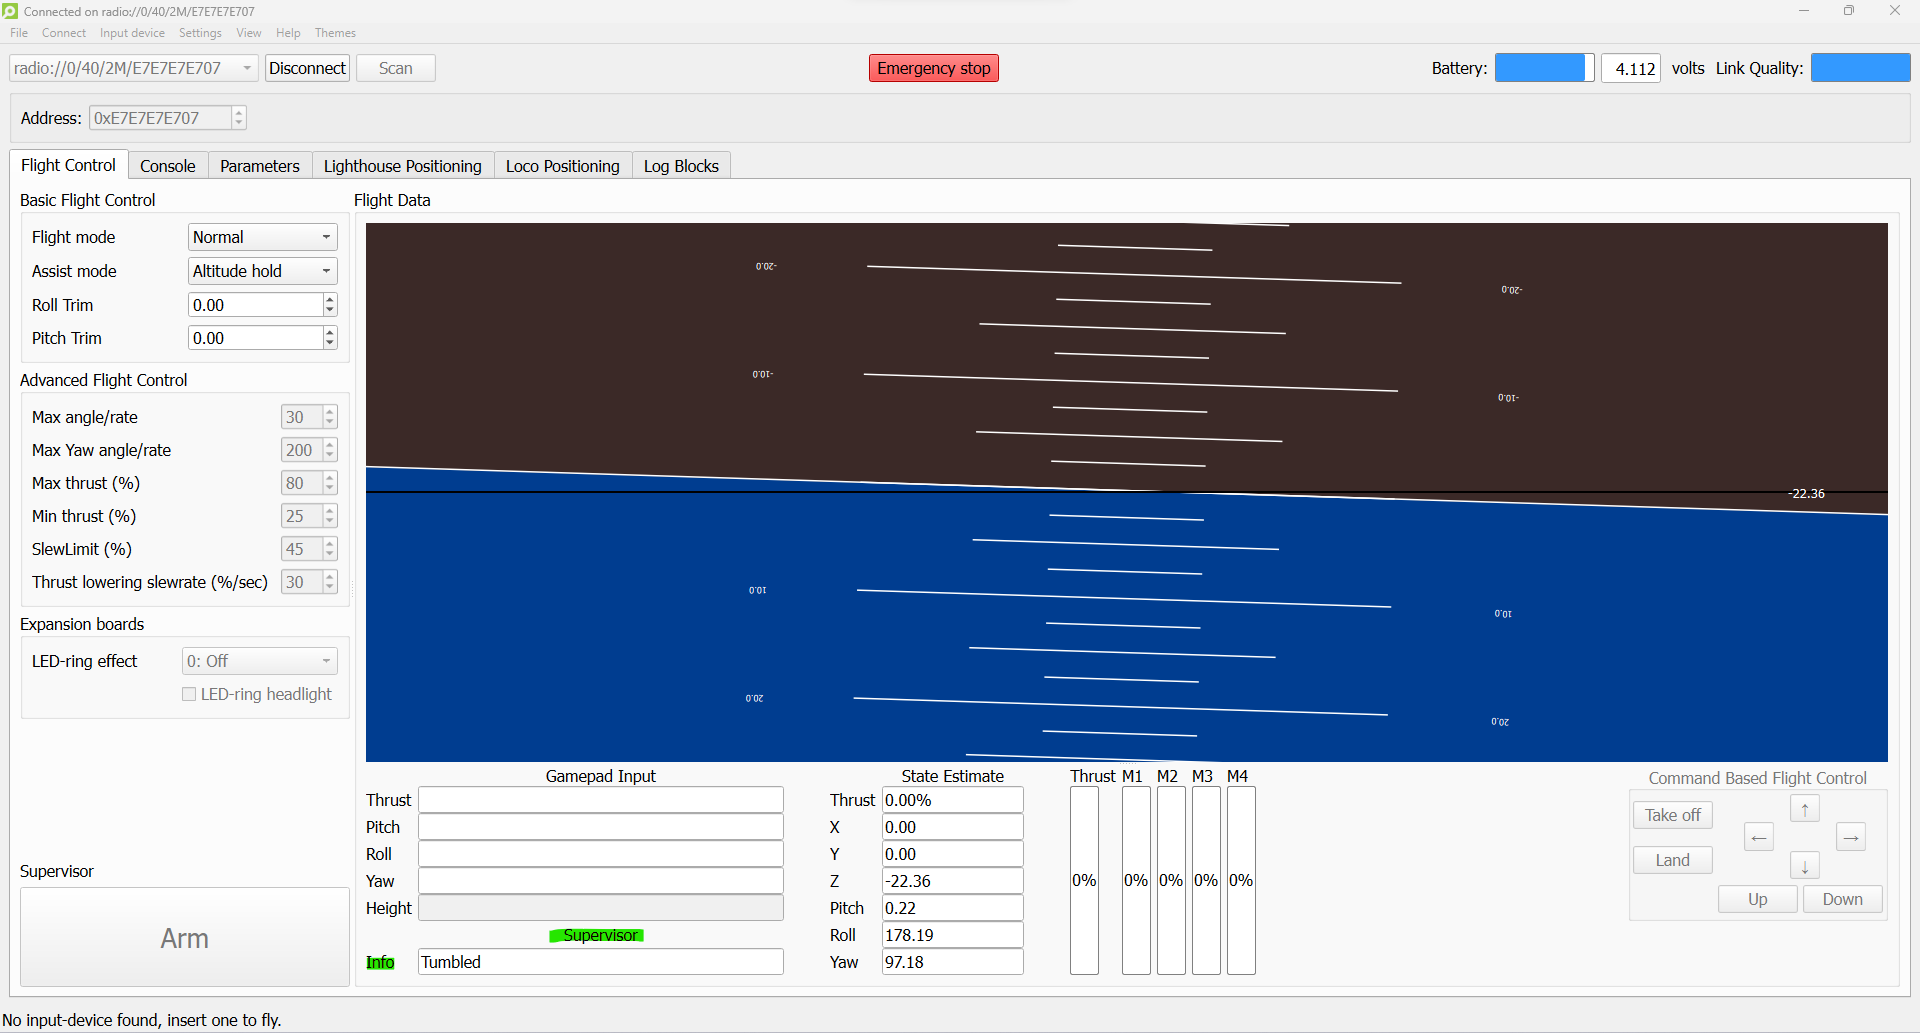
The most significant change in the CFclient is that we have finally transitioned from QT5 to QT6 for the GUI graphics. Additionally, we have addressed some issues with the toolboxes. Finally, we have added an information box to indicate the state of the supervisor, such as whether the Crazyflie is considered tumbled, flying, or if a restart is required because it is locked.
Cfclient when the crazyflie is tumbled with supervisor info
For the backend, namely the Crazyflie Python library, some important changes have been implemented. Along with fixes to the parameter and logging framework, full-state setpoints have been introduced. This feature has existed in firmware for a while due to the Crazyswarm1 project (now Crazyswarm2), but it wasn’t implemented in the cflib until now. Additionally, it’s now necessary to use `notify_setpoint_stop` in cases of switching between high-level setpoints and regular position setpoints. There is also a generic motion capture example now based on the libmotioncapture library.
Note that even though the CFclient has been converted to QT6, there are several examples in the Cflib folder that have not been updated yet. This will be fixed soon, and a ticket has been created for it. Additionally, in the Bitcraze-VM, there have been some reported issues with QT6 (see this ticket).
Latest changes in the firmware
The firmware has undergone some important changes too. On the STM side of things, the hybrid TDOA mode has been merged (check out this recent blog post). This feature is still considered experimental, so please refer to the documentation for the right settings. Additionally, support for the supervisor information box in the CFclient has been added. To utilize it, both the firmware and CFclient need to be updated. There is also a new example demonstrating communication between gap8 and cpx. Last but not least, it is now possible to create Python bindings for portions of the Kalman filter, mainly for the Loco positioning system. On the other hand, the NRF firmware has no added functionalities except for some build changes and fixes.
Crazyradio2 + LPS tools
We’ve also made some improvements in other firmware or tools. Starting with the Crazyradio2, which includes fixes for broadcasting (important for you Crazyswarm2 folks!). We also aimed to make a new release of LPS tools since we heard that people were experiencing issues with USB devices. Unfortunately, there are some problems with the GitHub release actions, so that will likely be delayed. For anyone facing USB issues, you can install the LPS tools from source with Python following the ReadMe’s instructions.
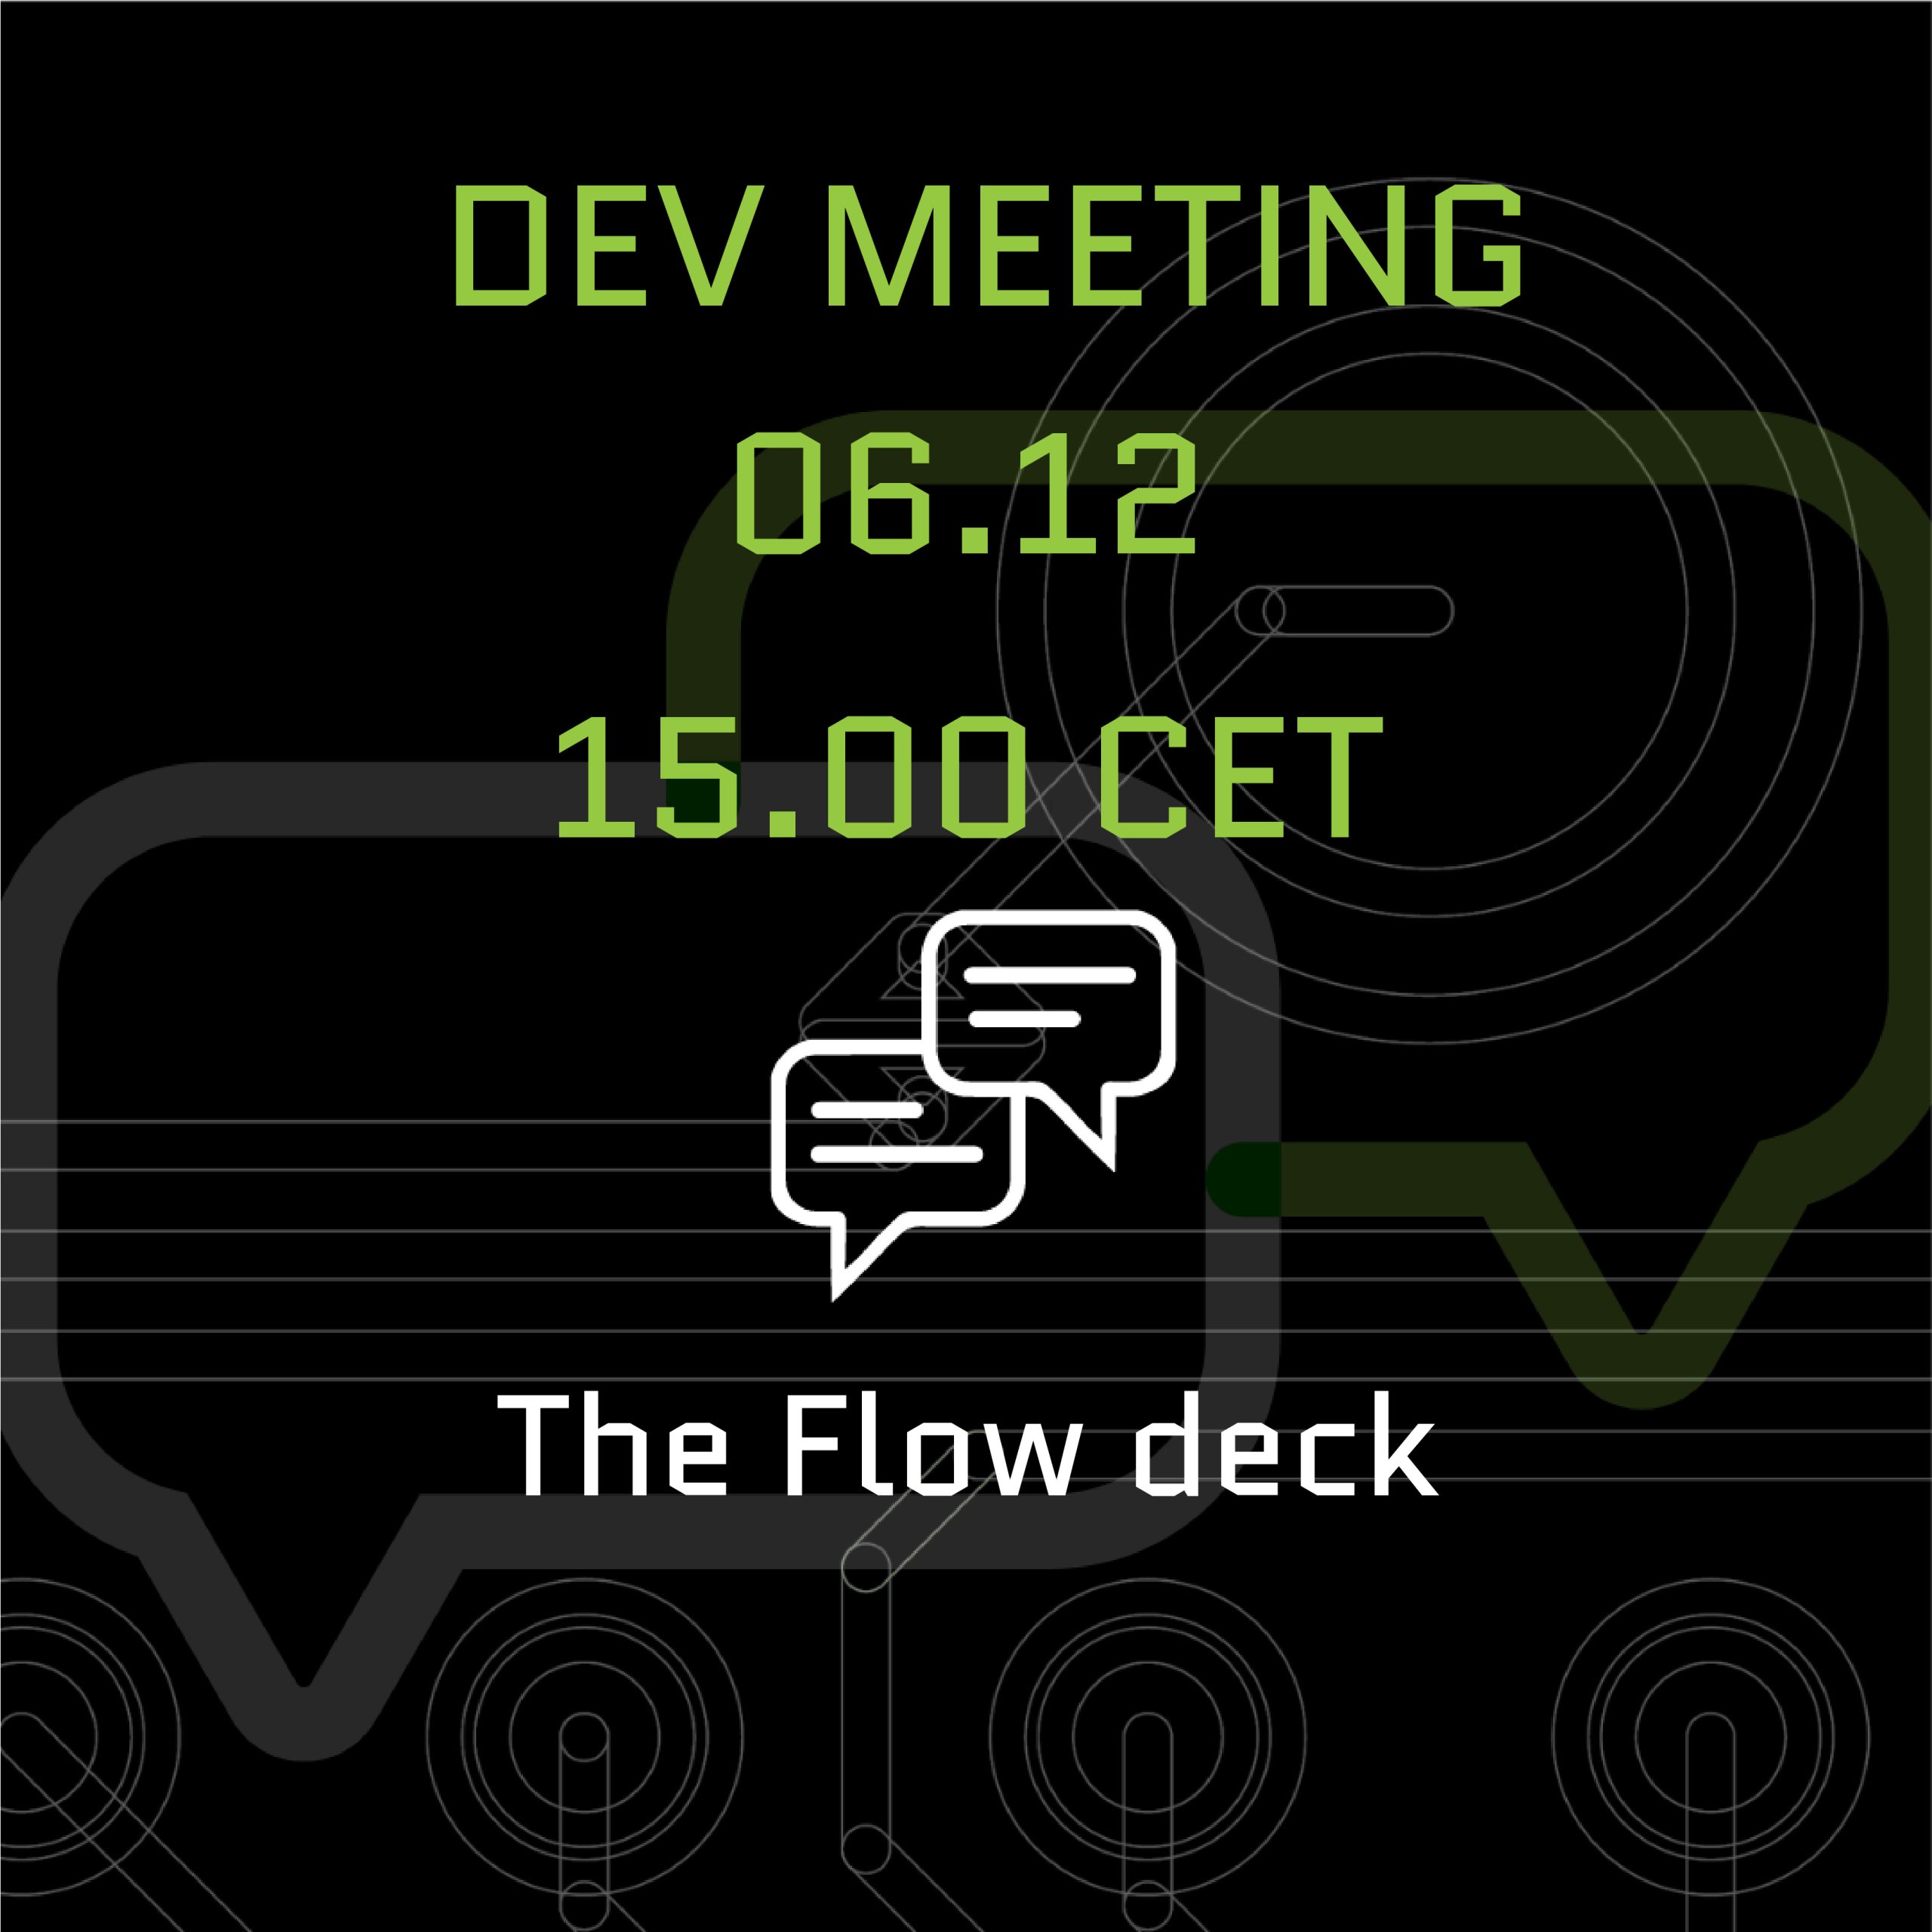
As we already announced last week in the Monday blog post, we will be having a developer meeting this Wednesday (6th Dec, 3 pm CET) regarding the Flow deck (refer to this discussion thread for joining information). Since we usually don’t fill up the entire hour, the last part of the developer meeting is available for some generic support questions face-to-face (online), including questions about the release!
The Flow deck has been around for some time already, officially released in 2017 (see this blog post), and the Flow deck v2 was released in 2018 with an improved range sensor. Compared to MoCap positioning and the Loco Positioning System (based on Ultrawideband) that were already possible before, optical flow-based positioning for the Crazyflie opened up many more possibilities. Flight was no longer confined to lab environments with set-up external systems; people could bring the Crazyflie home and do their hacking there. Moreover, doing research for exploration techniques that cannot rely on external positioning systems was possible with it as well. For example, back in my day as a PhD student, I relied heavily on the Flow deck for multi-Crazyflie autonomous exploration. This would have been very difficult without it.
However, despite the numerous benefits that the Flow deck provides, there are also several limitations. These limitations may not be immediately familiar to many before purchasing a Crazyflie with a Flow deck. A while ago, we wrote a blog post about positioning systems in general and even delved into the Loco Positioning System in detail. In this blog post, we will explore the theory of how the Flow deck enables the Crazyflie to fly, share general tips and tricks for ensuring stable flight, and highlight what to avoid. Moreover, we aim to make the Flow deck the focus of next week’s Developer meeting, with the goal of improving or clarifying its performance further.
Theory of the Flow deck
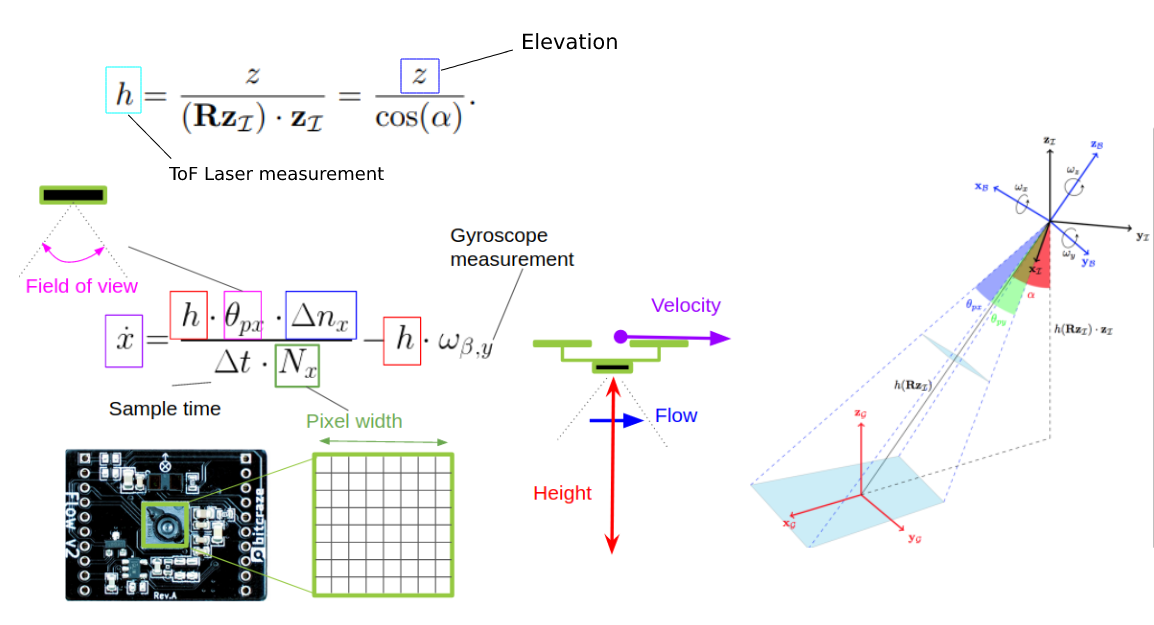
I won’t delve into too much detail but will provide a generic indication of how the Flow deck works. As previously explained in the positioning system blog post, the Flow deck is a relative positioning system with onboard estimation. “Relative” means that wherever you start is the (0, 0, 0) position. The extended Kalman filter processes flow and height information to determine velocity, which is then integrated to estimate the position—essentially dead reckoning. The onboard Kalman filter manages this process, enabling the Crazyflie to use the information for stable hovering.
The optical flow sensor (PMW3901) calculates pixel flow per frame (this old blog post explains it well), and the IR range sensor (VL53L1x) measures height up to 4 meters (under ideal conditions). The Kalman filter incorporates a measurement model that describes the relationship between these two values and the velocity of the Crazyflie. More detailed information can be found in the state estimation documentation. This capability allows the Crazyflie to hover, as explained in the getting started tutorial.
If you want to fly with the Crazyflie and the Flow deck, there are a couple of things to take in mind:
Take off from a floor with texture. Natural texture like wood flooring is probably the best.
The floor shouldn’t be too shiny, and be aware of infrared scattering for the height sensor
The room should be well-lit, as the sensor needs to see the texture.
There are certain situations that the Flow deck has some issues with:
Low or no texture. Flying above something that is only one plain color
Black areas. Similar reason to flying above no texture, but it’s more difficult than usual. Especially with startup, the position estimate diverges
Low light conditions
Flying over its own shadow
We made a video that shows these types of behaviors, starting of course with the most ideal flying conditions:
Moreover, it is also important to note that you shouldn’t fly too high or yaw too often. The latter will make the Crazyflie drift, as the optical flow cannot be distinguished as being caused by the yaw movement.
Developer meeting about Flow deck
We believe that many of the issues people experience are primarily due to the invisibility of the positioning quality. In many of our examples, the Crazyflie will not take off if the position is stable. However, we don’t have a corresponding functionality in our CFclient, as it is more up to the user to recognize when the positioning is diverging. There is a lot of room for improvement in this regard.
This is the reason why the next developer meeting will specifically focus on the Flow deck, which will be on Wednesday the 6th of December, 3 pm central European time. During the meeting, we will explain more about the Flow deck, discuss the issues we are facing, and explore ways to enhance the visibility of positioning quality. Check out this discussion thread for information on how to join.
Since September, it seems that things at Bitcraze are progressing at an incredible speed. A lot of stuff is happening, and this blog post will try to talk about why we feel excited about the changes coming up… With some teasers!
Changes in the office
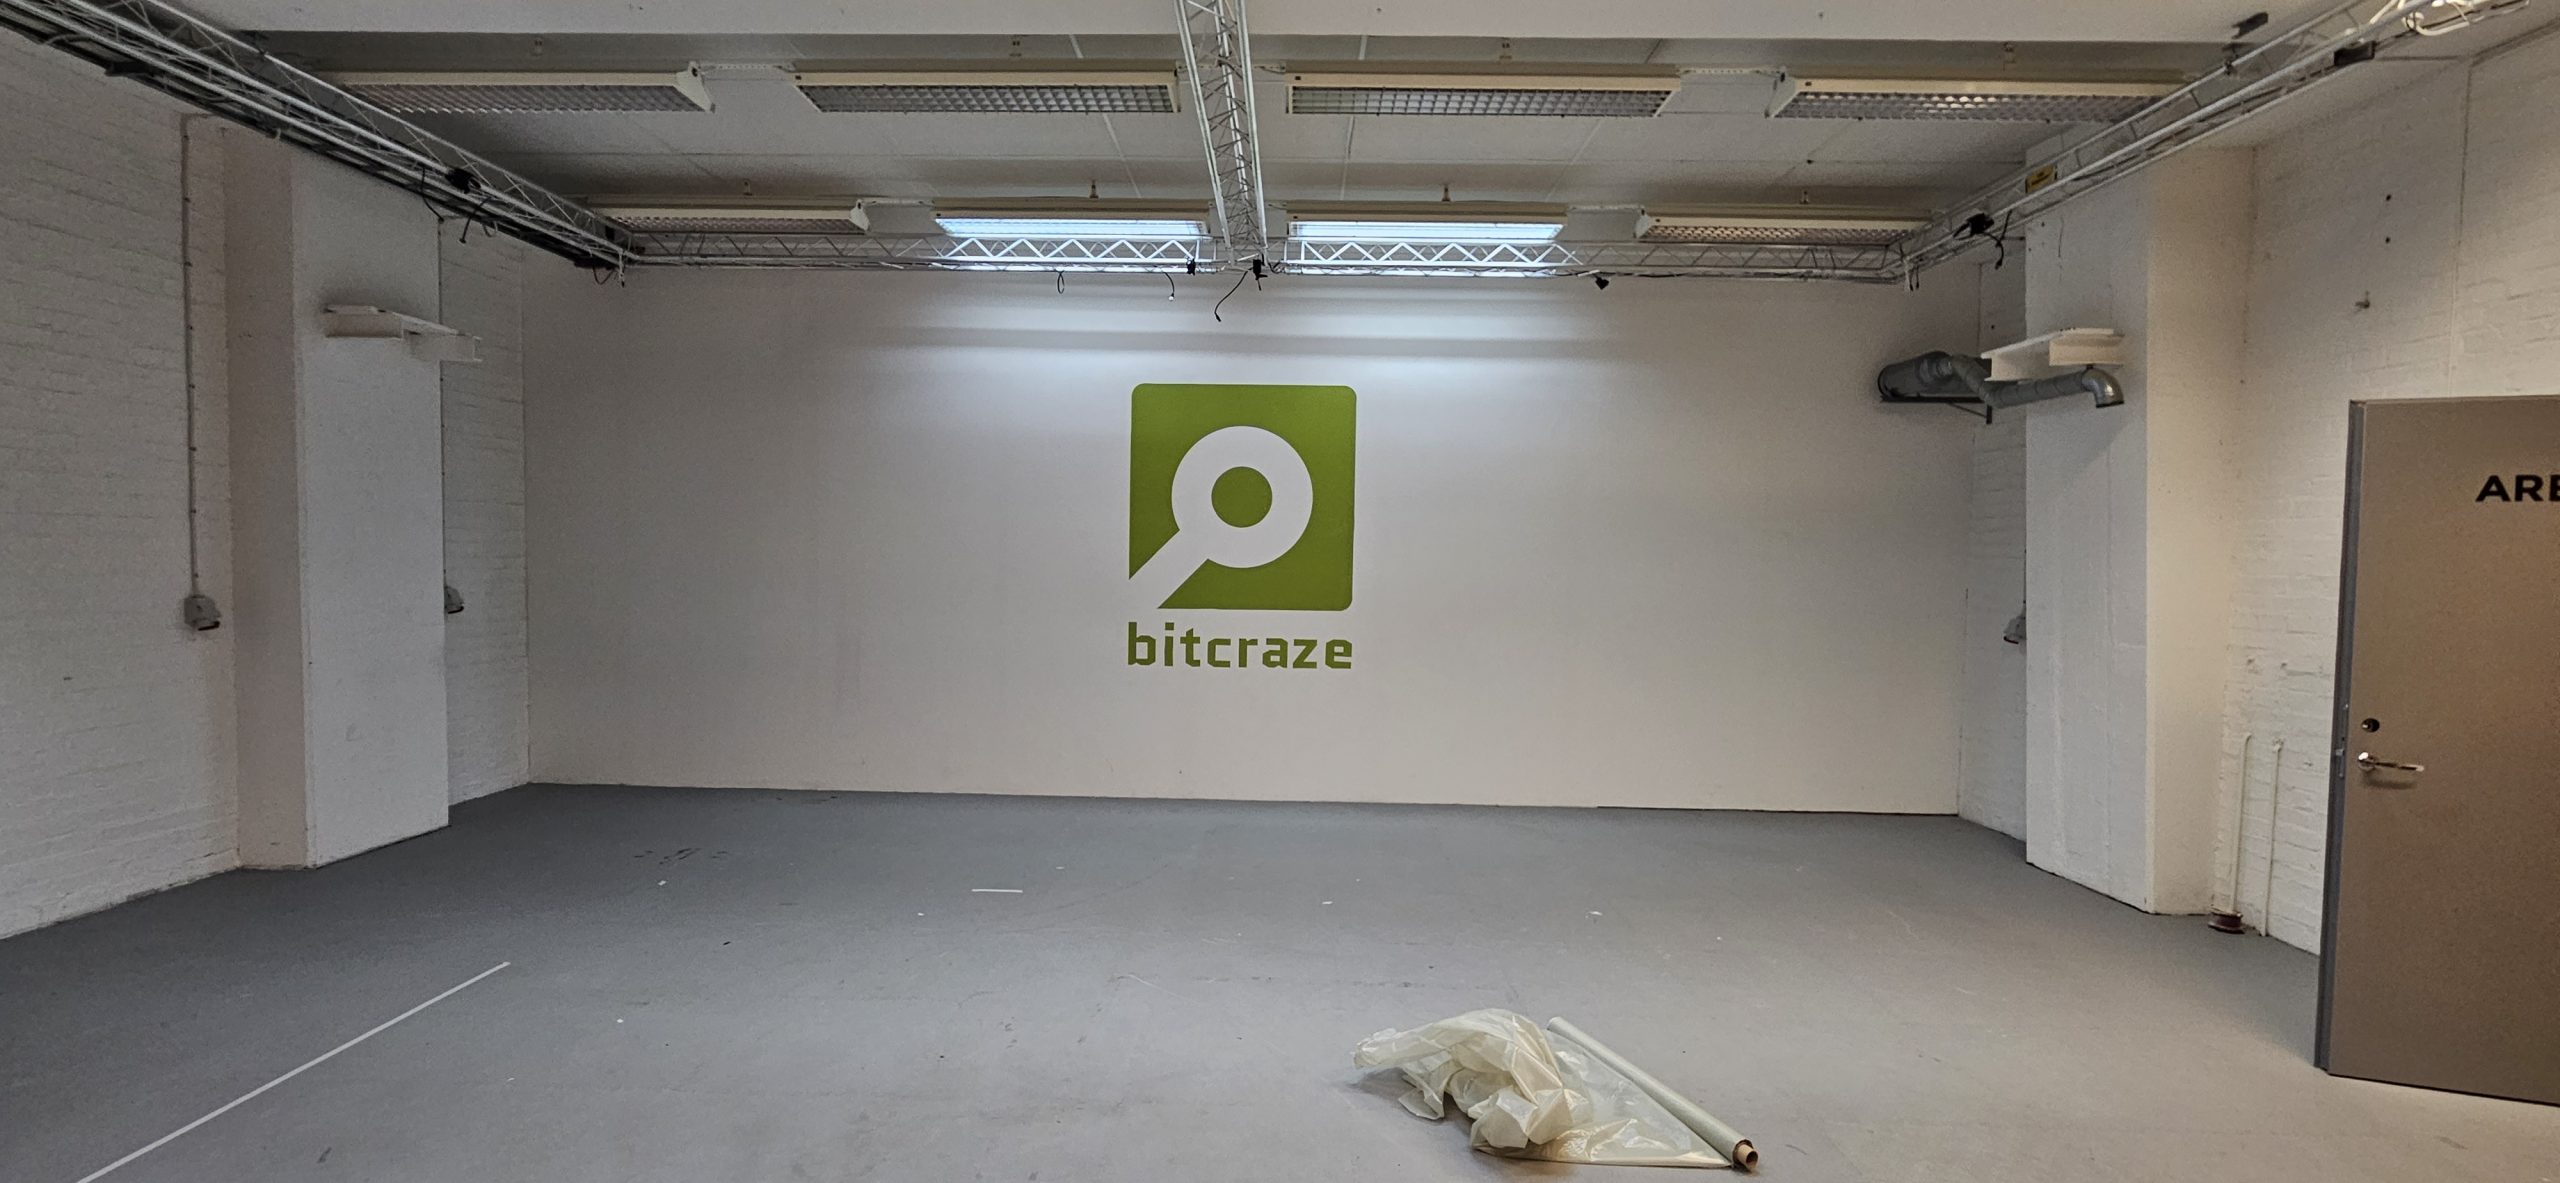
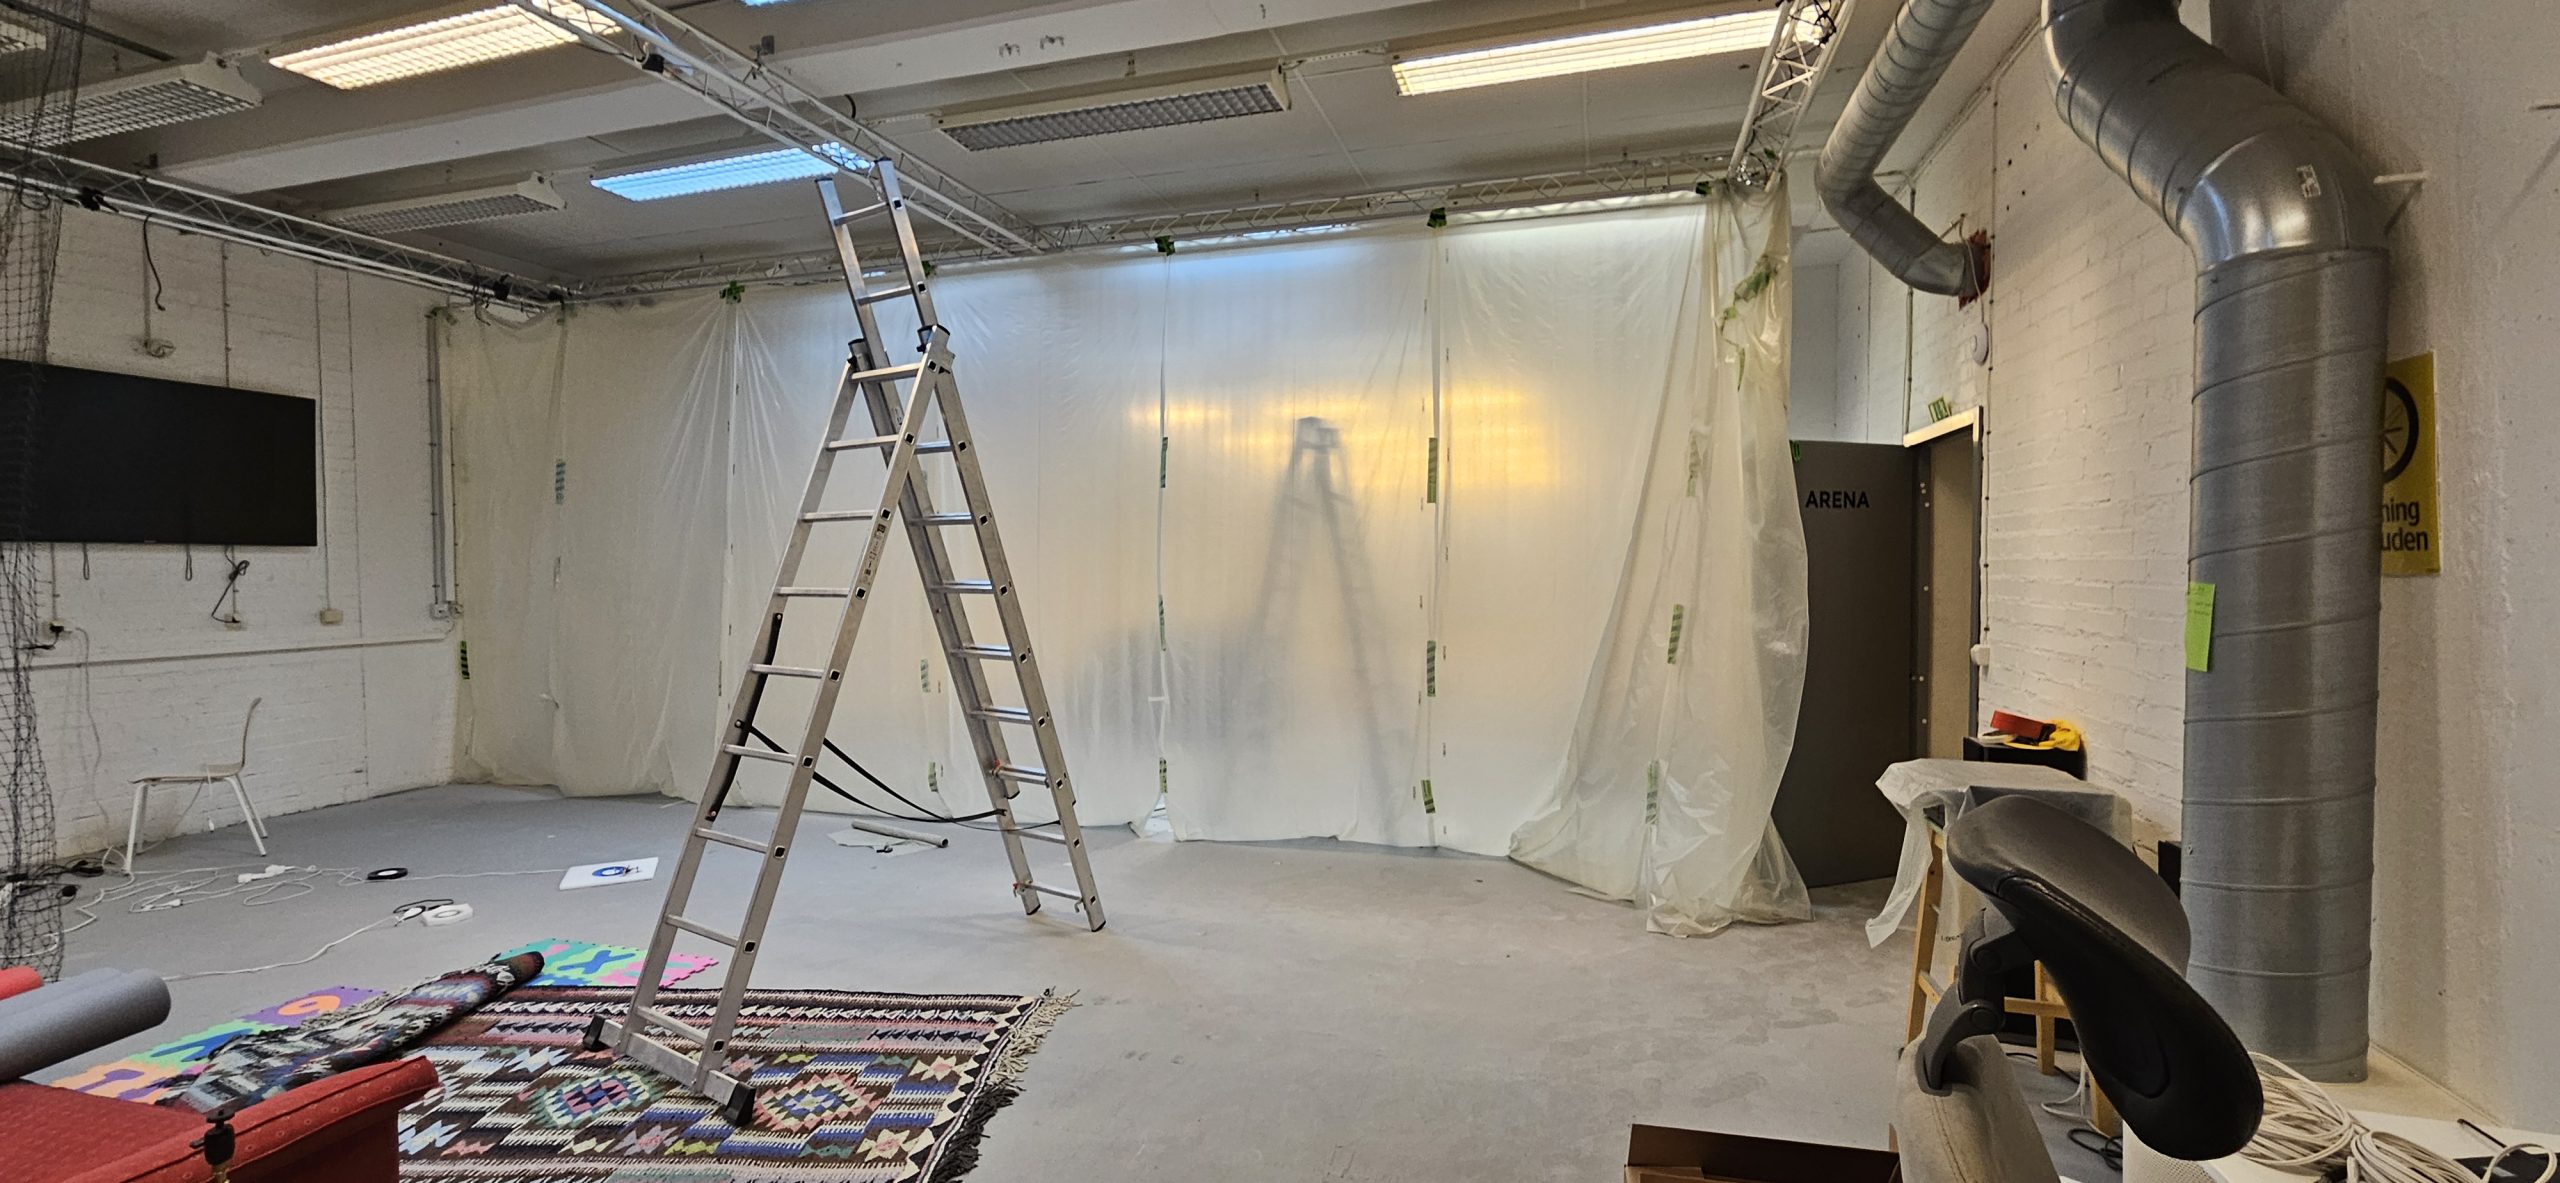
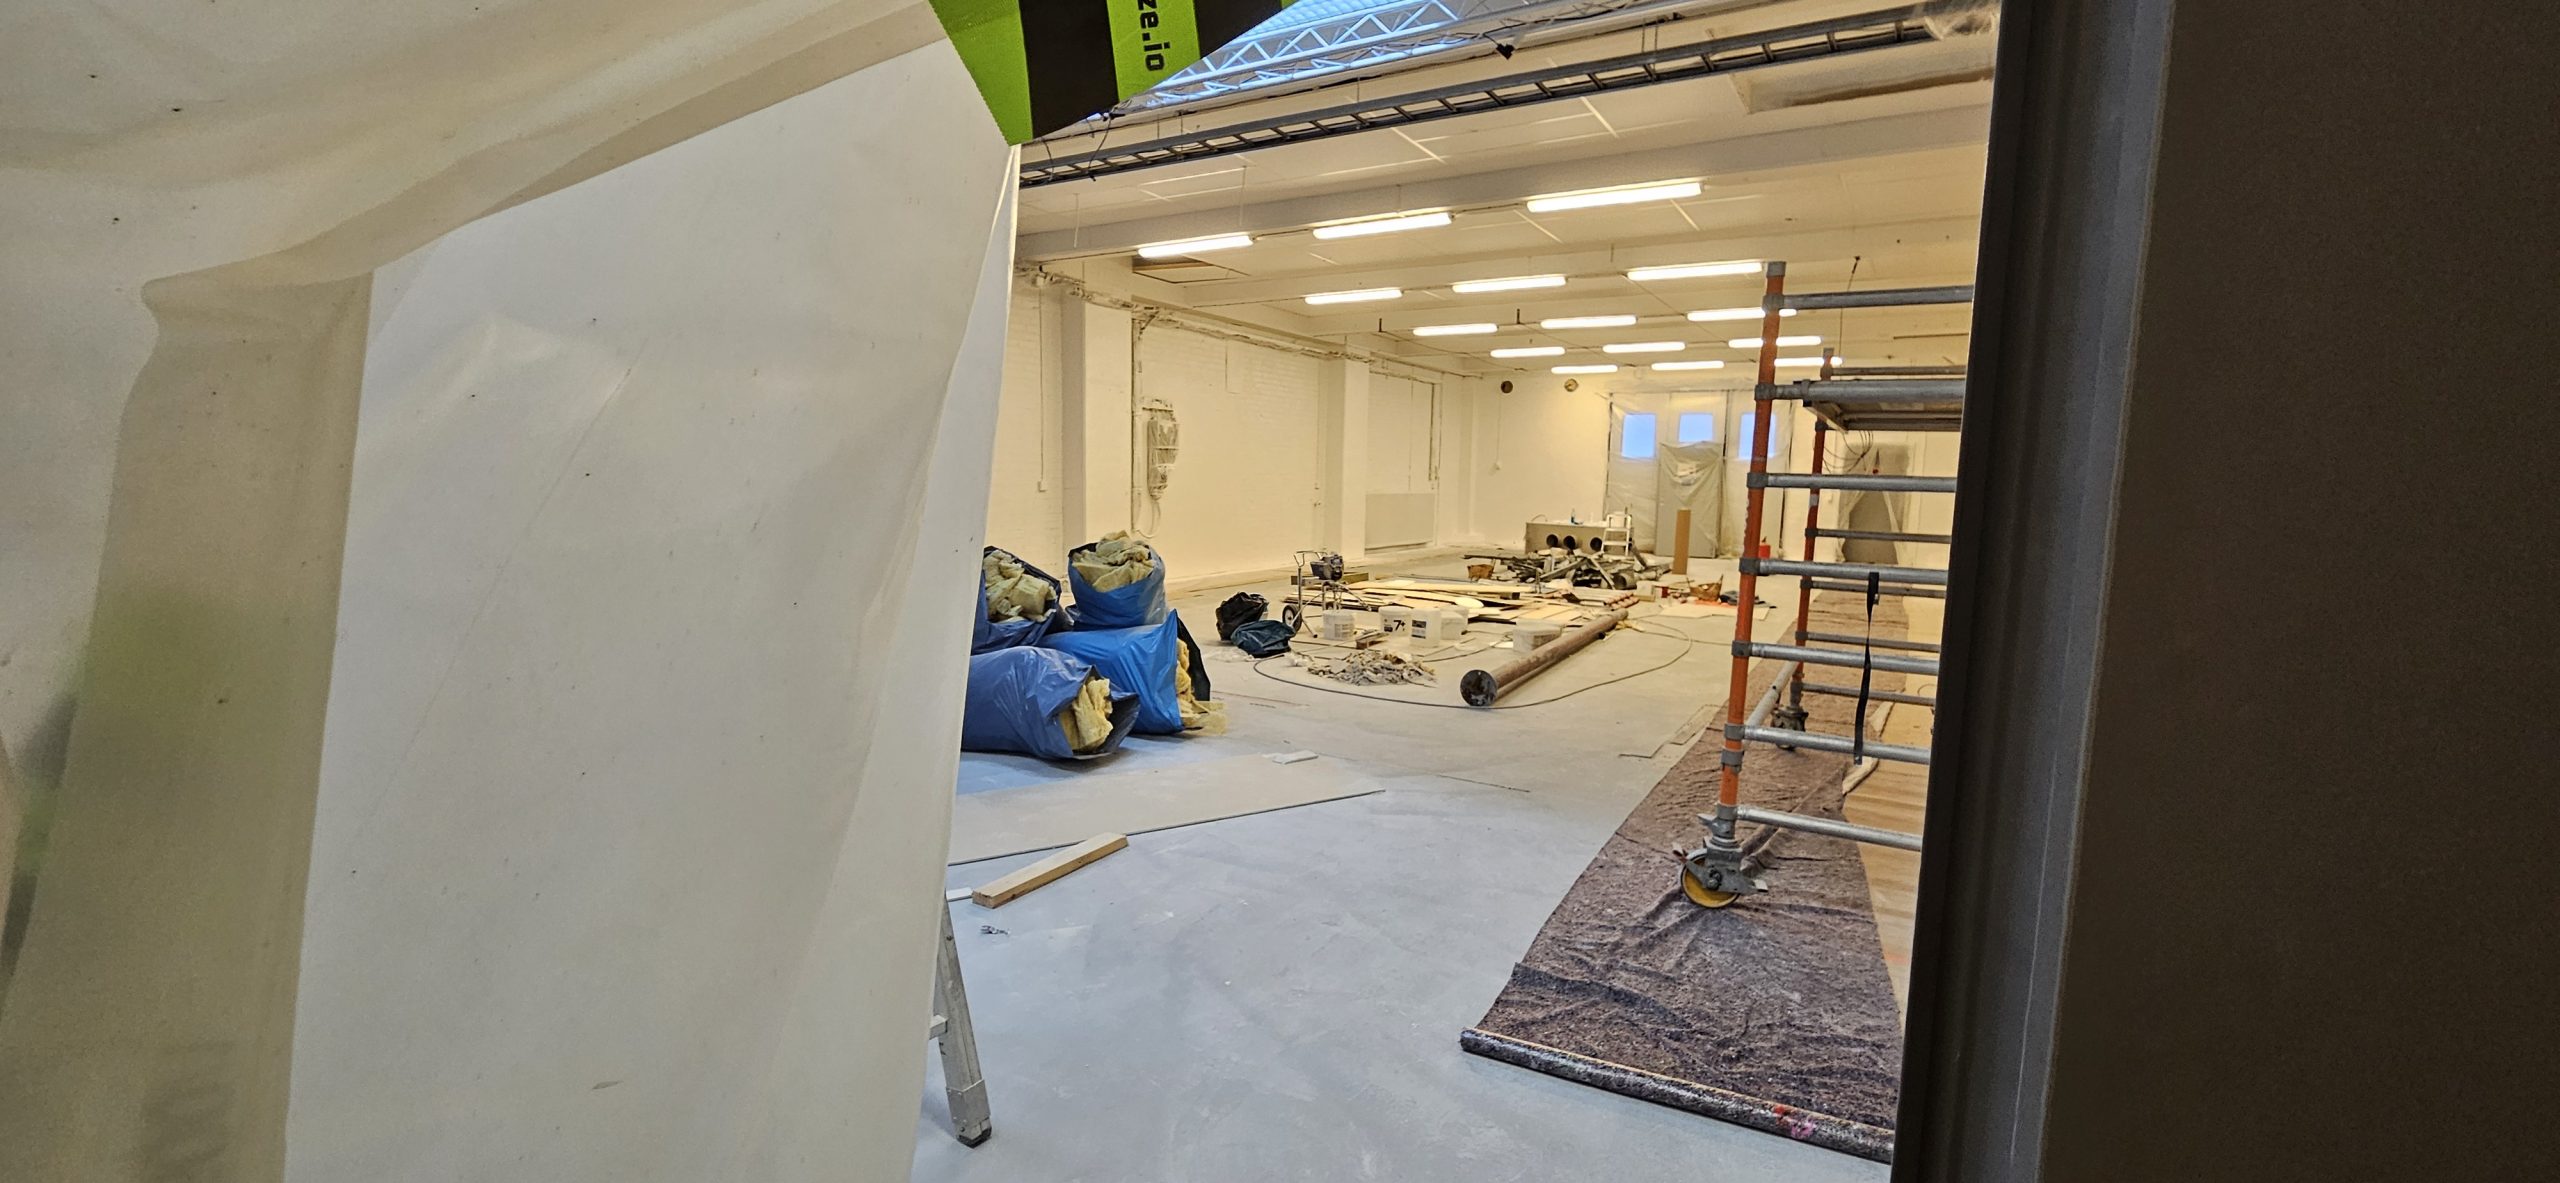
One of the reason we picked the office we’re at now is the big flight space, commonly known as the arena. It’s a pretty huge area (around 100m2), separated from the office space, with a high ceiling. It’s perfect for flying. But when we moved here in 2019 we always dreamed about the space that our next-door had, which could be a perfect extension of the flight lab. And, after years of daydreaming, our wish actually came true! So our flight lab is now in the process of getting significantly bigger. I’ll tease you with some before/during photos, to show what the status is right now, but we expect to have a majestic area to fly in quite soon.
Behind the curtain
If you have ideas on how to name it, a name that feels a little more majestic than “arena”, you’re welcome to share it in the comments!
Changes in the products
We have a list of products that we’re working on that we’re really excited about. You know already some of those if you have read our blog posts, and they are a big part of what we’re spending time with, but they’re not the only ones ! Here is a list of the projects we can reveal:
The brushless is in the pipes! We’re getting help to make it as sturdy as possible.
We’re working on an “upgraded” Crazyflie offer, with the longer battery pins and the 47-17 propellers.
There’s a new software release that should come out soon.
Most of our development work the past couple of months have been dedicated to a new deck for flying with more than 4 lighthouse base stations…
And of course, there are always prototypes laying around that look promising!
Of course, that’s just a hint of what lies ahead, and for right now, we can’t really say more until we’re sure everything is on the right tracks.
Other exciting stuff
I know I said this time and time again, but we’re actively looking for new Bitcrazers to add to the team. We hope that some changes will come soon and of course, we will share if we have some big news!
We’ve also partnered with Droneblocks to provide a drone education program for students in the US. The Crazyflie has been integrated into their STEM classroom bundle, complete with a coding curriculum and a dedicated software to introduce young minds to the world of drones. It’s a privilege for us to contribute the Crazyflie to this significant educational endeavor!
We plan to have everything coming together for an epic Christmas video with some new hardware, in our new flight lab… Of course, nothing is certain, but one thing is sure: it’s an adventure being at Bitcraze right now!
When we originally wrote the TDoA3 implementation for the Loco Positioning System back in 2017 we had the idea of adding functionality to also enable the Crazyflies to send UWB packets in some situations, AKA TDoA3 Hybrid mode. We did not have the time to implement that idea back then, but through the years there have been some interest in the functionality and recently I finally got around to do it as a Fun Friday project. Annoying enough it was not that complicated and only took a couple of hours, I should have done it earlier!
We wrote a bit about the hybrid mode in an earlier blog post and there is also a github issue with some discussions on the topic. The short version of the functionality is that a Crazyflie at selected times switches from only passively receiving UWB packets from the anchors, to also actively transmitting packets and doing Two Way Ranging (TWR) with the peers in the network.
One use case is for a Crazyflie to simply participate in the TWR traffic to give it ranging information for improved position estimation. This can for instance be useful when flying outside the convex hull where TDoA positioning degrades rapidly while TWR works pretty well.
Another funky use case is to extend a Loco positioning system by using TWR to fly outside the convex hull and land somewhere. At this point the Crazyflie switches role and acts as an anchor instead by including its position in the transmitted packets and enabling other Crazyflies to use the transmissions for TDoA or TWR position estimation.
It is also possible to go even more dynamic and transmit the estimated position while flying and thus act as a flying anchor. There are complications when doing this with multiple Crazyflies as they use information from each other and the estimated positions probably will diverge if errors are not handled in a proper way, but at least there is now a framework where this type of functionality could be added. See the references to research in the area in the previous blog post.
The implementation is very experimental and has not been merged to master yet, but if you are interested you can find it in the krichardsson/hybrid-mode branch (PR #1330). There are a few new parameters that changes the behavior such as turning on/off transmissions, using TDoA or TWR data for position estimation and what to include in transmitted packets. Please see the implementation and documentation for details. Also note that the hybrid mode functionality is not compiled by default and must be enabled in the build configuration to be available.
It’s been cooking on the slow burner for a long time now, the Crazyflie 2.1-Brushless, or CF21-BL in short. Ever since we got inspired by the tinypepper 1-cell brushless motor controller which showed us a small brushless ESC could be made, we got the idea of integrating brushless ESCs into the Crazyflie. Integrating the ESCs turned out to be easier then we though, but we hade more ideas, we wanted it to be efficient. Due to the FPV market and the toothpick sized category plenty of appropriate size components exist, however none is really optimized for efficiency. So we had to go back to the drawing board, contact suppliers and work with them to try and improve efficiency. This turned out to be a very time consuming task and we are now at a stage where we think we have gotten as far as we can with the resources we have.
Why go brushless?
A brushless setup is better in most aspects but it has some downsides, such as cost and complexity. The brushless motors requires a more complex design and is therefore more expensive to manufacture. It also requires a more sophisticated motor driver that also needs a larger PCB board space. On the upside we have better power to weight ratio, better longevity and efficiency to name a few. For the tiny type of brushless motors that are interesting here the efficiency gain is not so obvious though. This is mainly because it is hard to make an efficient motor driver due to the low inductance in the motors and this can definitely be further improved, perhaps with software upgrade of the ESC firmware in the future.
Let’s dive into the current specification!
After many prototypes this is where we are at now:
Crazyflie 2.1 base design using the PCB as the frame.
4 x integrated 1-cell 5A ESCs running BLHeli_S/Bluejay
Weight: 32 grams ( including 350mA battery)
4 x 08028-10000KV high-quality motors generating up to 30 grams thrust each
Custom-designed and optimized 55mm propellers with 35mm pitch
Over 10 min hover time in 32-gram configuration (~5g/W efficency)
The added thrust and the longevity of the brushless motors are probably the key features of the CF21-BL. This will improve payload capability or agility for applications where this is needed as well as the robustness. It will come at the expense of a higher price tag though.
The Crazyflie 2.1-Brushless has come a long way but there are still many things that have to be done before it will be available in the store and it is too early to talk about any timeline, but the goal is to release it during 2024!


